The latest Macintosh operating system is available for all users to give it a try and install it on their PC. The current Apple operating system has tons of new features and improvements in some applications. Thanks to Apple for upgrading the new macOS with new changes. At WWDC (WorldWide Developer Conference) Apple highlighted the latest Mac operating system on June 22. This operating system called “macOS Big Sur” and it is the “11.0 version” after macOS Catalina 10.15.
Apple introduced all the new features at WWDC and the major update comes in Safari web browser, Refreshed Maps, Messages, Control Center, Notification Center, and much more. The macOS 11 Big Sur is the advanced and powerful Apple operating system. However, the previous macOS 10.15 Catalina was the best and it has several new features and one of the major features is SideCar. But, if you compare macOS Catalina with macOS Big Sur, Then, macOS 11 Big Sur is better than macOS Catalina.
Although, the macOS 11 Big Sur is in beta mode and I recommend you to not install the beta version on your primary Mac desktop. The macOS 11 Beta version has a number of bugs that can crash your data and it will not be possible to restore your Mac. Therefore, try macOS 11 Big Sur on Virtual machines or wait for the macOS 11 Big Sur final version which is coming at the end of this year. However, a few days ago, Apple released the macOS 11 developer beta 2, which is available in the App Store and it is free of cost. If you have installed macOS 11 Big Sur beta 1 then upgrade it to beta 2.
Anyhow, in this article, we are going to show you “how to install macOS 11 Big Sur on PC-Hackintosh” using the new method. If you have tried the macOS Catalina on PC-Hackintosh. Then, the steps are the same and you have some ideas on how to install macOS 11 Big Sur on PC-Hackintosh. To have a clean installation on PC-Hackintosh or Macintosh. You need to download the EFI files, OpenCore Configurator, and commands to create macOS Big Sur Bootable USB.
macOS 11 Big Sur Compatible Macs List
There is some bad news for Mac users who have Mac computer below Mac 2013 model. The older Mac desktop cannot get the macOS 11 Big Sur update. However, you can install macOS Catalina on the older mac Mac computer. But, this time apple dropped the older Macbook Air 2012, MacBook Pro 2012, Early 2013 MacBook Pro, 2012 Mac mini 2012, and iMac 2012 & 2013.
But the below Mac desktop can support macOS 11 Big Sur and you can install and update macOS 11 Big Sur on the below Mac computers.
- MacBook 2015 and later
- MacBook Air and Pro Late 2013 and later
- Mac mini 2014 and later
- iMac 2014 and later
- iMac Pro 2017 and later (all models)
- Mac Pro 2013 and later
Steps to Install macOS 11 Big Sur on PC-Hackintosh
To perform a clean installation of macOS 11 Big Sur on your Mac, Macintosh, or Hackintosh. You will need some required files. However, before going to install the macOS 11 Big Sur, make a backup of your whole data and important files. You have the best backup option on your Mac that is “Time Machine”. Once you are done then download the below-required files and start the installation.
Step 1: Create macOS 11 Big Sur Bootable USB
To perform macOS 11 Big Sur bootable USB drive, you need to download the macOS 11 Big Sur dmg file. If you have a developer account, then, go to the Apple Developer account and download it from there. Otherwise, follow the below link to download the macOS 11 Big Sur dmg file.
Download macOS 11 Big Sur dmg file
- To download macOS 11 Big Sur from Developer account, Go to Apple Developer Website.
- Click Discover option from the top menu bar and tap on macOS.
- Now, click the download button.
- It will ask you to sign in with your Apple Developer account to confirm the downloading.
- Once you are done, then, scroll down and click on Install Profile.
- The macOS 11 Big Sur installer file will start downloading automatically.
- Now, you are done with the downloading macOS 11 Big Sur installer file. Now, follow the below steps to create a macOS 11 Big Sur bootable USB drive.
To create macOS Big Sur bootable USB drive, you have multiple options like TransMac, DiskMakerX, Unibeast, and MultiBeast. But, the easiest way is to erase your USB drive using “Disk Utility” and apply the commands using the “terminal”. This easy method will help you to create a macOS 11 USB installer drive.
- Plug your USB drive and go to Disk utility.
- Select your USB drive from the sidebar.
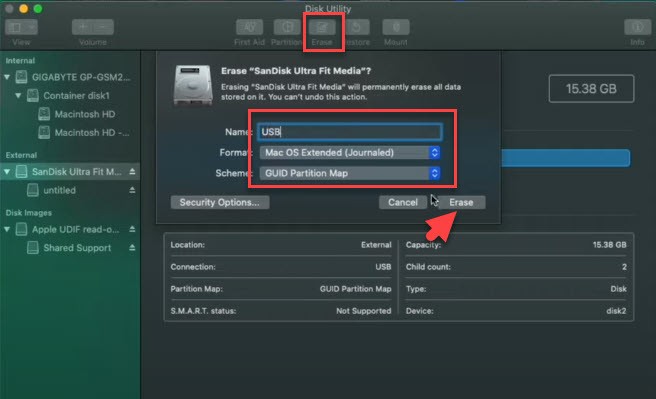
- Now, tap on the Erase option from the top menu.
- Follow the below parameters
- Name: USB
- Format: Mac OS Extended (Journaled)
- Scheme: GUID Partition Map
- Once you are done, click on Done and close Disk Utility.
To complete the macOS Big Sur bootable USB drive, go to “Spotlight” and type “Terminal”. After that, copy the below commands and paste it to the terminal for creating macOS 11 bootable USB drive.
sudo /Applications/Install\ macOS\ Beta.app/Contents/Resources/createinstallmedia --volume /Volumes/USB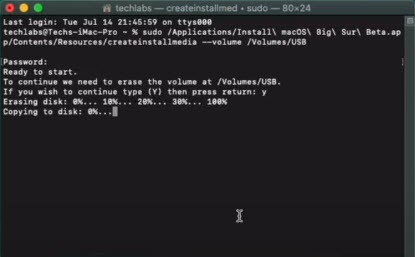
Step 2: Mount EFI Partition
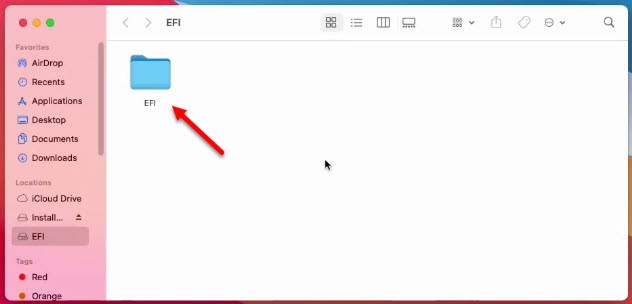
Now, open “Core Configurator” and “mount EFI partition” of your USB flash drive. After that, copy “EFI” and paste to EFI USB partition. Then, copy “OpenCore Configurator” and paste it to macOS Big Sur USB. Now, “Eject EFI USB Partition and USB flash drive”.
Step 3: Customize BIOS Settings
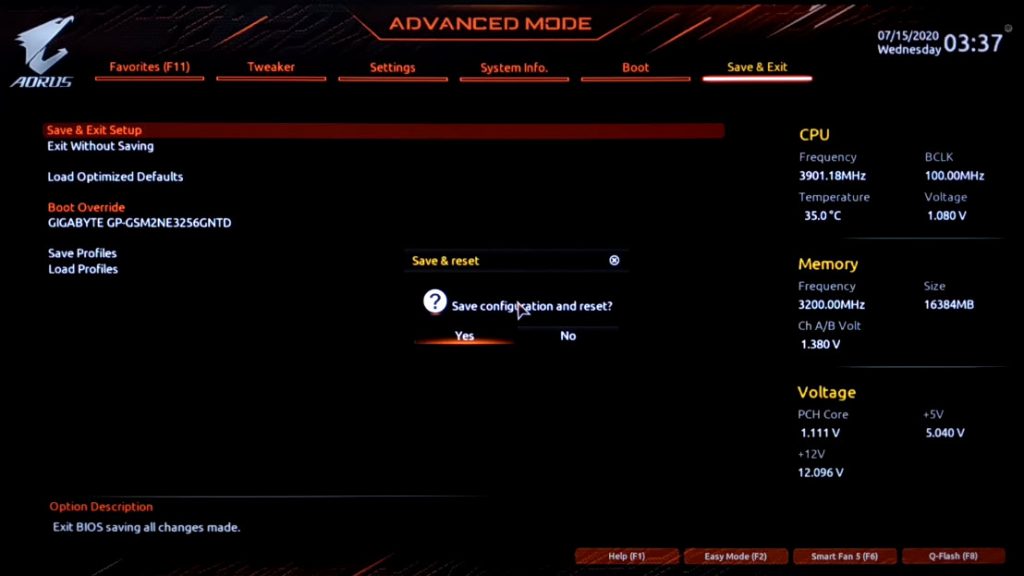
Now you are ready to install macOS 11 Big Sur on your PC-Hackintosh. But, before going to install macOS 11 Big Sur you need to edit BIOS settings. To do that, restart your PC and press the Delete key to enter the BIOS window. Afterward, select the Save and Edit tab then select Load Optimized Defaults and press Yes option. Now, select Save & Edit and press enter to restart your PC.
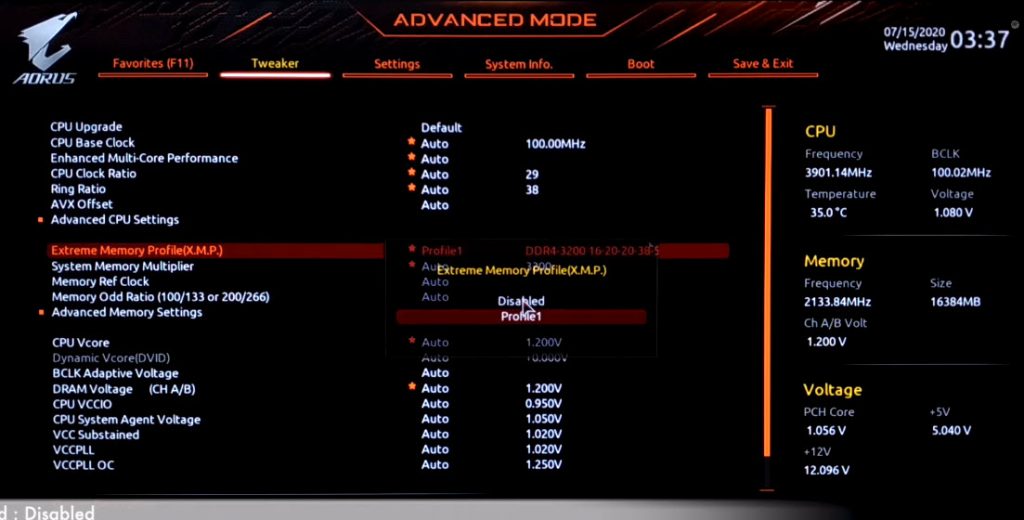
Once your PC restarted then press Delete key to enter the BIOS settings. Now bring some changes to other settings. Tab on “Tweaker” from the top menu and click the “Advanced CPU Settings > VT-d” and disable the option. Afterward, tab on Extreme Memory Profile(X.M.P) and select Profile1 from the dropdown menu.
Then, tap on “Settings” from the top menu and click on “IO Ports > USB Configuration” and click on “XHCI hand-off” and enabled the option

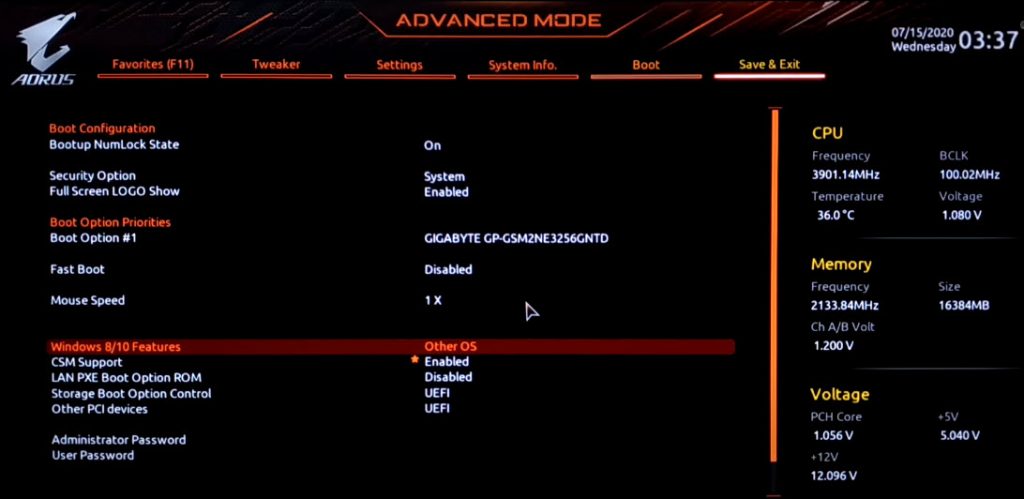
Now, go to the “Boot” Menu from the top menu and click on “Windows 8/10 Features” and select “other OS” from the dropdown menu. After that, go to the “Save & Edit” menu and save all the changes.
Step 4: Install macOS 11 Big Sur on PC-Hackintosh
You are done with BIOS settings and now it is time to install macOS Big Sur from Bootable USB drive. Therefore, connect the Bootable USB drive and press the “Boot Menu” key. Then, select the “USB flash drive” and press “Enter” to boot. It will take some time to complete the booting.
- After booting macOS Big Sur, you will the first macOS Big Sur installation screen. Here, select your language, and click continue.
- On macOS Utilities, select Disk Utility and continue.
- Select your drive from the sidebar and click on Erase from the top menu, Then, follow the parameters.
- Name: Macintosh HD
- Format: APFS
- Scheme: GUID Partition Map
- Now click on Erase and click on the Done button and close Disk utility.
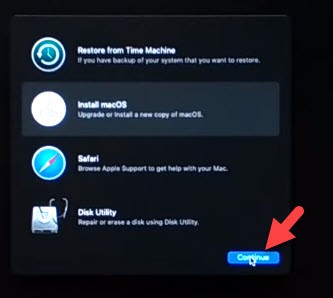
- Afterward, select Install macOS and continue.
![How to Install macOS Big Sur on PC-hackintosh]()
Install macOS - To set up the installation of macOS Big Sur beta, click Continue.
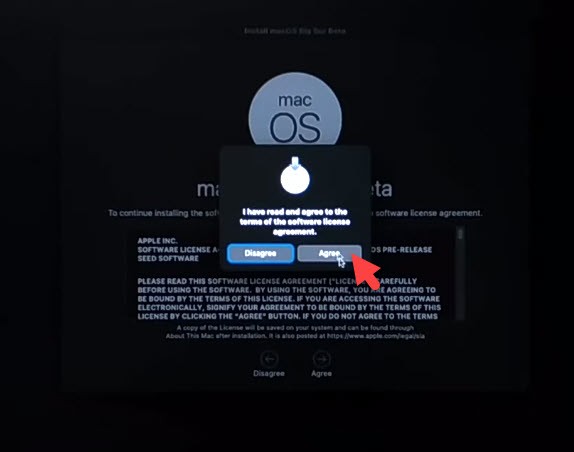
- Agree to the installation software license agreement.
![Agree to Software License]()
Agree to Software - Now, select the installation drive which is Macintosh HD and click the Install button.
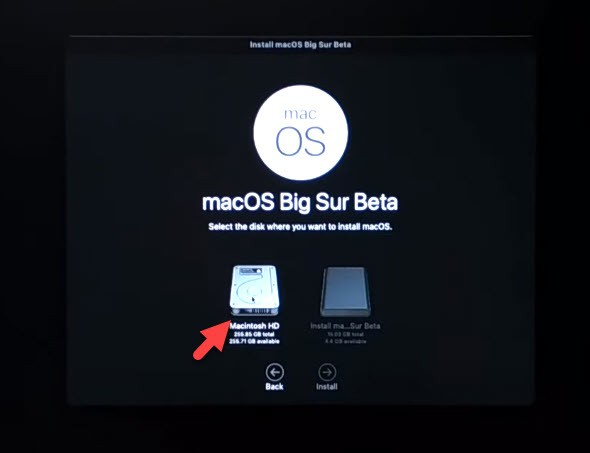
Now macOS 11 Big Sur is installing on your PC-Hackintosh and during the installation, your system will restart several times. You don’t need to worry about it. Just wait for a while.
Step 5: Complete the macOS 11 Big Sur Installation
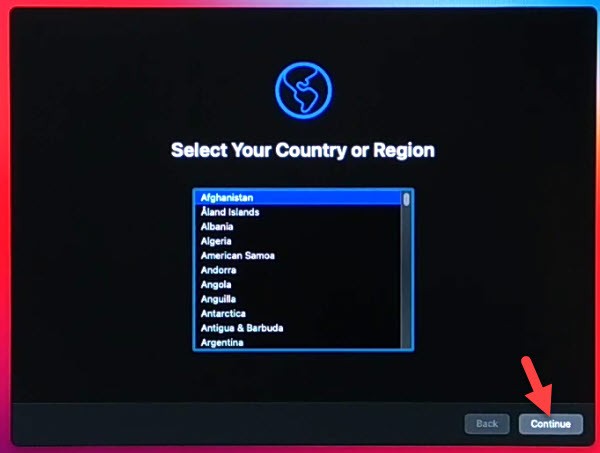
Once the macOS Big Sur installation completed then you will see the first set up of macOS Big Sur. Therefore, select your Country and continue.
- On “Written and Spoken languages” click on Continue.
- Click Not Now for “Accessibility”.
- On “Select your Wi-Fi Network” click on other network options and select the last option and continue.
- Click continue for “Data and Privacy”.
- Tap on Not Now for “Migration Assistant”.
- Here, it will ask you to “sign-in” with your Apple ID. Therefore, click on Not Now > Skip.
- Agree to terms and Conditions.
- For the first time, you will need to “create a computer account”. Therefore, type your Name, Account Name, Password, and Password Hint. Then, click on Continue.
- If you want to customize “Express Set-Up”, then click on Customize Settings else click on Continue.
- On “Analytics” click Continue.
- Click Set up later.
- On “Siri” click Continue.
- Now, improve Siri by Allowing the share of Audio Recording. Otherwise, select Not Now and click Continue.
- Select your macOS Big Sur theme.
- Wait for a while to complete the setting up of your Mac.
Finally, you install macOS Big Sur on your PC-Hackintosh with this method without facing issues. Now, there some settings that you should fix it.
Step 6: Install the Drivers in macOS Big Sur on PC-Hackintosh
After the macOS 11 Big Sur installation, you need to install some fixes drivers like Wifi, Internet, Bluetooth, Audio, and Graphic Display. Therefore, connect the USB drive that you copied the OpenCore Configuration setup. Then, move the OpenCore Configurator to the Desktop screen.
Now, open the Core Configurator and mount the partition of your USB flash drive and the system drive. Then, copy the EFI folder from the EFI partition of the USB drive and paste it into the EFI partition of the system drive.
Once you are done with EFI and Core Configurator, then, restart your Mac computer.
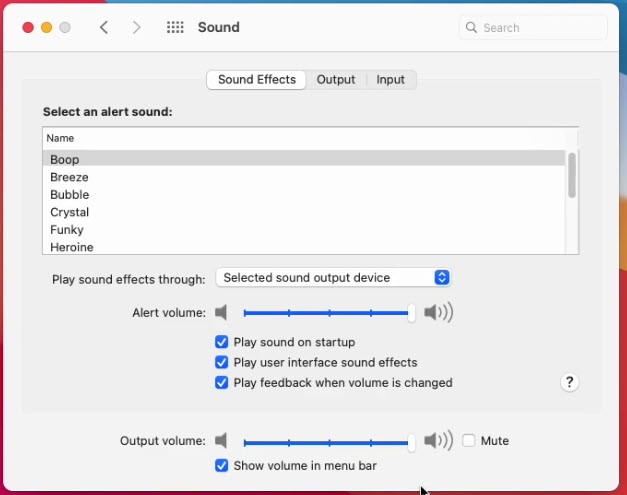
When your Mac restarted then go to “System Preferences > Sounds” and check if all the settings are working fine.
Go to “Bluetooth” and check its connectivity.

Now, go to Wifi settings and connect to your Wifi.

Finally, you have installed macOS Big Sur on PC-Hackintosh successfully. If there is any question feel free to ask me in the comment section.