Category: Windows

  • Is God of War Ragnarok Coming to PC? What You Need to Know

    Is God of War Ragnarok Coming to PC? What You Need to Know

    Sony just released the new God of War game called God of War: Ragnarok. It’s a sequel to the previous game and people are really excited about it. But some gamers are wondering if it will be available on PC. In this article, we will discuss the chances of God of War: Ragnarok coming to PC and what you need to know about it.

    Explore the epic world of God of War Ragnarok. Uncover its PC release rumors and stay updated on the latest news. Join Kratos in his next Norse adventure. Get ready for an unforgettable gaming experience!

    Is God of War Ragnarok Coming to PC?

    There is a good chance that God of War: Ragnarok will be available on PC. Sony has been releasing other popular games on PC, so it’s likely that they will do the same with this game. However, there hasn’t been an official announcement yet.

    PlayStation’s Approach to PC Ports: Sony has a plan for releasing games on PC. They usually wait about a year after the game’s release on PlayStation before bringing it to PC. This means that if God of War: Ragnarok does come to PC, it may take some time.

    There is a possibility that God of War: Ragnarok will be released on PS Plus in November 2023. If that happens, the PC version might come out in the first few months of 2024. But we don’t know for sure yet.

    PC Requirements for God of War Ragnarok (Expected)

    If you want to play God of War: Ragnarok on your PC, you need to make sure your computer meets the basic requirements. Here’s what you’ll need:

    • Windows 10 (64-bit)
    • Intel Core i5-2500K or AMD equivalent processor
    • 8 GB of RAM
    • NVIDIA GeForce GTX 960 or AMD equivalent graphics card
    • DirectX 11
    • 60 GB of available storage space

    Please remember that these are just expected requirements based on the previous game. The official requirements may be different, so keep an eye out for updates.

    Conclusion

    In conclusion, we have delved into the question of whether God of War Ragnarok is coming to PC. Throughout the article, we have examined the available information and discussed the factors at play. While no official confirmation has been made regarding a PC release, there are indications that it may be a possibility in the future. As fans eagerly anticipate any news or updates, it remains uncertain. It is recommended to stay tuned to official announcements and sources for the latest information.

    Frequently Asked Questions (FAQs)

    Will God of War Ragnarok come to PC?

    It’s possible, but we don’t have an official announcement yet. We’ll have to wait and see.

    When will God of War Ragnarok be available on PC?

    If it does come to PC, it may be released in the first few months of 2024, but we’re not sure yet.

    What do I need to play God of War Ragnarok on my PC?

    You’ll need a Windows 10 computer with an Intel Core i5-2500K or AMD equivalent processor, 8 GB of RAM, and an NVIDIA GeForce GTX 960 or AMD equivalent graphics card.

  • How to Install MacOS Ventura Virtualbox on Windows 10

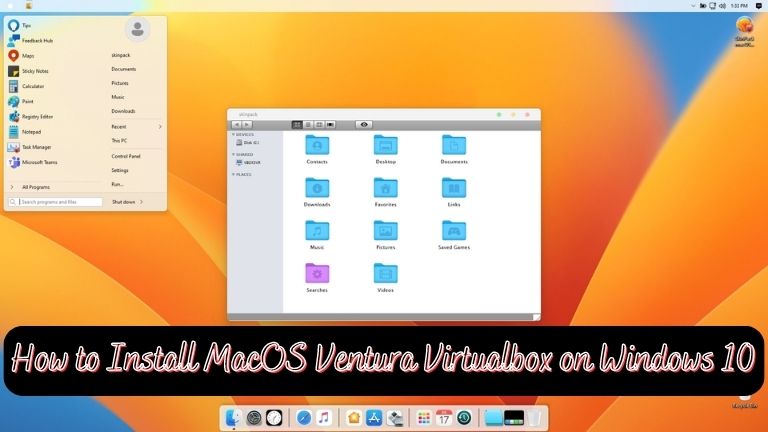
    How to Install MacOS Ventura Virtualbox on Windows 10

    MacOS Ventura is the latest version of the MacOS operating system. It is designed to provide a sleek and seamless experience for Apple users. However, if you are a Windows 10 user and wish to experience the MacOS Ventura environment, you can install it on your Windows PC using VirtualBox.

    VirtualBox is a free and open-source virtualization software that allows you to run multiple operating systems on a single machine. In this article, we will guide you on how to install MacOS Ventura on VirtualBox on Windows 10.

    Learn how to install MacOS Ventura on VirtualBox on Windows 10 with this step-by-step guide. Follow the instructions to set up the virtual machine, configure post-installation settings, and troubleshoot common issues. Experience the MacOS Ventura environment on your Windows 10 machine today.

    MacOS Ventura Virtualbox Requirements

    Before we begin, there are certain requirements that your system must meet to install MacOS Ventura on VirtualBox.

    Minimum system requirements:

    • A 64-bit processor with at least 2 cores
    • 4GB RAM
    • 30GB free storage space

    Recommended system requirements:

    • A 64-bit processor with at least 4 cores
    • 8GB RAM
    • 50GB free storage space

    You will also need to download the latest version of VirtualBox from the official website. Make sure to download the version that is compatible with your Windows 10 operating system.

    How to Install MacOS Ventura Virtualbox on Windows 10

    Once you have downloaded the VirtualBox setup file, you can begin the installation process by double-clicking on the file. Follow the instructions provided by the installation wizard to install VirtualBox on your Windows 10 machine. Once the installation is complete, you can launch VirtualBox from the start menu.

    Before you can create a MacOS Ventura virtual machine, you need to configure some settings in VirtualBox. First, click on the “New” button to create a new virtual machine.

    Downloading the MacOS Ventura ISO file

    You will need to download the MacOS Ventura ISO file from a reliable source. We recommend downloading the ISO file from the official Apple website or a trusted third-party website. Once you have downloaded the ISO file, you need to prepare for the installation process.

    Installation of MacOS Ventura on VirtualBox

    To install macOS Ventura on VirtualBox, you need to create a new virtual machine. Follow the steps below:

    1. Open VirtualBox and click on the “New” button to create a new virtual machine.
    2. Give your virtual machine a name, select “Mac OS X” as the type, and select “Mac OS X (64-bit)” as the version.
    3. Allocate the desired amount of RAM to your virtual machine. We recommend allocating at least 4GB of RAM.
    4. Create a new virtual hard disk and allocate the desired amount of storage space. We recommend allocating at least 30GB of storage space.
    5. Click on the “Settings” button.
    1. In the settings window, navigate to the “System” tab and uncheck the “Floppy” option under the “Boot Order” section.
    2. Next, navigate to the “Processor” tab and select the desired number of CPU cores.
    3. In the “Display” tab, increase the amount of video memory to 128MB and enable the “3D Acceleration” option.
    4. Navigate to the “Storage” tab, click on the “Empty” CD/DVD icon, and select “Choose Virtual Optical Disk File”.
    5. Browse and select the downloaded MacOS Ventura ISO file.
    6. Click on the “Start” button to begin the installation process.

    Once the macOS Ventura virtual machine starts up, follow the on-screen instructions to complete the installation process.

    Post-installation configuration

    After the installation is complete, you need to configure some settings in the MacOS Ventura virtual machine. Follow the steps below:

    1. Install VirtualBox Guest Additions by navigating to the “Devices” menu in the virtual machine window and selecting “Insert Guest Additions CD Image”. Follow the on-screen instructions to complete the installation process.
    2. Set up the network connection by navigating to the “Network” settings and selecting “Bridged Adapter” under the “Attached to” section. This will allow the virtual machine to connect to the internet.
    3. Change the display resolution by navigating to the “Displays” settings and selecting the desired resolution.

    Troubleshooting common issues

    If you encounter any issues during the installation or configuration process, refer to the troubleshooting guide provided by VirtualBox or MacOS Ventura. Some common issues and their solutions are:

    Issues with VirtualBox installation:

    • Make sure that your system meets the minimum system requirements.
    • Try re-installing VirtualBox with administrator privileges.
    • Check if your antivirus software is blocking VirtualBox installation.

    Issues with MacOS Ventura installation:

    • Make sure that you have downloaded the MacOS Ventura ISO file from a reliable source.
    • Try re-installing MacOS Ventura on the virtual machine.
    • Check if the virtual machine settings are configured correctly.

    Issues with Virtual Machine settings:

    • Make sure that you have allocated enough RAM and storage space to the virtual machine.
    • Check if the video memory and 3D acceleration settings are configured correctly.
    • Check if the network connection settings are configured correctly.

    Conclusion

    In this article, we have explained how to install MacOS Ventura on VirtualBox on Windows 10. We have provided a step-by-step guide for the installation and configuration process, along with troubleshooting tips for common issues. By following these instructions, you can experience the MacOS Ventura environment on your Windows 10 machine.

    FAQs

    Can I install MacOS Ventura on VirtualBox on a Mac machine?

    Yes, you can install MacOS Ventura on VirtualBox on a Mac machine. However, it is recommended to use the native Mac virtualization software, such as VMware Fusion or Parallels Desktop, for better performance.

    How much storage space should I allocate to the virtual machine?

    We recommend allocating at least 30GB of storage space to the virtual machine for a smooth MacOS Ventura experience.

    Can I use an older version of VirtualBox to install MacOS Ventura?

    No, you need to download and install the latest version of VirtualBox to install MacOS Ventura.

    Do I need to activate MacOS Ventura after installation?

    No, you do not need to activate MacOS Ventura after installation on VirtualBox.

    Can I run Windows 10 on VirtualBox on MacOS Ventura?

    Yes, you can run Windows 10 on VirtualBox on MacOS Ventura by creating a new virtual machine with Windows 10 as the guest operating system.

  • How to Fix News and Interests Taking Up Memory on Windows

    How to Fix News and Interests Taking Up Memory on Windows

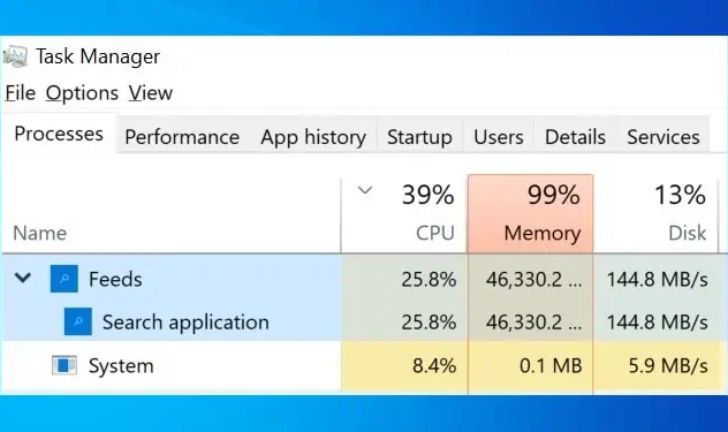
    News and Interests is a new feature on Windows that allows users to see the latest news and weather directly on their taskbar. While this feature can be useful, some users have reported that it is taking up a significant amount of memory on their system. In this article, we will explain How to Fix News and Interests Taking Up Memory on Windows and optimize the memory usage of News and Interests.

    How to Fix News and Interests Taking Up Memory on Windows

    News and Interests uses a combination of hardware and software resources to display the latest news and weather on the taskbar. This includes using memory to store data, as well as CPU resources to process and display the information.

    If the system is low on memory, the feature may not function correctly, or it may take up more memory than it should. This can lead to slow performance, lag, and other issues on the system.

    To optimize the memory usage of News and Interests, there are a few steps that can be taken.

    Disable News and Interests

    The first step is to disable News and Interests. This will free up the memory that is being used by the feature, and it will also prevent it from using any additional memory in the future. To disable News and Interests, follow these steps:

    1. Right-click on the taskbar and select “Taskbar Settings
    2. Scroll down to the “News and interests” section
    3. Turn off the toggle switch for “Show news and interests on the taskbar

    Clear Cache and Temporary Files

    Another step that can be taken is to clear the cache and temporary files that are associated with News and Interests. This will free up additional memory and can help to improve the performance of the feature. To clear the cache and temporary files, follow these steps:

    1. Press the “Windows key + R” to open the Run dialog box
    2. Type “temp” and press Enter
    3. Delete all files and folders in the “temp” folder

    Adjust Virtual Memory

    Virtual memory is a feature on Windows that uses hard disk space to supplement the physical memory on the system. By adjusting the virtual memory settings, it is possible to optimize the memory usage of News and Interests. To adjust virtual memory, follow these steps:

    1. Right-click on the “This PC” icon on the desktop and select “Properties
    2. Click on “Advanced system settings
    3. Click on the “Advanced” tab and then on “Settings” under “Performance
    4. Click on the “Advanced” tab and then on “Change” under “Virtual memory
    5. Adjust the virtual memory settings to best suit your system

    Disable Background apps

    You can also disable background apps which are running in the background but not in use. This will free up memory and help to improve the performance of the feature. To disable background apps, follow these steps:

    1. Go to settings
    2. Click on privacy
    3. Click on background apps
    4. Turn off the toggle switch for apps you don’t want to run in background

    Note: It is recommended to restart your system after making these changes.

    Conclusion

    By following the steps outlined in this article, it is possible to optimize the memory usage of News and Interests on Windows. This will improve the performance of the feature, and it will also help to prevent any issues that may be caused by low memory on the system.

  • How to Download and Install Telegram on PC in 2021

    How to Download and Install Telegram on PC in 2021

    The Telegram application is the biggest chatting app like Whatsup though it has more handy features and facilities. Therefore, Telegram is available for PC like Windows, macOS, and Linux. That’s why you can download and install Telegram on your PC. However, the first Telegram application for iOS was launch on 14 August 2013 and for Android in October 2013. You can use Telegram to create a group of millions of users. In Telegram, you can share photos, videos, and documents up to 2GB.

    Moreover, you can send and start voice chat in a group and even you can start video calls. Telegram founder is Nikolai Durov Pavel Durov and the CEO is Pavel Durov. Since January 2021, Telegram has 298 employees all over the world. However, you can find a new movie link on Telegram groups and download movies from telegram.

    So, in this article, we will cover how to download and install Telegram on a PC with few steps.

    How to download Telegram on PC

    You don’t need an Android emulator to download and install Telegram on your PC. Like other social media applications, you can download its Windows version from its official website. Therefore click the link below and download the Telegram Windows version.

    How to Install Telegram on PC

    Once the downloading is done, then follow the below steps to install telegram on your Windows pc.

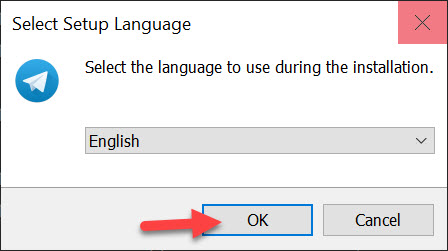
    Step1: Click on the telegram install setup and select the setup language. Then, click the OK button.

    How to Download and Install telegram on PC
    Select Setup language

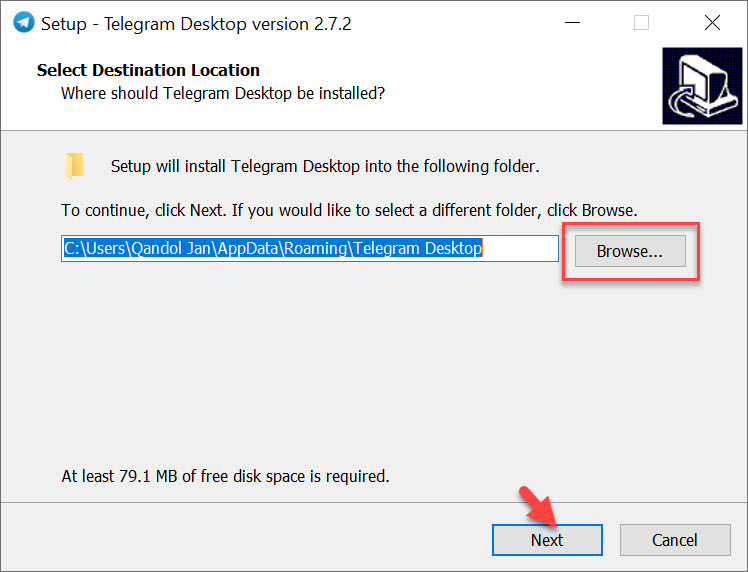
    Step2: Here, select the installation destination where you want to install the Telegram. After that, click Next button.

    Download Telegram on Windows
    Select Installation Destination

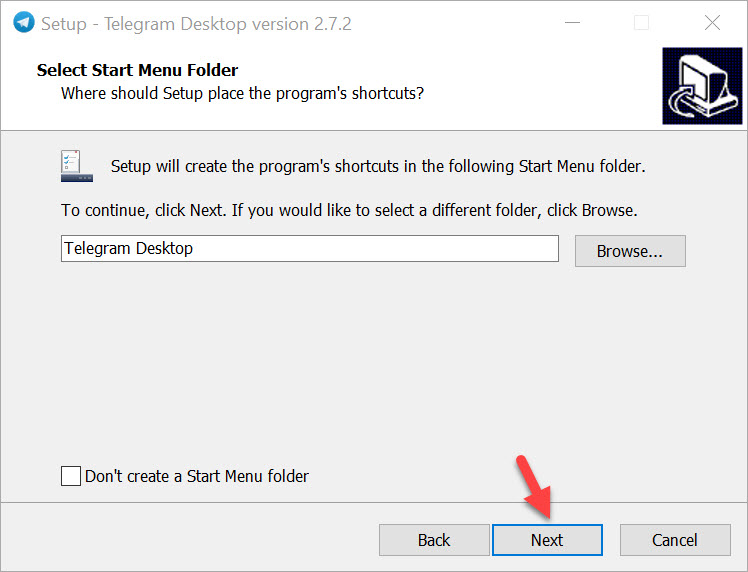
    Step3: Afterward, select the start menu folder and click the Next button.

    Install Telegram on Windows
    Select Start Menu Folder

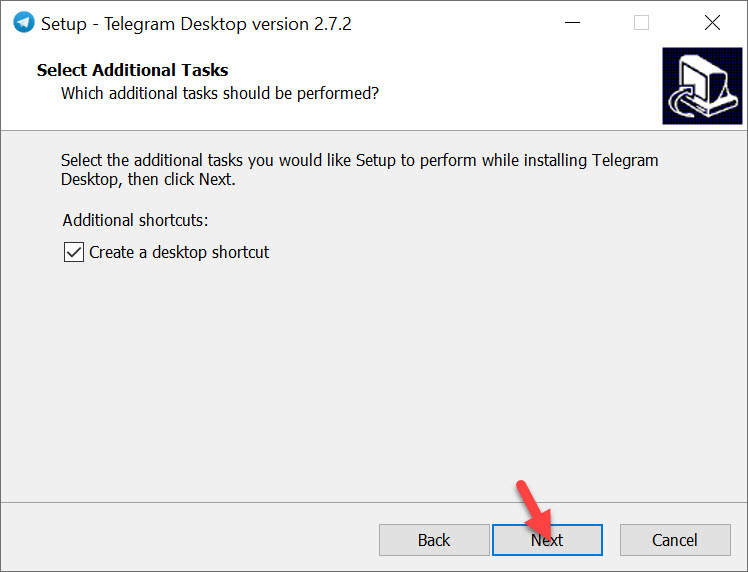
    Step4: Select the additional tasks you would like Setup to perform while installing the Telegram desktop. Then, click the Next button.

    Telegram for Windows, macOS, and Linux
    Select Additional Task

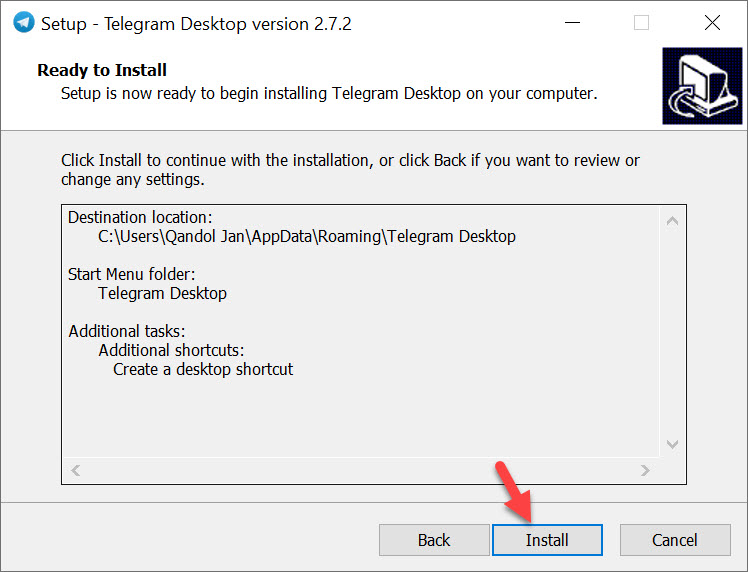
    Step5: The Setup is ready to begin installing Telegram Desktop on your PC. Click the Install button.

    Install Telegram on PC
    Install Telegram

    Once the installation is done, then click the Finish button.

    How to Setup Telegram on Windows PC

    Now the installation is completed and you are ready to set up your Telegram in order to start chatting.

    Simply click on Start Messaging. Now, you have two options to start with Telegram on windows. The first one is to open telegram on your phone and go to Settings > Devices > Scan QR. Once you scan this image then you can easily log in to your Telegram account.

    The choice is yours, the second method is to log in with your phone number.

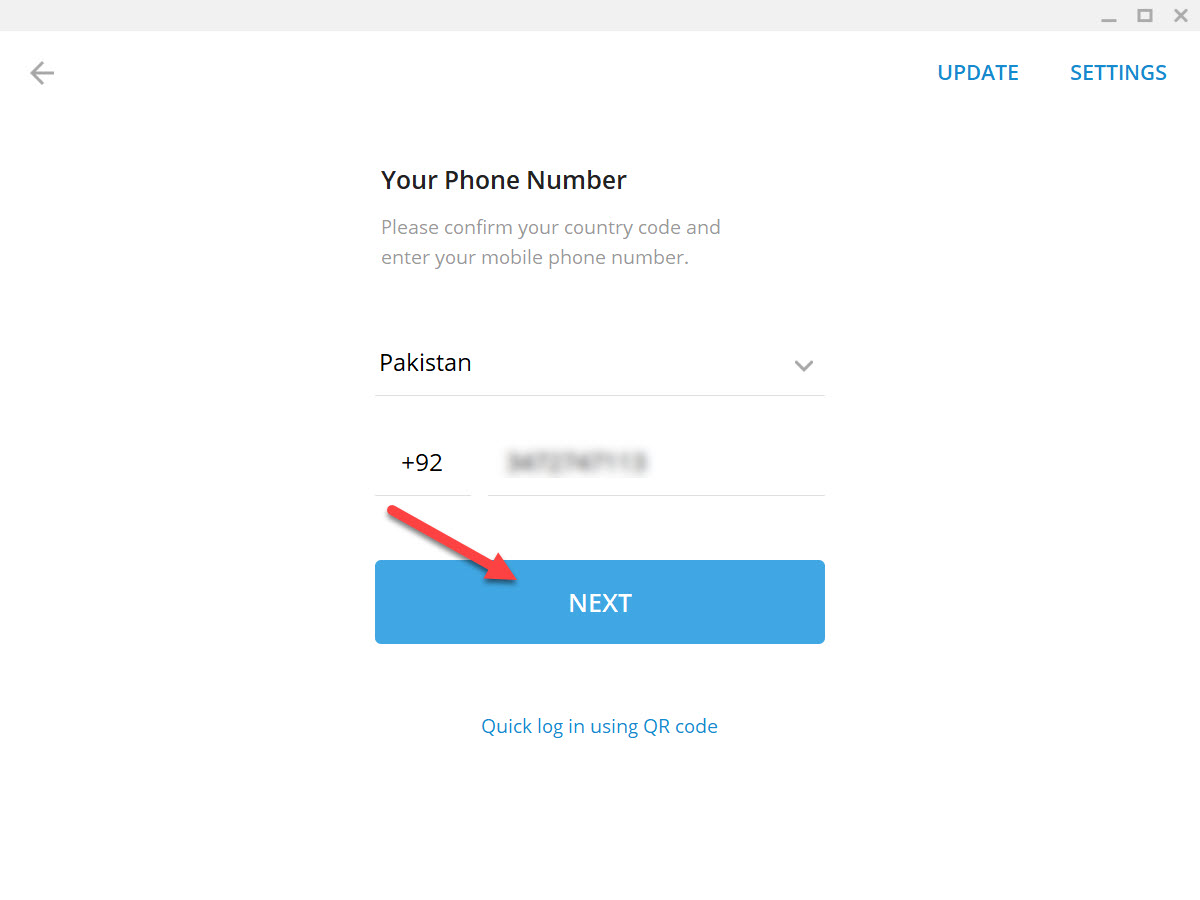
    Therefore, click the link to log in with your phone number. Then, here you need to type your phone number and go ahead.

    Type Phone Number to Login On telegram
    Phone Number

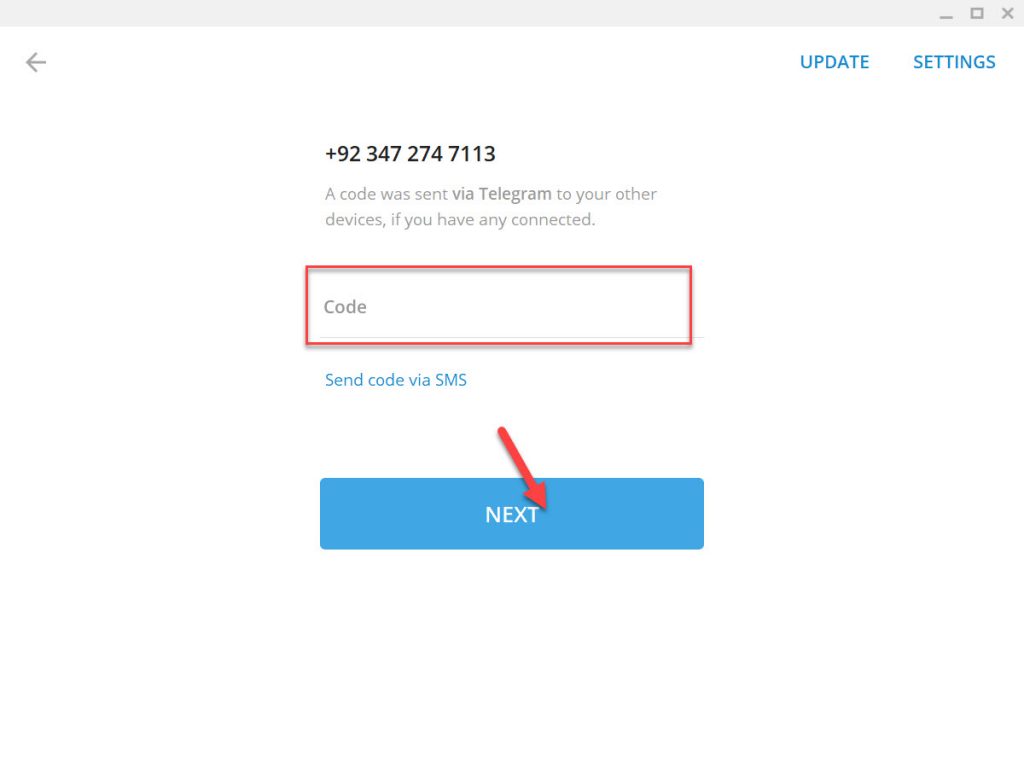
    After that, you will receive a verification code on your mobile telegram app. type the code number and continue using Telegram on PC.

    Verify Telegram App
    Verification

    Now, you can successfully start using Telegram and chat with your friends and group members.

    Read Next:

    Conclusion

    This was the guideline of how to download and install Telegram on PC in 2021. So, I hope you understand everything with all steps. In case, if you have any questions please feel free to ask me in the comment section.

  • How to Download Samsung Smart Switch on Windows 10, 7, 8?

    How to Download Samsung Smart Switch on Windows 10, 7, 8?

    Today, we will learn about the best Samsung tool which can be handy for all users who bought a new Smartphone and want to transfer the whole data from the old device to the new one. This happened to me, on my birthday night my mom gifted me a new Samsung A32 mobile. Though my old device is Samsung S9. However, I was confused about how to transfer my all data including Contacts, Images, Videos, Messages, Calendars, Samsung Notes, and my all applications. Here, I come and find the easy-to-use Samsung transferring tool that helps me to transfer my whole data without having any issues in a short period of time.

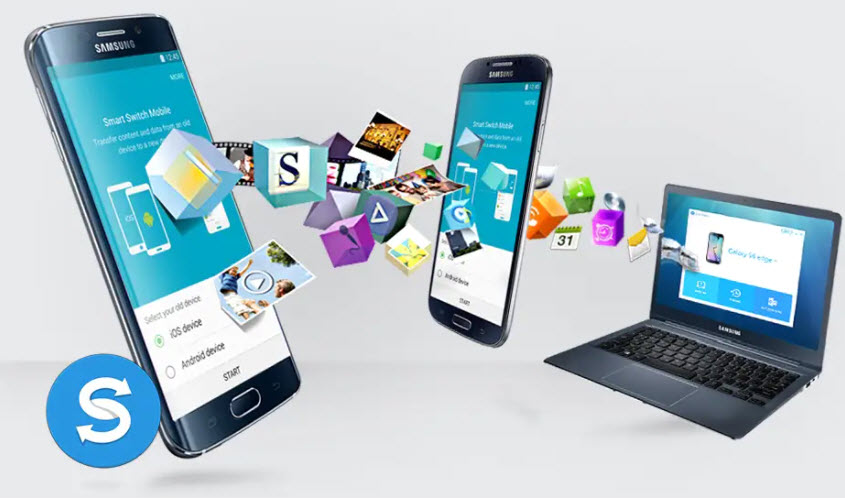
    Samsung Smart Switch is a Samsung transferring tool that helps users to transfer their old mobile data to the new mobile device. Even Apple brand users can use this application. Hands down, you can download and install Samsung Smart Switch on your Windows 10. This will help you to transfer data from one device to another one. The Samsung Smart Switch PC version helps you to receive data from your smartphone device. It means you can connect your PC with your mobile phone in order to transfer all data.

    Remember, backup your old device in order to not lose any of your data during the process. However, you won’t face such kinds of issues. As I transferred my whole data even my Apps data to my new device. This tool really helped me to get all data on my new device.

    What is Samsung Smart Switch?

    Samsung Smart Switch is an easy-to-use transferring tool that helps Android users to transfer whole data from one device to another. Even you can use it on your PC to send and receive data from one device. This tool can transfer all your data including Contacts, Messages, Call, Images, Videos, Apps and Apps data, Notes, and many more. However, your new mobile will looks like old mobile because of all data.

    You can connect old devices to a new device via Wi-Fi and Cable. But, if you want to transfer from android to PC then you need to download the Samsung Smart switch on your PC and connect it via Wi-Fi. If you want to use this tool on iPhone devices then download and install its application and go ahead.

    What Data Smart Switch can Transfer?

    Samsung Smart Switch is a Samsung application you can download from Play Store. Plus you can transfer the below data from your old device to the new device.

    • Contacts
    • Messages
    • Calls
    • Notes
    • Images
    • Videos
    • Songs
    • Applications
    • Applications data
    • Even Whole data

    Download Samsung Smart Switch on Windows 10

    On an Android phone, you can easily download and install it from Play Store. But downloading and installing on PC will need the download file. You can find the download link below and download the Samsung Smart Switch for Windows.

    Install Samsung Smart Switch on Windows

    Once the downloading is done then go to the download folder and find the Smart Switch setup file. After that follow the below steps.

    1. The first step clicks the Yes button to continue the installation.
    2. Then, agree to the terms and conditions and go ahead.
    3. Now, the Smart Switch is going to install on your PC, hold on.
    4. Here, the installation is completed, and click the Finish button.

    Now, everything is ready and you are ready to transfer the data from one device to another.

    Read next:

    Conclusion

    This article is all about how to download Samsung Smart Switch on your Windows 10 PC. And you get all details and ideas of what Smart Switch is and everything you need to know is inside the article. This tool is amazing and it will make it easy to transfer your whole data.

  • How to Record Windows Screen with IObit Screen Recorder?

    How to Record Windows Screen with IObit Screen Recorder?

    In this article, we will discuss the amazing recording software that will help you to record your Windows screen. However, there are several screen recorders but a few of them worth your time. About the recorder, I am saying in this topic is “IObit Screen Recorder”. Hands down, IObit screen recorder is a free software for Windows and easy-to-use while recording your screen. It has various features that can help you and feel you better to record screen. Besides that, you can record the full screen, a specific window, or select any region to record in high-quality videos with 4K Supported.

    Although, it will allow you to turn on the audio during recording. Like if you are in conferences, webinars, lectures, presentations and etc. Then, you must want to record audio too. Not only this, even you can add a mouse effect by highlighting the cursor and adding animation to the click action. IObit screen recorder allows you to take a screenshot during the recording and save it on your PC.

    The main part of the software is while you are recording the screen then you will see a watermark of the company or software which has bad impacts on your video. But, the IObit screen recorder doesn’t have such an option. There is no record time limitation and no watermark placed on your videos. It means, you can record video clean and as long as you want. After that, you can save it in MP4, AVI, FLV, MOV, TS, and GIF formats.

    When you are done with a recording then you can edit the video with the help of the IObit screen recorder basic video editor. It will help you to trim, cut, and split the captured videos. Last but not least, you can share your videos to a number of online platforms like Youtube, Facebook, Instagram, etc.

    IObit Screen Recorder Features

    The software has various features that are handy for users while recording video. Plus, a user should know about the features in order to have the best recording. So let’s check out.

    1. Flexible Screen Capture
    2. Record the screen with Audio
    3. No Lagging while HD recording
    4. Take a screenshot while Recording
    5. Multiple Output/Convert formats
    6. Edit After Recording

    Download and Install IObit Screen Recorder

    • Download IObit Screen Recorder Latest Version

    Once the download is done then install the IObit screen recorder on your Windows. The installation steps are too easy, only follow the screen instruction. Otherwise, follow the below steps.

    1. Go to the Download folder.
    2. After that, double-click the IObit setup file.
    3. On the first installation screen, you will see the welcome page. Here click Next.
    4. Now, Agree to the terms and conditions of the software.
    5. Here, select the installation destination and click Next.
    6. Click Next.
    7. Wait for a while to complete the installation and click the Finish button.

    How to Record Windows Screen with IObit Screen Recorder?

    Now the software is ready and you can record full screen or capture a specific part of the screen. Moreover, turn on the audio if you want and continue to the recording. So, let’s start.

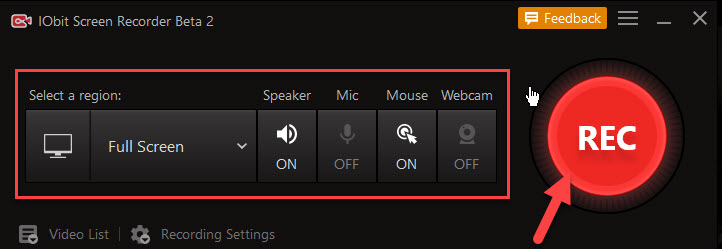
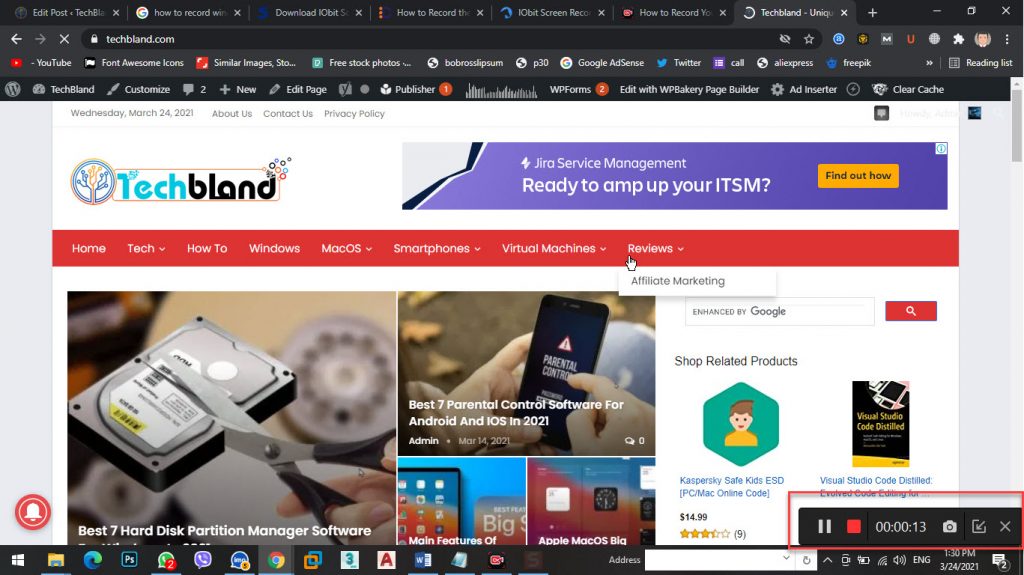
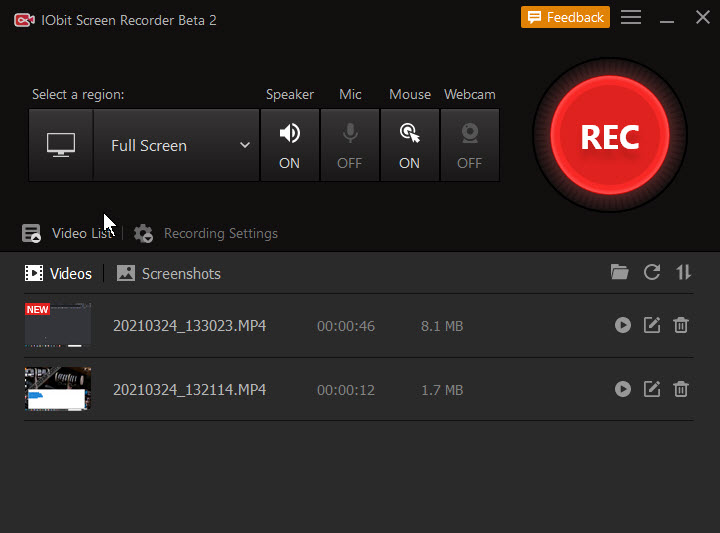
    Step 1: First of all, you have to select the recording area like you want to record full screen or a specific screen. So, click on Full Screen and select the option you want to go with. After that, turn on the Speaker and Mouse and click on Rec to start recording.

    how to record windows screen with iobit screen recorder
    how to record windows screen with IObit screen recorder

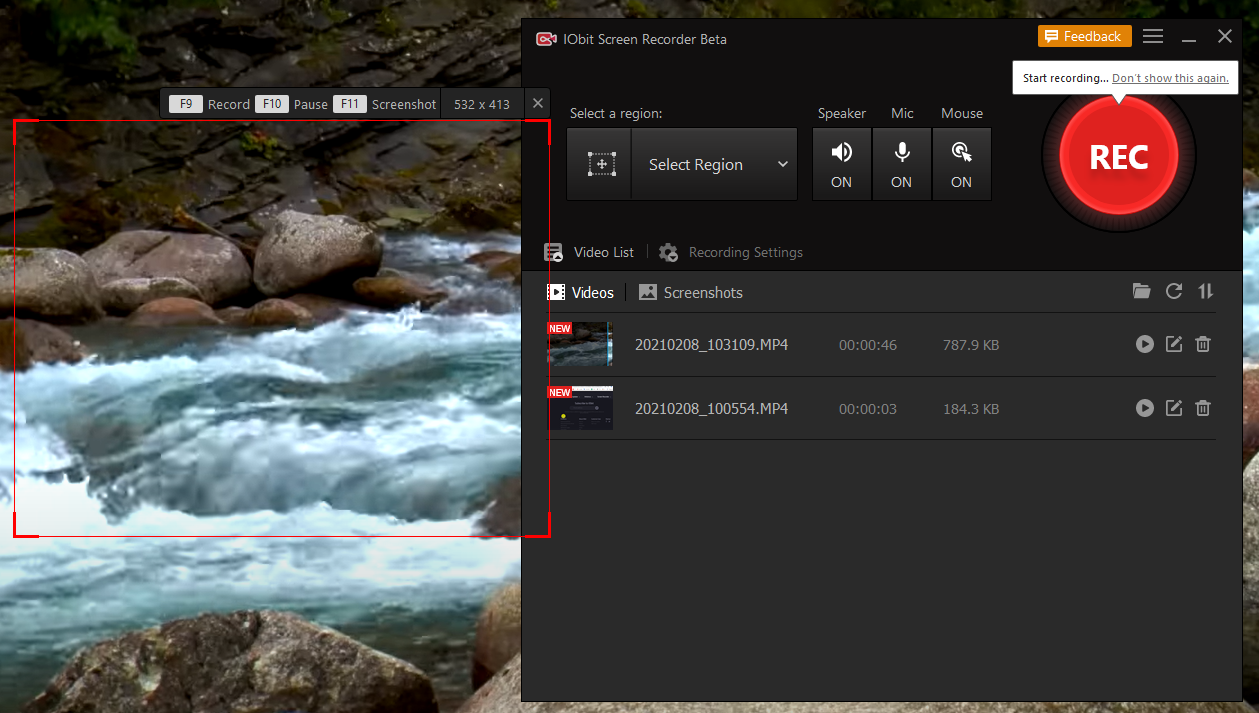
    Step 2: Here, your screen is recording as you can see. You can do anything during the recording. Once you are done then click the Rectangle Red box to stop the recording.

    Recording Screen
    Recording Screen

    Step 3: Now, you can see the recorded video plus you can share and edit the video with the given options.

    Edit and Save Video
    Edit and Save Video

    FAQs 

    Why Is There No Sound in My Recording?

    Check the audio input in the screen recorder. To record the system sound, make sure there is no headset connection. To ensure that external sound can be collected, turn on the microphone during screen recording.

    Is IObit Screen Recorder Safe to Use?

    IObit Screen Recorder is an online screen recorder and a screen recorder for Windows (PC) powered by IObit. To us, customer data and information security is our priority. We have implemented reasonable technical and organizational measures to ensure no malware or hacking issues.

    What Video Formats are Supported by IObit Screen Recorder?

    IObit Screen Recorder supports multiple formats, including MP4 AVI FLV MKV MOV TS GIF and so on.

    Can I Record My Webcam and Screen at the Same Time?

    Recording screen and webcam video simultaneously are primarily for instructional purposes, tutorials, and presentations. Unfortunately, IObit Screen Recorder doesn’t have this feature yet. You can record it separately. IObit is committed to better meeting customers’ needs, and the team is working on introducing this feature in a future release.

    Does IObit Screen Recorder Have a Watermark?

    Even though IObit is a free screen recorder for PC (Windows), it doesn’t place ugly watermarks or bombard you with annoying ads.

    Does IObit Screen Recorder Have a Time Limit on Screen Recording?

    There is no time limit for recording. Hence you can record as long as you want.

    Is It Illegal to Screen Record YouTube or Netflix?

    You can technically record movies and videos, but you’re not allowed to. Both YouTube and Netflix have terms of service that prohibit stream capture. That means it’s against their rules to screen record videos – that doesn’t necessarily mean it’s illegal, though.

    Is IObit Screen Recorder Free?

    IObit Screen Recorder is a completely free screen recorder with audio. You have access to the fully-featured of this free recording software, no time limits, quick editing after recording, and easy to create the great video that you want.

    Can Screen Recording be Detected on Some Platforms?

    It depends on the platform you use.

    Read Next:

    Conclusion

    In this article, we totally discussed how to record a Windows screen with the IObit screen recorder and you get everything. The IObit is the best screen recorder ever and you can use it to record any type of project etc. So, if you have any confusion then feel free to ask me.

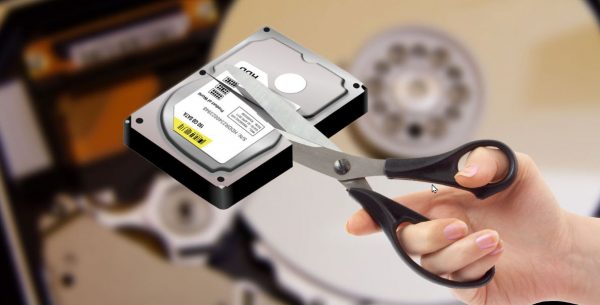
  • Best 7 Hard Disk Partition Manager Software For Windows in 2021

    Best 7 Hard Disk Partition Manager Software For Windows in 2021

    In today’s article review, we’ll be focusing on the Best 7 Hard Disk Partition Manager Software For Windows in 2021.

    As days go by, computers are becoming more efficient and powerful, especially when it comes to hardware specifications. Everything is getting bigger and better with each passing day. Nowadays, hard disks have been improved and are getting bigger as they’re capable of storing a large amount of data unlike before. With significantly improved disk space and a large amount of data to manage, it’s very difficult and tiresome for the owner to handle everything in one place with ease.

    Unfortunately, the inbuilt Windows Disk Management has never been so efficient and a reliable tool to work with. That’s why the inventory of a dedicated hard drive partitioning management software shines and has been a huge success over the years. It helps you separate and create partitions in the hard drive to smartly manage and organize your applications, files, folders, and other numerous data.

    What is Partition in Hard Disk?

    For readers who might be confused or might not know the meaning of the concept. Partitions are split sections in a hard disk that’s dedicated to a specific application or operating system and can be accessed as a single unit. Meanwhile, multiple partitions can be created to separate files, for instance, you can store multimedia files like videos, photos, movies in one partition, and install OS on another partition.

    This has proven to be the best and great way to manage your hard disk files by assigning them to a dedicated location and help to keep your system neat and well organized. However, multiple partitions can help you:

    1. Install numerous OS, based on the need, and create partitions for each of the OS.
    2. Boost performance, store, and access frequently used programs or in one partition.
    3. Split important files to avoid corruption or malware infection.
    4. Creating a dedicated space for files, apps, and data for important or urgent use.

    Best 7 Hard Disk Partition Manager Software For Windows PC

    You must be a tech expert to know how to shrink or extend partitions. However, with the assistance of a hard disk partition manager, you can easily and efficiently create separate entities for your apps and data without much hassle.

    Meanwhile, there are tons of hard drive partition manager software one can choose from the market currently. Unfortunately, not all of them will please you or give you the estimated service. However, we’ve tested across a plethora of partition software and brought to you the best 7 hard disk partition manager software for Windows 10 and older versions.

    #1: EaseUS Partition Master

    Over the years, EaseUS products & services are known to be feature-rich, and it’s one of the best partition managers that provides numerous functionalities & benefits. Amazingly, its easy-to-use interface allows you to drag the arrow either left and right to shrink or widen the partition. Also, there’s an option where you can manually input the partition sizes for accurate space – that’s if you don’t want to automatically use the slider option to resize partitions.

    By using EaseUS Partition Master, you can easily choose to blend partitions on one single disk, without losing any data. Also, you can change the volume labels & drive letters of the hard disk with its great features. There’s a password protection option that can protect the entire disk partition manager to avoid unauthorized access. Also, there’s a partition recovery tool where you can recover all deleted or lost partitions in case any mishap happens. One thing that makes the EaseUS Partition Master one of the best hard disk partition managers is its Execute button. That’s to say, whatever changes you make won’t take effect unless you click the button.

    Cons:

    • Numerous features
    • Easy-to-use
    • Offers security option
    • Preview changes before taking effect
    • Supports defragmentation of files
    • Single-click action delete
    • Regular frequently useful updates

    Pros:

    • Incompatible for commercial purpose
    • Compulsory system restart each time you want to partition the computer drive

    #2: Paragon Partition Manager

    Paragon is among the top hard partition manager for Windows PC that lets you shrink, expand, create, format, and hide partitions on your computer hard drive in just a few clicks. This hard drive partition software offers a broad set of features for quick & easy optimization, partitioning, and management of your Windows. After installation, you’ll be assigned a walkthrough wizard that’ll help you make changes to the hard disk.

    Also, when using Paragon Partition Manager, you can easily delete, resize, or format the already existed partitions. Meanwhile, you can use a slider or by entering the size manually to reduce the size of the partition. Paragon Partition Manager is mostly compatible with common files like FAT32, NTFS, and HFS. Unfortunately, extensive features like wiping the hard drive, merging partitions, migrating the OS, etc to a different drive can only be done in the Pro version of the software.

    Pros:

    • Allows changes without restarting the computer
    • User-friendly interface
    • Compatible with GPT/UEFI configurations
    • Preview changes before applying them
    • Best Windows 10 partition editor for beginners
    • Hard Disk performance is optimized during partitioning

    Cons:

    • The free version only available for personal use
    • Very big set-up files than other partition tools
    • Requires serial number during registration
    • No premium features in the free version

    #3: GParted

    GParted is one of the few partition tools that can create/edit partitions without any existing OS in the Windows PC. The only requirement for you to carry out this task is to convert the partition editor into a flash or CD drive to smoothly run the software. If you want to turn things off, all your need to do is just shut down your PC and boot it from the CD containing the GParted partition tool.

    Among other interesting features, you can shrink, expand, format, remove, clone, or hide any partition using GParted software. Also, this partition tool allows you to easily distinguish volumes from one another by changing the volume label of the drive. Meanwhile, GParted is compatible with both common and popular system files like FAT, HFS, NTFS, EXT, XFS, JFX, F2FS, and many others. Undoubtedly, this is one of the best disk partition tools that will serve all your basic partition needs.

    Pros:

    • Compatible with both Windows and macOS PCs
    • Easily recovers lost or deleted partitions
    • Only needed 300MB space for its installation
    • Can work on X86 and X86-64 computers that run on Windows, macOS, and Linux
    • No system reboot needed before applying changes

    Cons:

    • Must burn the partition tool to a USB or disk device before using it
    • Old model dashboard

    #4: Tenorshare Partition Manage

    Tenorshare is one of the easiest partition tools you can use for your hard disk. This disk partition manager is the simplest choice to manage your hard drive and make changes to your hard disk over a single dashboard. By using Tenorshar, you can edit, create, format, resize, or delete files on your hard drive. Also, if you want to easily recognize your partition, simply change the partition’s capabilities and properties.

    Creating partition with this tool is very easy, all you’ve to do is to download the software, select any unallocated space on your partition list, strike the create button in the screen, fill-up the required details, hit “Yes” to create one, click “Apply” to finish the process.

    Pros:

    • You can preview your changes before it’s being implemented
    • Supports Windows 10, 8, 7, Vista, XP
    • Supports FAT, EXT, NTFS, and HFS conversions
    • You can equally use an external USB drive, hard drive, etc

    Cons

    • Doesn’t allow users to split or clone partitions which are common features in other partition tools
    • A very dull interface when compared to other HDD partition software

    #5: AOMEI Partition Assistant SE

    AOMEI Partition Assistant SE is one of the easiest and most popular disk partition tools. It’s well equipped with all the necessary partition features along with many advanced tools that you might not see in most other HDD partition software. Also, this hard disk partition manager can create a pre-installation environment that’ll run the AOMEI before the Windows starts up. Meanwhile, you can shrink, expand, format, and delete partitions.

    The ability to create a bootable Windows PE is of great help in case you want to avoid system reboot after making changes, or you can’t start the operating system. There’s an inbuilt Copy Wizard that can copy and transfer all the content from one drive or partition to another. Fortunately, Extend Partition Wizard can expand the system’s partition without any reboot.

    Pros:

    • Restores lost or deleted partitions
    • Conversion of system files to and from NTFS & FAT32
    • Availability of standard and professional versions to suit every user’s preference
    • Easily merge, split, or hide partitions without losing any data
    • You can access and manually implement your changes before finally applying them
    • Offers easy-to-understand Wizard

    Cons:

    • Incompatible to convert dynamic disk to basic disk
    • Advanced interesting features are only available in the premium version

    #6: Active@ Partition Manager

    Active@ Partition Manager is another free Windows 10 disk software that helps you optimize your storage devices, partitions, or logical devices without shutting down your system. This partition manager allows you to format, create, change partition attributes, mark partitions as active, or delete logical drives. Also,  Active@ Partition Manager helps you to easily create partitions on your flash drive memory.

    Also, it’s a basic backup tool that lets you create a complete copy of any partition or hard drive. There’s an inbuilt S.M.A.R.T support feature that brings out the health of your dashboard, which makes it incomparable to other similar disk partition software in the competition. Interestingly, there’s a portable version, which means you can move it from one location to another, but it’s the only disadvantage is the limited functionalities.

    Pros:

    • Can work on Windows 10/8/7/Vista/XP
    • There’s a S.M.A.R.T feature that brings an overview of your hard drive’s health
    • Free and lightweight
    • Compatible with UFS, HFS+, EX2/EXT3/EXT4, and other popular file systems
    • Converts MBR to GPT

    Cons:

    • Clustered interface
    • Absent of cloning partition feature
    • Inability to resize locked partitions

    #7: MiniTool Partition Wizard Free

    MiniTool is the best hard disk partition manager software for Windows 10 tool options for beginners. Unlike other partition tools in our list, MiniTool main focus is to maximize disk performance. Meanwhile, there’s a built-in disk diagnostic master that analyze disk usage, measure disk, read & write speed, easily fixes logical file system errors, and detects bad sectors in the disk drive.

    This disk manager tool works great to create, format, or resize partitions flexibly. Also, you can convert through MBR/GPT disks, and partitions between FAT32 and NTFS. This software offers a data recovery solution too, including the ability to detect and retrieve lost data from deleted, formatted, or damaged drives. Fortunately, you can easily Migrate OS to SSD/HD Wizard if you want to copy the existing Windows drive to a different one.

    Pros:

    • Also allows you to expand system partition without any reboot
    • You can run a test to identify bad sectors in the disk
    • Also available in a portable version
    • You can easily restore lost or deleted partitions using Partition Recovery Wizard
    • Supports almost all common partition functions
    • Let’s talk remove some of the partition attributes

    Cons:

    • Most of its interesting features are only available in the updated version

    Read Next:

    Conclusion

    Most times, managing your disks can be tiresome and intimidating especially when you have little or no technical knowledge about hard drives. However, the invention of disk drive manager software has put an end to all these problems.

    This software helps you to clearly analyze or optimize your disk without much hassle. We’ve outlined a top seven disk manager software that’ll do this task for some of them without paying any dime. You can choose from our aforementioned list and install any of the partition editor software for Windows to quickly create and manage

  • 9 Simple Tweaks to Speed Up Your Windows 10 PC

    9 Simple Tweaks to Speed Up Your Windows 10 PC

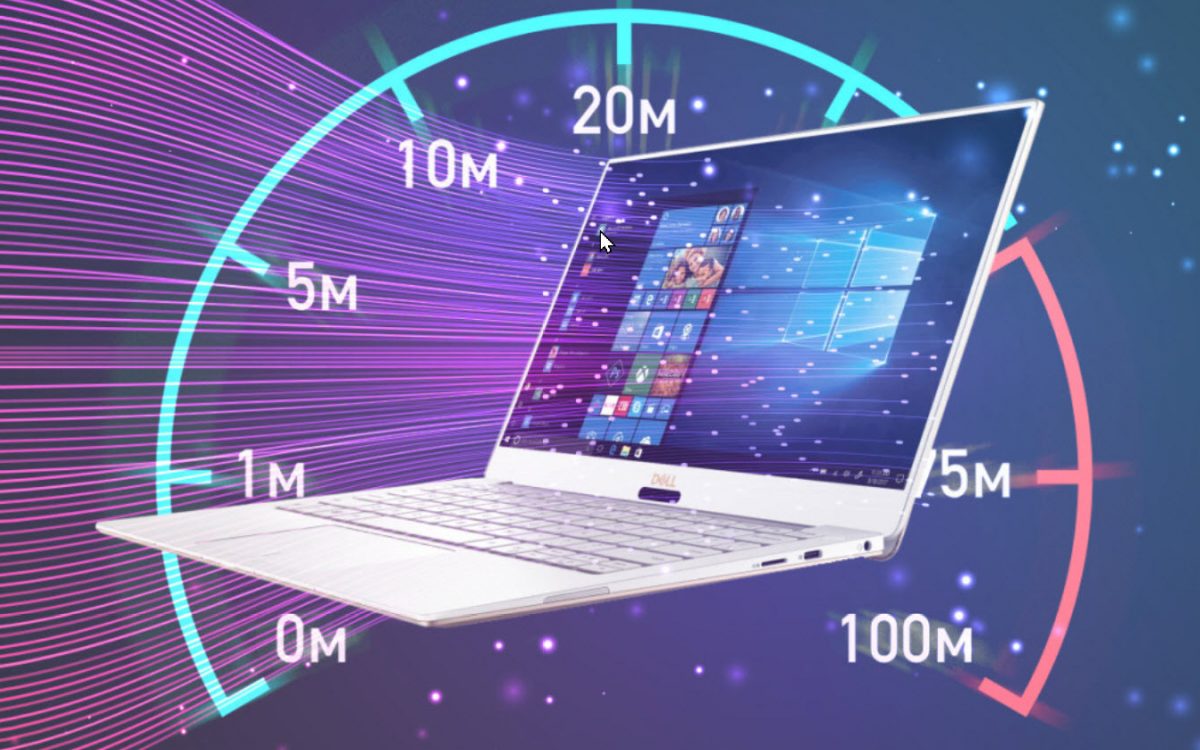
    Looking to boost your Windows PC speed? then check out this article which is about 9 Simple Tweaks to Speed Up Your Windows 10 PC. Let’s get started.

    As companies continue to speed up their PC hardware, so does software, and Windows 10 is not an exception. To confirm this, try and upgrade from Windows 7 or earlier, and see how surprisingly fast your machine is ready for action. However, there are other performance tweaks to consider after updating your operating system. Meanwhile, even the newest, shiniest Windows version isn’t immune to retardation.

    Most times, you’ll hear a lot of Windows speedup stories telling you to turn off some of the operating system’s more fun features such as visual animations to speed up the computer. However, most of our 9 simple tweaks are a guideline on how to speed up your Windows 10 system without compromising its functionality or appearance. Fortunately, most of them are totally free, why some require spending a few dollars on software or hardware. For users with older Windows versions or low machines but want to boost their machine, a couple of tips towards the end will help speed boost system performance.

    However, always avoid clicking on those “Speed Up Your PC!” ads for registry cleaners you often see on your PC as most of them lead to malware. Meanwhile, you should know that Microsoft doesn’t support the use of registry cleaners for Windows 10.

    Here are our few recommendations to keep your OS version up to date. This may be too small to include below as a separate step. Meanwhile, always go to the Settings app’s Windows Update section to see whether there are any away reliability and security updates you should install. Your system might speed up after trying any of these. You can try this tweak even if you don’t want any major system update – go to the same Settings to choose the hardware driver you want to update.

    9 Simple Tweaks to Speed Up Your Windows 10 PC

    1. Uninstall Crapware

    Though Microsoft is trying to improve it, some unnecessary Windows pre-installed Softwares continues to be a major issue to some recent computers. A few years back, we saw a Lenovo PC with up to 20 pre-installed programs that occasionally interrupt what we’re doing with the computer. Recently, the number of pre-installed software has drastically dropped. One of the latest HP just comes with pre-installed apps, including ASUS which has only five. However, Microsoft is not excerpted in this issue, though some of them are games and reality software you may like.

    However, you can easily right-click on any unwanted app tile Start and select Uninstall. Also, you can right-click on the Windows logo Start button and select Programs and Features to immediately uninstall the software. Also, you can simply type Programs in the search box next to Power Button.

    Meanwhile, you can also find the perpetrators by sorting out the list of installed programs on your list. Another good option is to sort by Recent to see if any apps weren’t installed by you. You can usually find culprits by sorting the size to delete very large items you might not need. Unfortunately, this process can be time-consuming as you can only remove one at a time, so set aside at least one hour if you have a bunch of bloatware. Also, don’t forget to get rid of apps that are installed by you but are no longer needed.

    Keep in mind Windows 10 has two types of applications including Modern Windows Store apps and Traditional Desktop ones. You can access them by visiting the modern Settings app’s Apps and Features page.

    One of the advantages of removing apps is to boost performance as many software load processes at boot time and collect lots of RAM and CPU cycles. In the Programs and Features section of Control Center, you can also click Turn Windows Features On or Off and scan the list to see if there are any unnecessary apps in your system.

    2. Limit Start-up Processes

    As earlier mentioned, a lot of apps install background programs that run every time you start up your PC. Most of these programs are unnecessary to have on your computer. Unlike Windows 7 you need to run the MSCONFIG utility, Windows 10 (and older Windows 8.x) gives you a faster option to limit what runs at start-up by going to the updated Task Manager.

    The simplest way to summon the Task Manager is by pressing Ctrl-Shift-Esc. Thereafter, Switch to the Start-up tab, it’ll show all the programs that load when Windows startup.

    3. Clean Up Your Disk

    On the Start menu, type Disk Cleanup. This will show the authentic Disk Cleanup utility that has been attached to Windows for several generations of the OS. Disk Cleanup detects outcasted junks including offline web pages, temporary files, and installer files on your PC, and offers the service if deleting them at once. Meanwhile, you may discover that your system’s recycle bin is bulging at the seams. However, this will only affect the speed of your computer if your drive space is almost full.

    Also, if there’s no regularly scheduled disk defragmentation, you can set it up in Optimize Drive tool, which you can also find by typing its name in the search box next to the Start button. However, if your primary disk is an SSD, you won’t need any defragmentation since no moving parts are reading the disk.

    Another good method of keeping storage use is by enabling the Storage Sense option. This will automatically free up space occupied e temporary files and Recycle Bin items by removing them.

    4. Add More RAM

    If you’re an old fan of Windows PC, you’ll notice that Windows 10 efficiently manages more memory than older versions. Meanwhile, more memory can always fasten PC operations. In recent Windows systems such as Microsoft Surface Pro tablets, you’ll discover that adding RAM isn’t an option. However, you’ll see business and gaming laptops that support RAM upgrades, but they’re rarely found. The latest slimmer ultrabooks and 2-in-1 laptops are usually fixed. However, top-notch RAM makers websites like Kingston, Corsair, and Crucial all offer product finder that show you the type and amount of RAM your PC needs. Above all, their prices are quite cheap.

    If the provided RAM is too much, and you’re using an old computer, it’s better to go for a hard drive rather than SSD. Also, you can option using Ready boost with a USB stick. This caches data on the removable device’s storage to boost memory access that would be slower if you used a spinning hard drive. All you’ve to do is to go to the USB Key’s File Explorer entry, right-click to show properties, and finally, switch to the ReadyBoost tab to get going. For most recent computers, this tweak might not be available.

    5. Install an SSD Startup Drive

    It’s not that Windows Startup doesn’t work, but loading and using high demanding applications like Adobe Photoshop will be much faster with SSD. Also, in Settings’ Apps and Features Page, Windows Store programs can easily be shifted from a spinning hard drive to an SSD. One of the best and simple tweaks to speed up Windows 10 is to exchange HDD to SSD.

    For faster system performance, it’ll be best to replace your internal startup hard drive. Meanwhile, if you have a laptop, this might be the best option. However, an external SSD with a USB Type-C can provide a massive speed boost in applications with large storage.

    6. Check for any Viruses and Spyware

    You can use an in-built Windows Defender or any third part protection app to check this. However, Malwarebytes Anti-Malware is our pick for the best malware cleanup app. Fortunately, it’s totally free in case you don’t want to spend extra cash on malware software. Also, some antivirus products have a lighter footprint on system performance than others.

    7. Change the Power Settings to High Performance to improve Speed

    However, it’s good to know that this isn’t a good choice if you want to save power. Meanwhile, it’ll effectively improve your Windows computing speed. Go to the Settings app’s System click the Power & Sleep option and then select the Additional power settings link. From there select the drop-down arrow on the right edge to “Show additional plans” and then click High Performance.

    8. Run Troubleshooters

    On the Settings app, search for troubleshooting. Thereafter, Windows will show available troubleshooting utilities you can choose, and also they can run automatically or manually. To ascertain your curiosity, run the other troubleshooters, including Hardware and Devices, Search and Indexing, and Windows Store Apps. Also, in the old-style Control Panel’s System, click Security > Security and Maintenance Page, Select Maintenance, and hit Start Maintenance. This will happen automatically on a daily routine though you can change the time it works.

    9. Turn Off Search Indexing

    Especially for lower-powered Windows, search indexing can consume a lot of system resources, but only temporarily. If you’re the kind of user that does a lot of searching, this won’t appeal to you as most of the searches will be slower. However, to turn off search indexing in Windows 10, click to open the Indexing Options Control Panel window. Thereafter, click Modify and uncheck specific locations you don’t want to be indexed.

    However, if there’s any need to leave search indexing on, you can do that but turn it off anytime you find out it occasionally slows down your system.

    Read Next:

    Conclusion

    A speedy computer will boost your work productivity. Upgrading your computer to the latest OS doesn’t guarantee speedy performance. There are a lot of tweaks you need to try out if you desire to have a fast performing PC. However, we’ve outlined a top 9 tweaks to speed up your Windows 10 computer. Stay glued to our page and get the latest PC tech news and reviews.

  • How to Factory Reset Mac and Windows 10 Computers

    How to Factory Reset Mac and Windows 10 Computers

    Don’t know what is your Laptop password? Thinking! but you cannot recall the password. Then, check the article on how to Factory Reset Mac and Windows 10 computers.

    Computers are generally reliable and important part of every business person, but sometimes things go wrong. When that your industrious computer develops a fault before you buy a new one try a thorough factory reset. This wipes the entire data or files on your computer and keeps it in a state of how it was when you first bought it.

    Apart from your personal use, you can factory reset a computer to prepare it for a new owner to make sure no sensitive information falls into the wrong hands. Sometimes, a little itching on your computer might be solved by uninstalling a recent update. However, if you’re experiencing some kind of sluggishness on your system, backing up your files and resetting your PC to its factory settings might do the trick.

    The factory reset process has been the same process for years on Macs with Intel processors. But a change to Apple Silicon chip has slightly altered the old method of factory resetting a Mac powered computer. However, the factory reset process on Windows 10 seems to be much easier.

    On the next sub-heading is a guideline on how to erase a hard drive and reinstall the operating system on your Mac or Windows 10 Computers.

    How to Factory Reset your Mac PC

    Step by step I will guide you on how to factory reset Mac and Windows 10 computers. First of all, you will get tips on factory reset of Mac computer. So, pay attention, and let’s get started.

    1. Enter Recovery Mode

    The initial step before wiping your data and reinstalling the operating system is to enter the macOS recovery option. However, due to the recent release of new Mac versions, we now have two ways of doing this. You can either enter recovery mode through any of these methods depending on the chip inside your computer.

    For Intel-Based Macs

    If you’re using a Mac with an Intel processor, hold down the power button. Then choose the Restart option from the pop-up menu. Also, you can perform this action by opening the Apple icon in the top-left corner of the pane and select Restart. From here, hold down Command + R until the Apple logo surfaces. Thereafter, release the keys and allow your computer to automatically boot up and open into Recovery.

    For Apple Silicon-Based Macs

    Mac models using silicon needs to be turned off completely. Open the Apple menu and select Shut Down or hold down the power button and click Shut Down through the pop-up menu. Meanwhile, click and hold the power button to turn on the Mac and hold for some seconds until “Loading startup options” shows up. Click Options from the startup screen to enter the macOS recovery menu.

    However, if there’s any case whereby your computer is frozen and the normal resetting option isn’t working, you can try the Control + Command + Eject shortcut.

    2. Erase Your Data

    Notwithstanding your recovery mode method, you need to select a user with administrator privileges and enter their login details before accessing the computer’s start-up options. Immediately you’re in macOS recovery, select Disk Utility to erase the computer hard drive.

    In your Mac Disk Utility menu, select the Macintosh HD below the internal heading and click erase in the top toolbar. Thereafter, you’ll see a dialogue box requesting the drive name and format. Write the name as Macintosh HD and ensure the format is set to Mac OS Extended or APFS.

    Therefore, select Erase Volume Group to erase the drive. Also, ensure that any other system drives are wiped out to completely format the computer and avoid any system errors during the reinstall process. Exit out of the Disk Utility page to refer back to the Recovery screen.

    However, be aware that you can no longer recover any deleted data once this process is done. But if you’ll later need any item that’s on the hard drive. So, you can back them up through Time Machine or sync to iCloud.

    3. Reinstall and Restore

    Meanwhile, if you’re planning to sell the computer, you can save your strength and let the new owner install another macOS version. Contrary to that, if you’re keeping the computer, the next step is to reinstall macOS back into the system.

    Before that, ensure your computer has at least 60% battery power or is connected to a charger and connect to the internet. Thereafter, select Reinstall macOS and follow the necessary instructions to download a new version of macOS.

    If you backed up your files through Time Machine, you can restore those files through Migration Assistant as part of the reinstall process. Mac will require if you want to transfer file from Time Machine backup or through another Mac. Choose Time Machine and continue to restore your files.

    However, if you don’t want to perform this action while cleaning your Mac. However, you can refer back to the Recovery screen and click the Restore From Time Machine Backup option. Thereafter, if you want to reinstall your saved files, select the appropriate backup option from the list to act.

    How to Factory Reset Your Windows 10 PC

    1. Recovery Settings

    To open the Settings Window, click the Start menu and select the gear button in the lower-left corner. Also, you can select the Settings Window from the app list, under Settings, then Update & Security > Recovery, then choose to Get Started under Reset this PC.

    2. Save or Remove Files

    When it comes to these settings, you have two ways of doing this: you can either choose to keep the system files and delete downloaded apps or settings or you format everything and start afresh.

    However, when you choose to Keep my files, your personal installed apps and files will be saved. B.ut apps and settings will return to how they were when you first bought the PC. Also, every pre-installed apps will be returned. However, you can choose to prevent this by going to the Additional Settings pane and uncheck Change settings.

    Meanwhile, if you want to erase everything, but bear in mind Windows will completely delete all your apps and files, click Remove Everything. This is the quickest way to remove your files and it’s also the default option. However, if you wish to completely erase the system files. Then, go to Change Settings at the Additional Settings pane then check the data eraser option.

    However, this option will take a longer time to complete but it’s the most secure option. Meanwhile, Microsoft advises completely wiping the drive if you wish to get the most out of your PC. But that means you can’t recover all your deleted files.

    3. Reset your Computer

    Once you’ve decided on which option to choose from, click Next and Windows will display what will be deleted from your PC before making the final decision. However, if you selected the Keep my files option, Windows will also bring out a list of what will be deleted with the reset process.

    Finally, hit Reset to actually commit. After that, your PC will automatically reboot. When you finally return to Windows 10. You’ll discover that your PC has returned to how it was when you first opened it. Meanwhile, if you backed up your files through Recovery Drive or any online backup service. You can now go and restore them to the machine.

    Read Next:

    Conclusion

    If your Mac or Windows PC is running sluggishly, resetting it back to factory settings will be the best option for you rather than deleting a few files. Before that, ensure to back up your files so as to restore them back after the factory reset. Also, it’s highly recommended to factory reset your PC before selling it to prevent the new owner from gaining access to your sensitive information. We’ve outlined the basic steps on how to factory reset your Mac or Windows 10 computer. Meanwhile, follow up our page by hitting the subscribe button and be the first to get access.

    If you have any questions on how to factory reset Mac and Windows 10 computers then ask me in the comment section

  • How to Optimize Windows 10 for Gaming and Performance in 2021

    How to Optimize Windows 10 for Gaming and Performance in 2021

    In 2021, legions of users are playing games and they look after a better operating system to have the best performance and game mode. However, there are various games that are in-demand and have thousands of users. But, playing games and having the best performance. You will need to optimize Windows 10 for gaming and performance in 2021. Although, PC gaming is one of the famous activities nowadays. Though Windows 10 is the best and recommended one when it comes to the operating system. There are several OS like macOS, Kali Linux, and much more. However, Mac operating systems are also best for gaming but Windows 10 is off the hook.

    If you want to have the best time and better operating system in order to play games till the end without having slow issues. Then, follow this article where you can optimize your Windows 10 because most of the gamer face slow performance. In fact, the PC gaming performance can be effected by the graphics card, CPU, Memory, Hard Disk, Network, and many more. If your PC has these all options with high-level performance then you will have a better experience.

    Microsoft has done its best job to optimize Windows and adapting it to the needs of the gaming community. The Windows 10 operating system offers better game performance and faster frame rates. As a base, it serves the best Graphic drivers on the market that is crucial when it comes to gaming. The PC supports native games and retro ones too. Along with that, it supports Xbox streaming with the Game DVR feature. The best optimization settings to speed up your PC is, it has a Game Mode.

    Therefore, it doesn’t look simple and you don’t need to worry because in this article I will guide you on how to optimize Windows 10 for gaming and performance.

    How to Optimize Windows 10 for Gaming and Performance in 2021

    There are more than 10 steps to bring changes to your Windows in order to have a better gaming performance. Thus, we will go one by one and change all those settings or will perform extra tips to optimize Windows 10 for gaming.

    #1: Update your Windows to Latest Version

    The best tip to have a better game experience and improve your Windows is to install Windows completely and use the latest version of Windows. To have a clean installation of Windows, you need to download the Windows 10 ISO file and then install it on your PC.

    The latest version has many new features and options that you can optimize the Windows 10 for gaming. However, the previous or old version of Windows doesn’t have such options as Game Mode, Xbox Networking, etc.

    If you cannot re-install Windows 10 then make sure you have updated your Windows whenever the new version is released. Therefore, have the latest Windows 10 update and optimize your Windows for gaming.

    #2: Game Mode Optimization

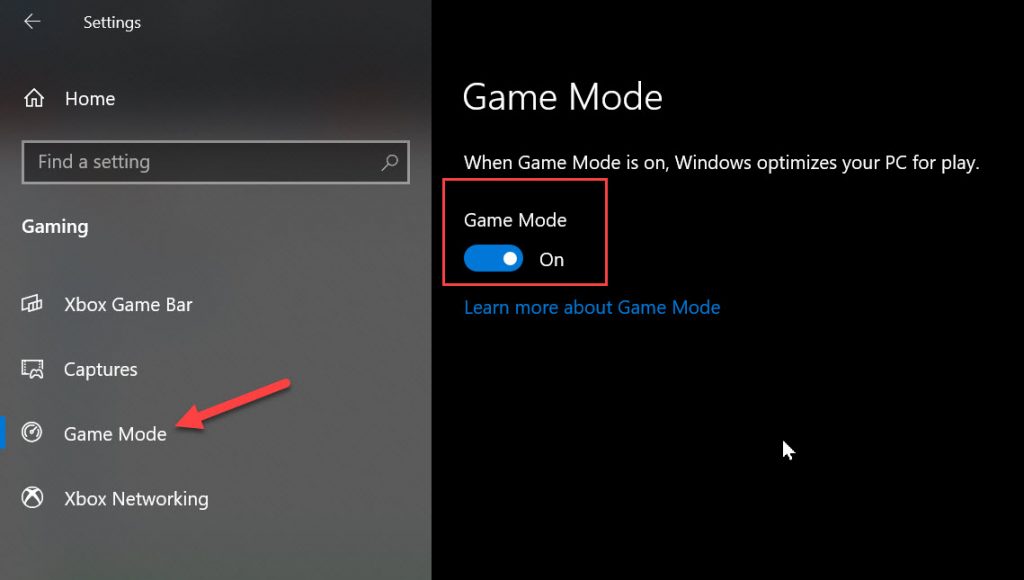
    If you are PC is running the latest Windows 10 operating system version. Then, you will have the Game Mode option. Along with that, you have Xbox Game Bar, Captures, and Xbox Networking. These all options are available in the latest version of Windows 10. So, the best optimization option is to turn on the Game Mode option. To do that follow the below steps.

    1. Press Windows Key + I
    2. Here, find out the Gaming feature and click on it.
    3. On the Gaming feature, you will see the Game Mode on the left side of the window. So, click on Game Mode.
    4. If the game mode is turn off then Turn On the game mode in order to have a better gaming experience.
    how to optimize windows 10 for gaming and performance
    how to optimize windows 10 for gaming and performance

    #3: Enable Ultimate Performance Power Mode

    The second best tip to optimize Windows 10 for gaming is to turn on Ultimate power mode to have high performance. To do that follow the below steps.

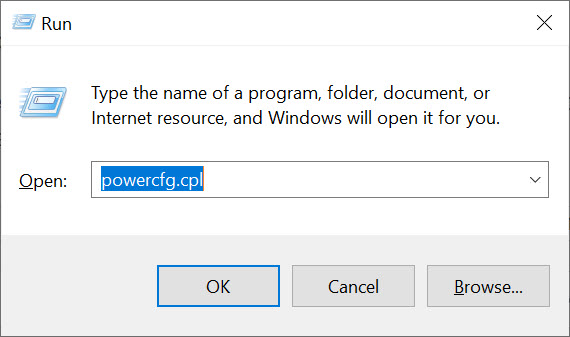
    Step 1: Press Windows Key + R to option Run box.

    Step 2: Here, type powercfg.cpl and click ok. This code will option the Power Options menu.

    Enable Ultimate Power Mode
    Enable Ultimate Power Mode

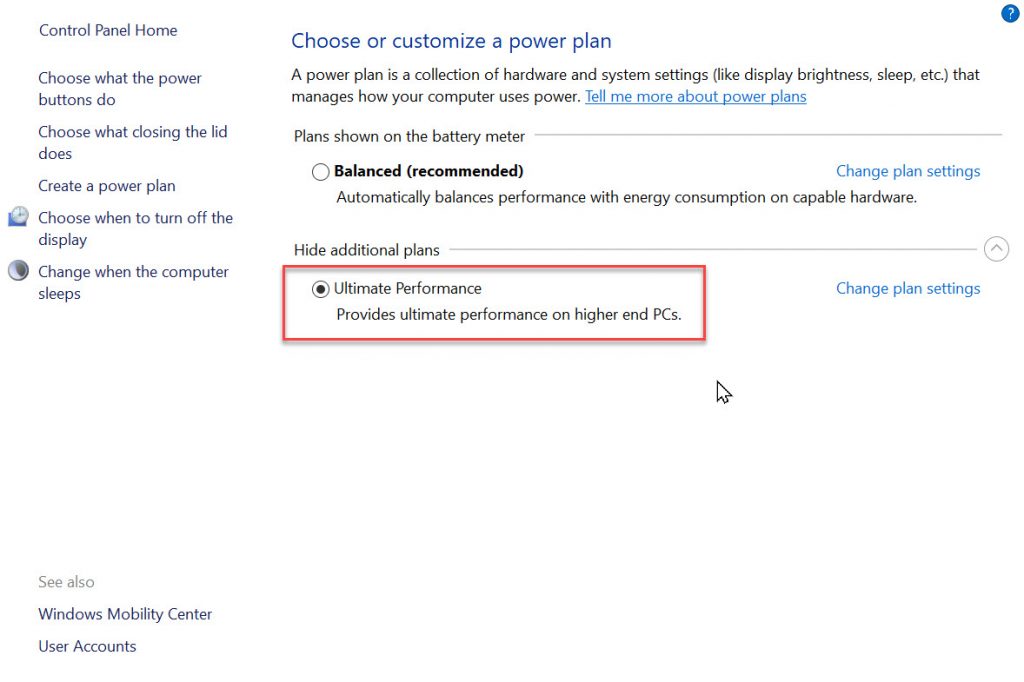
    Step 3: You will see several options in power options. So, select the Ultimate Performance and enable it. This option will provide the ultimate performance on higher end Pcs.

    how to optimize windows 10 for gaming and performance
    Ultimate Performance

    Note: If you don’t see the Ultimate performance in the Power options then follow the below steps to enable it.

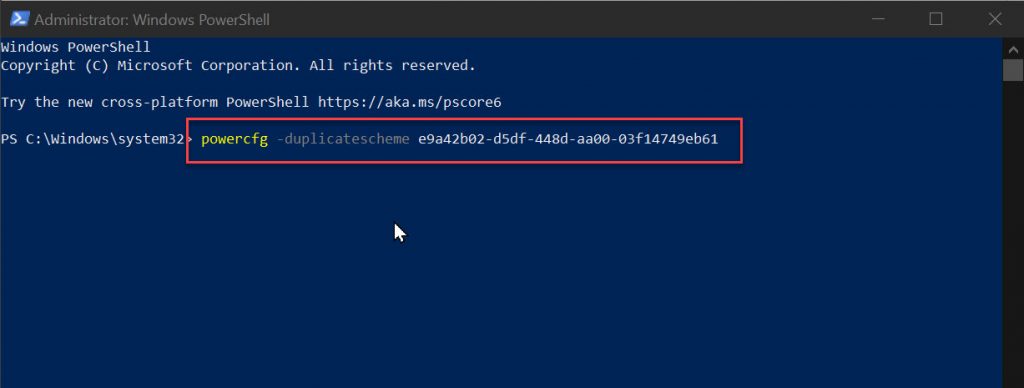
    Step 1: Right-Click the Start Menu and select Windows Powershell Admin from the menu.

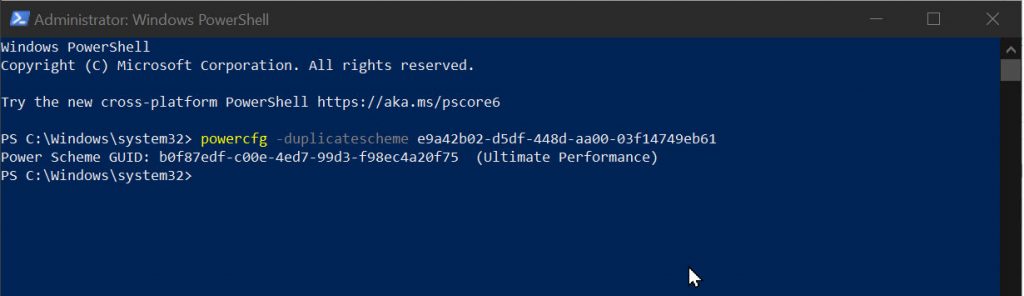
    Step 2: Now copy and paste the line code in Powershell (powercfg -duplicatescheme e9a42b02-d5df-448d-aa00-03f14749eb61) and hit enter.

    Display Ultimate Performance with Powershell
    Display Ultimate Performance with Powershell

    This will enable and display the ultimate performance plans in your Power Options.

    Optimiza Windows 10 with Ultimate Performance
    Ultimate Performance Appears

    #4: Disable Nagle’s Algorithm

    In order to have a better game performance, you have to disable Nagle’s Algorithm using the below steps. However, having Nagle’s Algorithm is useful but while playing games it will contribute to latency issues. So, disable the option will be the best tip to optimize your PC.

    To disable Nagle’s Algorithm and improve the performance, follow the below steps.

    • Press Windows Key + X
    • Click on Windows Powershell
    • Now type ipconfig and press enter
    • Here it will identify your PC IP address.

    When the IP address identified and noted and edit the Windows Registry

    • Hit Start option
    • Type Regedit and enter
    • Select Registry Editor

    Now copy and paste the path in the address bar

    HKEY_LOCAL_MACHINE\SYSTEM\CurrentControlSet\Services\Tcpip\Parameters\Interfaces

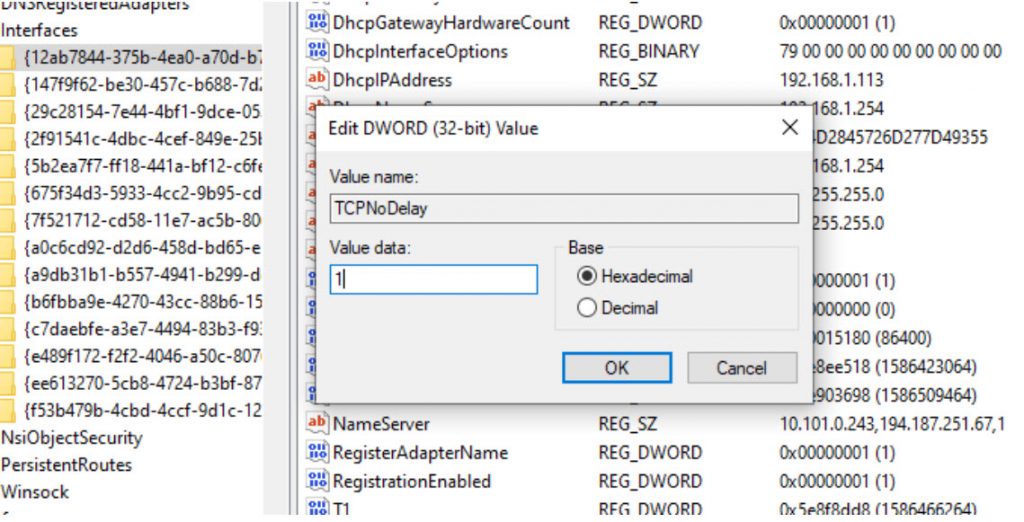
    On the left side of the screen, you will see several folders with different filenames comprised of letters and numbers. In order to access the correct file then match your IP address with the one listed against DhcpIPAddress in one of those folders.

    Disable Nagle Algorithm
    Disable Nagle Algorithm

    When you find your matching folder then follow the below steps:

    1. Right-click on the folder
    2. Select New > DWORD (32-bit) Value
    3. Name this TcpAckFrequency
    4. Click OK
    5. Select New > DWORD (32-bit) Value again
    6. Name this one TCPNoDelay.
    7. Double-click on each and set their parameters to 1
    If you face any kind of issues by disabling Nagle’s Algorithm then reset the parameter values to and they will be disabled.

    #5: Optimize Windows 10 with Faster DNS

    1. Press Windows + I to open Windows Settings
    2. Now find Network and Internet and go to Change Adapter Settings
    3. Right-click on your Wireless Network
    4. Highlight Internet Protocol Version 4
    5. Make a note of the two DNS entries for future reference
    6. Replace them with 1.1.1.1 and 1.0.0.1
    7. Click OK, then Close.
    8. Restart your default browser

    This will help you to have a faster Internet connection in order to play online multiplayer games.

    #6: Upgrade to SSD from HDD

    SSD is faster than HDD, if you are using HDD then change to SSD. Afterward, you will see the changes and the improvements to your PC. I had a very slow PC while using HDD then I upgraded to SSD. After that, my PC performance goes higher. One of the best ways to optimize Windows 10 for gaming is to upgrade your HDD to SSD.

    However, upgrading to SSD from HDD will not increase the speed immediately but it will speed up your Windows 10. If you want to upgrade HDD to SSD without losing data. Then, you can choose the clone tool “MiniTool ShadowMaker”. This will help to enable you to clone OS from HDD to SSD without losing data. Therefore, download the MiniTool ShadowMaker or purchase for advanced settings.

    #7: Update your Graphics Drivers

    In fact, you don’t need to update your drivers unless your hardware face issues. However, we have the two best graphics card like Nvidia and AMD which are in demand. But, you will face issues while updating driver. So, installing the manufacture’s drivers and keeping them up-to-date can give you a better performance and your Windows boost up.

    Hands down, you are runing one of the graphics card like Nvidia, AMD, and Intel. But it doesnt mean you have the latest version. Go to the download pages of the graphics card and find out the latest version and download it. In case, you dont know what graphics car you have and go here.

    #8: Disable Automatic Windows Updates

    You have some articles that told you always keep your Windows up-to-date. Though, having the updated Windows will be good to have new features and improvements. But, doing it manually is the best way in order to not disturb you while playing the game.

    While playing the game and get a pop-up Windows update notification or it updates itself. Then, you don’t like that process and you might want to turn off the automatic update. Therefore, follow the below steps.

    1. Press Windows key + I to open the Settings
    2. Click on update and Security
    3. Now click on Advanced options and disable automatically download updates

    This option will stop downloading Windows automatically.

    Read Next:

    Conclusion

    These are the best tips to optimize Windows 10 for gaming and performance in 2021. If you are a gamer then this article helped you a lot. A gamer needs the best tips to optimize his PC and those tips are shown in this article.