Category: Windows

  • Convert MBR to GPT without Losing Data during Windows 10 Installation?

    Convert MBR to GPT without Losing Data during Windows 10 Installation?

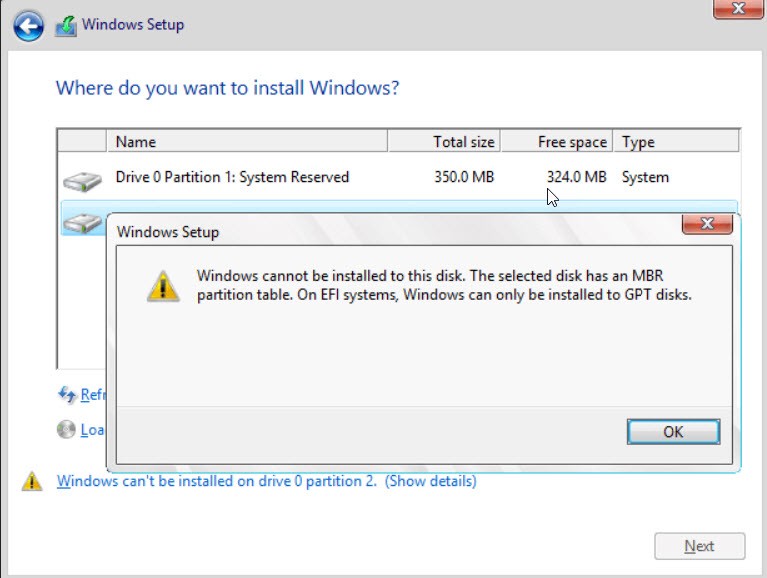
    During Windows 10 installation on your computer, you will see an error called “Windows cannot be installed to this disk. The selected disk has an MBR partition table. On EFI systems, Windows can only be installed to GPT disks”. Or you will see a message “Windows cannot be installed on drive 0 partitions 2. Because of this problem, you can’t move on and complete the Windows 10 installation. Don’t worry, in this article, I will guide you on how to convert MBR to GPT without losing data during Windows 10 installation.

    There are several ways to fix this error during installation. As you can use the command prompt or BIOS system to convert the MBR to GPT or GPT to MBR. But, using this method you might lose your all data because on CMD you need to format your hard drive and this is impossible for you. Besides that, there is a third-party tool that you can convert MBR to GPT without losing data and you will find it in this article.

    Before moving on, let me tell you more about this problem. On the computer, we have two Hard drive partition system like the Legacy system and EFI system. And we have two partition styles like MBR (Master Boot Record) and GPT (GUID Partition Table). So, the Legacy system supports MBR, and EFI supports GPT style. This was the computer partition method. Besides that, we have a file partition system like we make a Pendrive bootable. However, we have two file systems NTFS and FAT32. So, we can say (Legacy system = MBR + NTFS) and (EFI system = GPT + FAT32).

    Hands down, all the problem is with your bootable USB drive because the partition is not matching with the hard drive partition system. Therefore, go and check in which file system you have formatted your Pendrive NTFS or FAT32.  If the bootable USB is formatted in NTFS. Then you cannot install Windows 10 because the Pendrive should be formatted in FAT32 which is equal to GPT.

    To convert MBR to GPT, you can use the command prompt built-in tool or BIOS system. Even you can use third-party software. But, I recommend you to not do any of the options. Simply, format your USB drive in FAT32 and install Windows from the beginning. Afterward, you will not face any kind of problem.

    When do you need to convert MBR to GPT?

    The main reason to convert MBR to GPT is when you attempt to create more than 4 primary partitions on your disk. Sometimes, users convert MBR to GPT because they want to make full use of a disk with more than 2TB of space. The third reason is when you want to install Windows on an EFI/UEFI boot disk. The final and the well-known message error that you see while installing Windows 10 “Windows cannot be installed to this disk. The selected disk has an MBR partition table. On the EFI system, Windows can only be installed to GPT disks”.

    So, this was the reason why you need to convert MBR to GPT. In order to convert it, follow the below methods.

    MBR vs GPT

    This is the comparison of MBR and GPT partition style and you will know which one is better to use.

    Comparison MBR (Master Boot Record) GPT (GUID Partition Table)
    Supported Partition Numbers Maximum 4 partitions. Maximum 128 partitions.
    Supported Disk Capacity 2TB (for 512B sector), 16TB (for 4Kn sector) No disk capacity limit (2^64 logical blocks for 512B or 4Kn sector)
    Supported Boot Mode BIOS UEFI
    Supported OS
    • Windows10/8/7/XP/Vista
    • And Windows Server 2019/2016/2012/2008
    • Windows 10/8/7, Linux
    • Windows Server 2019/2016/2012/2008
    • And Windows XP/Vista (64bit for data only)
    • macOS and modern Mac OS X


    Advantages of GPT disk over MBR disk

    • Faster Boot Speed: GPT UEFI will load the software quicker than the ancient MBR BIOS boot mode.
    • Better software Compatibility: GPT has higher OS compatibility than MBR because it supports most operational systems, as well as Windows Server and macOS.
    • Advanced knowledge Protection: GPT contains the backup of the first GPT header and partition entries that protects data on the disk better.

    Methods to Convert MBR to GPT Disk

    Below are the handy methods that can help you to convert MBR to GPT without losing data during the Windows 10 installation. So, follow one by one.

    1 Method: Convert MBR to GPT using Command Prompt

    You have a bootable USB and trying to install Windows 10/8/7 on your computer. But, on the partition window, you face a problem and get a message written: “Windows cannot be installed to this disk. The selected disk has an MBR partition table. On EFI systems, Windows can only be installed to GPT disks”. To fix this message, restart your computer ad follow the below steps.

    1. Once your computer restarted, press F12 to bring the boot menu.
    2. Here, select the bootable USB and move on.
    3. Now, continue installing Windows 10, and click on Install Windows.
    4. On the activation key window, press Shift + F10 to open the command prompt. Or click on Repair your computer > Troubleshoot > Command Prompt.
    5. On CMD, type Diskpart and press enter.
    6. Type list disk and press enter.
    7. Here, you will see the total list disk of your computer. So, select the disk you want to convert to GPT. Therefore, type select disk (disk No) and press enter.
    8. Type clean and press enter.
    9. Finally, type convert gpt. This command line will convert the MBR to GPT.
    10. Now, type Exit and press enter.

    This method should convert the MBR to GPT and you should not see that message again. I hope this method helped you and fixed the problem.

    2 Method: Convert MBR to GPT via MBR2GPT

    The best and handy Windows 10 built-in utility called MBR2GPT that located in Win\System 32 directory. This MBR2GPT.exe allows you to convert the MBR system disk to the GPT system disk without losing any data. To do that follow the below steps.

    Before applying the below steps, make sure your device supports EFI/UEFI boot mode.

    1. So, press the Windows + R key to open the run dialog box and type CMD, and press OK.
    2. On command prompt, type “mbr2gpt /convert /disk 0 /allowfullos” and press enter.
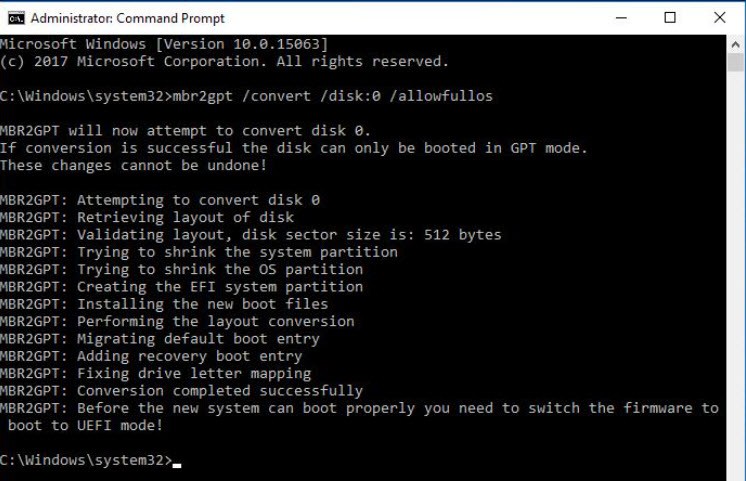
    Convert MBR to GPT without Losing Data during Windows 10 Installation?
    Convert MBR to GPT via MBR2GPT Tool

    With help of this method, you can easily convert MBR to GPT.

    3 Method: Convert MBR to GPT using Disk Management

    Using the Diskpart or disk management both require to delete all the data stored on the converted disk drive. So, before applying this method, make sure to have a backup of your all data. You can use free backup software EaseUS Todo that will help you to make a backup of your all files.

    So, back up the files that are stored on the MBR disk that you want to convert it to GPT. After that, delete all the partitions or volumes if the disk has. Then, right-click the MBR disk that you are going to convert to a GPT disk and click on Convert to a GPT disk.
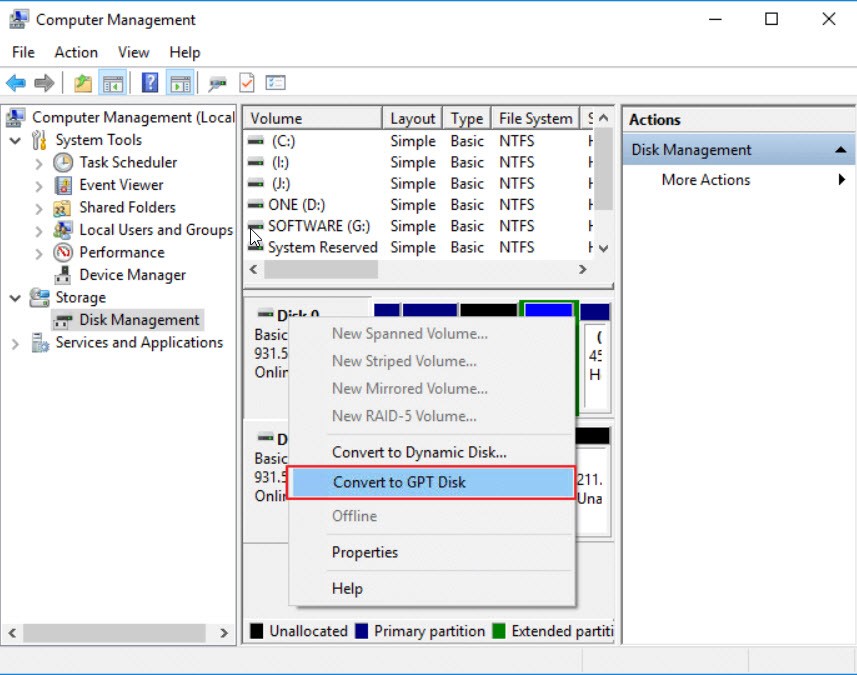
    Convert MBR to GPT using Disk Management
    Convert MBR to GPT using Disk Management

    After all, close the disk management when the process is done. Now, you can create new partitions or install a new operating system on the disk.

    4 Method: Convert MBR to GPT during Windows 10 Installation

    While during the Windows 10 installation after you created a partition. Then, you will see a message such as “Windows cannot be installed to this disk…..”. So, this is a highly recommended message that you should convert MBR to GPT. Otherwise, you can’t complete the Windows 10 installation. So, during the installation, you can make a bootable drive using AOMEI partition Assitant. Therefore, follow the below steps.

    Steps 1: Connect the USB or CD/DVD to another working computer and run the AOMEI partition assistant. After that, click make bootable media in the sidebar.
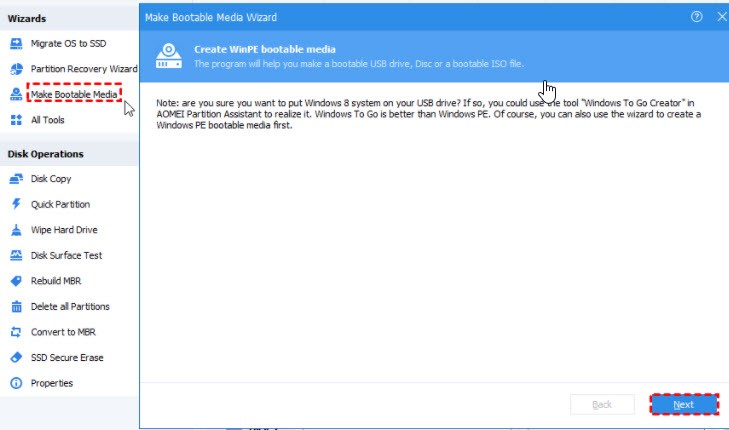
    Convert MBR to GPT without Losing Data during Windows 10 Installation?
    Make Bootable USB

    Step 2: Here, select the USB boot device the way you want to make a bootable USB. Then, click on the Process.
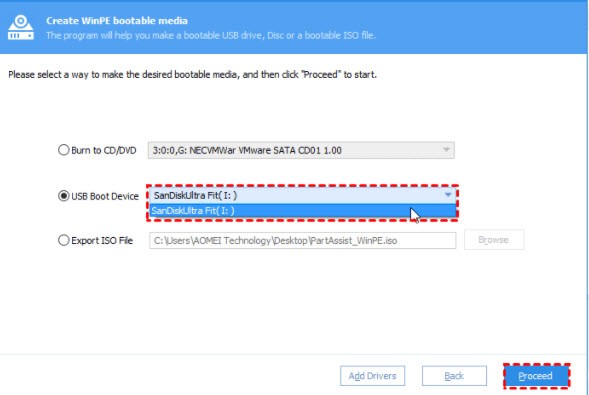
    Select Boot Device Option
    Select Boot Device Option

    Step 3: Once it is done then click on the Finish button.

    Step 4: Again connect the bootable USB to the computer you are installing the Windows on. So, start your computer and go to the boot menu. Here, boot from the bootable USB and install Windows 10 on your computer.

    Read Next:

    Conclusion

    As I said in the beginning, this problem is because your Pendrive is not formatted as FAT32. So, I recommend you to format your USB and select FAT32 during the process. After that, restart your computer and continue installing Windows 10. In this case, you will not face those problems again.

    Finally, there were the best methods to convert MBR to GPT without losing data during the Windows 10 installation. So, I hope this article helped you a lot.
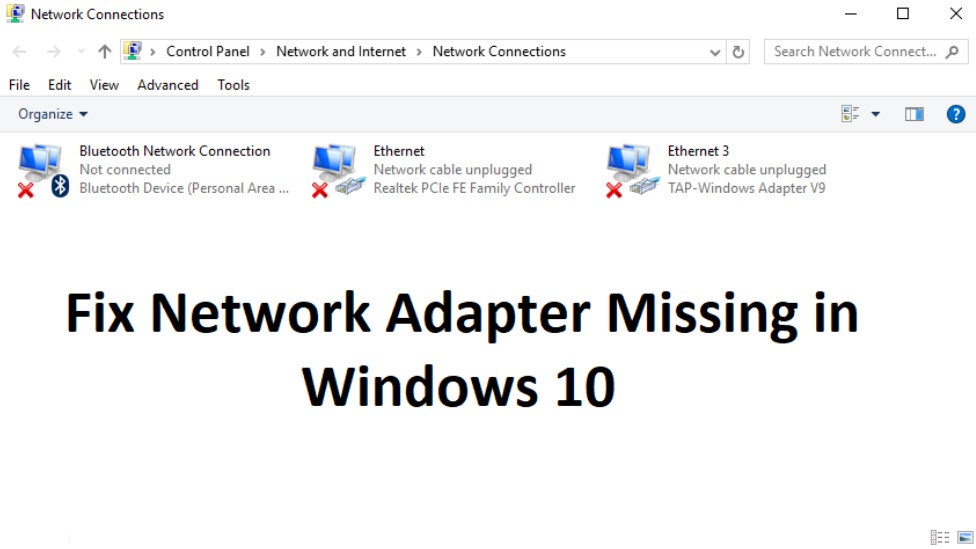
  • How To Fix Network Adapter Missing In Windows 10? {Solved}

    How To Fix Network Adapter Missing In Windows 10? {Solved}

    A network Adapter is one of the important parts of an operating system whether Windows, Mac, Linus, or other OS. This is an internet/network that you can access other servers. Though you are reading my article, it is only because of the internet. So, a network adapter is an essential device in your system that help you to send and receive data on both wired and wireless network. No matter you have a wired or wireless network (people call it Wifi). If your Windows 10 is missing the network adapter whether under the device manager or on the system tray. Then, there will not be any device listed in order to connect to the internet.

    If the network adapter is missing under the device manager or not detected on your Windows 10 PC. You don’t need to worry because in this article I will show you the 8 ways to fix the network adapter missing in Windows 10 PC.

    You are not the only user who has such a serious issue. There are legions of Windows users that are asking how to fix the network adapter missing in Windows 10 PC. There are several reasons behind the Network Adapter missing issue and they are listed below.

    • Network adapter missing in Device manager
    • No Network Adapters showing in Device Manager
    • Network Adapter Not Detected
    • Network Adapter Not Found Windows 10
    • No Network Adapter In Device Manager

    Our research says, the main reason behind the missing network adapter in Windows 10 is the outdated/older network card driver installed on your PC. Or you have upgraded to the latest version of Windows 10 and the network adapter driver cannot support the latest Windows 10 version. There are several ways to fix the missing issues.

    If your computer is facing the issue for the first time then reboot your computer and check if you can discover the network adapter on your PC.

    Note: If you are using an Ethernet cable plugged into your PC. Then, unplug the Ethernet cable and plug it again. Now check if you can find the network adapter on your Windows 10.

    Several Ways to Fix network Adapter Missing in Windows 10

    Before going to follow the below steps in order to fix the network adapter missing in Windows 10. You have to restore or backup your data just in case something goes wrong.

    Now follow each method one by one and check the network adapter after each method you applied. If one method not worked for you then try the second one.

    Method 1: Reboot your Windows 10 PC

    The essential point to fix any kind of issues with certain software or other parts of your PC. Is to reboot your computer, this way will refresh the software and can fix several issues.

    Therefore, go to Start Menu or press the Windows key. After that, click on the Power Button and click on the restart option. Or you can use the shortcut key to restart your computer and the shortcut key is Alt + F4 and select the restart option.

    Method 2: Update Network Adapter Driver

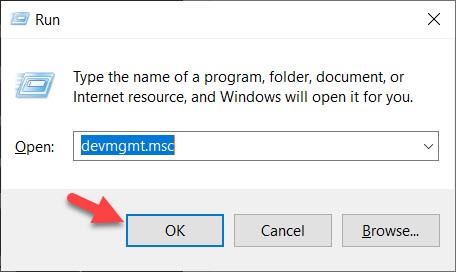
    Press the Win + X key and click on Device Manager, Or press Win + R and type “devmgmt.msc” in the Run dialog box to open device manager.

    How to Fix Network Adapter Missing in Windows 10
    Open Device Manager

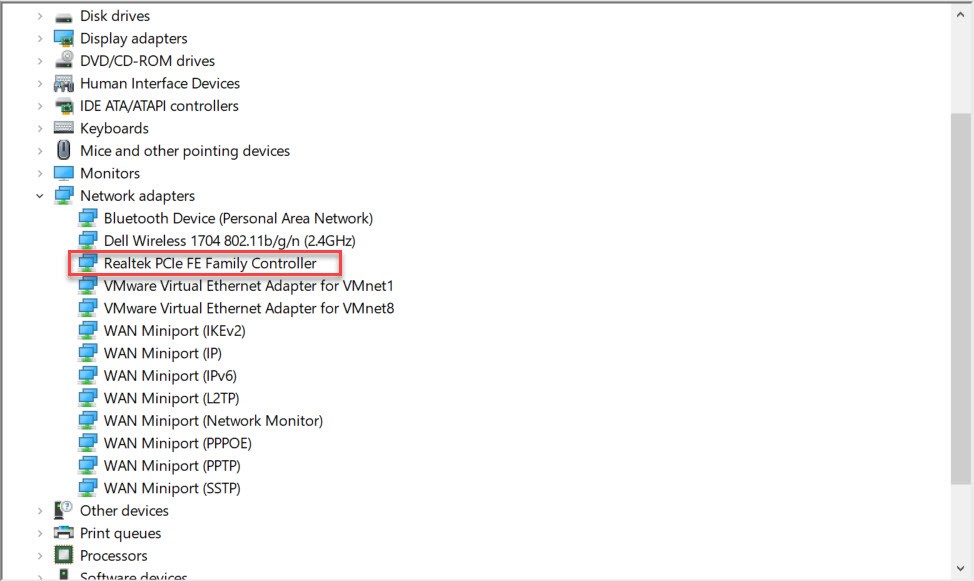
    Now, Expand Network Adapters and select your Windows 10 Wifi Controller and Right-Click on it. Then, Click on Update Driver Software.

    How to Update Network Adapter Driver on Windows 10
    Update Network Adapter Driver

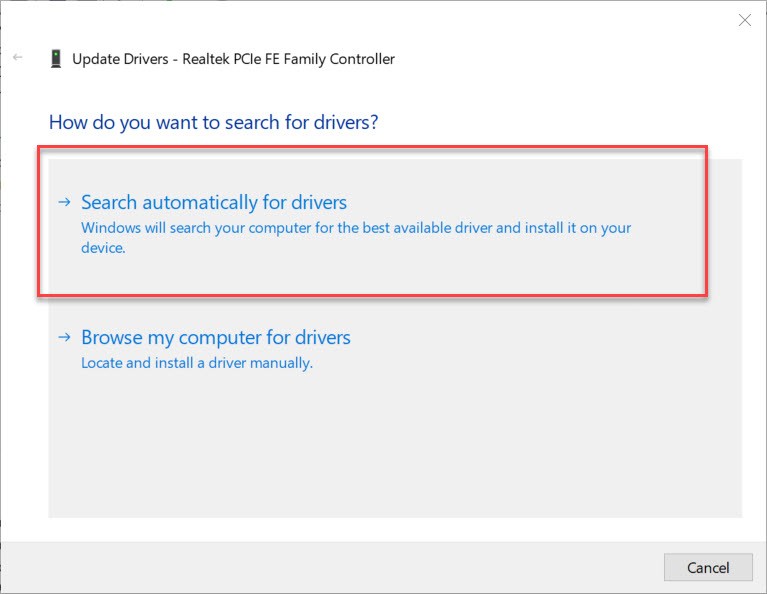
    Here, you have two options to update the network adapter driver. And I recommend you to click on the first option to search updates automatically for drivers.

    Search Automatically for Driver Updates
    Search Automatically for Driver Updates

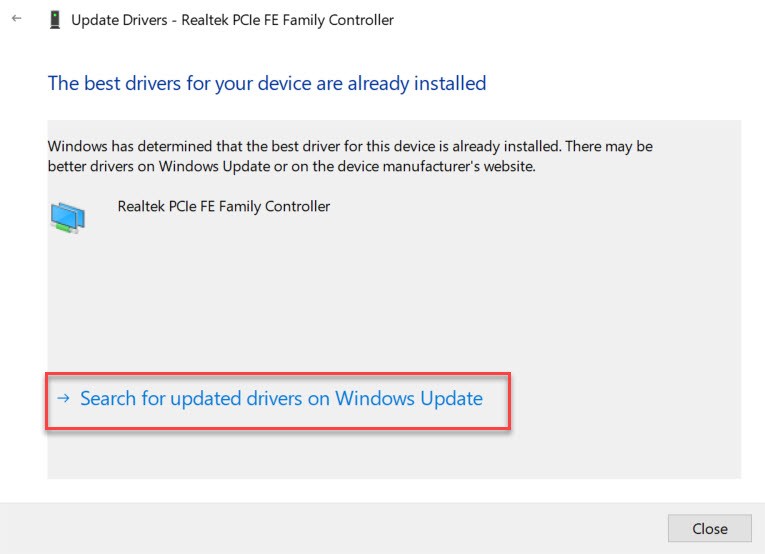
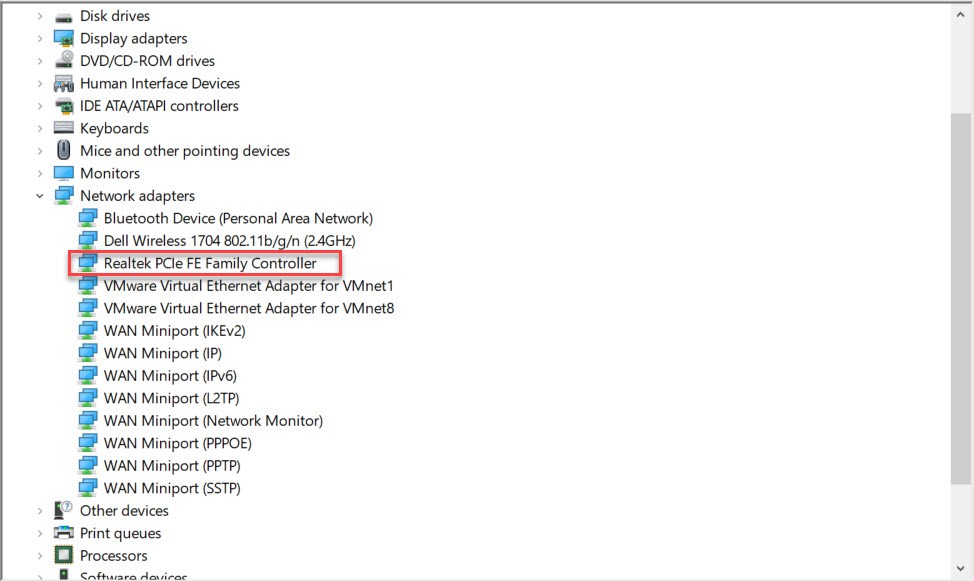
    Here, you will see the best drivers for your device are already installed. But you can check any updates on Windows update Window.

    How to Fix Network Adapter Missing in Windows 10
    Search for Updates

    Method 3: uninstall Network Adapter Driver

    Press the Win + X key and click on Device Manager, Or press Win + R and type “devmgmt.msc” in the Run dialog box to open device manager.

    How to Fix Network Adapter Missing in Windows 10
    Open Device Manager

    On Device Manager Window, Expand network adapter and find your network name. Make sure, you have selected the correct one.

    Uninstall Network Adapter on Windows 10
    Uninstall Network Adapter

    Now, Right-Click on your Network name and Click on Uninstall.

    Here, you will be asked for uninstalling confirmation. Select yes.

    After all, restart your Windows 10 PC and your Windows will install the network adapter automatically. In case the driver is not installed automatically. Then, go to the device manager and from the top menu click on Action and click on Scan for hardware changes.

    Method 4: Run Network Adapter Troubleshoot

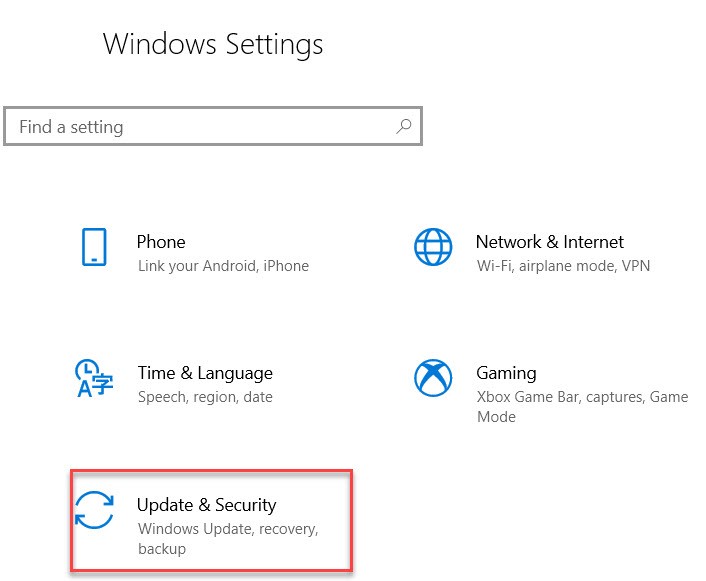
    Press the Win + I key to open Windows Settings and click on Update and Security.

    Here, click on the Troubleshoot option from the sidebar.

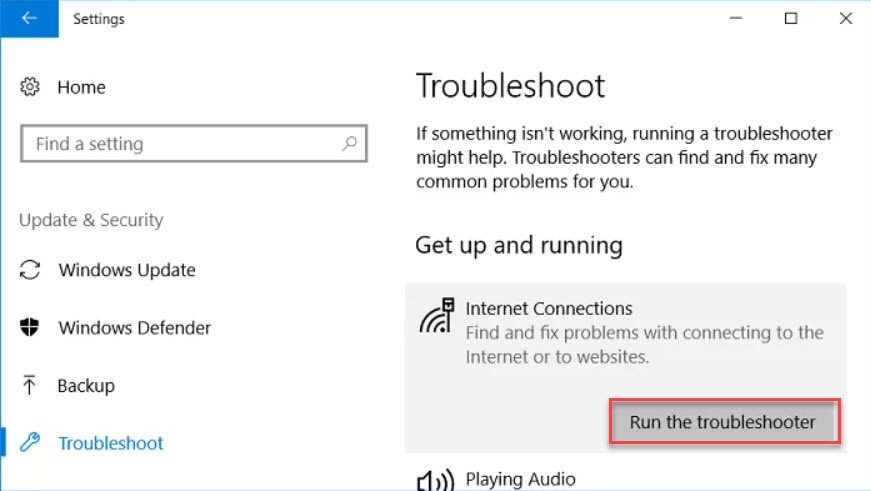
    If your Windows 10 PC has a network adapter issue, then, you will see an error under the Troubleshoot. So, click on Internet Connections and click on Run the troubleshooter.

    How to Fix Missing network Adapter on Windows
    Internet Connection Troubleshooting

    Now follow the on-screen instruction to complete the troubleshooter.

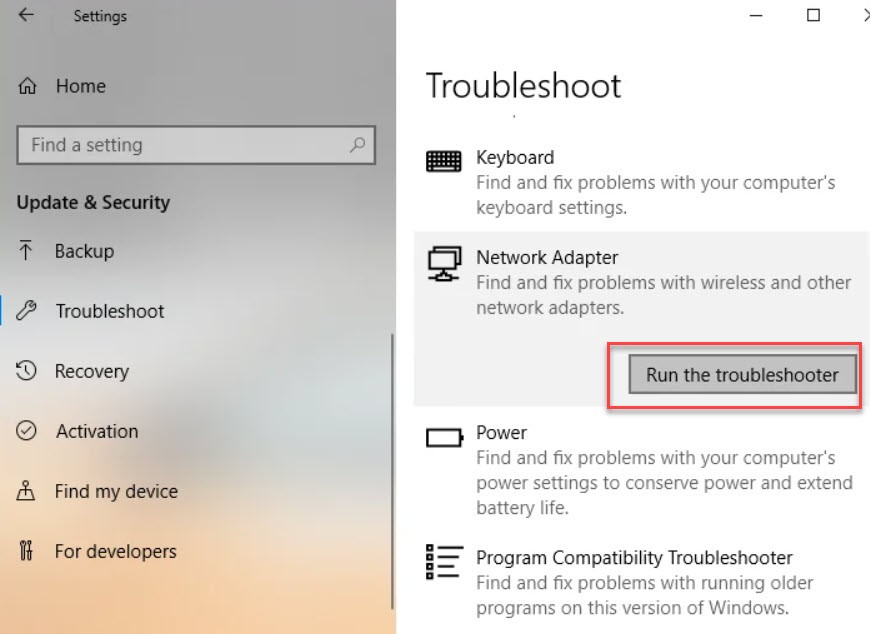
    In case, the above one did not work then from the troubleshoot window click on Network Adapter and click on Run the troubleshooter.

    Fix Network Adapter Issues on Windows
    Network Adapter Troubleshoot

    Finally, restart your PC to save all changes and come back to see if the problem is fixed or no.

    Method 5: Update your Windows 10

    One of the best way is to fix the missing network adapter in Windows 10 is to update your Windows 10 operating system. Make sure, your operating system is up-to-date.

    Press Win + I to open Windows settings and click on update and Security.

    Update your Windows 10
    Update Windows

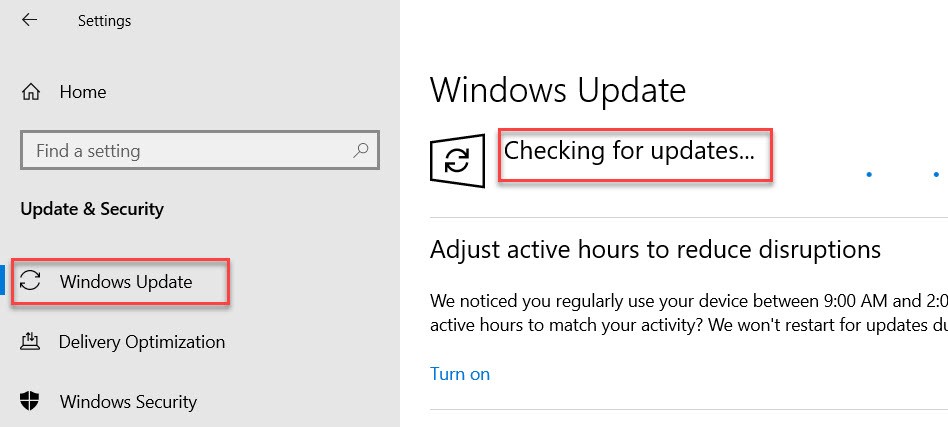
    Click on Windows Update from the sidebar.

    Now, click the Check for Updates to check if any update is available or no.

    Check for Windows 10 updates
    Check for Windows 10 updates

    In case the new update is available on your Windows, Then, download and install the update.

    Download and Install Windows 10 update
    Download and Install Windows 10 update

    After that, restart your computer to save all changes.

    Method 6: Cleanup Network Drivers

    • Press Windows + R key to bring out the run window.
    • Now, type cmd and press Ctrl+Shift+Enter key to open cmd as administrator. Or go to the Start menu and search for cmd. After it appears click on run as administrator.
    • In cmd, type netcfg -d and press enter. This will clean the network devices and will solve the network adapter missing on Windows.
    • Now restart your computer and come back to check if the problem is fixed or no.

    Method 7: Reset Winsock from CMD

    • Press Windows + R to open the Run dialog box.
    • After that, type cmd and press Ctrl+Shift+Enter to run cmd as administrator.
    • In the command prompt, type netsh Winsock reset and press enter.
    • Close cmd and restart your computer.

    Afterward, check your computer if it discovers the network adapter missing.

    Method 8: Enable Network Driver

    Sometimes, it can happen that your network driver is disabled, and because of that, you can’t connect to the internet. Therefore, to fix and enable the network drivers, follow the below steps.

    • Press Windows + X key and click on Device manager.
    • On Device Manager, under network adapter right-click on your network driver and click on Enable driver.

    This step can help you to connect your windows to the internet.

    Read Next:

    Conclusion

    These were the best methods to fix the network adapter missing on Windows 10. I hope this article helped you to fix your network adapter missing. In case, you have any questions and confusion. Let us know in the comment section.

  • How to Fix Missing Screen Resolution on Windows 10?

    How to Fix Missing Screen Resolution on Windows 10?

    You might purchase a new monitor and everything looks stretched. Though your monitor screen resolution is 1920 x 1080. But, there is no way to set the exact screen resolution. This problem occurs when you update your system to Windows 10. In some cases, you face such a problem because you bought a new monitor. In any case, you need to fix your Windows 10 screen resolution.

    You are not the only user who complained, there are legions of Windows users that have updated their system and have such a problem. However, my research says, if your graphics card work at 1920 x 1080. Then, everything will be fine and you can easily fix it. If your graphics card doesn’t work, then, there is not a windows 10 problem.

    Now, you have to search and find out if your graphics card work or no. If it works, then install a windows 10 graphics driver for your card. Or, update your graphics card which I will guide you in this article. So, let’s fix the missing screen resolution on Windows 10.

    How to fix missing screen resolution on Windows 10?

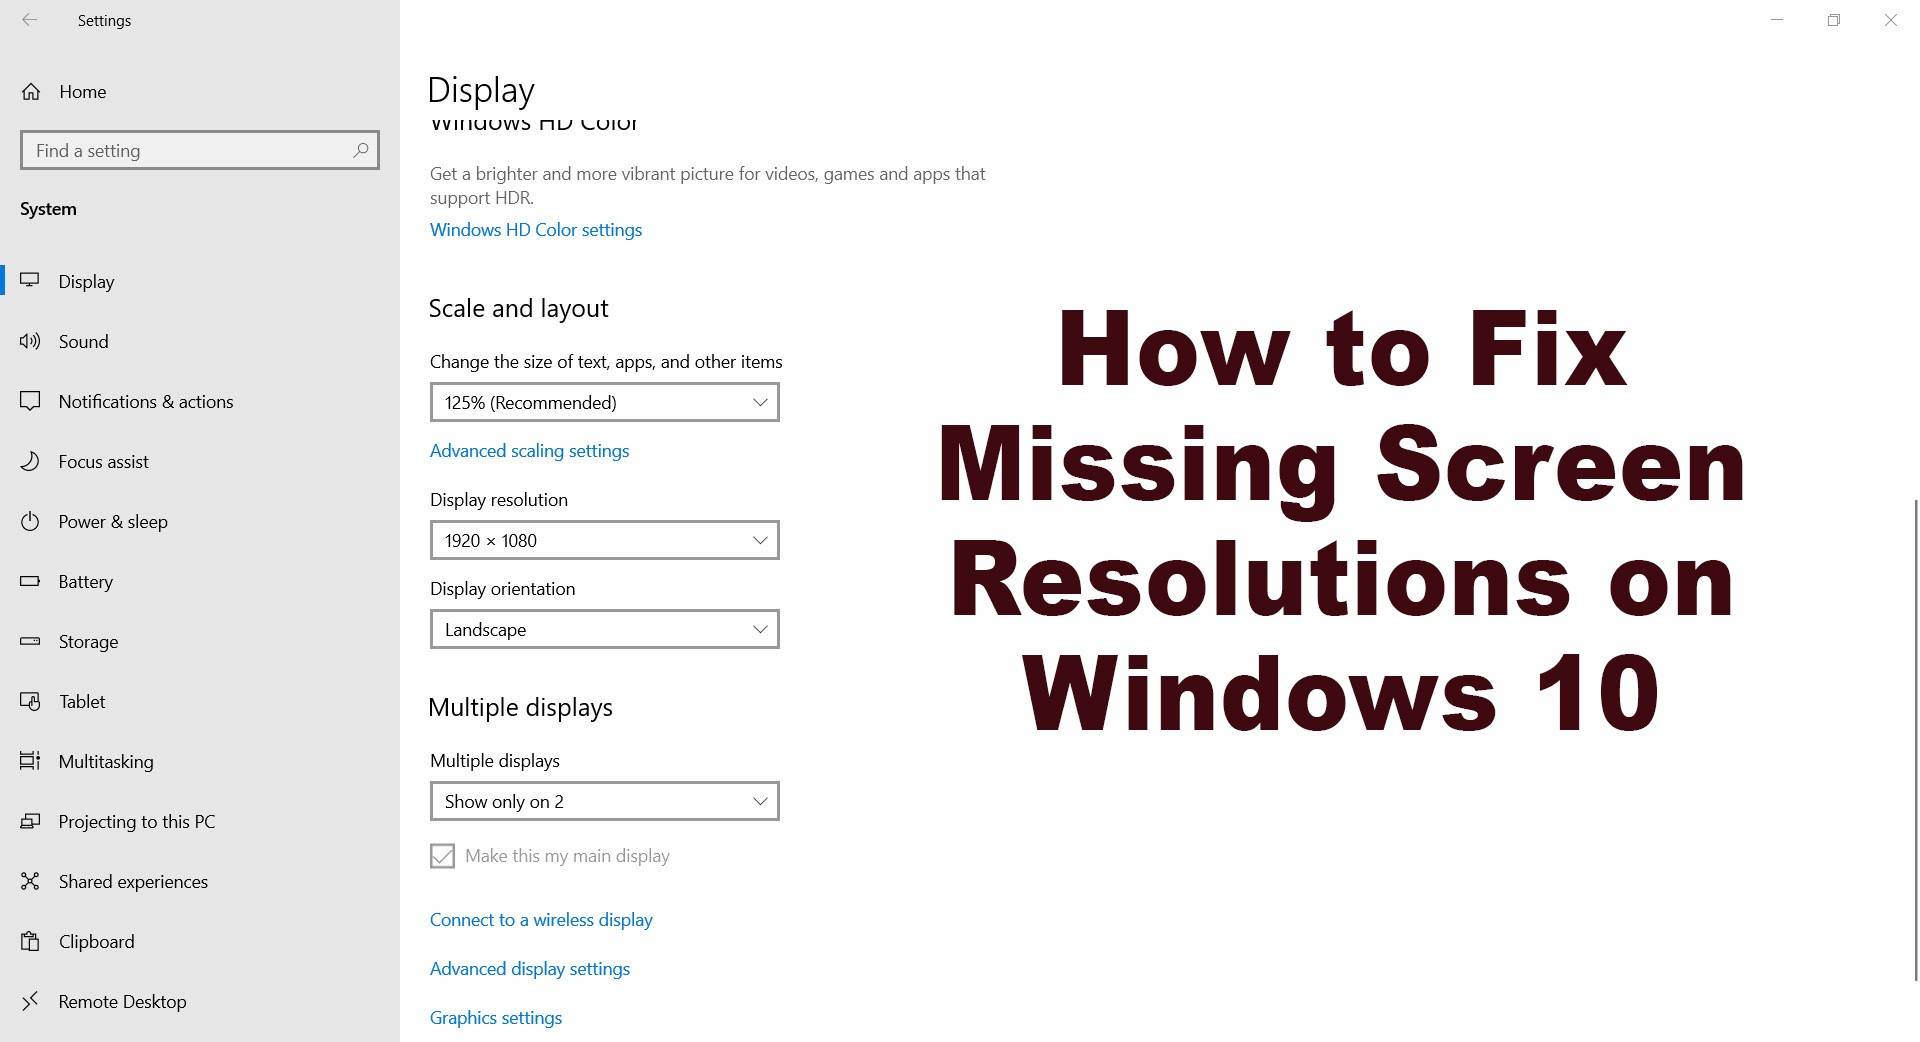
    My problem was with missing screen resolution, though my graphics card supports 1920 x 1080. But, the issue is I can’t find the advance screen resolution like 1920 x 1080 or other pixels. You have noticed, every monitor has its own screen resolution pixels and Windows will choose the recommended ones. Later on, you can change the default screen resolution on your Windows 10.  So, below are the steps on how to fix the missing screen resolution on Windows 10.

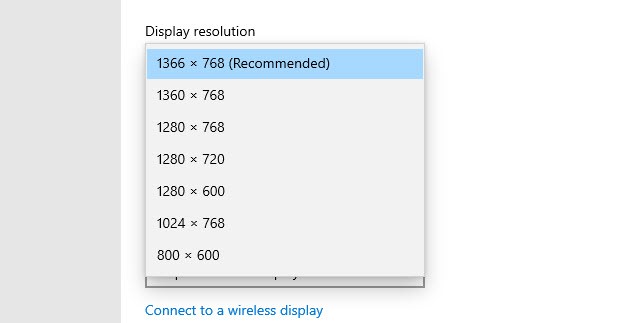
    You can see the recommended display resolution which is for laptop screens. But my monitor is ViewSonic LED and I need to change the screen resolution in order to see everything fine.

    How to fix missing screen resolution on Windows 10
    Windows 10 Display Resolutions

    To do that, press Windows Key + X and click on Device Manager.  Or go to Start Menu and search for Device Manager and open it.

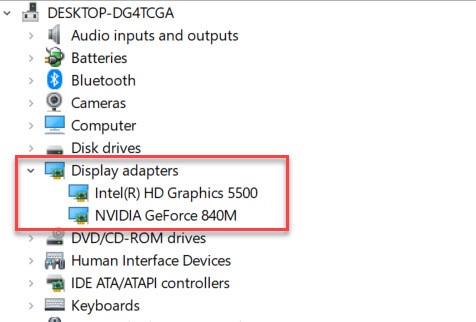
    On Device Manager, Extend Display Adapters.

    Windows 10 Display Adapters
    Windows 10 Display Adapters

    Now, right-click on the graphics card, and update the drivers.

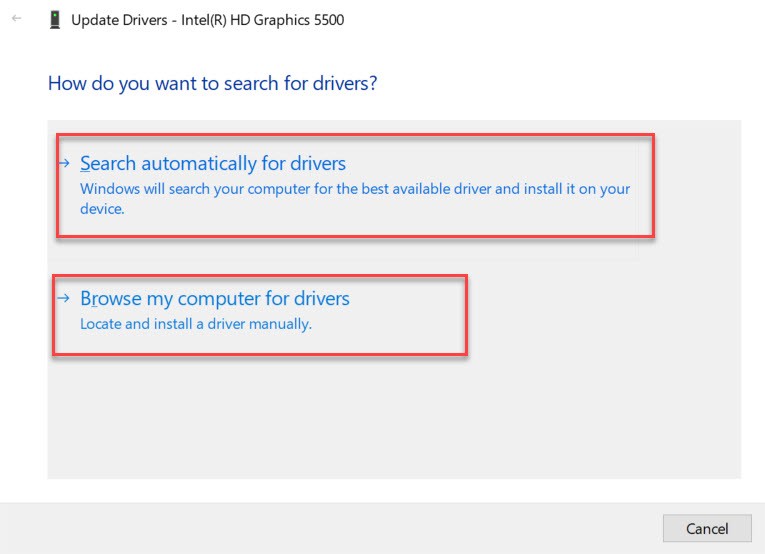
    Here, you will see two options to update the drivers. The first option “Windows will search your computer for the best available driver and install it on your device”. And the second option ” It will browse your computer for drivers”. So, I recommend you select the first option and click on it.

    Update Graphics Card driver
    Update Graphics Card driver

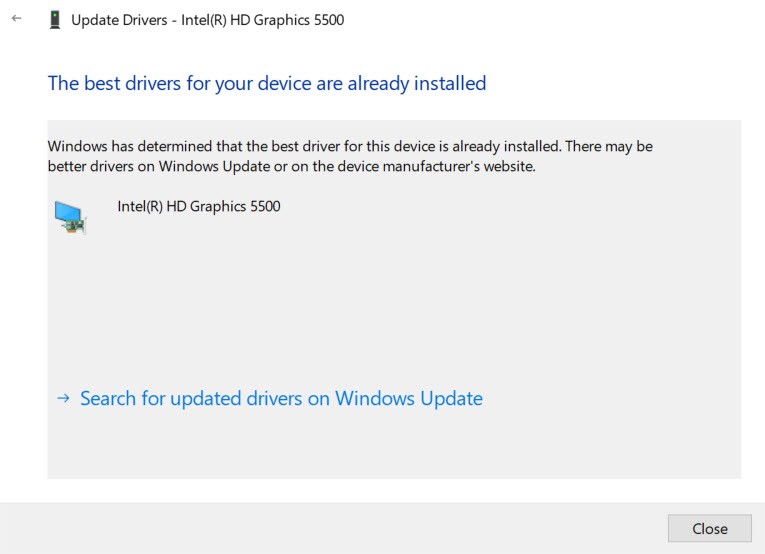
    If the driver is updated then you will see the below screenshot and it will find the updated drivers on your Windows update. Therefore, click on the Search for an updated driver on Windows Update.

    How to fix missing screen resolution on Windows 10
    The best Driver is Updated on your PC

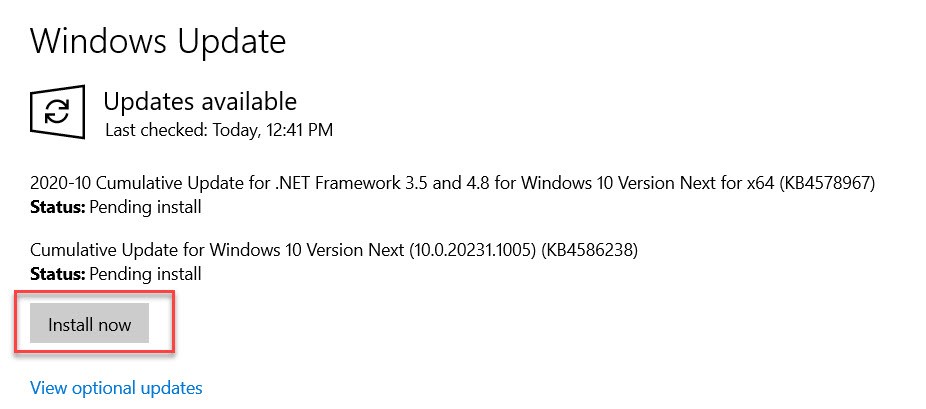
    Once you click on the link then you will be redirected to the Windows update window. Here you will see the driver update. Simply click on Install Now.

    Install Driver Updates on Windows 10
    Install Driver updates

    So, you have updated your Windows driver. Now, go and check the display resolution. Whether it is fixed or no. Let’s do it together.

    Change the Screen resolution on Windows 10

    You have updated your Windows 10 graphics card driver and now you should see the missing screen resolutions. Therefore, follow the below steps to fix the screen resolution.

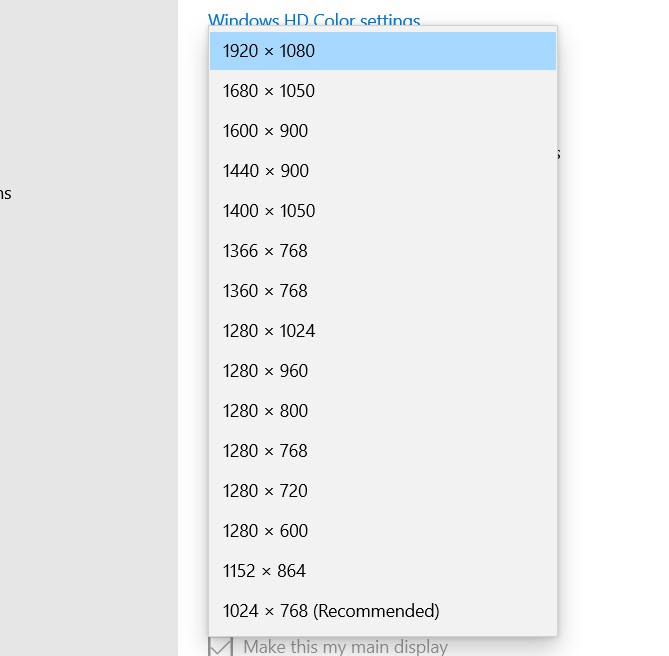
    Go to Display Settings and scroll down to display resolution. Here you can see the missing screen resolution on your Windows 10.  So, select the best screen resolution for your Windows and click on Keep changes.

    Missing Screen Resolution Fixed
    Missing Screen Resolution

    Read Next:

    Conclusion

    Screen resolution is one of the important features and options in Windows 10 or other operating systems. If your OS screen resolution is fixed then everything will be stretched. Therefore, follow this article and fix the missing screen resolution, and set the exact resolution for your PC.

  • How To Fix AMD Driver Crashing on Windows 10 PC?

    How To Fix AMD Driver Crashing on Windows 10 PC?

    AMD and NVIDIA are some of the popular graphic cards for Windows computers. Whoever, install, or use the Windows operating system, they mostly prefer to install the AMD or NVIDIA GPUs on their system. However, AMD is most recommended by millions of users. Though AMD is an American company that develops computers connected with technologies. In this case, The marketable products of an American company are the AMD graphic card. Even so, the company develops amazing products, but sometimes there are some issues with the developed items.

    Today that all Windows users have complained about AMD driver issues is only because of the new and updated version of the AMD graphic card. AMD is updated to 15.7.1 version a few days ago, this version has several errors that Windows users are looking for its solution. However, some users face “AMD driver crash black screen issues”, “AMD driver crash blue screen errors”, and there are more crashes that you will see in this article.

    Gamers, photographers, Videographers, and other users that do graphics need the best graphic cards. In this case, AMD is one of the successful and best GPUs in 2020. Therefore, we will fix the AMD driver crashing on Windows 10 PC together with the help fo the below steps.

    What are the AMD Driver Issues?

    Before going to the solution steps, let’s see what are the AMD driver issues that Windows users faced these days. Hands down, those errors are only because of the new AMD version. It means you can solve the issues by rolling back to the previous AMD version. But, the latest AMD update has several new features and improvements. So why not to use the AMD latest version. Though I will show you how to fix AMD driver crashing on Windows 10 PC. Then, don’t worry about the tiny errors.

    So, below are the AMD driver issues that Windows users complained about. And you can see the reasons why those errors occur in your system.

    • AMD driver crash black screen issues: This issue occurs because of outdated software or operating system version. You can fix this issue by installing the latest AMD driver or software updates.
    • AMD driver crash blue screen errors: BSOD issues are very irritating and often onerous to fix. Unluckily, AMD drivers may cause BSOD issues when they crash.
    • AMD driver crash on Youtube: This issue appears when a user wants to launch Youtube. In this case, the video will stop playing and you will see a black screen appears. Later on, the AMD driver immediately recovers by itself and the video starts playing again. This problem will be for some minutes.
    • AMD driver crashed when playing games: AMD graphic card plays a major role for gamers to play games. But, due to the AMD driver issues, users think its system has problems or it can’t support the game.
    • AMD driver crash during installation: this error occurs when you are trying to install the latest AMD version on your system.

    If you have one of the above issues with your AMD driver on windows 10. Then this article is for you and you will get several ways to fix the AMD driver problems.

    Solution 1: Rollback to previous AMD version

    The AMD driver crashes on Windows because of the latest version 15.7.1. Therefore, downgrade to the AMD previous version.

    • Press the Win key or click to the Win Logo located at the left corner of your screen and open the start menu.
    • Click settings or search for settings and open it.
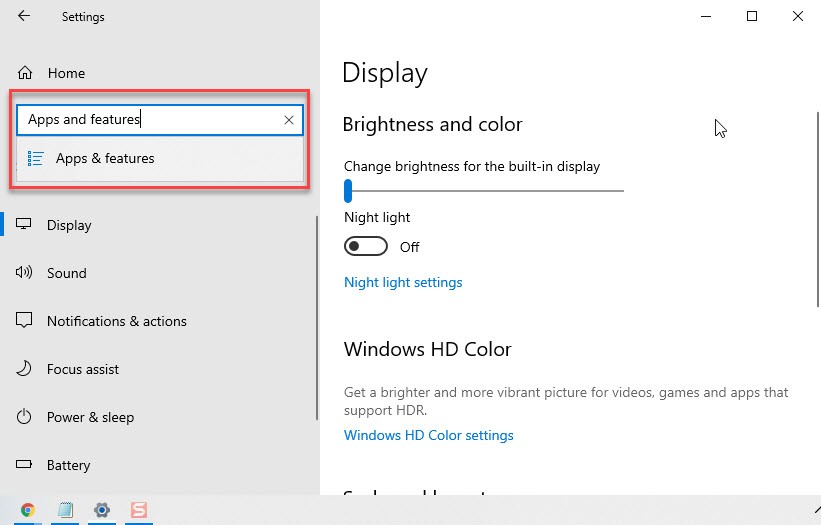
    • Now, go to the system and search for Apps and features and press enter.
    How to Fix AMD Driver Crashing on Windows 10 PC
    Apps and Features
    • In the right panel, find the AMD Catalyst Install manager application and rightclick on it. After that, click on Uninstall.
    • It will ask you to confirm the uninstallation, confirm the uninstalling the AMD and wait for it.
    • Finally, you have uninstalled AMD latest version 15.7.1. Now, go to the AMD official website and download the previous AMD version 15.7.
    • Once the download is has done, extract the files and run the AMD driver installation.
    • Now, right-click on the Win logo or press Win+X and open Device Manager.
    • Here, double-click on Display adapters and expand it.
    • Afterward, right-click on the generic display adapter from your machine and click on Update Driver Software.
    • Click on Browser my computer for driver software, then click on Browse.
    • Now, move it to the directory where the older version of the driver is extracted and click Ok.
    • Finally, the setup wizard locates the drivers in the specified location. So, start the installation of those drivers.
      Once the installation is done then restart your system.

    I hope the first solution fixed your AMD driver crashes on your system. In case, you have the issues then follow the below solutions.

    Solution 2: Reinstall AMD Drivers

    The current update of AMD is 15.7.1 and if you have installed this version and you have issues with AMD drivers. Then, reinstall AMD drivers on your system. This method will fix the issues you have with your AMD drivers. To do that, follow the below steps.

    • Press the Win+X key and click on Device Manager.
    • Now, go to Display Adapters and right-click on your system graphics card and click on Uninstall.
    • Once the uninstalling AMD is done, then go to the AMD official website and download the latest version of AMD drivers.
    • After downloading AMD drivers, run the AMD installation setup and install the AMD drivers on your system.

    Once you installed the AMD drivers on Windows 10 PC, then it is extremely recommended to update the AMD drivers automatically and fix all the driver’s issues.

    So, get the Driver Easy to update the AMD drivers automatically. Doing this, the AMD driver’s crashes will be fixed on your system. If not, then follow the next solution.

    Solution 3: Update AMD Drivers

    The best way to fix the AMD driver crashes issues, is to update your AMD graphics card. In this case, you will get the new update and new features. Plus the updated AMD will have several bug fixes. Therefore, update your AMD drivers, and to do that, follow the below steps.

    • Press Windows key + X and go to Device Manager.
    • Click on Display Adapter and right-click on AMD driver and click on Properties.
    • Here, navigate to the driver and click on Update Driver.
    • Wait for a while to complete the updating driver. After that, restart your system.

    Solution 4: Clean AMD Graphics Card

    One of the best solutions to fix the AMD driver freezing issue on Windows 10 PC is to clean the graphics card of your system. Although, the above methods work 100% and it will fix the issues you have on your machine. If not, then try to follow this solution.

    To clean the graphics card, open your computer case, and remove the graphics card. After that, clean its fan from dust.

    Solution 5: Change TdrDelay Value from Registry Editor

    The TdrDelay value checks how long it takes for your graphics card to respond. If the card does not respond within this time period then Windows 10 will restart the card drivers thus causing a crash. To fix this problem you should try increasing this value.

    • Press the Win + R key to the open the run box and type regedit and press enter.
    • On Register Editor, go to HKEY_LOCAL_MACHINE\SYSTEM\CurrentControlSet\Control\GraphicDrivers from the left sidebar.
    • Right-click anywhere in the right pane, and choose New > DWORD (32-bit) Value or New > QWORD (64-bit) Value depending on the system you use. For 32-bit systems, it’s recommended to use DWORD 32-bit and QWORD 64-bit for 64-bit operating systems.
    • Enter TdrDelay as the name for newly created DWORD and double click it.
    • Set Value data to 8 and Base to Hexadecimal. Click OK to save changes.
    • Close the Registry Editor.
    • Restart your computer.

    After doing this step, now check your AMD drivers or graphics card. Whether you have issues or no.

    Solution 6: Update your Operating System

    Updating your operating system has several good points. Whenever, you update your system whether it is Windows, Mac, or Smartphones. Then, you will see better performance, new features, and several bug fixes. Therefore, make sure you are running the latest update of the Windows 10 operating system.

    To check your system is up-to-date, go to Start menu > Settings > Updates & Security > Windows Update. Here, check for updates. If your system is not up-to-date then update your system and install them.

    Solution 7: Uninstall Web Browser

    Sometimes the errors are caused by your web browsers like Google Chrome and Firefox Mozilla. As some users reported, the AMD driver crashes are because of the web browser and its extensions. So, uninstall the web browsers for some minutes and reinstall it back once the problem is solved. Till that time you can use other web browsers.

    Solution 8: Fix Corrupt System Files

    Your AMD drivers crash on your system because of a missing file system or a corrupt file and this can be the reason. So, you can fix those issues with the help of the SFC / scannow command code.

    • Go to the start menu and search for CMD and open it as an administrator.
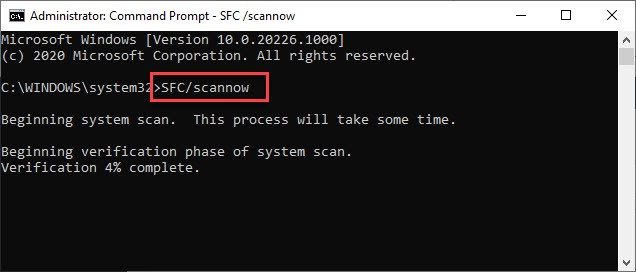
    • Here, type SFC/scannow and press enter.
    • Wait for a while to complete the process and it may take time.
    • Now, restart your system.
    Howto Fix AMD Drivers Freezing on Windows 10
    Fix Corrupt Files

    Read Next:

    Conclusion

    You get many solutions to fix the AMD driver crashing on Windows 10 PC and I told you what can be the reason behind these problems. The 8 solutions are handy and will work to fix your AMD issues. I hope you have fixed your issues and this article was helpful for you. If you have any solution to fix the AMD driver’s crashes, then, let us know in the comment section.

  • How to Clean Temporary Files in Windows 10 Laptop?

    How to Clean Temporary Files in Windows 10 Laptop?

    Hands down, Windows 10 is one of the best operating systems that everyone can handle and use it. You can see Windows 10 for years and find out some tricks on how to use it. As Microsoft owner tweeted, Windows 10 is the last operating system and there won’t be Windows 11 or something else. But, this current operating system will get several updates and features after months. No doubt, everyone can perform their task on Windows 10, though the Mac computer is harder for some users.

    However, you can see temporary files on every device such as Windows OS, Mac OS, Linux OS, Android, iOS, etc. But, these temporary files can be handy for your device to run faster. In some cases, cache files make your system faster and more responsive. But, if you don’t have enough storage space, then it is better to clean Temporary files in Windows 10 Laptop.

    Windows 10 save significant amounts of cache. If your system has enough free storage space and free RAM to work with or a high-performance CPU. Then, you won’t face problems with low storage space, but, this cache can slow down your system performance and you will face certain issues. Therefore, you need to clean Temporary files in Windows 10 Laptop to make your system faster.

    1: Clean Temporary Files in Settings

    There are several methods to clean temporary files, we will cover one by one. In the first method, we are going to use the Windows 10 settings to free up storage space and remove all cache files. Therefore, follow the below steps.

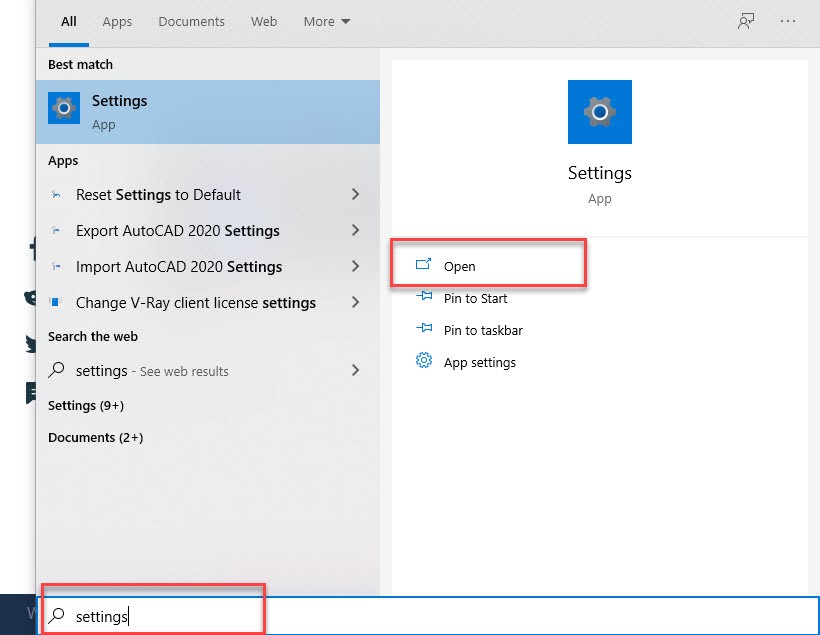
    Step 1: First of all, tap on the Windows Logo located at the left corner of your screen. Or, press the Win Key to open the start menu. After that, search Settings and open it.

    How to Clear Cache on Windows using Settings
    Open Settings

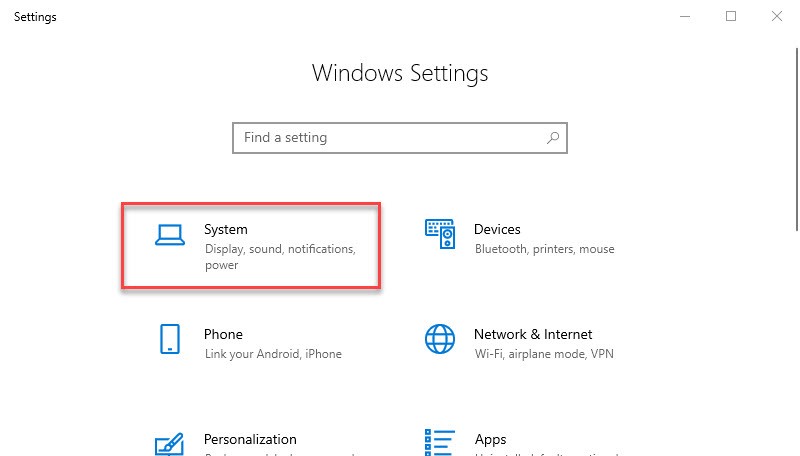
    Step 2: In Windows Settings, you will see various settings options. But, you are going to click on the System option.

    Open System to Clean Temporary Files
    Open System

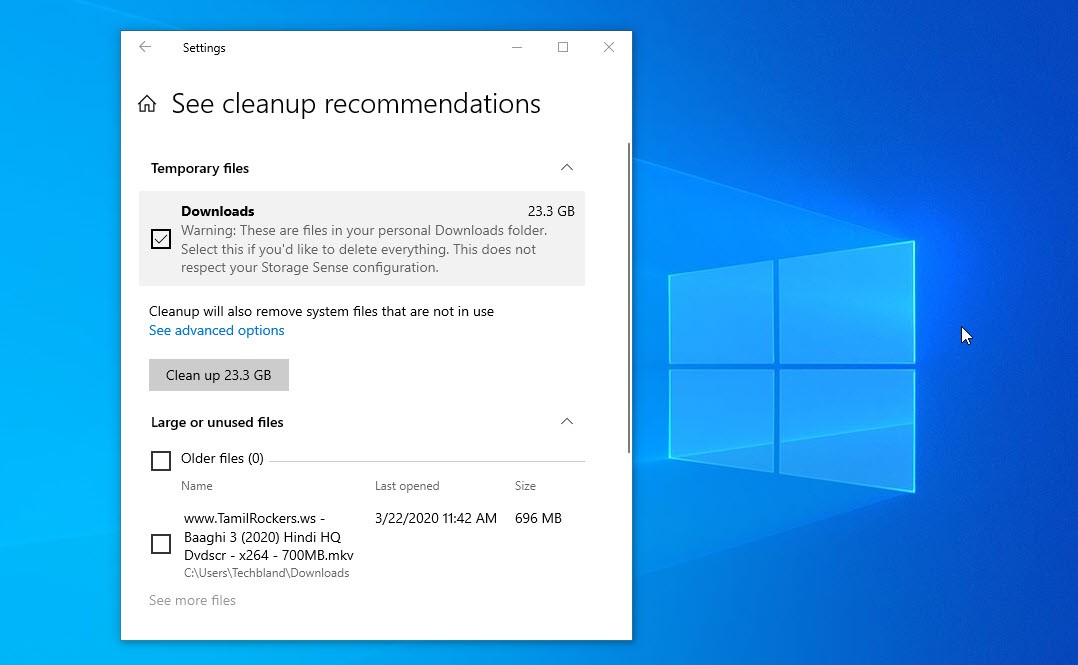
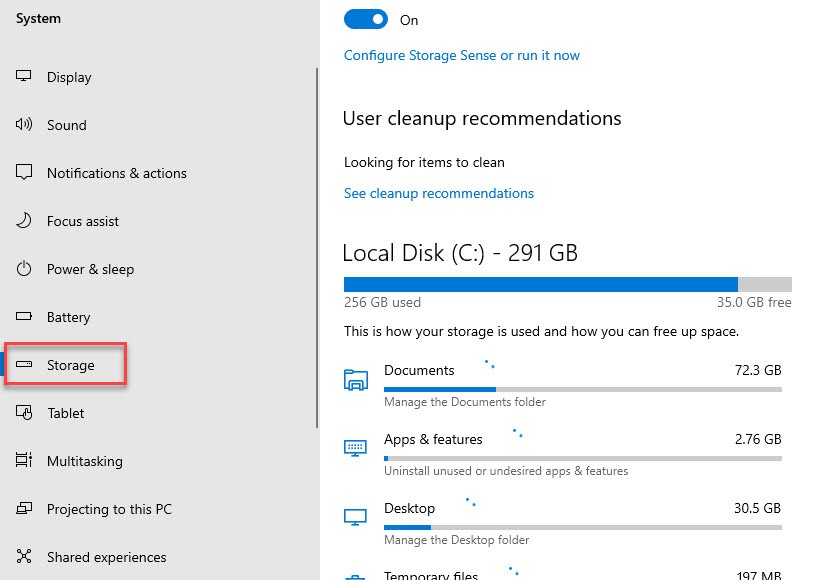
    Step 3: Now, tap on Storage from the left sidebar, Here, it is looking for items to clean. Just wait for a while to find out all the temporary files from your system storage. Afterward, click on See cleanup recommendations.

    How to Clean Temporary Files on Windows 10 Laptop?
    Clean Storage

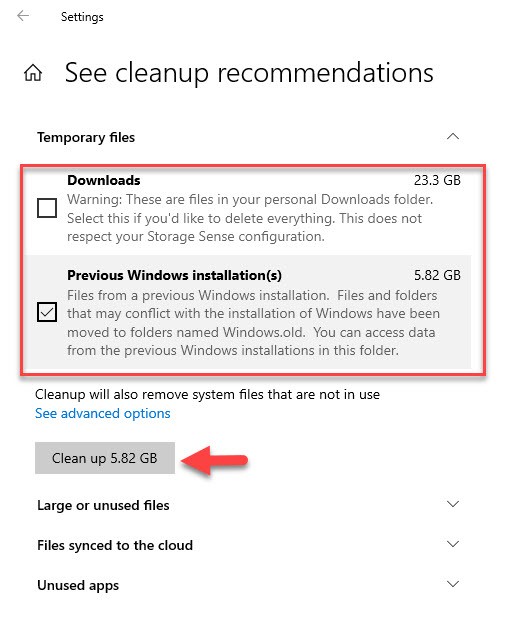
    Step 4: Here, you will see the recommendations files that should be deleted or removed from your system storage. Select the file you want to remove and click on Clean up.

    Cleanup Recommendation Files
    Cleanup Recommendation Files

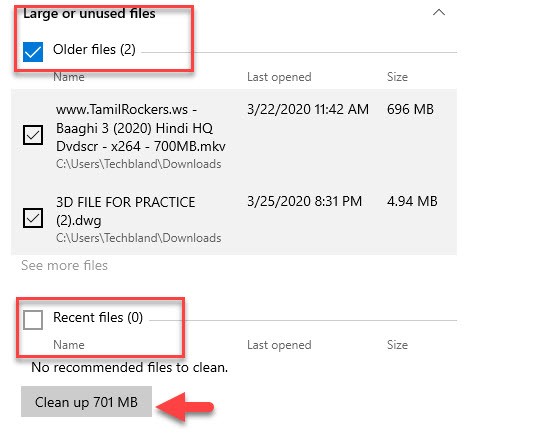
    Step 5: Wait for a while, the recommendations files are cleaning up. Once it is done then check the below files if you want to remove it too. So, select the older files and click the Clean Up.

    Clean Large and Older Files in Windows
    Clean Older Files

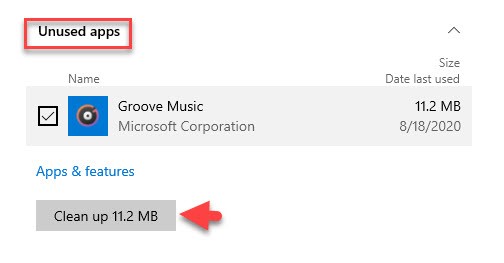
    Step 6: Scroll down and clean the Unused apps from your system.

    How to Clean Teporary Files in Windows 10
    Clean Unused App

    This was the first method that you can clean all the temporary files which are recommended to be deleted. Which this method, you can clean up to +20GB files.

    2: Clean Browser Cache in Windows 10

    The next method is to clear all cache of your web browser in Windows 10. Whether you are using Google Chrome or Firefox Mozilla. But, there are tons of cache created by your web browser when you are searching anythings. To clear the cache of your browser, follow the below steps.

    Step 1: Open your web browser whether Google Chrome, Firefox Mozilla, Opera, etc. As I am using Google Chrome, So, I am going to clear the cache of the Google Chrome web browser.

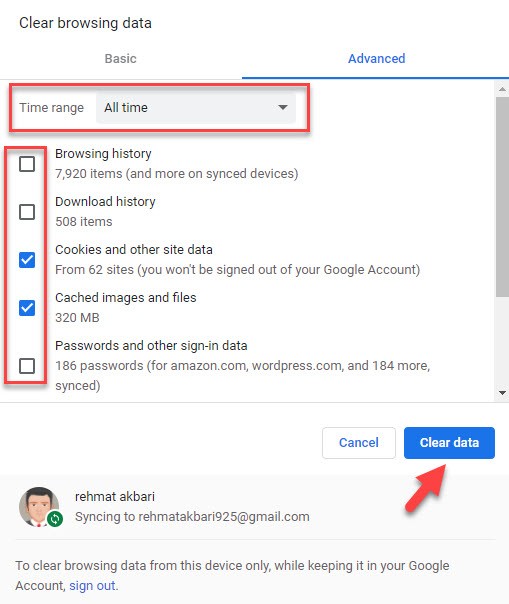
    Step 2: Press the CTRL+SHIFT+DEL key to open the browser cache page. Select All Time and select the options you are going to clear its cache. After that, click on Clear Data. Like this, you can delete the browser cache anytime you want.

    Clear Browser cache in Windows 10
    Clear Browsing Data

    3: Clean Temporary Files using Disk Cleanup

    Here, we will clean temporary files in Windows 10 using Disk Cleanup. To do that, follow the below steps.

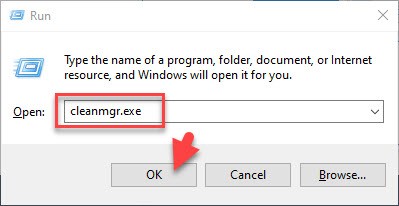
    Step 1: Press Win+R to open the run box and type Cleanmgr.exe and click the Ok button.

    Clear Cache using Disk Cleanup
    Open Run Box

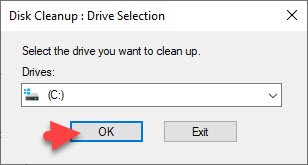
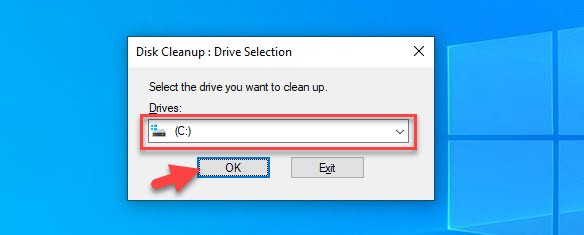
    Step 2: Here, select the disk you want to clean the temporary files. Once you select the disk then click the Ok button.

    Select Disk to Clean Teporary Files
    Select Disk

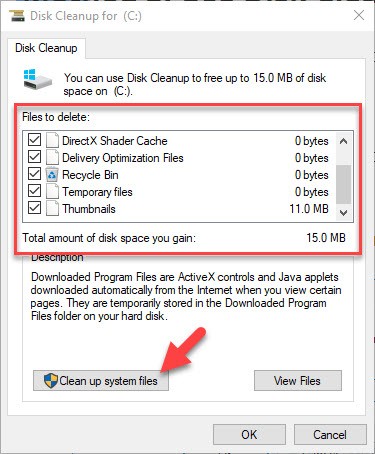
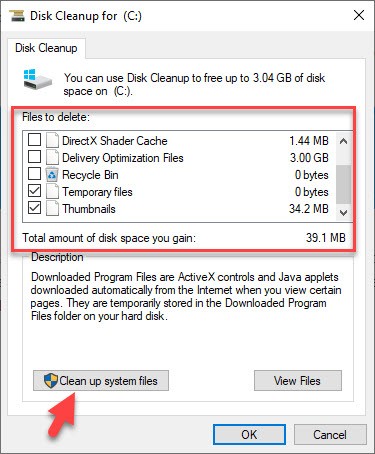
    Step 3: Now, select the files to delete and free up disk space. Once you select the files then click the Cleanup System Files.

    Clean up System Files in Windows 10
    Clean up System Files

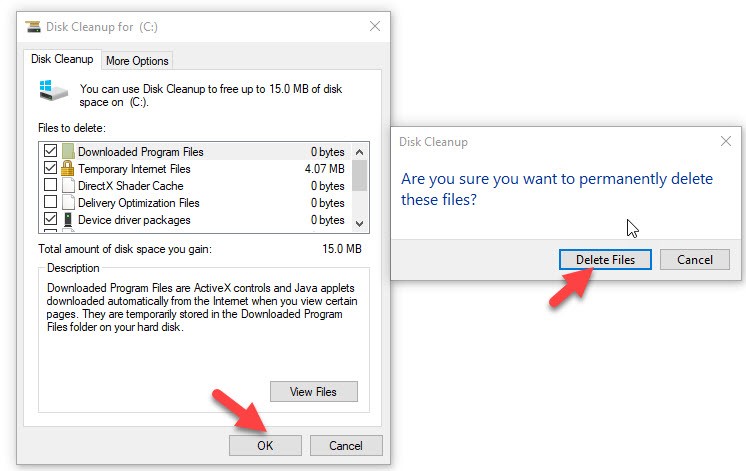
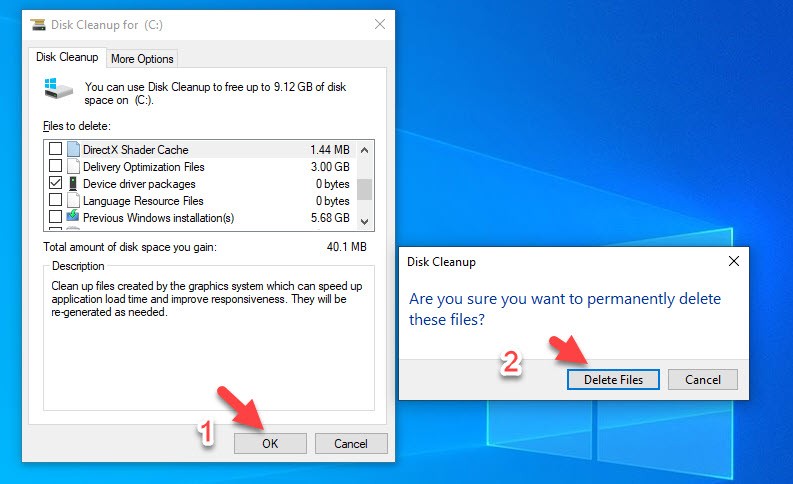
    Step 4: Now, click on the Ok button and you will see a pop-up menu. Here, click the Delete Files to delete all the temporary files. Therefore, wait for a while to clean the temporary files.

    Delete All Temporary Files in Disk CleanUp
    Delete all Files

    4: Clear File Explorer Cache

    To clean Temporary files in File Explorer, open File Explorer or press the Win+E shortcut key to open the file explorer.

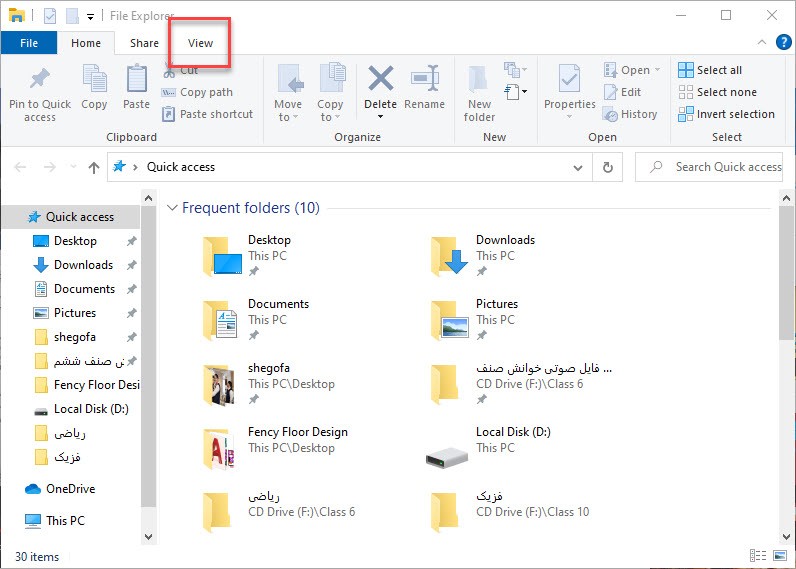
    Step 1: click the view option.

    Open File Explorer on Windows 10
    File Explorer

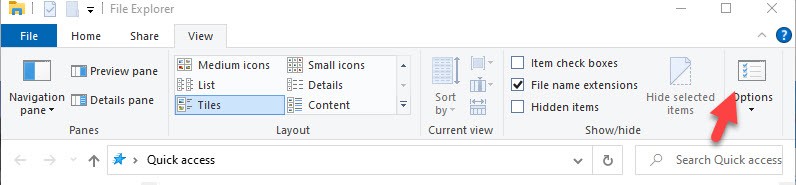
    Step 2: Now, click the Options menu from the right side of the window.

    File Explorer Options
    File Explorer Options

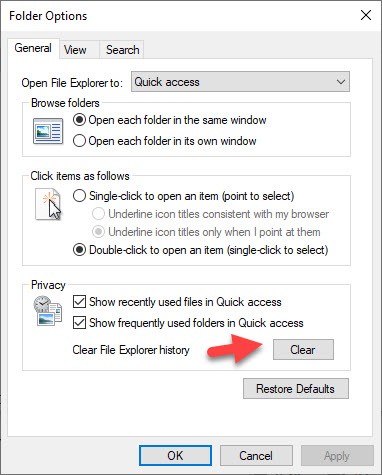
    Step 3: In the General option, click the Clear button to clear all the file explorer cache.

    How to Clear Cache on Windows 10 to speed up computer
    Clear File Explorer Cache

    Read Next:

    Conclusion

    Cleaning the temporary files within a month is the best option to make your PC run faster and perform well. If you face any kind of problems or slow browsing then try to clear all cache in your Windows 10. The above 4 methods will help you to clean temporary files in Windows 10 Laptop. In case, you have any new method where we can clean all cache, Then let us know in the comment section.

  • Systweak Antivirus – The Best Antivirus Software For Windows 10

    Systweak Antivirus – The Best Antivirus Software For Windows 10

    We all are aware of the fact that the digital world is surrounded by malicious threats. This threat poses a security concern for your own data, browsing history, and overall privacy. If you are not collated with antivirus software in your Windows system then you may get attacked by viruses, malware, Trojan, adware, spyware, or other cyber threats. This is why one needs to keep any of the best antivirus software for their Windows 10 PC and save their privacy from getting leaked out.

    You are worried about the safety of your computer and important data. Your computer may be infected with viruses, which can steal your personal information, or even worse. Use the best antivirus software to scan your computer for viruses, and remove any that it finds.

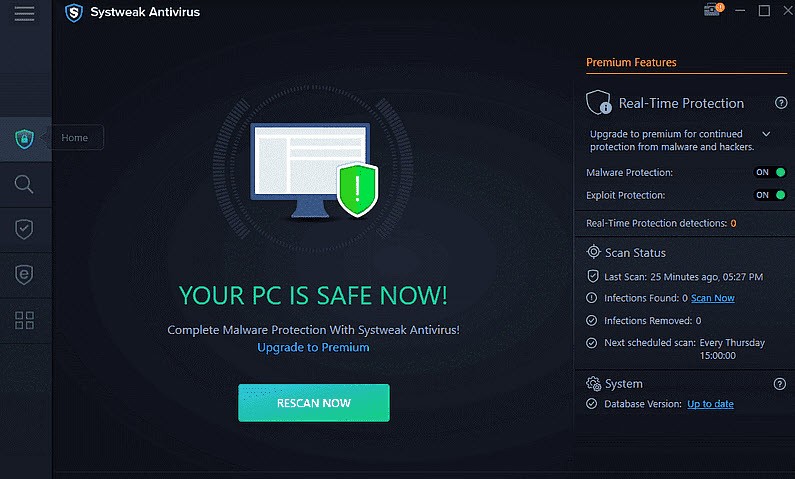
    Thankfully, Systweak Antivirus was developed after year-long research which is capable of offering real-time protection to your system. Moreover, one can easily browse through the web without being afraid of downloading malicious files that hamper the overall performance of the system. It even maintains the protection shield for 24/7 and 365 days, acting as a one-stop solution for complete protection.

    Systweak Antivirus- The Best Antivirus Software For Windows
    Download Systweak Antivirus

    Features Of Systweak Antivirus 

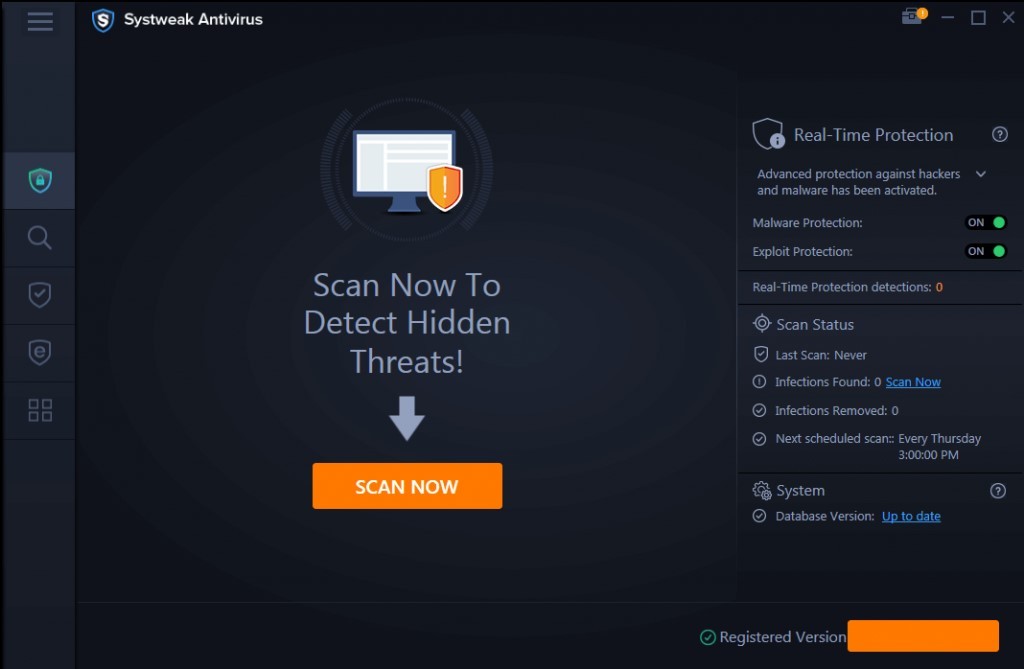
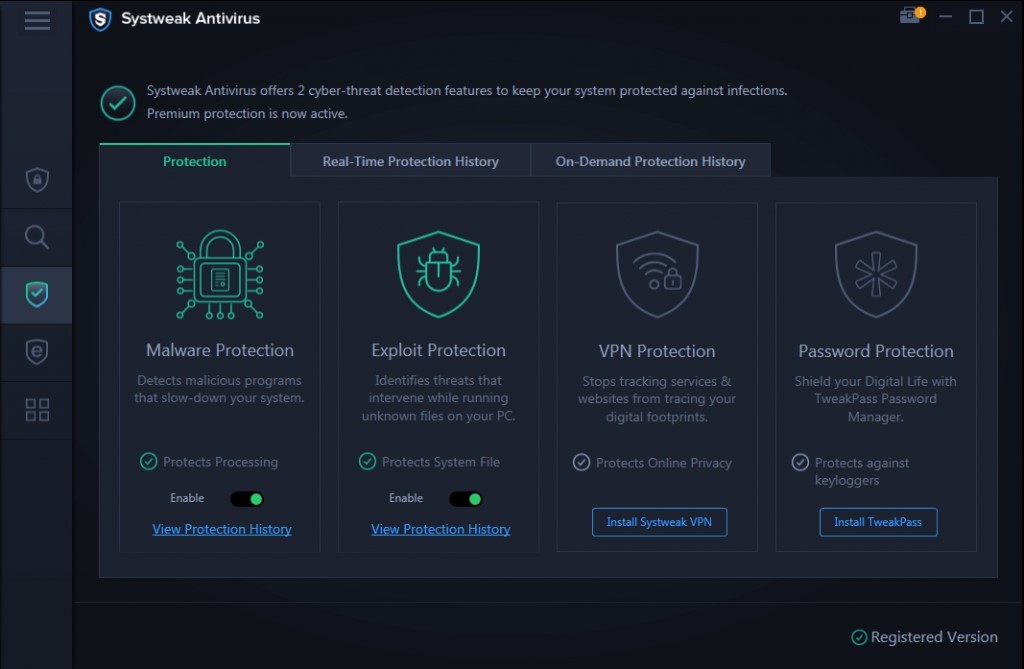
    • Real-Time Protection: The best and foremost feature of Systweak Antivirus is real-time protection to the system. It literally means that any threat is detected before entering into the system and removed right there so that no damage could be done. The antivirus engine of this tool keeps an eye constantly over the system checking threats.
    • Background Running: Systweak Antivirus automatically runs in the background of your computer when you are working and makes sure that your workflow is not hindered by any means. While it runs, it makes sure that all the actions are deeply analyzed for maximum safety.
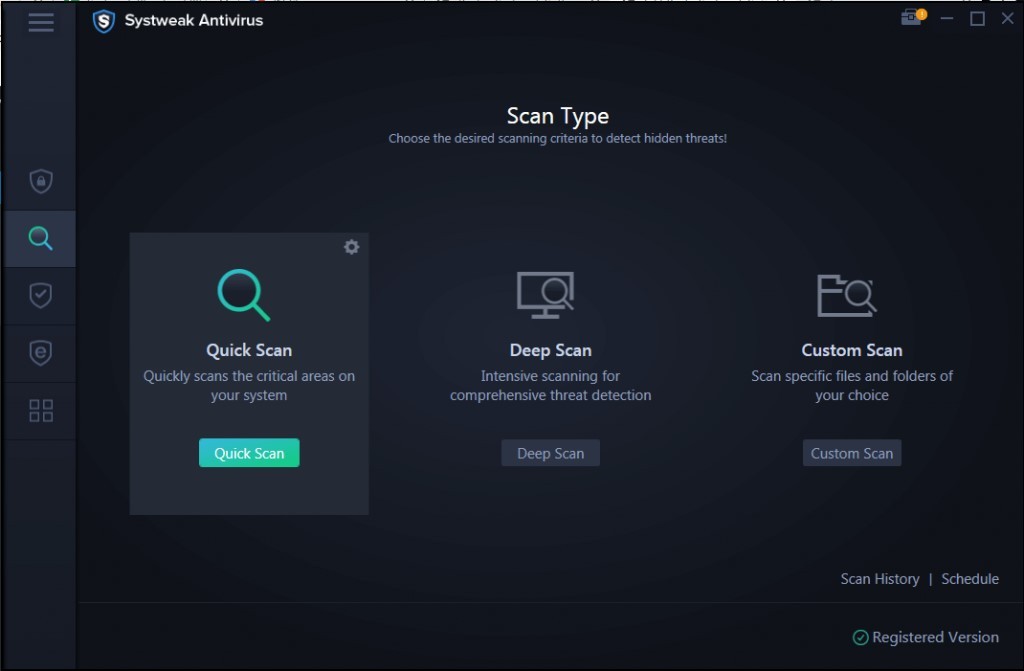
    • Different Scanning Modes: Systweak Antivirus offers you three different modes of scanning the system as per person convenience and maximum protection. Quick Scan goes in the most vulnerable areas of the computer and finds out the sign of threat. Deep Scan makes sure that it scans every nook and corner of the computer and may even take time longer than usual. In the case of Custom Scan, you are free to choose a particular drive or folder for scanning.
    • Improves System’s Performance: Although Systweak Antivirus is not an optimization tool, it doesn’t mean there is no input for the same. By not letting any malware into the system and allowing you to browse the web securely, the system performance remains much faster, making it the best antivirus software.
    • Exploit Protection: Any PUPs that may make way into your system during an unknown file run could easily be blocked by the feature of Exploit Protection. With that, Systweak Antivirus ensures that users can check the startup items which are malicious in nature and slows down the system boot.
    Systweak Antivirus Features for Windows 10
    Systweak Antivirus Feature
    • Always Working: Unlike other antivirus applications, this affordable antivirus software. Makes sure that it runs smoothly for 24*7 and is not exited from the system’s tray by any means.
    • Lightweight: In a world where we are totally dependent on a number of applications that make the system heavy, a lightweight antivirus is no less than a blessing. Systweak Antivirus is not just the best anti-spyware software but also is light on resources.

    How To Use Systweak Antivirus On Windows 10 PC?

    In order to use Systweak Antivirus on your Windows computer, follow these steps mentioned below:

    Step 1: Download and install Systweak Antivirus on your computer by clicking the link.

    Step 2: Run the file once it has been downloaded and the app will automatically launch.

    Step 3: As you land on the interface, click on the magnifying glass icon and you can choose the mode of scanning.

    The Best Antivirus Software For Windows
    Quick Scan your PC

    Step 4: Once you select the scan mode from three different options, the process will automatically start. So that all the threats could be removed.

    Step 5: Now, relax as the process goes on and gets over. Now you can minimize the interface and let your workflow easily.

    Systweak Antivirus Specifications:

    Country Of Development: India

    Size: 21 MB

    Windows Version: Windows 7,8,8.1 and 10

    Parent Company: Systweak Software Private Limited

    Trial: 30 days

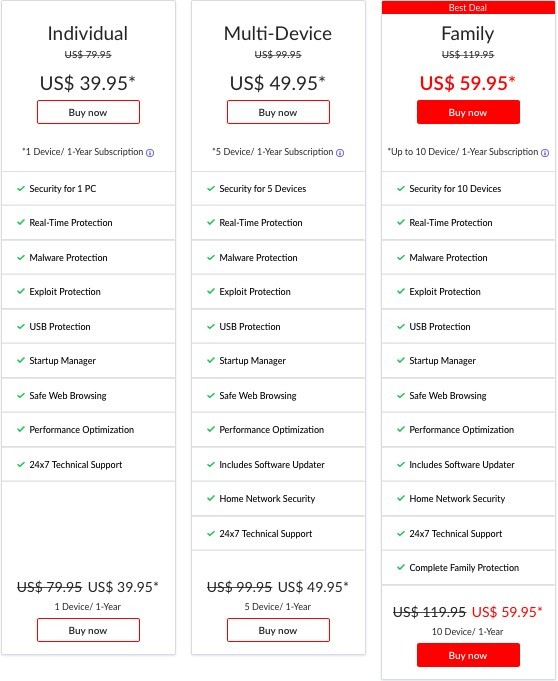
    Cost: Starting from $39.95


    Price List

    Systweak Antivirus Premium Price List
    Systweak Antivirus Price List

    As you can see in the price list above, Systweak Antivirus comes in three slabs. The first individual slab allows 1 device to enjoy the fruits of the product. Whereas the second slab lets, you try your hands on multiple devices (5 devices) at a time. In case of the best deal or Family deal, 10 devices could be easily using Systweak Antivirus with all the additional supports like family protection, home network security, software update, etc.

    When you compare the prices of this best antivirus software with its competitors. You will find that all the best possible characteristics are available at the lowest possible price. Rest, real-time protection, Startup manager, malware protection, USB protection, safe web browsing and Exploit protection.

    Read Next:

    Conclusion

    When you have the option to choose the best antivirus software for your Windows 10 or maybe the best anti-spyware software. You definitely don’t want to try out other options. Moreover, if you don’t want to trust the product in one single go. Then you have a month period to decide whether you wish to stick with it or not. But we assure you that you will be super excited to notice the speed of scanning, performance boost, secured browsing, and attractive interface

    Moreover, scanning out the system deeply is something that every person wants to go with. No one certainly wants any traces of virus or malware stuck in the system for further issues. Plus, the super-strong engine of the antivirus is simply mind-blowing. This is the reason we have called Systweak Antivirus as the best antivirus software for Windows 10 PC.

  • How to Convert MP4 to WAV Quickly on Windows 10 PC?

    How to Convert MP4 to WAV Quickly on Windows 10 PC?

    MP4 is regarded as the most popular file format in the world for storing video, audio, image, and other files. And WAV is an excellent audio format for TV, radio, and DVD. Although the compatibility of MP4 is much higher than other multimedia formats, it is a lossy file format. With the same compression ratio and encoder, WAV files have better output quality. Therefore, if you want to convert MP4 audio files to other audio formats for enjoyment on the go, WAV is a good choice for you.

    There are different methods to convert MP4 to WAV. Maybe some users will turn to online converters. Most of them do not charge any fees, but they only support online conversions that require a stable network connection and vulnerable to hacker attacks. So we recommend that you choose a desktop program to convert MP4 to WAV, they do not require a network connection and are very secure.

    WonderFox HD Video Converter Factory Pro is a trusted and professional conversion program for Windows users, helping you to convert MP4 files to WAV at lightning speed without any quality loss. Moreover, you don’t have to worry about being unfamiliar with it and not using it. It is designed with a clean and intuitive interface allowing you to download videos, convert videos, edit videos, and more in simple steps.

    Why choose WonderFox HD Video Converter Factory Pro?

    WonderFox HD Video Converter Factory Pro provides a one-stop solution for converting MP4 to WAV, the following are its highlights that make it unique.

    • Convert the video from SD to HD.
    • Add subtitle to video.
    • Download popular videos from Vidio, Vimeo, YouTube, Liveleak, Hulu, Dailymotion, Facebook, and much more.
    • Convert video and audio to 500+ formats and devices like MKV, VOB, MOV, WAV, MPG, MP4, AVI, 3GP, M4V, MTS, phone, TV, desktop, laptop, tablet, handset, etc.
    • Extract audio from video files.
    • Record the screen with sound.
    • Convert video and picture into GIF.
    • No need to download and install additional programs to edit your video files, the converter acts as a basic editor to help you add special effects, merge, cut, clip, crop, watermark, trim, rotate, etc.
    • Download and convert videos in batch mode, up to 10 can be processed at a time.

    How to convert MP4 to WAV Quickly on Windows 10 using WonderFox HD Video Converter Factory Pro?

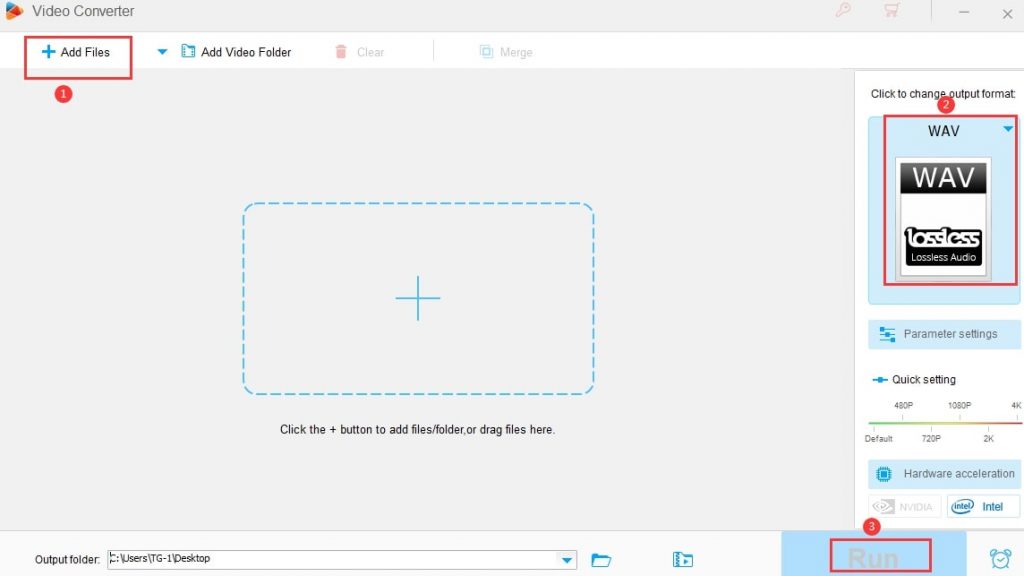
    Step 1: Run the converter and enter “Converter” from the main interface, then click “Add Files” to load your MP4 file into the program to be converted.

    Step 2: Click on the right side of the software interface to find a hidden format list. There are more than 500 output formats and devices for you to choose from. WAV under the “Audio” tab is our target format.

    Step 3: Click the “Run” button to start converting MP4 to WAV.

    How to Convert MP4 to WAV Quickly?
    Video Converter

    Pros

    • Easy to use.
    • Comes with a multilingual interface, English, Japanese, French, etc.
    • Fast speed will not cause any loss to the output format.
    • Multiple gadgets in one.

    Cons

    • Windows version only.

    Read Next:

    Conclusion

    WAV is a lossless audio format and provides high-quality output. Converting MP4 to WAV can facilitate you to listen to high-quality audio files on the go. WonderFox HD Video Converter Factory Pro will be one of the best programs to provide you with safe and professional conversion services.

    It supports more than 500 output formats and up to 50 times the conversion speed, allowing you to get high-definition output files in the shortest time. Not only that but its additional features such as downloading videos, editing videos, splitting screens, creating ringtones and GIFs, etc. will make your digital life colorful. Download the software now and share your views with us below.

    Moreover, if you any questions regarding how to convert MP4 to WAV quickly on Windows 10 PC. Then, feel free to ask us in the comment section below.

  • How to Clear Cache on Windows 10 to Speed Up Computer?

    How to Clear Cache on Windows 10 to Speed Up Computer?

    You are not the only Windows user that facing slow performance with your computer. However, legions of users are curious to find solutions on how to clear the cache on Windows 10 to speed up its computer. Although, Microsoft recommends you to clear your Windows 10 cache to help your PC run faster and it will help you to employ more of your hard drive storage space for applications, games, and certain files. So, the cache is a set of temporary files held by Windows 10 application, software, or the OS itself. In case, if your cache increase over time, it can slow down your PC performance.

    You can find the temporary files in the Disk Cleanup program located in the File Explorer menu options in Windows. Windows 10 mostly uses temporary files that can help to make future requests or to help the operating system function. However, the Cache is data that stored on your Windows 10 computer that can help to make further requests for that data faster.

    There may be times cache gets corrupted or is not functioning efficiently. So, it is highly recommended to clear out the cache periodically to free up space on your drives, Troubleshoot issues on your PC, and improve overall the system performance.

    In this article, I will show you several ways to clear the cache on your Windows 10 to improve performance. Therefore, pay attention and follow the instructions one by one.

    How to Clear Cache on Windows 10 to Speed Up Computer?

    If you notice your Windows 10 PC is running slower than normal or you think your PC is not performing well. Then, you have to apply the below methods to clear the cache to speed up your computer.

    Clear Cache using Disk Cleanup

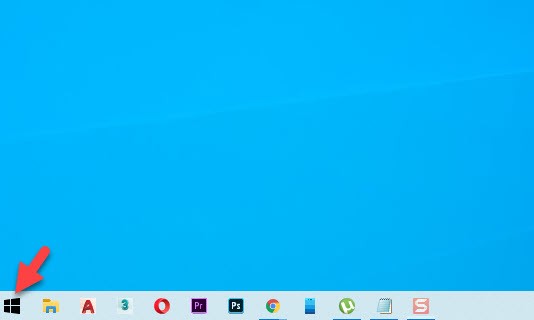
    The common cache every user knows is about temporary files and you can clear temporary cache files using disk Cleanup. Therefore, press the Win key or click the Win icon located at the left corner of the screen.

    How to clear cache on Windows 10 to speed up computer
    Open Window

    Here, search for Disk Cleanup and press the Enter key to open the Disk Cleanup utility.

    On Drive selection, make sure you have selected the C Drive of the operating system and click on the Ok button.

    Select Drive to Clear Cache
    Select Drive

    Now you will see several files with different names. So, you need to scroll down and select the Temporary files. Besides that, you can select other files that take space on C drive. Once you are done then click on Clean Up System Files and click on the Ok button.

    How to Clear Cache on Windows 10
    Clean-Up System Files

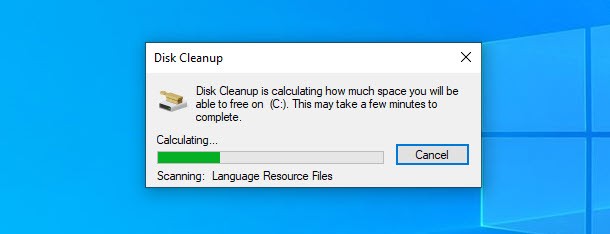
    Here Disk Cleanup is calculating how much space you will be able to free on C drive. Simple wait for a while to complete the process.

    Windows 10 Clean Up Cache
    Clean Disk Calculating

    Now click on the Ok button and click on Delete Files, it will delete the temporary files and free up to 9.12GB of Disk space on C.

    How to Delete Temporary Files on Windows
    Disk Cleanup for C Drive

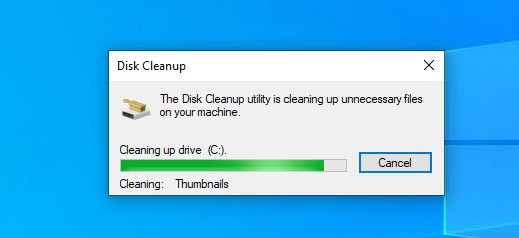
    The Disk Cleanup utility is cleaning up unnecessary files on your machine. wait for a while and the process will be done. So, this is the first method to clear the cache on Windows 10.

    Disk CleanUp is clearing Cache on Windows
    Disk Cleanup Utility

    Microsoft Store Cache

    If you are facing issues with downloading or installing an application from Microsoft Store or Windows Store. On the other hand, if the store app is not launching itself. Then, you need to clear and reset the cache to fix the issues, don’t worry, it won’t delete any of your installed apps.

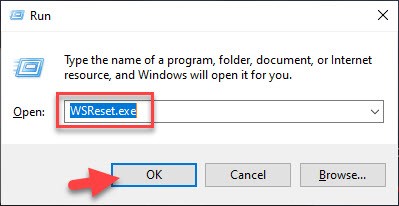
    If the store app is open, close it, and press Win+R to open the command prompt. Type WSReset.exe and press the Enter key or click the OK button.

    Microsoft Store Clear Cache on Windows 10
    Run WSReset.exe

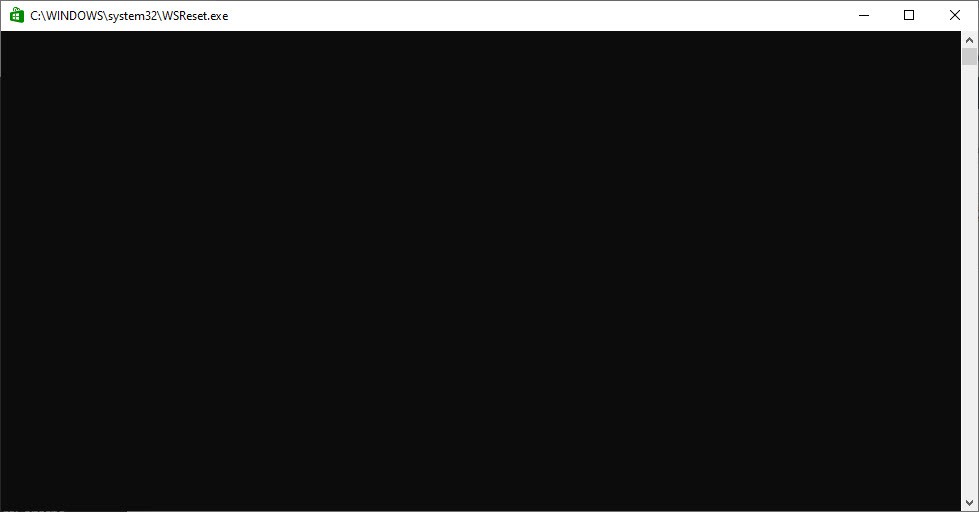
    Here you will see a black screen that deleting the store cache on the background. You don’t need to do anything, simply wait for it. Once the cache is deleted then the Store App will open automatically.

    CMD Deleting Cache on Windows 10
    CMD Deleting Cache on Background

    DNS Cache

    In case you have a problem with the internet connection or you have issues accessing certain websites or server. Then, you might have a corrupt local DNS cache. The DNS stands for Domain Name System like www.microsoft.com to an IP address. However, sometimes the problem occurs such as DNS cache poisoning, spoofing, or some other issues. So, flushing the DNS cache can sometimes fix those problems allowing your PC to connect properly.

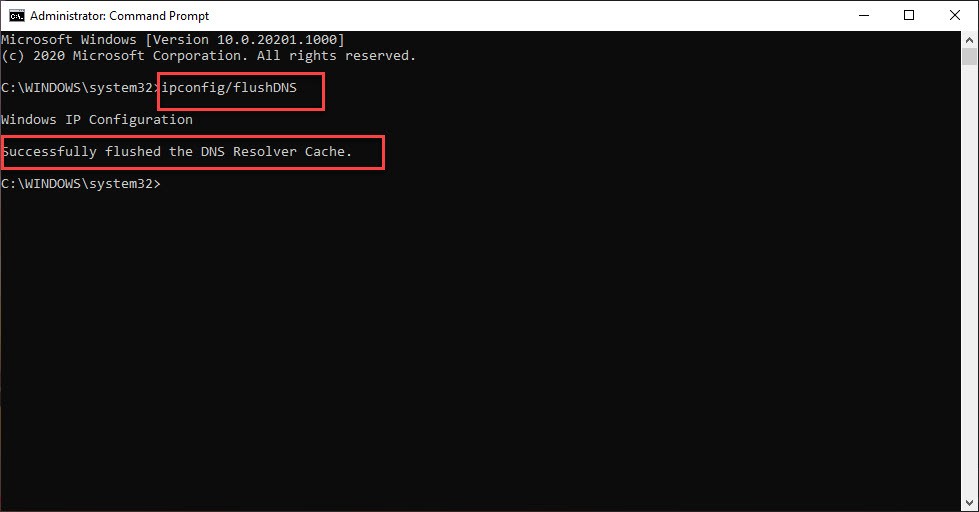
    Therefore. go to Win and search for CMD and run it as an administrator.

    Here, run the command code ipconfig/flushDNS and press the Enter key. If you get the answer of “Successfully flushed the DMS Resolver Cache”. Then, it means the DNS cache cleared successfully.

    How to Clear DNS Cache on Windows 10
    Clear DNS Cache

    Web Browser Cache

    If you have a problem with your PC webs browsers like having a slow experience on opening certain websites or overloaded cache. Then, you need to clear the web browser cache on your PC. Here, I will show you the most useful web browser on Windows 10 which is Google Chrome.

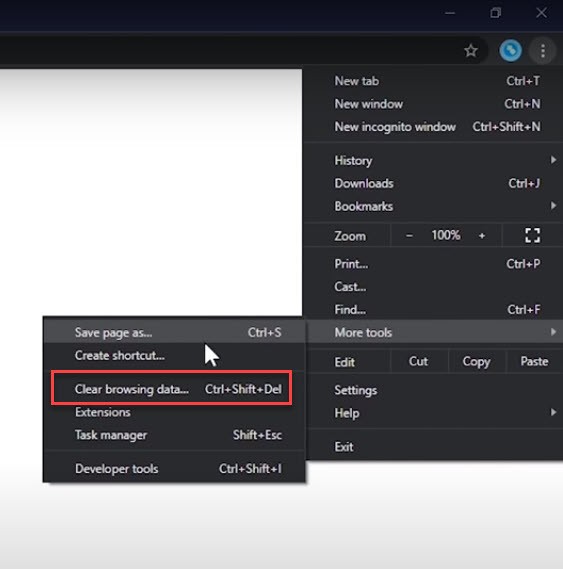
    Open the Google Chrome web browser and click on the Three-dot option located at the right-top corner of the screen. After that, move down and click on More Tools > Clear Browsing Data. You can use a shortcut key for clear browsing data which is Ctrl+Shift+Del.

    Clear Web Browsing Cache on Windows 10
    Clear Browsing Data

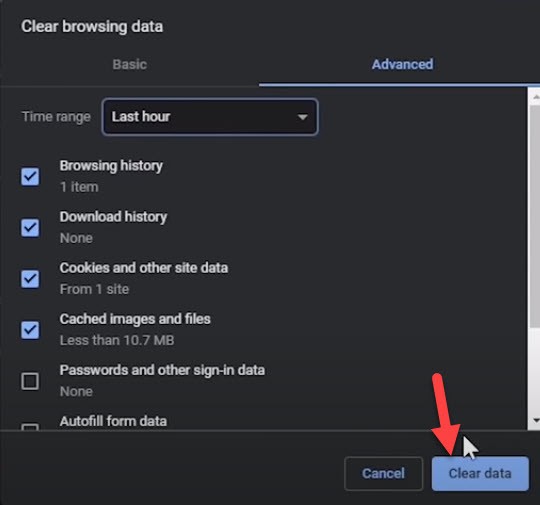
    Here, you have two options to clear data, You can select a certain folder from the Basic option or if you want to have more options to clear data then go to the advanced option. Select the folder you want to delete the cache and click on Clear Data.

    best Way to clear Google Chrome Browser Cache on Windows
    Clear Data

    You can use the same method for the Firefox web browser or other web browsers on Windows 10.

    File Explorer Cache

    If you notice the file explorer folder or any other files is not working properly and it is showing its slow performance. Then, you need to clear the file explorer cache. Therefore, open File Explorer (you can press the Win+E shortcut key to open the file explorer).

    Open File Explorer on Windows 10
    File Explorer

    Now, click on the View option located at the top menu.

    File Explorer Options
    File Explorer Options

    Here click on the Clear option to clear the file explorer cache and speed up your folders and files to perform well. After that, click ok to close the folder.

    How to Clear Cache on Windows 10 to speed up computer
    Clear File Explorer Cache

    Location Cache

    In case you turn on your location in your computer settings then the program and other services will detect it and the location cache will be stored for 24 hours. But the problem is, sometime the cache will be corrupted and it will show the wrong location. Therefore, you need to fix it following the below method.

    Go to Start Menu or press the Win key to open the start menu and search for Privacy Settings and open it.

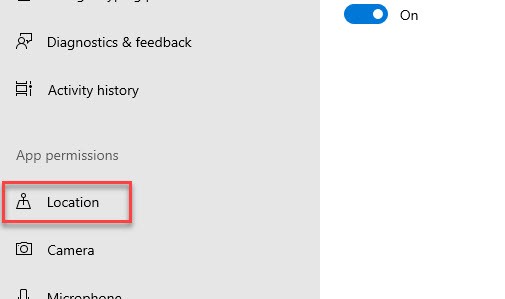
    On the left-hand side under the app permission click on Location.

    How to clear location cache on Windows 10
    Open Location

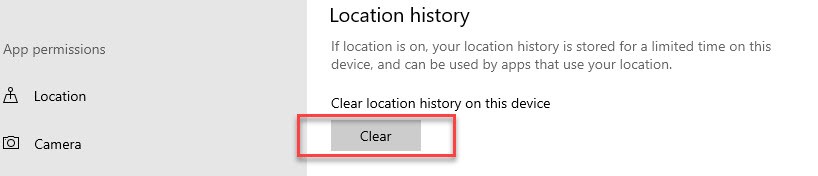
    On the location section, scroll down and find ou Location History. Here you need to clear the location history by clicking on the Clear button. Once you clicked then you will see a Tick icon, it means the location cache cleared successfully.

    How to Clear Cache on Windows 10 to Speed Up Computer
    Clear Location Cache

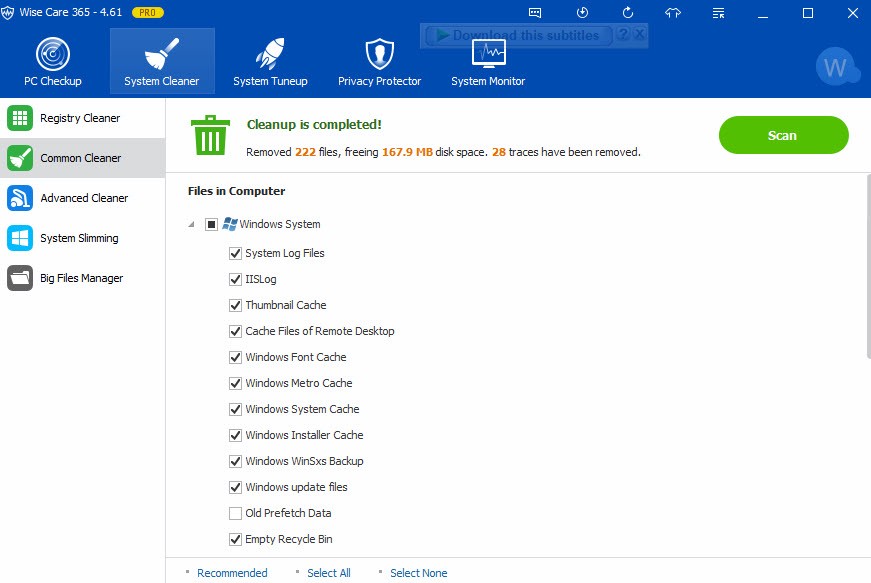
    Clear Cache using Wise-Care Software

    You have checked the above handy methods to clear the cache on Windows 10 to speed up your computer. I know there are several steps to do that in order to clear the Windows 10 cache. But, the Wise-Care 365 software will clear all your windows 10 system cache and it will delete all types of caches including Windows system cache, Windows Installer cache, Google Chrome Cache, and other caches with one click. Therefore, download and install the software then scan for cache and delete all the caches.

    How to Clear Cache on Windows 10 To Speed Up Computer
    Use Wise Care Software

    Read Next:

    Conclusion

    The best methods that help you to clear your Windows 10 cache to have a fast performance were shown in this article and I hope it was helpful for you. However, deleting your system cache will be the best option to speed up your computer. Therefore, always clear your Windows 10 cache to have a fast performance.

  • Best Color Printer Laser for Mac and PC – Get the Best One

    Best Color Printer Laser for Mac and PC – Get the Best One

    Just like the world is advancing in technology, more products are being produced for it to satisfy human wants. The type of modern printing machines produced these days was among the rarest seen until recent years. Today, the best color printer laser for Mac and PC are coming to its own technological advancements. One of the big differences between inkjets and lasers is the superb speed it possesses. They’re faster, and their speedy machines work superbly for both color and white and black printouts.

    Over time, there are two major reasons for these products not conquering their closest competitors. One of them is its high cost, and the second is its color qualities not been superb. But as the advancement in technology increases, the quality being produced recently also increases. Its recent transformation is already taking over the global color printer markets. The cost for this best color printer laser for Mac and PC is reducing as well for you can comfortably purchase a high-quality one for as low as $300. These high-quality color Laser printers can as well different budgets for all purposes, so the product price is nothing to worry about.

    Best Color Printers Laser for Mac

    Despite not reaching their maximum popularity, the products are already going around the technology-advanced global village. Through my streams of research, I was able to bring out the best color printer Laser for Mac and PC that can serve both colored and black and white printouts.

    The Mac printers listed here are all of the high quality. They’ll serve all your office works at a very fast speed.

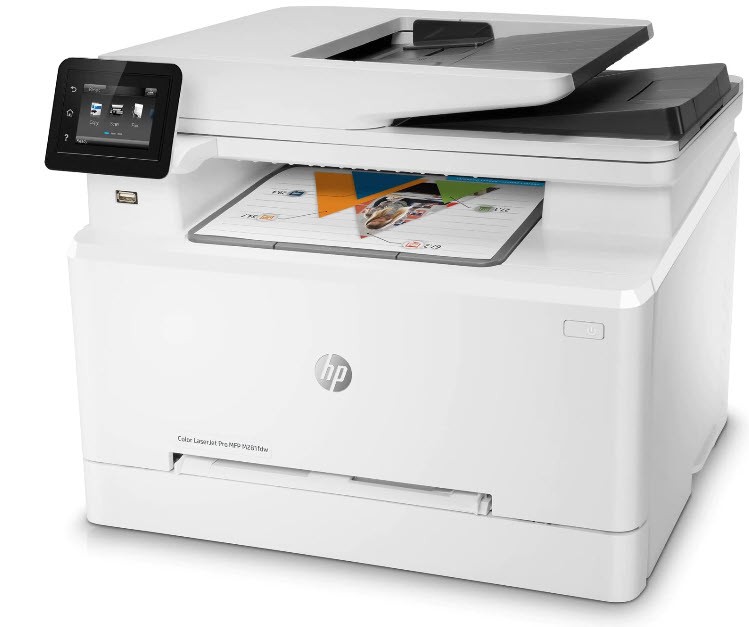
    1: HP LaserJet Pro M281fdw Wireless All-in-One Printer

    Best Color Printer Laser for Mac and PC
    HP LaserJet Pro M281fdw

    Buy on Amazon

    Price: $318

    This super hp printer has the same design as the recent laserjet printers that came out. Except it is in a different outlook. The system is developed for small teamwork of about 1–5 people. It also possesses a very good outlook design and also has a very large 2.7-inch touch screen LCD space where users can control the device without having to revert back to their computers.

    The heavy piece of the machine makes no mistakes, the heavy part of it carries over 40ibs. Its weight makes it difficult to move about, but you’re assured of quality parts and reliability. The printer speed stands at 24 ppm for both text and color printouts. The first-page printout is as fast as 10.3 seconds for black and 11.7 seconds for color. Its input tray paper has an input capacity of 250 sheets. Moreover, instead of using only a single toner cartridge, users will have as many as 4 of them (3 color toner cartridges and 1 black toner cartridge) to accommodate the different hues needed to produce quality realistic graphics and images.

    Like many other HP printing products, it comes along with the HP Smart inside app facility which allows for direct printout services from email, mobile phone (supports both iOS and Android devices) or tablet computers, etc. As well as acquiring an Ethernet capability that can be used for wired networking services.

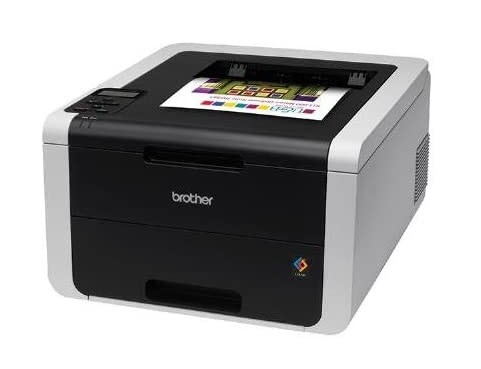
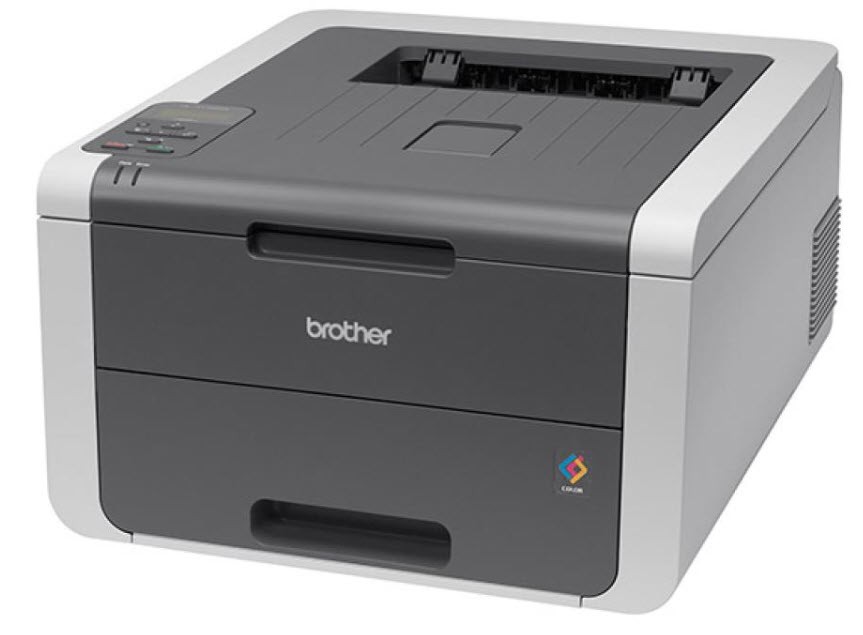
    2: Brother HL-3170CDW Color Laser Printer

    Best Home Printer For Mac and PC
    Brother HL-3170CDW

    Buy on Amazon

    Price: $400

    In big offices, companies, or workplaces where large printout services are required, this color printer is the best for it. It’s indeed worthy of consideration for large printing services.

    It is a reliable digital color printer and has inbuilt wireless connectivity, Hi-Speed USB 2.0, Ethernet, 2-sided printing capability, produces up to 23 pages per minute, fits up to 250 sheets in its paper tray, and requires small ink usage.

    Its text printouts are very sharp and neat to look at, while color qualities have good qualities. Thus making it easier and more unique for professional documents, magazines, graphs, posters, etc.

    3: Brother Printer HL3140CW

    Brother Best Printer Brand
    Brother Printer HL3140CW

    Buy on Amazon

    Price: $290

    Another superb quality printer Laser from Brother. This product is indeed one of the best printers in the world right now. With its amazing quality features, you can ever imagine. This quality printer is quite affordable, it also comes with various great features such as wireless networking, and also prints up to 19ppm for color and crisp black documents.

    Although it comes with a very simple compact design. On the other way round, it carries a handling capacity of 250 sheets, and is also paired along with a single-sheet manual feed slot. It is designed for printing on a small size paper like envelopes or thick order media.
    Its other features are wireless printing from any mobile devices (Android or iOS systems) using AirPrint, iPrint&Scan from Brother as well as Wi-Fi Direct, Google Cloud Print, etc.

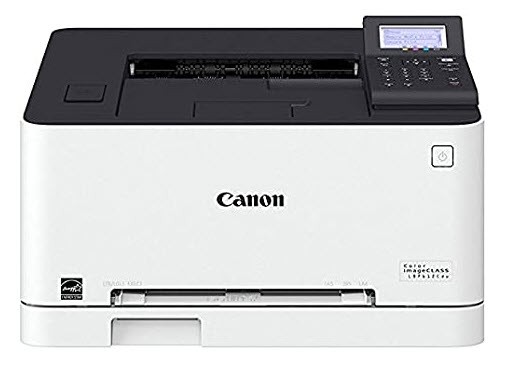
    4: Canon imageCLASS LBP612CDW

    Canon Image Best Printer
    Canon imageCLASS LBP612CDW

    Buy on Amazon

    Price: $280

    This quality printer offers various top features and is a reliable device for any type of home service or office environment. Your documents or photos will be printed out in high quality at a speed of up to 19 pages per minute (Black/Color), which sounds amazing right, special thanks to its V2 (Vivid and Vibrant) Color Technology. You can save more time, energy, paper, and other related costs with its duplex printing features.
    It’s equipped with many amazing features, The 5-line, B/W LCD panel with an easy user interface. So, you can be able to control it at ease, customize the printer settings, or access your favorite features without any professional assistance. The LBP612Cdw also comes with WiFi connectivity, mobile printing, and Wifi Direct options.

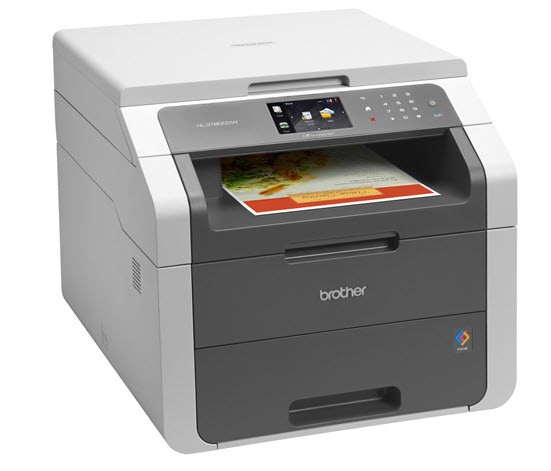
    5: Brother HL-3180CDW (White)

    Purchase Brother Printer
    Brother HL-3180CDW

    Buy on Amazon

    Price: $250

    This color printer is specifically designed for those who don’t want printers that occupy space. It’s exactly the size of an all-in-one quality laser. The Mac printer comes with multifunction features and is combined with both wireless and USB networking, giving its users the option to use any of them. The system is powered by 333MHz of CPU and offers a printing speed of up to 23ppm that can help you to improve a home or office printing service.

    The printer comes with a lot of amazing features, such as “scan-to” features, and allows you to print directly from any mobile device using Wi-Fi Direct, Brother iPrint&Scan, Google Cloud Print, or Cortado Workplace. The installation can be done quickly from USB,  your PC, or WiFi. Also, Brother packs it up with a Digital LED print technology that can deliver top-quality black and white & high-impact color business documents. It also includes a two-sided printing so which enables you to save more paper with a paper tray that can contain up to 250 sheets.

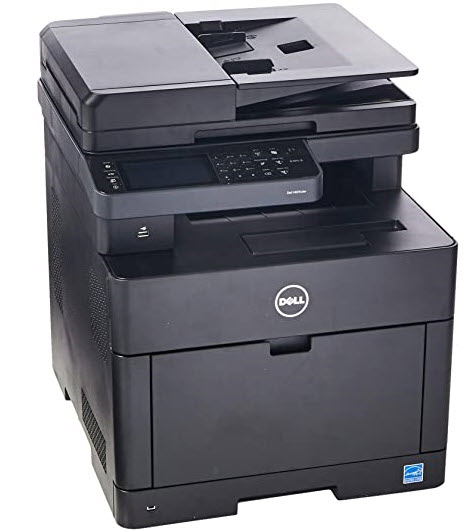
    6: Dell Color Cloud Multifunction H625cdw

    Dell Color Cloud Multifunction H625cdw
    Dell Color Cloud Multifunction H625cdw

    Buy on Amazon

    Price: $800

    Dell, is a well-known company for its quality products. Dell has the best reputation for its various quality computing accessories. This Dell color printer can print out, scan, and scan all types of documents. It’s mostly used in small and large offices.

    It comes with premium free for scanning-searching customizing Ms-office formats or PDFs.

    It comes with several features and the first and foremost is that you can print out any type of document through Wifi connection, USB flash devices, and the Cloud option. Moreover, you can as well access various cloud storage sites, like Google Drive, Dropbox, Evernote, OneDrive, Salesforce, and Sharepoint online 2013.

    Printing navigation is excellent. With a 4.3inch coloration touch screen that is customizable. However, the color printer has an alphanumeric with buttons for the Home menu, Login & Logout buttons, Details, Job status, Copy, Wifi Connection, and Fax. Moreover, it comes with a paper tray that can contain up to 250 sheets and a 50 sheets feeder, with a non-obligatory 550-sheet tray. All sums up a total of 850 sheets tray.

    7: Brother MFC-J470DW

    Best Color Printer Laser for Mac in 2020
    Brother MFC-J470DW

    Buy on Amazon

    Price: $350

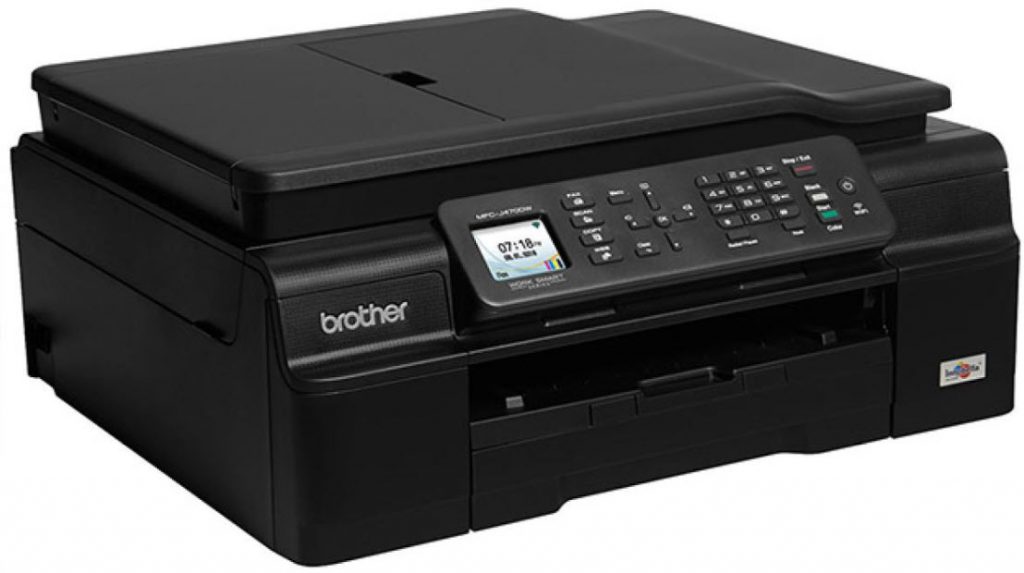
    This printer as well as an all-in-one multi-purpose machine. It can print, fax, scan, and photocopy all your files at a speed time of 4.9 pages per minute. However, this is also a wireless inkjet printer with multi-function capabilities.

    You can as well connect your devices through a Wi-Fi connection. It accepts computers, Mobile phones (Android or iOS), laptops, etc. You can as well connect through USB, Wi-Fi Direct, etc.

    Best Color Printers Laser for PC

    If you think you don’t need a home printer, or you’re doubting whether you’ll purchase one, then you’re missing out on it. Think again.

    With the outbreak of this pandemic, you’ve now seen the need of keeping one at home for it to solve your numerous work problems. Just like in the office, you’ll need a printing service at home also which will handle printing services without a hitch.

    The best color printer laser for Mac and PC for your home needs to be more versatile and strong than a regular office printer. Since the modern household needs to print out a wide range of documents probably from the works you take home from the office, your children’s assignments, etc. You’ll often find you need to print out forms and documents in each of your works.

    Moreover, a home printer that can do an excellent job by printing out your holidays or summer outing photos will help save you a lot of money. And unlike those big and bulky office printers, these are all all-in-one compact printers. It also requires just a little bit of space and be either Laser or inkjets.

    No matter what size of family you have, your taste, and as well your budget, you’ll find it all here as well as their different features.

    1: Canon Pixma TS9120

    Best Color Printer Laser for PC in 2020
    Canon Pixma TS9120

    Buy on Amazon

    Price: $314

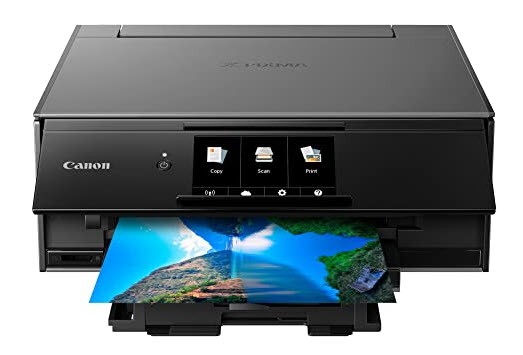
    This is a very smart work approach from Canon. This is an all-in-one inkjet printer that you can print from anywhere. Thanks to its 6-color ink system, the camera can deliver exceptional quality photo results, making it one of the best home printers ever made.

    The camera is also flexible with its connection abilities which enables Bluetooth and WiFi to print. You can also print from your smartphone (Android or iOS), computer, tablet, or laptop. The printer also comes with photo-specific features such as photo blue ink. The Printer also possesses a Max speed of 15 ISO ppm, 10ppm color, and a 100 sheets paper capacity with A4 paper size.

    2: HP laserjet pro M15w Printer

    Best Color Printer Laser for Mac and PC in 2020
    HP laserjet pro M15w Printer

    Buy on Amazon

    Price: $110

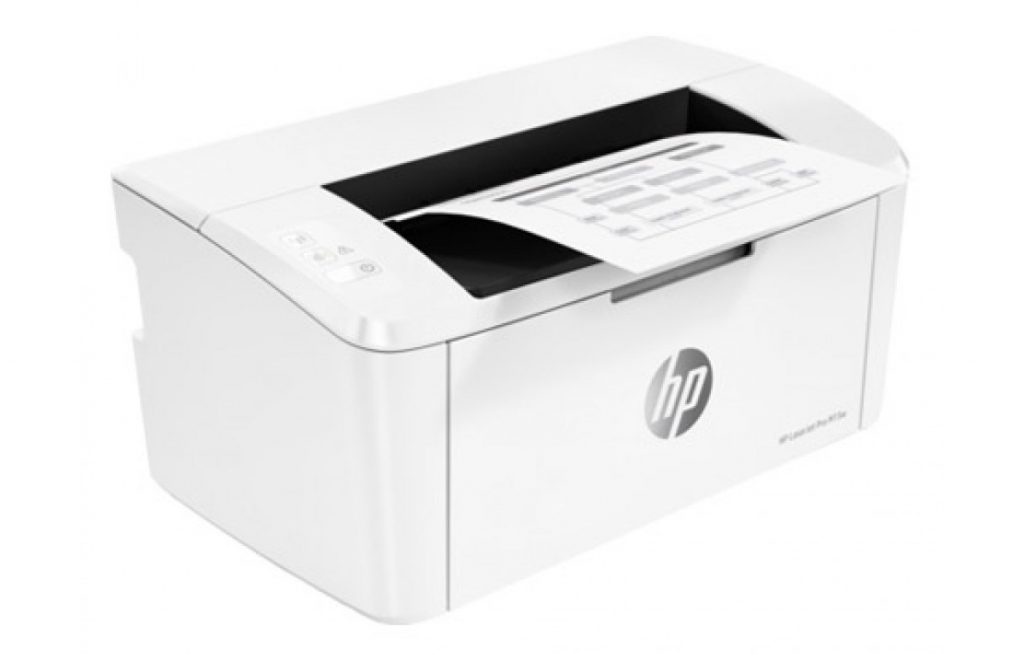
    This is the world’s smallest printer and also one of the most affordable. Being small and also not as expensive as an inkjet, it possesses the speed, consistency, and economy that of a Laser. The HP LaserJet Pro M15w is the ideal home printer.

    The Laser printer manages to hold 100 paper sheets capacities and also a respectable speed rate of 19ppm.

    3: HP Envy 5055 printer

    HP Envy 5055 Color Printer for PC
    HP Envy 5055 printer

    Buy on Amazon

    Price: $100

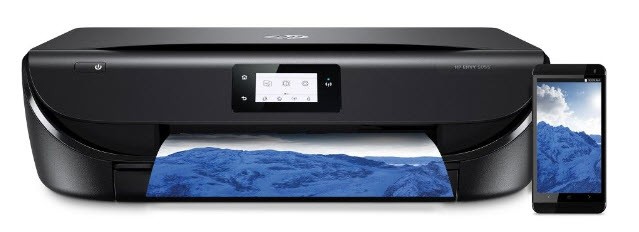
    This very humble all-in-one can print and scan but its main strength is in photo printing. Unfortunately, there’s no Ethernet port, nor USB port for printing from a flash drive. But its printout results are extremely great.

    However, the supplied starter cartridges are extremely light on ink, but if you want to replace them with high-capacity carts, then the running cost is going to be quite expensive. This three-in-one color inkjet printer possesses a Max speed of 10ppm with 100 sheets of paper capacity.

    Note: this printer is known as HP Envy 5010 in the UK.

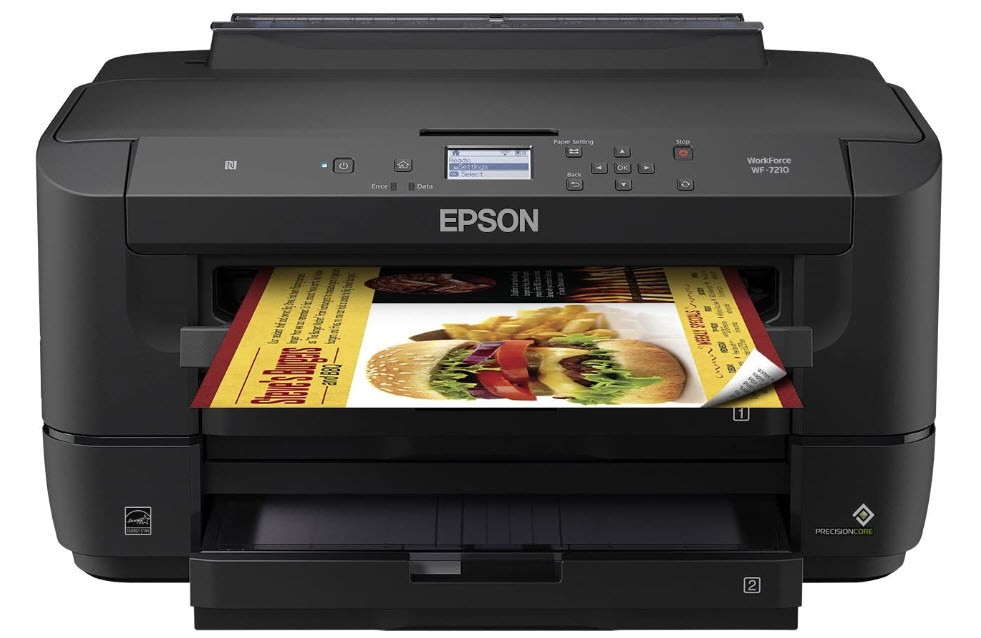
    4: EPSON Workforce WF 7210DTW Printer

    EPSON Workforce WF 7210DTW Printer
    EPSON Workforce WF 7210DTW Printer

    Buy on Amazon

    Price: $431

    This is a compatible Duplex A3 printer. They’re specially designed for home office and can handle A3 papers, but the ones that can automatically print on both sides of an A3 page are very rare.

    The printout quality is very superb and impressive, be that glossy photo or monochrome text. The long list of its amazing features includes both Wi-Fi and NFC connectivity and the two paper trays that can hold about 500 sheets combined and a max printing speed of 18ppm. That sounds quite impressive right, that is all the good qualities this awesome printer possesses.

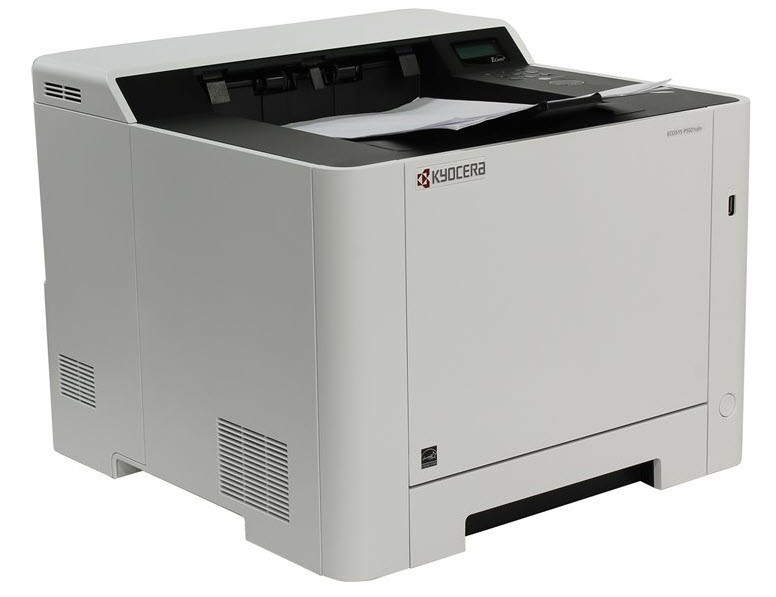
    5: Kyocera Ecosys P5026cdw Printer

    Kyocera Ecosys P5026 cdw Printer
    Kyocera Ecosys P5026cdw Printer

    Buy on Amazon

    Price: $408

    This stout Laser printer takes a relatively small space. Despite its high capacity for paper and toner. This means you can go ahead of printing quickly and efficiently at a very low maintenance cost.

    This colorful laser printer is easy to use and can be used and can be comfortably relied upon for immaculate mono and color documents time after time. Among other amazing features, the printer possesses a paper capacity of 250 sheets, alongside a max speed of 26ppm.

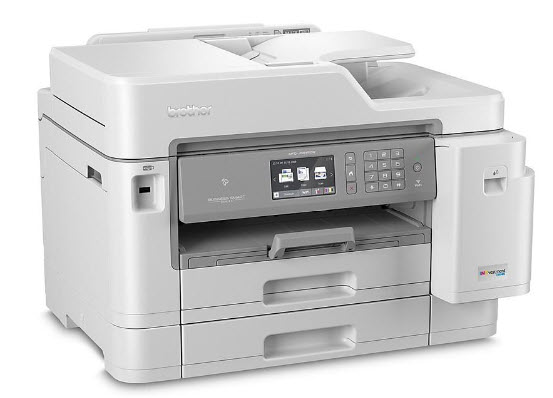
    6: Brother MFC-J5945DW Printer

    Best Color Laser Printer for Mac and PC in 2021
    Brother MFC-J5945DW Printer

    Buy on Amazon

    Price: $897

    The big brother Enterprise blurs the line between an office printer and a home printer. They possess a combination of fast printing speed and the high capacity of a laser machine. All this with the superior photo finish of the inkjet.

    Although it’s recommended for both applications because even though it’s much smaller than the laser equivalent MFC-L8690CDW, the inkjet MFC-J5945DW can as well handle A3 paper. Despite being less economical than lasers, it possesses many amazing features which a 500 sheets capacities, a printing speed of 22ppm, and a paper size of up to A3.

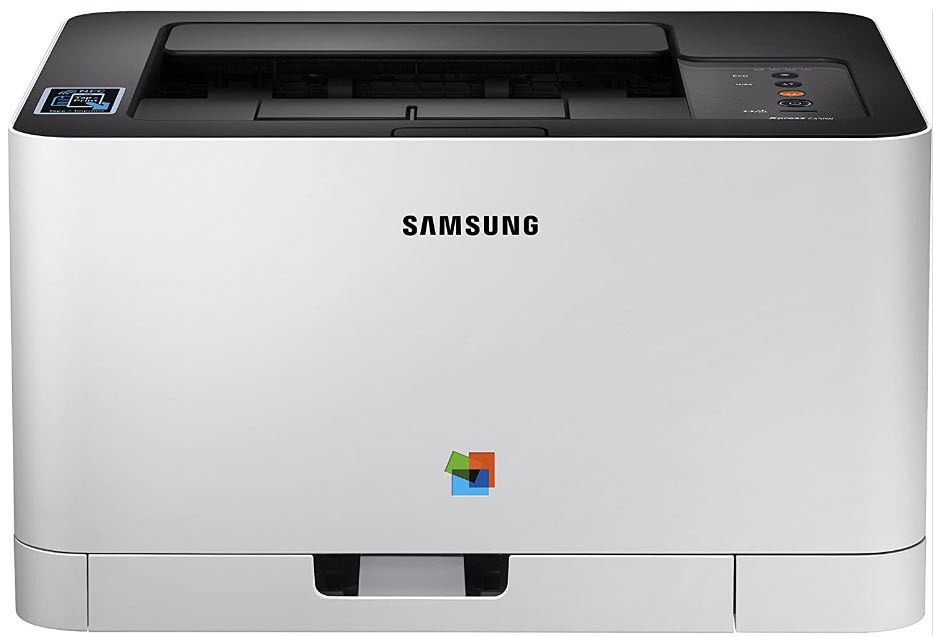
    7: Samsung Xpress C180W printer

    Samsung Xpress C180W printer
    Samsung Xpress C180W printer

    Price: $380

    This is a simple design smart home printing machine. This Samsung smart-looking laser printer is equipped with the connectivity of both WiFi and NFC and it as well supports both smartphones (Android or iOS), computers, laptops, etc.

    The printer is designed in such a way that it’s very easy to accommodate at home. But it requires you to fit a useful amount of toner and paper inside, making it absolutely good for a monthly cycle of 40,000 pages. Among its awesome features, it possesses a rapid printing speed of 18ppm, 250 sheets of paper capacities, as well as a paper size of up to A4.

    Read Next:

    Conclusion

    Whether you’re a student, housewife, cooperate work, office, or company owner, you need to purchase at least one best color printer laser for your Mac and PC to keep in your house, as well as the office. You deserve a printer that doesn’t force you to the brink of frustration every time you want to print from your smartphone, laptop, or tablet. The printer will as well reduce the inconveniences and stress associated with your office works.

    To wrap it up, there are several best color printer lasers for Mac and PC that you can purchase for your home and office Pages. The type of printer you’ll buy all depends on most importantly your budget; that’s why I included the price tag on each printer, then you consider the purpose, its features, and then the space available for the printer.

    As for your convenience and part of our mission in making research easy for the public, we’ve out listed the best types of printers available in the market today. We’ve also out listed the prices for each. what is left for you now is to take your time and study the article above, and then find out the best one you can afford for your office and home purposes.

    Kindly follow our website for more tech reviews and If you have any questions. Then, feel free to ask us in the below comment section.

  • How to Get New Start Menu in Windows 10?

    How to Get New Start Menu in Windows 10?

    Do you want to have the new start menu design in Windows 10? Though Windows 10 is the current Microsoft operating system. However, Microsoft will update Windows 10 after a few months and highlight all the new features and improvements. Therefore, on July 1, 2020, Microsoft released the first Windows 10 insider preview update called Build 20161. This Insider Program update has several new features in Start menu, Taskbar, Notification Experience, Settings, improving the Tablet experience, and much more.

    The Insider Preview Build 20161 update has a redesign start menu that offers “a more streamlined design” by applying “a uniform, partially transparent background to the tiles” in lieu of solid color backgrounds. Although, the new update has several bugs and it will be a little risky to download the build 20161 version on your windows. Though updating to the new insider version means, you will put your PC on the Windows Insider Dev Cycle. This cycle allows you to test all the new features as early as possible.

    But, the new update is not available for some users. However, in this article, we will guide you on how to get the new start menu in Windows 10. You can enable the new start menu using the ViveTool and using the Settings > Insider programs. Therefore, we will show you both methods to get the new start menu in Windows 10.

    How to Get New Start Menu in Windows 10?

    As I said, you can get the new start menu in Windows using the ViveTool third-party utility. But, this method might work for some users and might not work for some other users. But, downloading and installing the new update of the Insider Program will allow you to get the new start menu. Therefore, firstly, we will try to enable the start menu using the settings > Insider Program.

    1. Open the Start menu and tap on Settings.
    2. Now, tap on Update and Security.
    3. After that, click the Windows Insider Program from the left side of the page.
    4. On the Windows Insider Program, click the Get Started.
    5. Now, you need to link an account to get started. Therefore, click the Link an Account.
    6. Here, tap on Microsoft account and link it to your account. (In case, if it asks you to register to insider program then do it and link to your account) Then, click Continue.
    7. Tap on Dev Channel and click Confirm.
    8. Tap on Confirm.
    9. Now, restart your PC in order to get the Insider Preview Builds.
    10. Once your PC restart, then, comes back to settings and go to the Windows and Update section.
    11. Now check for updates, Whether you will see resume updates or check for updates.
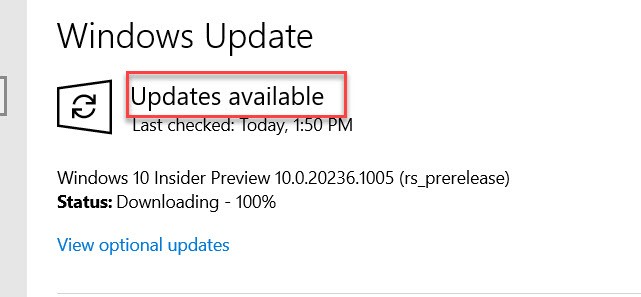
    12. After that, it will check for updates and find the new update of Insider Preview build 20161. First of all, it will download the update and then it will install the update. Once the downloading and installing is done. Then, click on Restart Now. Here, you will see a windows pop-up section. So, click the restart now.

    Now, you must have the new start menu in your Windows. To check it out, go to the start menu and look for tiles for windows programs like Adobe or Office. Following the above method, your computer should get the Insider Preview to build 20161 updates. And you should have a new start menu design.

    How to Get new start menu in Windows 10
    New Start Menu in Windows 10

    How to Get Start Menu Using ViveTool?

    In case, the above method is not worked for you then I recommend you follow the below steps. However, the above method is better from this method. Though this method has 2 command line codes that should run in CMD using administrator. Although, this method will work for some users. So, check the below method if it works for you then let me know in the commend section.

    1. Download the ViveTool utility
    2. The file is compressed and you need to extract it using WinRAR or 7ZIP software
    3. Now, go to start menu and search for CMD and run it as administrator.
    4. Copy the ViveTool directory where you extracted ViveTool like C:\Users\Techbland\Desktop\ViveTool
    5. After that, type ViVeTool.exe addconfig 23615618 2
    6. press Enter
    7. And Restart your PC.

    Now, check the start menu and you should have the new start menu design.

    Read Next:

    Conclusion

    Always check for updates because the new update will have several new features and improvements. Whether you are on smartphones or Computers, Try to keep your device up-to-date. Therefore, the new update for Windows 10 Insider Program is available in Insider Program section.

    This update has an awesome start menu and with the help of this article, you can get the new start menu in Windows 10. So, if the methods work for you then feel free to leave your feedback in the comment section.