Like other YouTubers, you also want to stream high-quality videos such as 4k videos view. But the matter is how you can switch to 4k resolution or how you can download youtube 4k video on Windows or Mac. You are right that youtube announced supporting 4k resolution but according to Google term and policy, you can’t download 4k videos on your system. Don’t worry, I am here to guide you the best way to do that in a second.
Thanks to Youtube owner for the great quality resolution and let’s hope google lets us download the youtube 4k video directly from youtube. However, you have multiple youtube 4k video downloader that allows you and help you to download multiple videos in any formats. Even some video downloader allows you to transfer the downloaded video to your iPhone or PC system.
In this article, I will show you and guide you the easy video downloader methods that you can download youtube 4k videos easily without any problems. The 4K video downloader software is in demand and most of the users use this downloader. The same, I will do it with a 4k video downloader.
Without that, you have several downloaders like MobiMover, Videoder, Freemake, and many more. Although some of the downloaders work on Android and iPhone. You need to download the app from the play store or app store and download youtube videos.
So, I will perform the instruction on two video downloader and you should apply any of the downloader methods. In case, it doesn’t work then apply the second method. I am sure both methods will work.
Which Format is best to download Youtube Video?
The Youtube video downloader apps allow you to download 4k videos in any format you want. It will give you several format choices to download your video and some of the common formats are MP4, 3GP, AVI, and MOV. This format choice setting will affect what you stream your video on. The best format you choose the best your video quality will be.
If you are not familiar with formats, Then the 3GP is best for small screens like smartphones and its size is tiny. Which is best for low space mobiles. If you want a video with tiny storage then try 3GP format.
And for Mac and Windows devices the MOV is best for Mac desktop and this format will work in any Mac computers. Besides that, AVI is developed by Microsoft and it works on PCs. And MP4 format, you are familiar with it and most of your video can be in this format. So, this format is pretty nice and it will work on any devices. Therefore, choose the best format before downloading the youtube videos. If you want a high-quality video then go with the best format.
How to Download YouTube 4K video on Windows or Mac?
Windows and Mac have millions of users and both operating systems are best in their place. Mac has its own features and Windows has its own. Both systems work awesome and firstly, I will guide you on how to download youtube 4k video on Windows using a 4k video downloader.
Before going to download the youtube video, first, you need to download and install a 4k video downloader. For that, follow the below steps.
First Method: Download and Install 4K Video Downloader on Windows or Mac
If you don’t have a 4k video downloader setup then download the software from its official website and install it on your PC.
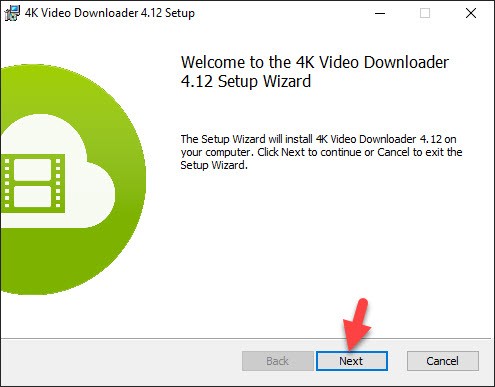
Step 1: Once you download the setup, then, go to the download folder and double click the software setup. After that, you will see the welcome setup wizard. Here, click the Next button to continue the installation.
4K Video Downloader Installation
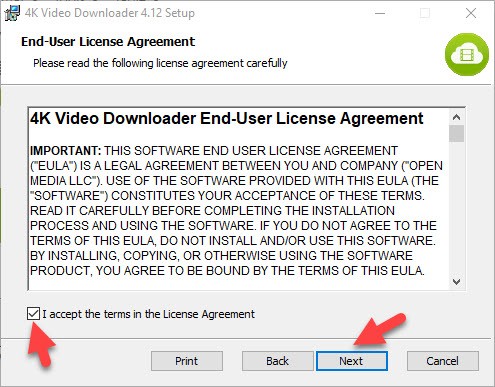
Step 2: Next step, agree on the terms in the license agreement and click the Next button.
Agree to License Agreement
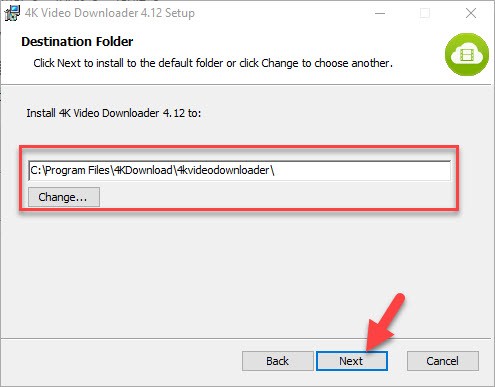
Step 3: In case, you want to change the default destination folder. Then, click the Change button and select the new installation path and click the Next button.
Select Destination Folder
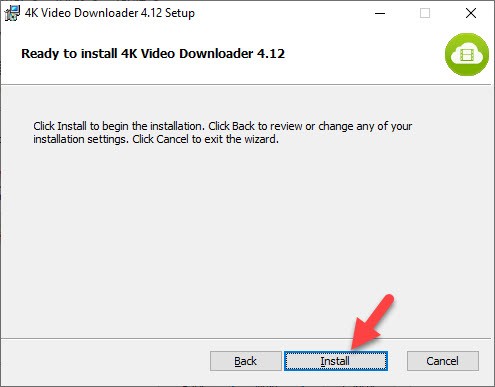
Step 4: Now, you need to click the Install button.
Install The Software
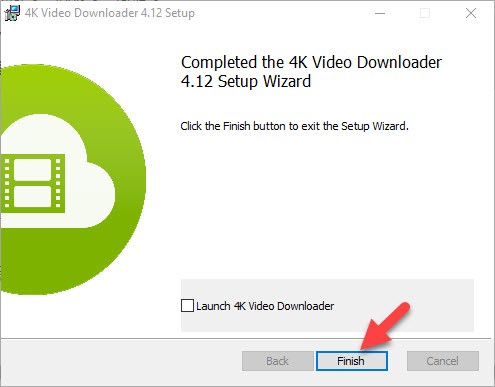
Step 5: Afterward, the installation process will start and wait for a while to complete the process. Once the software is installed on your Windows. Then, click the Finish button.
Installation Completed
Download Youtube 4k Video
Now you have 4k video downloader on your Windows. So, let’s download any youtube video using the software.
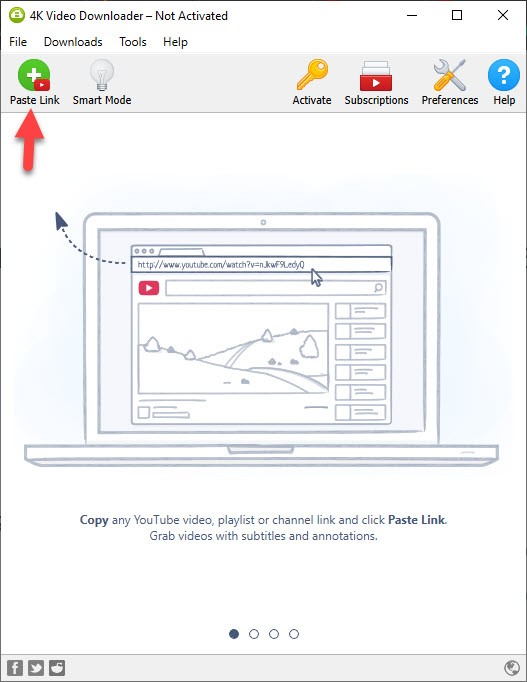
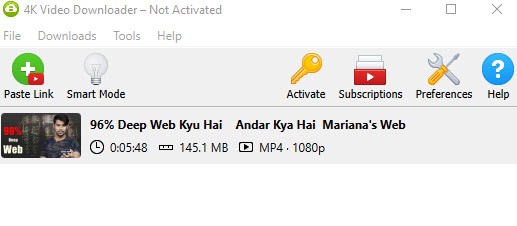
Step 1: To download youtube video, open 4k video downloader and click the Paste Link. Here, paste the video link that you copied and you want to download it.
Paste Youtube Link
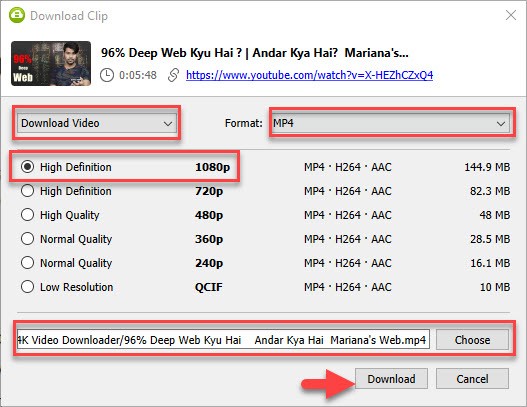
Step 2: After that, you will see the below screenshot. Here, follow the below list.
If you want to download the video, then, select Download Video from the dropdown menu.
On the left side, select the video format you want to download or you want to see the video quality on.
Now, select a high-quality resolution. Don’t be confused about the picture, you will have a 4k resolution option on your system.
In case, you want to change the default video destination, then click the Choose button.
Finally, click the Download button.
Download Video
Step 3: Once you click the download button, then wait for a while to complete the download process. After that, your video will be downloaded and you can watch it offline. Simply, double click on the video, and the video will be played for you.
Download Completed
So, this was the first video downloader method for Windows and Mac users. If you are windows or Mac user then you can follow the above instructions. However, a 4k video downloader work on Mac, Windows, and Linux. The downloading procedure is quite easy, you don’t need to pay a penny or anything else. Simply copies the video link and paste it here. At a time you can download 24 videos using this software.
About the video quality resolution, you don’t need to worry. Freely download and install the software and check the 4k option.
Second Method: Download and Install Freemake Video Downloader on Windows or Mac
Freemake video downloader is the best option for you. This software allow you to download videos from 10000+ websites and you can select any format quality. So, download Freemake video downloader and install it on your system.
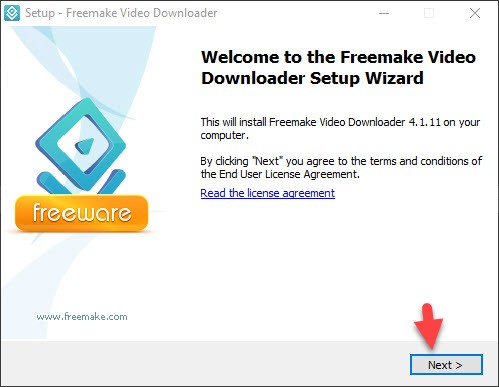
Step 1: Once you download the Freemake video downloader. Then, go to download folder and double click on the setup. After that, you need to select the language and click Next button on the welcome wizard setup.
Install Freemake on your System
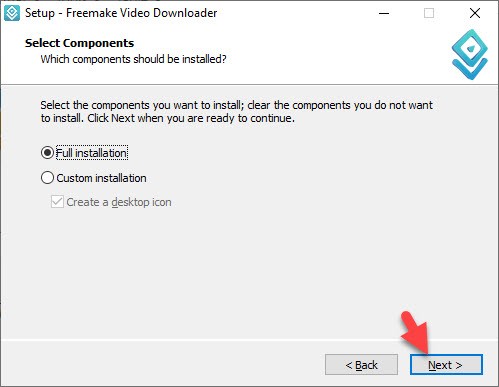
Step 2: On the select component page, select the full installation option and click the Next button.
Select Component
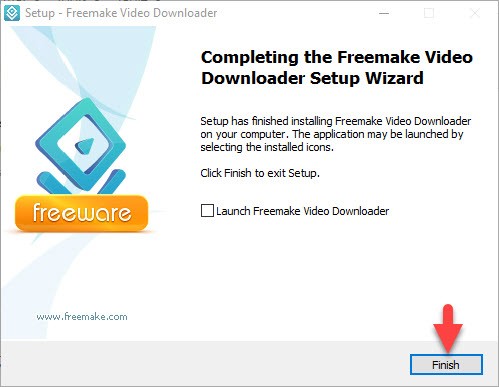
Step 3: Wait for a while and the installation will be completed after a few seconds.
Freemake Installation Completed
Download Youtube 4k Video using Freemake
Now, that you have a Freemake video downloader on your Windows or Mac. Then you can download the high-quality video using the software. Remember, you can download any kind of videos, simply you need to copy the video URL and paste it here. Besides that, You can select any format you want to download the video. So, let’s start
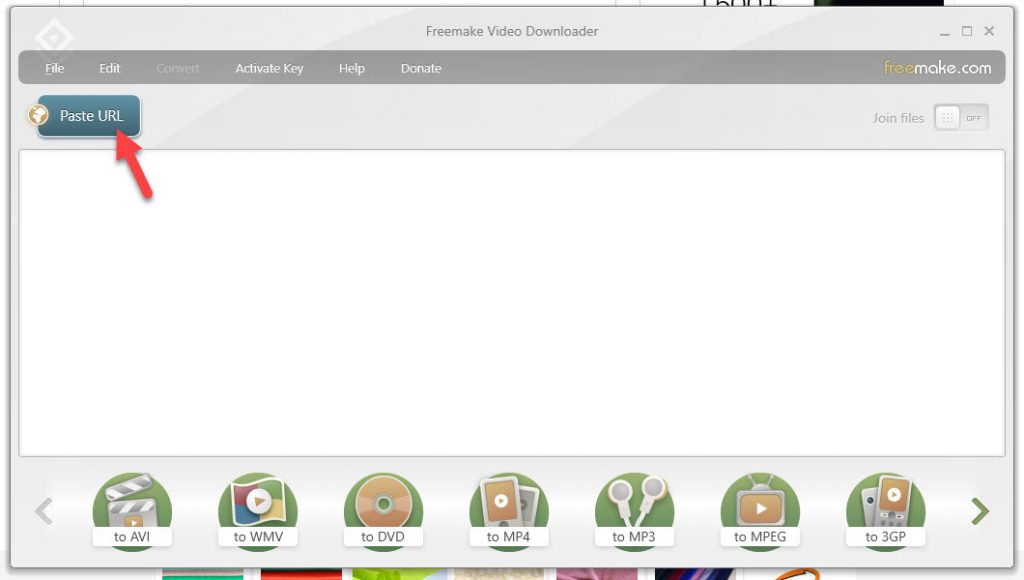
Step 1: First of all, copy the URL of any youtube video and launch Freemake video downloader. After that, click the Paste URL. After that, select the format from bottom of the page.
Paste Video Link
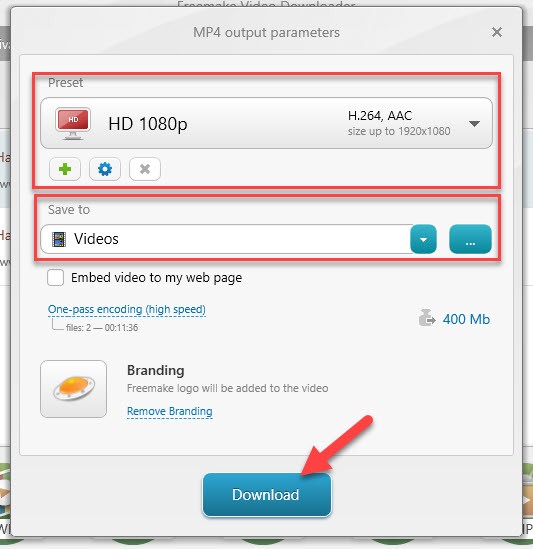
Step 2: Once you paste the link then follow the below list.
Select the video quality, You will find the different video quality from the preset dropdown menu.
For save to option, select videos.
Now, click the Download button.
Download Youtube Video
Step 3: After a while, your video will be downloaded and you can stream it offline. To open the video click on it.
This was the second method of youtube 4k video downloading. Both Softwares are best and both will work on Windows and Mac. Now, you don’t need to worry about downloading youtube 4k videos because you get all the solutions in this article.
The more your video quality is high the more you enjoy watching the video. Youtube has different resolution options for users to pick up and watch the video. Like this, the video downloader software allows us to download the video in different quality and various formats.
So, I hope you understand everything about how to download youtube 4k video on Windows or Mac. And whatever you were looking for, this article gave you. In case, you have any questions then feel free to ask me in the comment box.
Youtube has millions of users daily and millions of users are uploading and earning a penny from youtube. You will find thousands of different niche videos like informative courses, funny, entertainment, movies, drama, games, and many more. Even you can learn a specific course from youtube, you don’t need to get admission or look for a teacher to teach you. However, youtube is your teacher, it will guide you A to Z instructions. If you know, millions of users are searching and streaming knowledgable videos. Thus, Youtube is in the second position after Google itself.
You have the clue, a user visits youtube only to watch videos or download videos in order to watch it anywhere anytime, even without the internet. It is true, users upload videos and earn a good bit of money from Adsense. Therefore, you can stream youtube videos on Windows, Mac, Android, and iOS mobiles. But the matter is, How to download youtube 4K videos?
However, this year youtube announced to support 4K videos and you can stream 4K videos or upload 4K videos and enjoy streaming. Of course, you want to download high-resolution videos to watch it offline. But, google terms of service don’t allow the user to download Youtube 4K videos. It is not impossible, you can use third-party software to download youtube 4K videos.
You will find thousands of apps, desktop software, and online downloader in the stock. At a time you can’t use multiple downloader software and you don’t know which one is the best. Therefore, we have researched and used different youtube 4k video downloader and finally, we find the best youtube 4k video downloader for you. So, you can choose one of the below 4k video downloaders for your Desktop or smartphones and download your favorite videos in high resolution.
4K Video Downloader Review
Firstly, what is 4K video downloader and why user indeed to find the best youtube 4k video downloader for their PC. However, you have various youtube video downloader and those apps or software allow you to download videos, playlists, channels, audio, and subtitles from youtube, Facebook, Soundcloud, and other websites.
With the below downloader you can save the video in MP4, MKV, M4A, MP3, FLV, 3GP, and in high quality to stream it offline on your Android, iOS, Windows, Mac, TV, or other devices.
Therefore, once you install the software on your computer then you can download videos up to 8K. Even you can download any resolution like 720P, 1080P, and 4K Ultra HD.
The Best Youtube 4K Video Downloader for Windows, Mac Desktop
First of all, let’s know the best video downloader for Windows and Mac desktops. If you want to download 4K videos on your computer then try the below downloader.
1: 4K Video Downloader
The best downloader for your Windows, Mac, and Linux is a 4K video downloader. This software is the best choice to download your favorite video directly from youtube. The software allows you to download videos, playlist. channels, and subtitles in high-resolution 1080p, 4K 720p, 4K, and 8K resolution.
Therefore, download the software for your operating system and install it on your PC. After that, you can choose the output path, resolution, format, and language before downloading the video. The 4K video downloader downloads the video soon and you can enjoy streaming the video offline.
Pros:
4K video downloader is free and 100% safe for your PC.
It can support 4K and 8K resolution videos.
You can download annotations and subtitles in .srt format with a 4k video downloader.
If you want to export the downloaded videos or songs to iTunes, Then you can do it with the software.
The 4k video downloader supports 3D video and 360-degree video download.
You can import links that saved in CSV files.
Cons:
The software can support downloading 24 or fewer playlists video.
2: MobiMover
The MobiMover is available for Windows and Mac computers though it is the professional iOS data manager. The software can’t only help you to manage your iOS data. But it also allows you to download 4K videos from Facebook, Youtube, Twitter, Dailymotion, and other websites. However, you can download MobiMover for your Windows and copy the video link/URL and paste it on MobiMover.
After that, click the download and enjoy the video offline. In case, you are Mac user then download MobiMover for your Mac and follow the same instructions. Moreover, you can transfer the downloaded video to your iPhone with the help of MobiMover.
Pros:
The MobiMover is 100 safe and free for your Mac and Windows.
It can download 4K (2160P) and HD (1440P/1080P/720P) videos from Youtube.
You can download videos from BBC, Vimeo, Instagram, Facebook, Youtube, etc.
The software supports iOS data transfer and file management.
Cons:
Unfortunately, it can’t support downloading 4K videos to Android phones.
And it can’t support mass downloading videos.
3: Videoder
The Videoder software is in stock for Windows and Android devices. You can download Youtube 4K videos from Youtube, Facebook, Twitter, Tiktok, Voot, etc. Even you can download from 1000 websites. And in Android, you can download videos from 50 different websites. On Your computer, you can create your personal collections of videos and audios. This can help you to find your downloaded videos easily. The Videoder software can download youtube playlist and youtube videos faster.
Pros:
You can stream or download videos with Videoder.
It gives you different video qualities to select and you can share the videos in the app.
The video will be downloaded in high quality with the customizable design and impressive UI.
You can download the free version from its official website.
Cons:
The free version includes ads.
You should use the premium version.
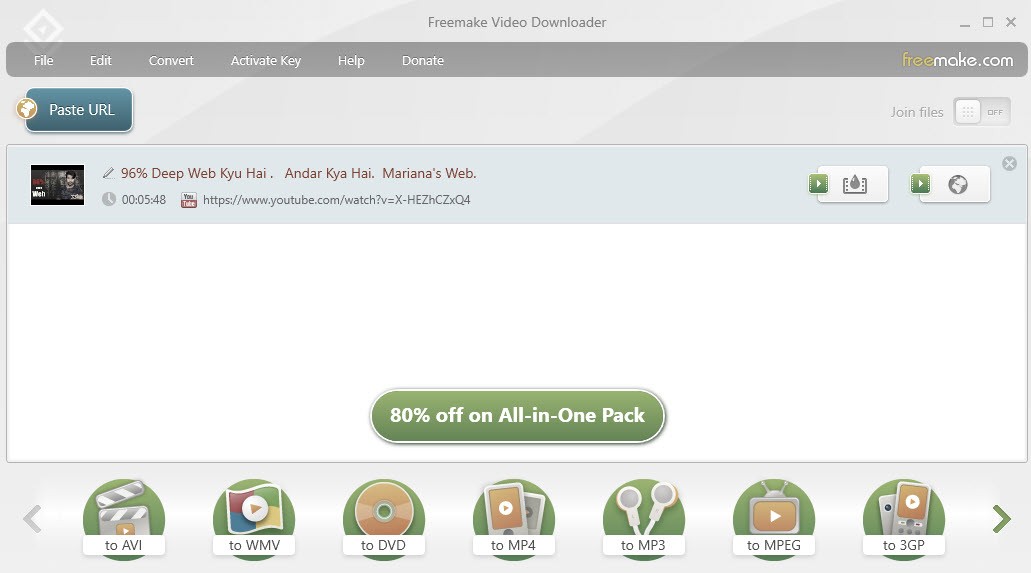
4: Freemake Video Downloader
The last downloader for your Windows and Mac is Freemake video downloader. This software is free and secure for your PC and it is a powerful software for your PC. With this software, you can download videos from 1000+ websites including Youtube, Facebook, Vimeo, Dailymotion, etc. Hands down, you can download youtube 4K videos, playlist, channels in different formats like HD, MP4, MP3, AVI, 3GP, FLV, etc.
Pros:
Freemake is in stock for Mac, Windows, and Linus OS.
It supports downloading youtube 4K and other HD videos.
You can download the whole playlist and channels.
It supports uploading videos to Dropbox, Google Drive, OneDrive, etc.
Freemake supports more than 500 video and audio formats.
You can rip web links to AVI, MKV, WMV, iPhone, PSP, Android, etc.
Cons:
You can download videos within 3 minutes.
Best Youtube 4K Video Downloader for Android and iPhone
Many users watch youtube videos on their Smartphones because the smartphone is always with them. Therefore, you can download your favorite youtube videos with the help of the below video downloader.
1: Videoder for Android
Videoder downloader is available for PC and Android too. You can install the Videoder app on your Android phone and download the Youtube 4k video up to 10X faster. This app allows you to download videos from 50+ websites and even you can download audio on your android phone.
Pros:
You can download 4K video or you can watch 4K videos.
The app downloads 4K videos from Facebook, Youtube, Instagram, and etc.
Download Videos and Songs.
The app will download up to 10X faster.
Customize the app according to your choice.
2: SnapTube for Android
The SnapTube is a well-known application for Android that allows you to download 4k videos, UHD, and 1080p videos. Even you can download MP3 from Facebook, Instagram, etc. The App interface is easy to use and you can search for your own videos. However, you can download multiple videos with various resolutions.
Pros:
SnapTube allows you to download multiple resolutions.
You can download MP3 files.
Find your own videos with keywords.
It can convert MP3 media to required formats.
Download videos in different formats.
The App is safe and free for your Android.
You can resume, cancel, and pause the download.
3: Wondershare UniConverter for iPhone
When we talk about the best youtube 4K video downloader then the first app which comes in our mind is Wondershare UniConverter. This app is the best for iPhone users to download 4K video and other high-resolution videos. You can download videos from 1000+ websites including Facebook, Instagram, Youtube, Lynda, Udemy or even you can convert youtube video to MP3 format. The app provides many different formats like AVI, MKV, MOV, and etc.
Pros:
You can download videos from 10000+ websites on your iPhone.
It supports downloading 4K/H videos in High Quality.
You can download Youtube Playlist videos.
It provides you to convert video to MP3.
Download video at a super-fast speed.
The app can convert youtube videos over 1000+ formats.
And you can transfer videos from computer to iPhone, iPad, and other devices.
4: MobiMover for iPhone
For the iPhone, it is not easy to download youtube videos or other videos from different websites. However, Apple Inc. is very strict in these video download apps. Therefore, there is no way to download videos on iPhone. But the MobiMover apps can help you to download youtube 4k videos. And it can provide you to download any kind of videos and download it easily on your iPhone.
Pros:
The MobiMover is 100 safe and free for your iPhone.
It can download 4K (2160P) and HD (1440P/1080P/720P) videos from Youtube.
You can download videos from BBC, Vimeo, Instagram, Facebook, Youtube, etc.
The software supports iOS data transfer and file management.
Forget 480P, 720P, or even 1080P because now you can watch or download 4k video on your Windows, Mac, Android, and iPhone devices. However, you can’t download youtube 4k videos directly from youtube. Therefore, you can download or use third-party software that can download youtube 4K videos, Facebook videos, Vimeo videos, etc.
So, the above video downloader can help you to download videos from 1000+websites. Though some downloaders can provide you the opportunity to convert videos into MP3 or other formats. I hope you understand and find your best youtube 4k video downloader for your device and enjoy video offline anywhere anytime.
What you will do if you forget your computer login password? though you have one PC and without reinstalling Windows operating system there is no option for you to reset the password. However, some researchers will say to enter the previous password multiple times and then click the forget password. Then, you can reset your login password. But, in my opinion, that method will not work.
So, now what can be the option to bypass the Windows 10 login password in an easy method without losing any data. I know, your files are much important for you and you never want to lose it. Therefore, in this article we have written the best solution to reset Windows 10/8/7 login password.
We will not use any third-party software or any reset software. Therefore, we will do it with the help of our Android phone. Yes! you can bypass Windows 10 login password using Android phone. The method is easy, only you will need to download and install disk reset application such as WPGenius or Refixer Apps.
With this android disk reset application, you can easily reset the password. As a result, you don’t need to visit any software house to reset the password or you don’t need to reinstall the Windows 10 operating system. So, pay attention to each line in order to not face problem during the process.
How to Bypass Windows 10 Password using Android Phone?
A single person is using an Android phone or iPhone even you can see people using phones everywhere. So, the Android phone is not only about using Facebook, playing games, or other tasks. But, you can do many things with your Android phone such as reset your computer password, install Windows OS, Kali Linux, or macOS in your android phone, or hack wifi password.
So, there are many things to be done with your Android phone. Therefore, use your Android phone in a positive way and solve your multiple problems.
Before going to bypass windows 10 login password using your Android phone. You need to prepare a few things that explain below.
Your Android Phone should be Rooted
Yes! to use the reset disk application and reset your computer password, you need to root your phone. The application requires a rooted phone. So, if your phone is not rooted then you can root it without a PC. Though you can root your phone using PC but why to not root without PC because you forget your login password and you can’t use your PC.
Download WPGenius Disk Reset App
Once you root your Android phone then you need to download the WPGenius application to reset the Windows 10 login password. Therefore, click the link and click the Download button to download the WPGenius for android version. Once the download is done then install the application in your android phone.
Prepare Android Phone to Bypass Windows 10 Password
Step1: Open the WPGenius application.
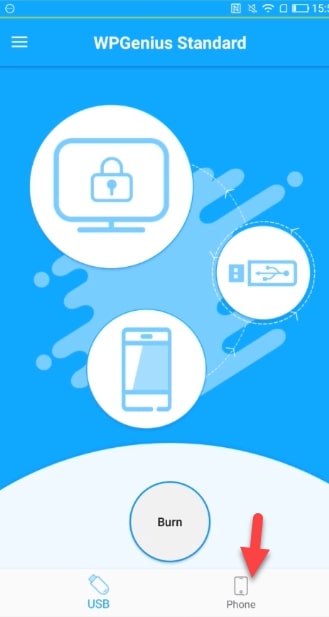
Step2: Now, click the Phone button because we are going to use our phone to reset the password.
Select and Click Phone option
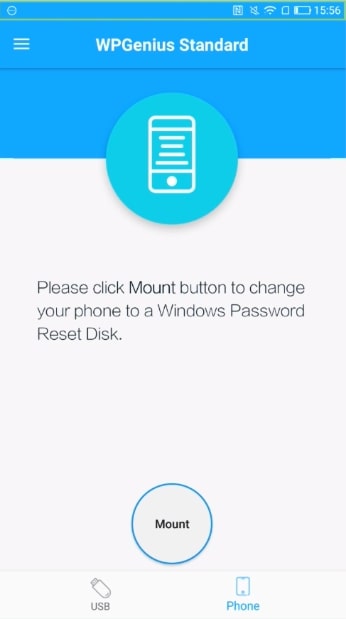
Step3: After that, click the Mount button to change your phone to a Windows password reset disk.
Click Mount Button
Step4: Now, connect your phone via USB cable to the computer you want to reset its password.
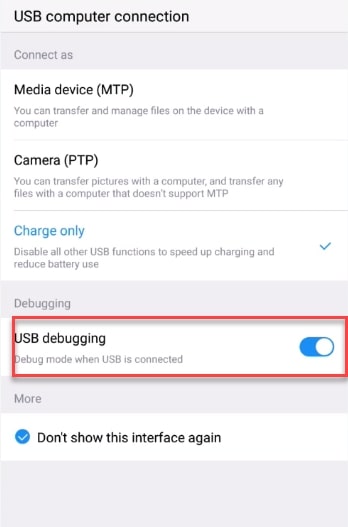
Step5: Once you connect your phone to the computer then make sure you have enabled USB Debugging from setting. Then, select Media device (MTP).
Enable USB Debugging
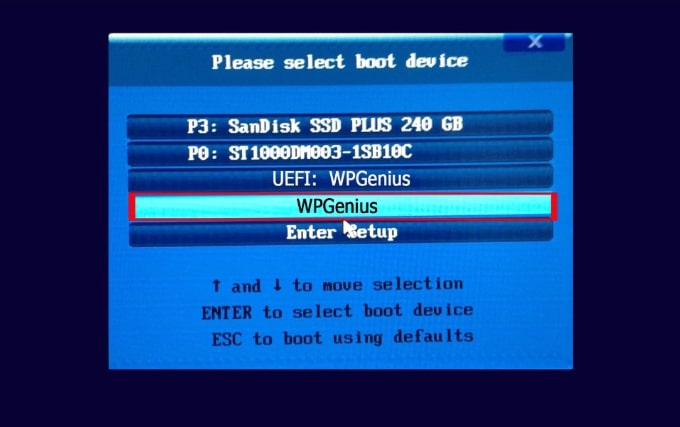
Step6: After that, restart your computer and press and hold F12 to see the boot menu screen.
Step7: Here, boot your computer from WPGenius, Therefore, click the WPGenius.
Boot your Computer from WPGenius
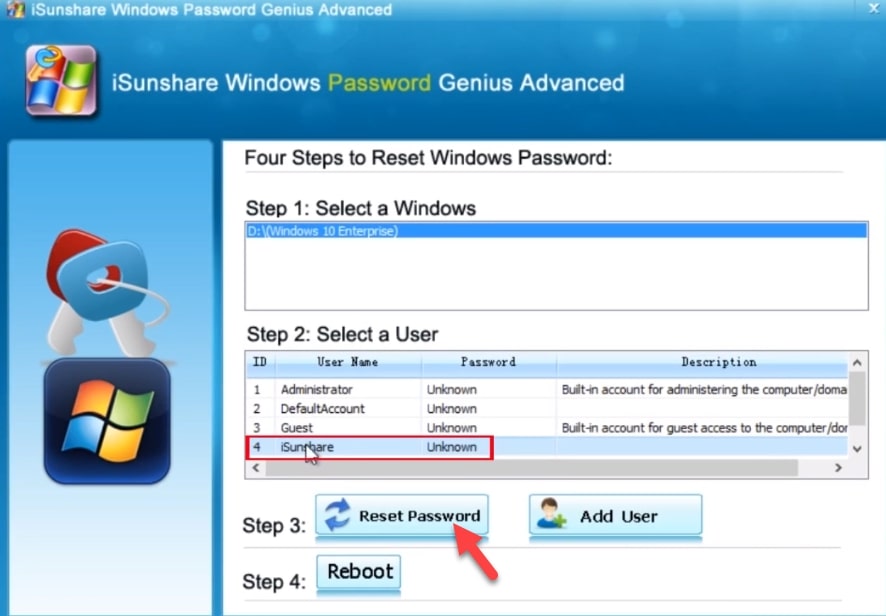
Step8: Now you will see iSunshare Windows password Genius Ultimate Interface. Here, select iSunshare option and click the Reset password. Once you click the reset password option, then, it will ask you “Do you want to set this user to blank”. So, click the Yes button.
Reset Password
Finally, reboot your computer and once you come back then you will see your computer won’t ask for a login password. Now you can use your computer.
There are many other ways to bypass Windows 10 login password using an Android phone. But, this method is so easy and safe. You can reset your password easily without losing your content. So, I hope you understand this method and it helped you to bypass your Windows password.
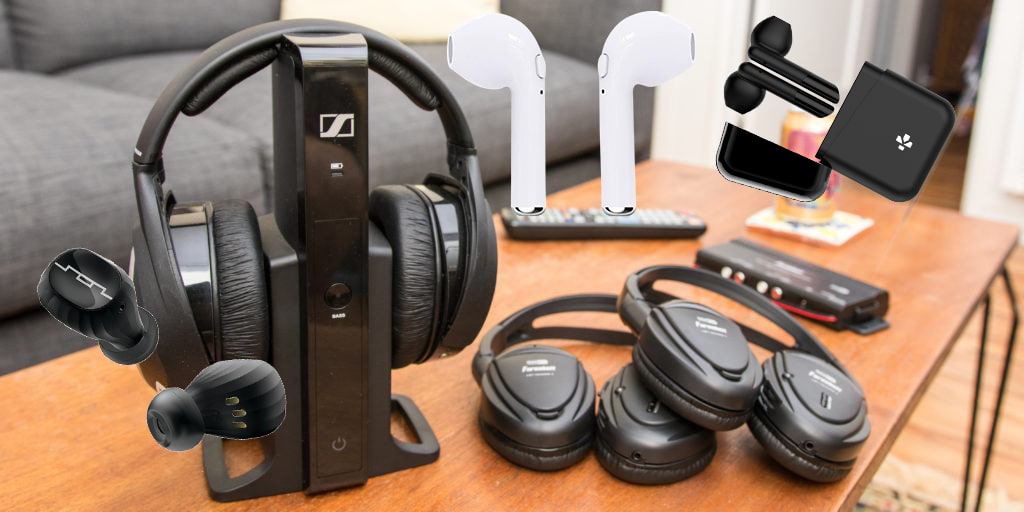
You are confused about which headphones to buy though there are thousands of headphones with different qualities. Don’t worry, Techbland will help you to find The Best Wireless Headphones. Nowadays, people prefer wireless headphones rather than wire cable headphones. Wireless headphones are in high demand from legions of users and you can connect the wireless headphones with your portable devices anywhere anytime.
There are several headphone companies like Sony, AKG, Bose, Shure, Grado, and many more. But the question is, which company’s reputation and products are of high quality with a 100% guarantee. Users never judge the headphone until they didn’t use them, So, to give them a try you will need to purchase one of the headphones and give it a shot and check all the quality and sound noise cancellation.
Hands down, wire headphones are in demand a few years ago but now no one recommends you purchase wire headphones although you have different designs of headphones. So, in this article, you will get the best wireless headphones for smartphones, computers, gaming, music, running, and working out. It means you will find the best headphones for all devices. check it now.
You are looking for some good quality earbuds, but you don’t know which ones to choose. There are so many different brands and types of earbuds, it’s hard to know which ones to buy. Try out the best earbuds by electricfieldsfestival! They come with a lifetime warranty and the sound quality is amazing!
Best Wireless Headphones For Android Devices
There are billions of Smartphones and billions of users have Android or iPhone mobiles. So, you might want to listen to music or play games and many more things to do. Then, you prefer to use headphones and connect them via Bluetooth. Therefore, below are the best wireless headphones for Android.
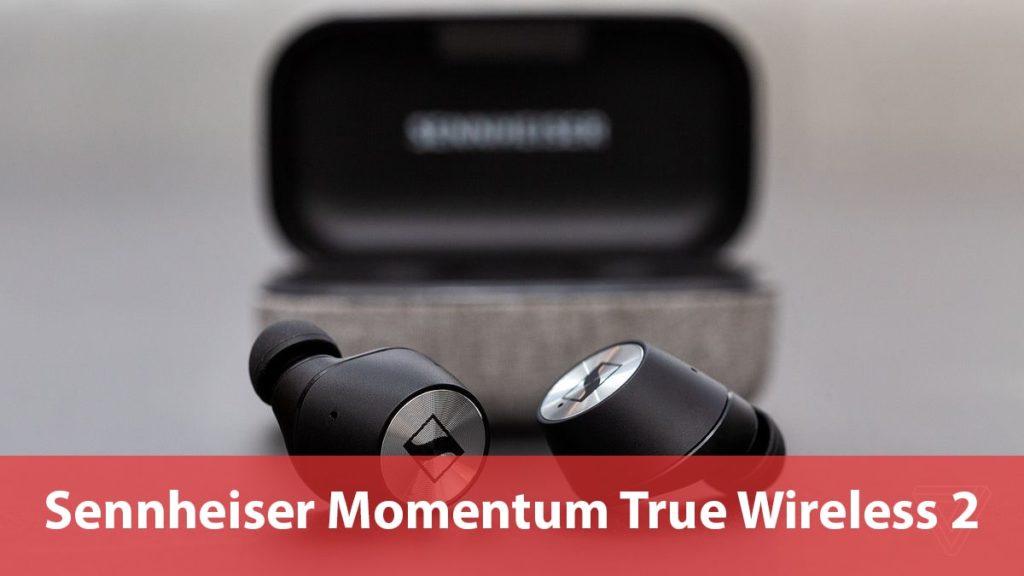
Here is the first and the best headphone for all smartphones including iPhone and Android phones. Even you can use it for your PC to listen to and play games. So, Sennheiser Momentum True Wireless 2 is now in stock and you will get it at $300 on Amazon that’s pretty good. However, you will find Momentum true wireless 1 Gen and 2 Gen. There is a big difference between these two Generations. The 2nd Gen is much smaller than the 1st Gen and I appreciate the 2 Gen because it is so comfortable and has more features.
You don’t need to worry about water resistance, this headphone is waterproof and long life guarantee. If we compare Momentum headphones with Airpods and Sony then this headphone is second-to-none. You can use it while running and workout at the gym too.
It has 28 hours of Battery life and much faster touch control over the headphone. you can customize the settings on your mobile with its application. On the app, you will find all the control over the headphone and you can change all the settings. Therefore, I like these headphones and recommend you purchase this one.
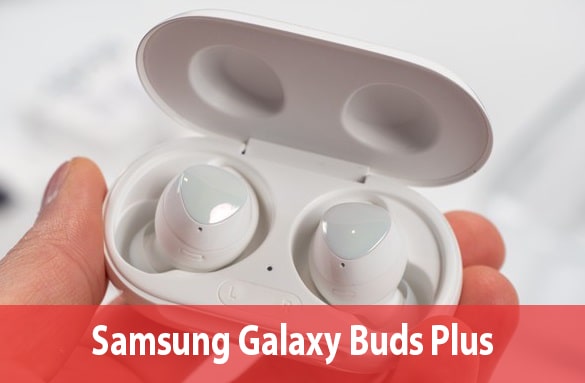
Samsung Galaxy Buds plus is the demand from legions of people, you will get Galaxy Buds and Galaxy Buds plus each of the headphones has different prices with different colors. But which one to buy? Well, you will get the Galaxy Buds headphone at $100 and Galaxy Buds plus will be at $150 or $170. I prefer to click the link and purchase the Samsung Galaxy Buds with +11 hours extended battery, Triple Mic’s (with wireless charging case), and International version R175N.
There are three different Samsung Galaxy Buds plus colors Black, White, and Blue. you can order your favorite color for Buds plus. So, if we compare the original Galaxy Buds with Samsung Galaxy Buds plus battery life then Galaxy Buds plus has more battery life with a fast wireless charging case. this headphone has 22 hours of battery life (11 hours with the buds and the next 11 hours with the charging case). However, battery life plays a major role thus go with Galaxy Buds plus with double battery life. If you charge the battery for three minutes then it will give you one-hour battery life playtime.
So, both Galaxy Buds and Galaxy Buds plus are IPX to sweat and water resistance. both headphones have fast charging cases but there are two more upgrades with Galaxy Buds plus. Although the original Galaxy buds have one speaker and the Samsung Galaxy Buds plus has two speakers. it means the Galaxy Buds plus has better sounds. Moreover, there are many features and functions with galaxy buds plus, Therefore, don’t miss the headphone and click the link and buy on Amazon.
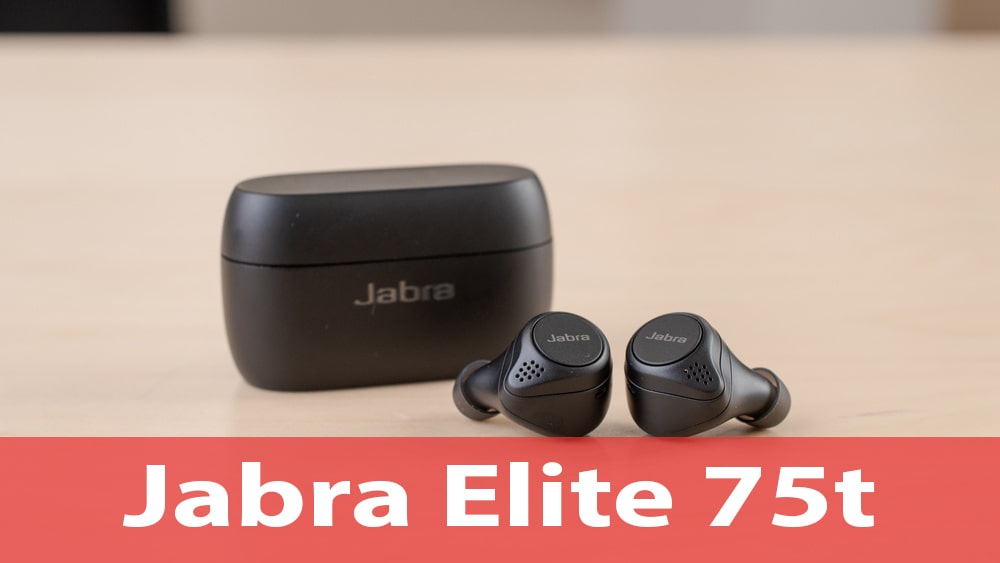
Here I am with the other best wireless headphones which are Jabra Elite 75T. This headphone is newly released and it is much better than the previous one which was Jabra Elite 65T. You will get it on Amazon at $180 bucks. There are many new changes to the design and features. So, Jabra Elite 75T earbuds with true wireless charging case, Titanium black, Bluetooth Earbuds with a more comfortable, Secure fit, long battery life, and great sound quality.
This earbud has a proven wireless connection with 4 microphone call technology. It has up to 7.5 hours of battery life with 28 hours charging case. You can customize your music with its android and iOS application. Simply install the application and bring changes to the settings as you wish. The best thing with this earbud is, that it has 2 years warranty against dust and water though it is water-resistance. Besides that, you can enable voice assistance that is Google Alexa and Siri.
The next feature is Bluetooth 4.0 with a fast charge, If you charge for 15 minutes then you will have a one-hour battery charge for music play. However, There are many earbuds and you will need to select and purchase the best one. What I think, this is for you and order it now.
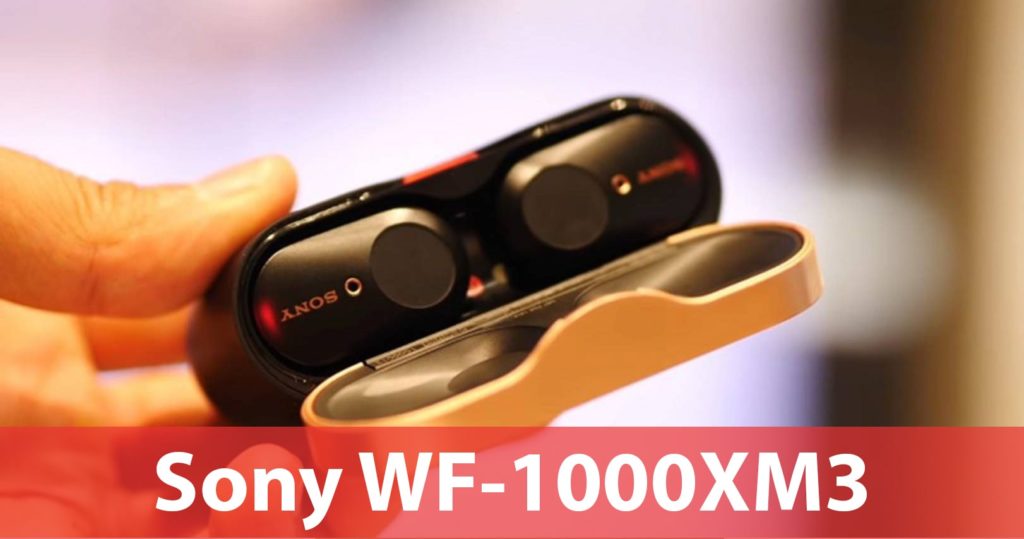
In headphone life, Sony plays a major role and it has many products that are in demand and best of all. Here are the Sony WF-1000XM3 Earbuds. At the same, you will get Sony headphones for your computers or for more having styles. Though these earbuds are the best and it has the best design with attractive colors thus you can pick your favorite color. However, Sony is the true wireless earbuds with Alexa voice control and noise cancellation. Therefore, you can buy it on Amazon at an affordable price.
Sony designed HD noise-canceling processor QN1e for high-performance noise-cancellation and high-quality audio or Dual noise sensor technology captures ambient noise precisely with two microphones and a stable wireless connection. Moreover, you will have hands-free calling with HD voice.
This earbud has the best battery life of 6 hours + 18 hours. If you charge for 10 minutes then you can play music for up to 90 minutes. Although the music playback time is a maximum of 6 hours. So, the bottom line is, this is the best at an affordable price thus don’t miss it and order on Amazon.
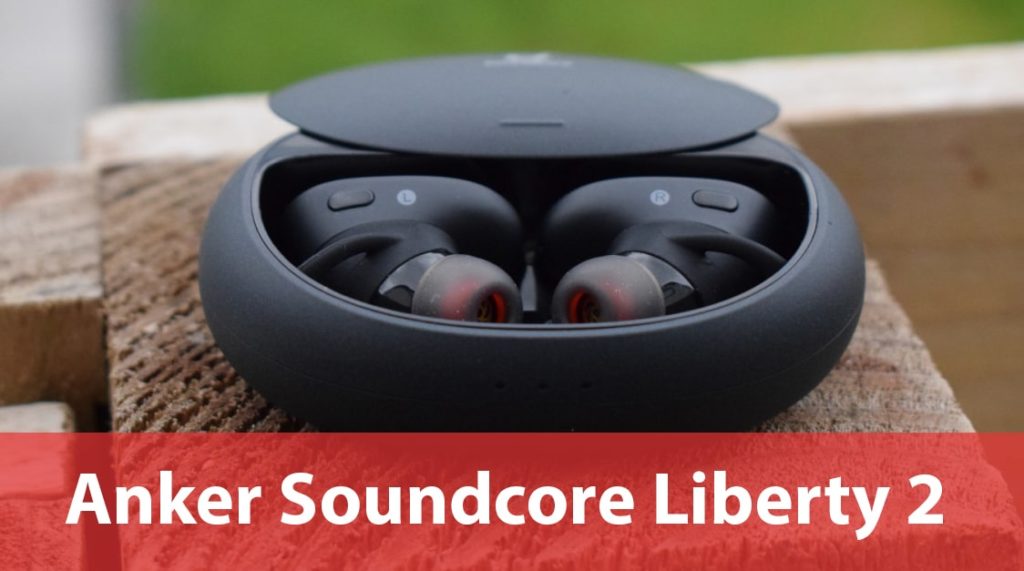
There are more headphones for your Android or iPhone, But this is our last earbud for Android that we search for and find useful and trusted. So, Anker Soundcore Liberty 2 Pro is the best earbud and this company is trying to move on the next step into more premium territory with its Soundcore Liberty 2 Pro. However, Anker has more value in its headphones and you can use one of its headphones for your smartphone. This earbud is at a low price according to the other earbuds that I mentioned above. You will get it at $150 bucks from Amazon with your favorite color.
So, the Anker earbud is the true wireless, Bluetooth earbuds with Astria Coaxial Acoustic Architecture, in-ear studio performance with 8 hours of playtime, hear ID personalized EQ and wireless charging. It has 8 hours of battery life on a single charge with 32 total hours of playtime with the charging case. During the call, noise cancellation microphones will help you to reduce the ambient sound so the caller can hear you. Although, you can charge this earbud via USB-C and it also supports wireless charging.
The Best Wireless Headphones for iPhone
You get the best headphone for your Android phone, Now, you will get the handy and affordable headphones for your iPhone. Therefore, check the below headphones for your iPhone.
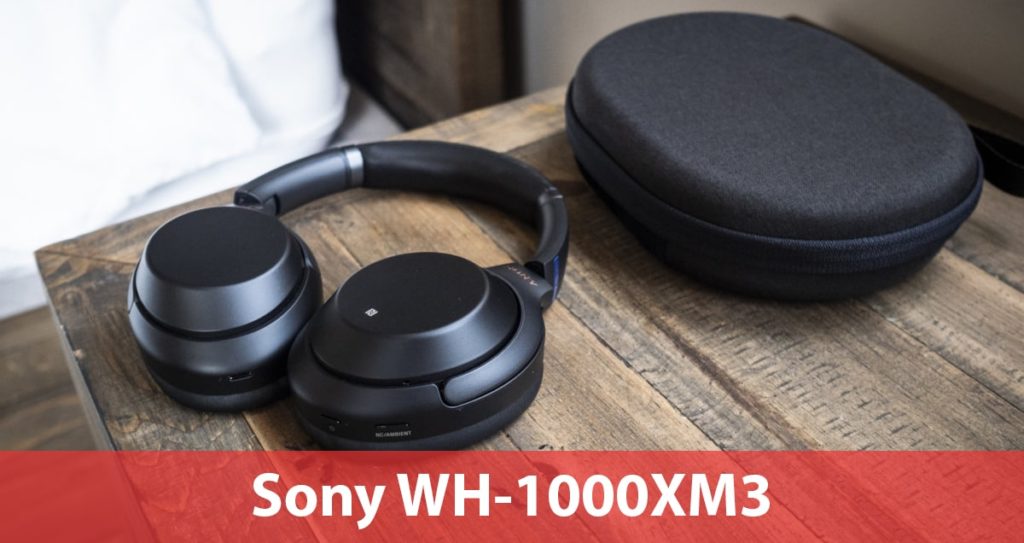
These is the first and the best headphones for your iPhone even for all devices including Laptops. I mentioned that Sony is the best company that has the second-to-none headphones and Earbuds for your devices. But the confusion is, which one is better to buy and it is worth the money we paid. Here I will give you the Sony WH1000XM3 review. So, Sony WH 1000 XM3 is a pair of noise-canceling headphones with a terrible name and it has a few handy features.
You can connect these headphones via Bluetooth to any device and you will find a touchpad on the right side of the headphone to control the audio. If we talk about its battery life, then, it has 30 hours of battery life with a 3.5MM audio jack at the bottom of the headphone. Besides that, you can enable the voice assistant for Google Alexa and Siri.
Moreover, if you want to change the settings or have full control over the headphone then you can do it via its application. Therefore, you will need to run its application and customize all the settings that sound good. However, you will have the adjustment of the noise cancellation between the human voice and the ambient voice so that you can hear the human voice clearly. There are many goodnesses about this headphone, So, purchase the headphone and give it a shot with all the settings and features.
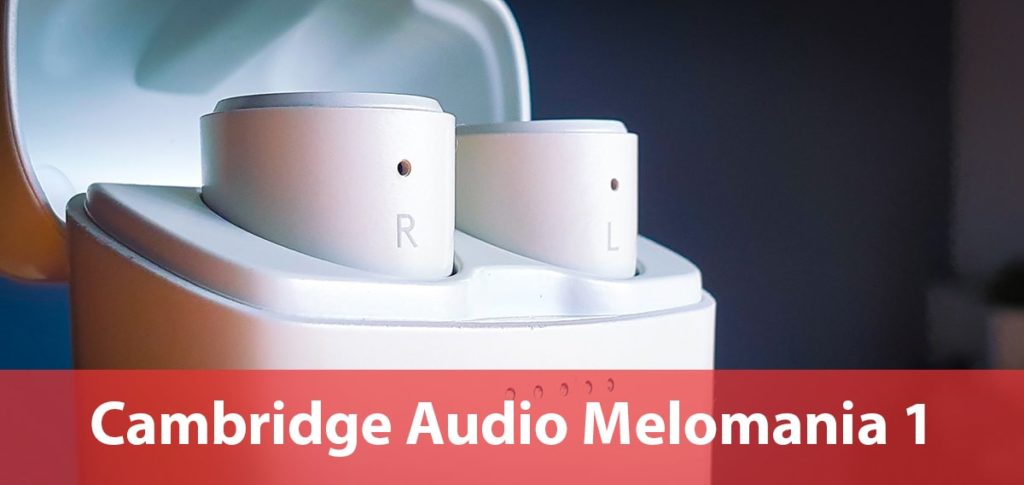
Have you experienced the Cambridge headphones before, If Yes, then you have the clue how the Cambridge Earbuds are the best and most high-quality? Here is the new release of the Cambridge Audio Melomania 1 with the true wireless charging case. It has a total of 45 hours of battery life (9 hours with playtime and 36 hours with a charging case). Although Cambridge charging case shape is like Airpods and it’s the smaller Earbud of this year.
So, this Earbud is waterproof and noise cancellation, you can enable the Siri or Google assistant compatibility. The best thing about this earbud is, that you can find it at a low price on Amazon. Therefore, click the link and order the new release Earbud.
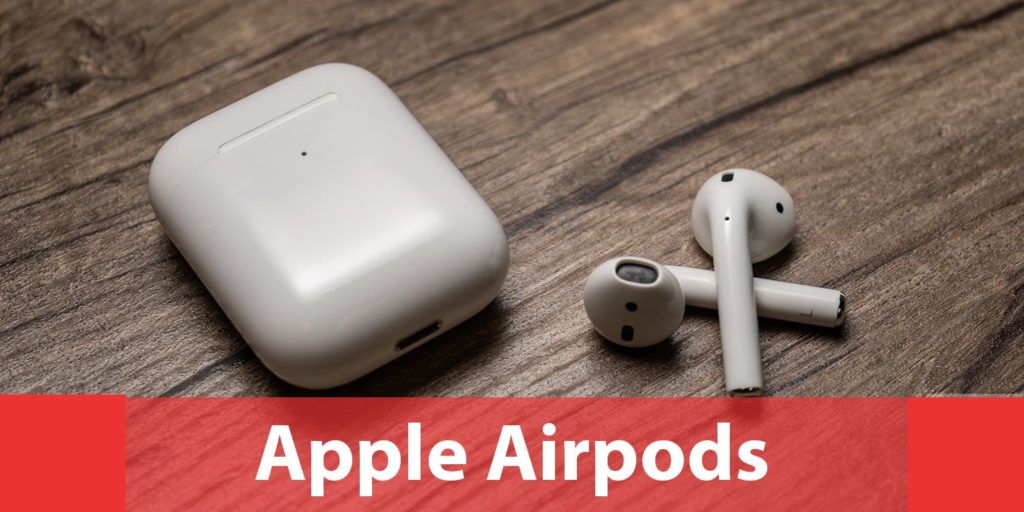
Apple Airpods 2 is the latest version and it’s far from the world-famous Airpods, but if we test the new Airpods then it looks similar to Airpods 1 even though there are some modifications and new features. Firstly, you will see the changes in pairing mild between Airpods 1 and 2 however the form and instances are the same. If we look at Airpods development then Apple brought an H1 chip in which offers us a greater 15% Talktime and you could switch the connection across two devices quickly.
Moreover, Airpods give you five times faster connectivity for the duration of smartphone calls and gambling games with Airpods, you’ll face less than 30% latency. you then have an S-Series hand-free alternative where you can manage collection without touching Airpods, So, this is the latest wi-fi charging and you have a normal wireless charging case choice with Airpods 2 and the charge is $14.
Apple Airpods is the most expensive headphone among all other headphones, though you will get them at $250. So, some users can’t afford this payment and they will not prefer to purchase this Airpod. Therefore, you can pick the other one.
Best Wireless Headphones for Computer
However, every headphone works for all devices including computers, smartphones, or other portable devices. There are some PC that doesn’t have Bluetooth feature, then, you can’t connect the wireless headphones. Hands down, you will need wired headphones to plug in and listen to music or play games.
In case, you have a laptop then you can use wireless headphones and connect it via Bluetooth. But the Desktop computer doesn’t this feature and you don’t have any method to connect it, Therefore, you need to purchase a wired headphones. Though our topic is about wireless headphones. But here I will mention some best wire headphones. In case, you have a Desktop computer then use this one.
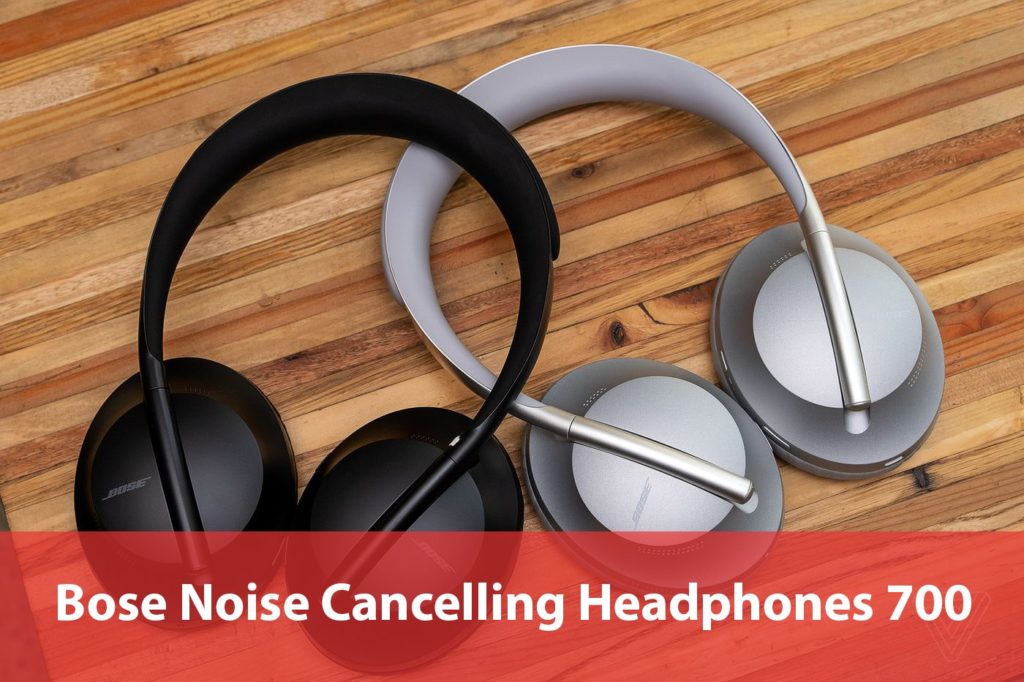
The first wireless headphone on the list for the computer is Bose noise cancellation headphones 700. Its name is terrible but this headphone is new and it has the best and unique design. Hands down, Bose headphones compete and they release the best headphones for their customers. However, this headphone has a black and silver color that’s what I like about its design. You can see its smooth ear cups attacked to the single stock.
You can rotate the headphone and it has 100% movement flexibility. Thanks to Bose to added the new features to this headphone. Bose 700s headphone is much better than the previous version of headphones. So, you will have the USB-C connector and you can connect via Bluetooth on two devices at a time. that’s what I like about this feature. Moreover, you can play/pause the music by double-clicking on the cap’s surface or scrolling up and down to change the volume of the song. Besides that, you can change the songs by moving your finger left and right.
In this headphone, you will get three buttons and on the right side, there are power and Bluetooth buttons. Simply single-click the button to turn on and off the Bluetooth and press for a long time to power the headphone. Then, the next button is the voice assistant button. So, the left side button is about noise cancellation adjustment. There are many more features that you will get once you purchase the headphone.
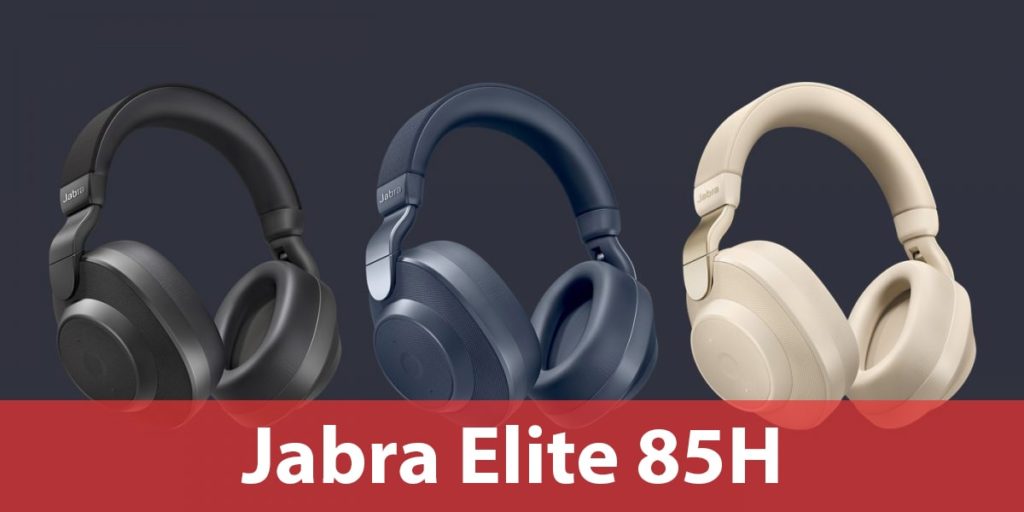
Jabra is one of the well-known headphones companies and it has legions of customers who purchase its newly released or other headphones as a row. Here is the other version of Jabra Elite 85H wireless headphones with a unique design and three colors which are black, blue, and silver. So, you can connect these headphones via Bluetooth even if you can use them with your Android or iPhone devices. If we talk about its noise cancellation then it is amazing Jabra put the best noise cancellation adjustment where you can adjust the noise-canceling while you are on call.
One of the important features of headphones is noise cancellation. With this feature, the user can easily hear your voice that’s what every user wants. However, this headphone is water-resistant and you don’t need to worry while you use them in rainy weather but there will be some dust on the headphone caps.
Moreover, you can control the music with its volume from your caps surface, There you will find buttons to play and pause the music or change its volume and even you can access to voice assistant of Google Alexa and Siri. Jabra has its application where you can access all the settings and you can customize the options. So, I recommend you go with these headphones and you can buy them from the above link.
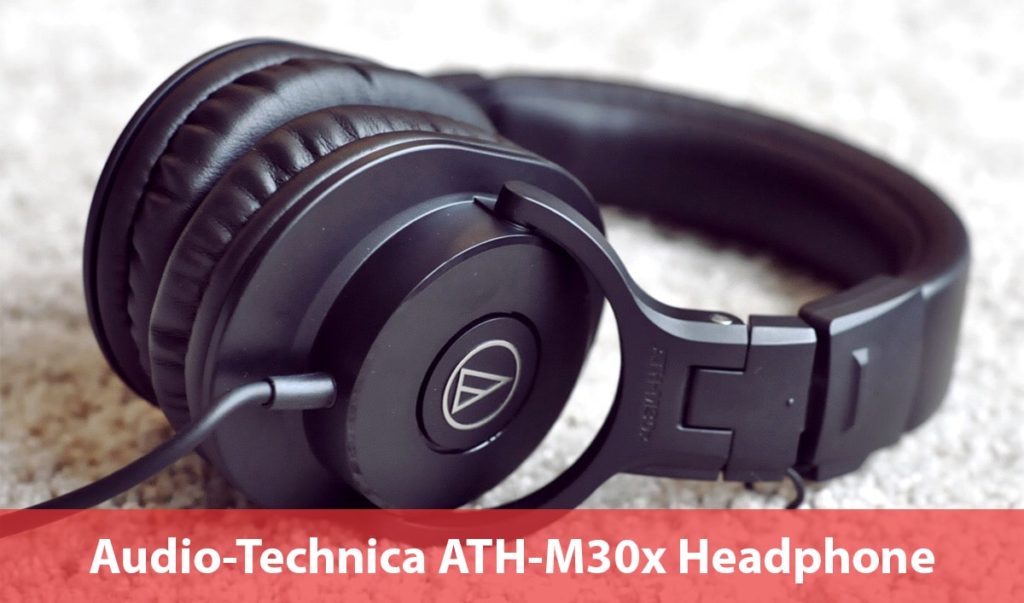
As I told you, I will mention the best wire headphone for your PC and your home use. Here is the best wire headphone called Audio Technica ATH-M30X. Audio-Technica is a professional monitoring headphone and it is great for DJ use and also for your home use. This is the line of M-series headphones from Audio-Technica and this is the second generation of headphones.
Audio Technica’s new headphone model is in demand because of its low price budget you can buy it at $70. I think everyone can afford this price. So, let’s talk about its design, the design is awesome and it’s very comfortable while you wear it then you feel free with these headphones.
Moreover, it has very comfortable ear caps that you can wear the headphone for a long time without any problem. It has a high-quality sound system and it will reduce the outside noise. So, among wire headphones, Audio-Technica is the best to buy.
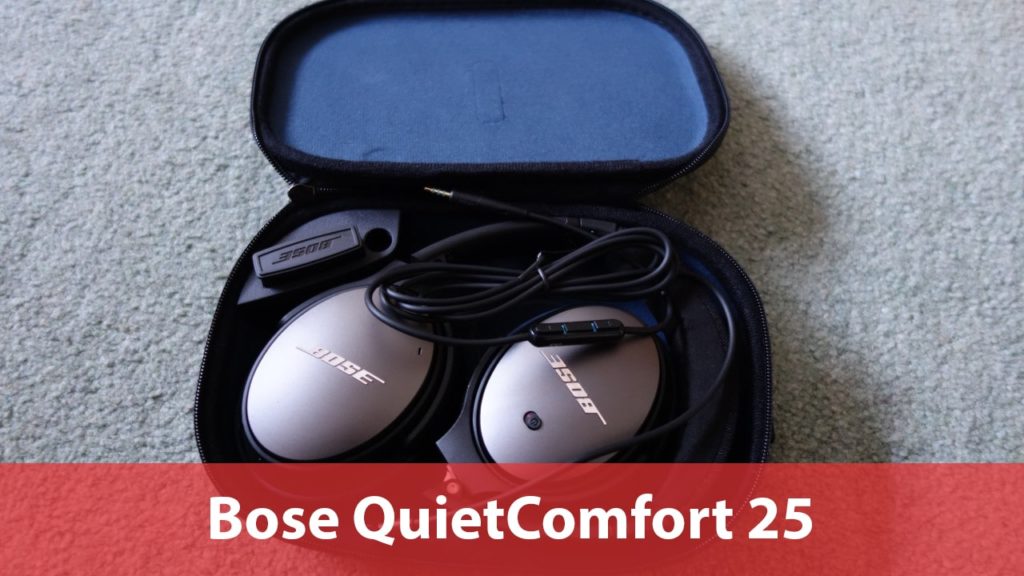
Bose headphone company has a high reputation for its products and so far thousands of customers are purchasing Bose headphones. Here is the old Bose headphone model released in August 2009 but still people prefer this model and they recommend all to go with this headphone. So, Bose QuietComfort 25 is the best for noise canceling and a high-quality sound system. The company mentioned, that this headphone is basically for Apple devices but you can use them with any device.
Bose QC 25 model has an awesome design it’s made of plastic that you can rotate anywhere and it is 100% flexible. you don’t need to worry about its body part. Everything will work fine and it is very comfortable while wearing the headphone for a long time. However, among wire headphones, this is the only one that has more customers so far.
Other Wire Headphones you must check
There are many wire and wireless headphones in the market but I will mention those headphones that are worth the money you will pay and will be second-to-none. So, check the below wire headphones and purchase your favorite one.
There are many gaming headsets but the problem is which one is the best and perfect for gaming PC. Here, I will show you the best Wireless headphones for Gaming.
The best headset for gaming or gaming PC is Steelseries Arctis 7 which is perfect for game lovers to use while playing games. People prefer wireless headsets for gaming because they don’t want the stupid wire to disturb them again and again. Wearing headphones during the game is much better if you are playing multiplayer games then it’s a must to have a headset to know what’s going on. So, Steel Series headphones help you to play your game and get the best experience. You don’t need to worry about the battery life, Here, it has up to 24 hours of battery life with 20Hz-20,0000Hz frequency response.
Steel Series 7 headphone has many new features that are worth our money and make us two-minded about what to do. Headphone with noise cancellation is more in demand than non-noise cancellation. Thus, one of the features is noise-canceling and the other one is chat mix control, customizable ear cup plates, and headband.
You can control the sounds from the earcups, Here, you will find buttons to customize the volume or power off the headphone. Therefore, without wasting your time click the link and order the headphone.
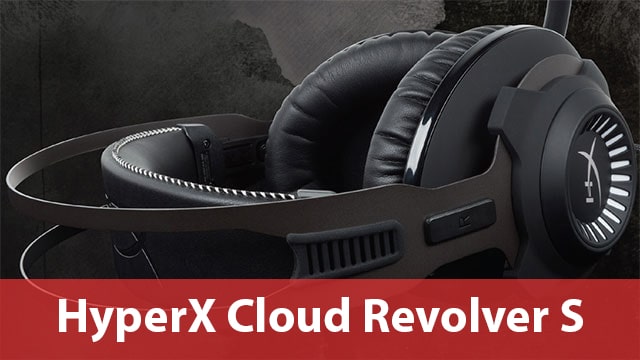
When we first sat down to review the HyperX Cloud Revolver S, we have been a tad conflicted. On one hand, it boasts exceptional 7.1-channel surround sound, introduced through Dolby’s trademark virtual sign processor. On the other, it is extremely expensive when compared to other similar headsets. Fortunately, as one in all Kingston’s most subdued pair of cans we have ever seen (or heard), the pure consolation and top-notch sound greater than make up for its high rate and weirdly placed detachable mic. And that’s why it tops our listing of the best PC gaming headsets.
So, here I give you another best gaming headset that is worth buying, In case, you are curious to know about gaming headphones then keep reading till the end.
If you are a serious gamer and you play games most of the time then this headphone is for you. The Astro A40 + MixAmp is a premium gaming headphone package built for game lovers who can control all the settings with their fingertips. This headphone is the best so far around the other gaming headsets. Thanks to the company for several features, lightweight frame, soft, and awesome earcups with high-quality sound.
Astro A40 has an awesome design if you see the earcups or other body parts all are made awesome. So, there is a new upgrade to the speaker and the headset. Besides that, there is a new upgrade with MixAmp that is handy for users. However, this headphone is in stock for PS4, Xbox, and PC. That does not matter for which purpose you are using but you will enjoy wearing an Astro A40 headset.
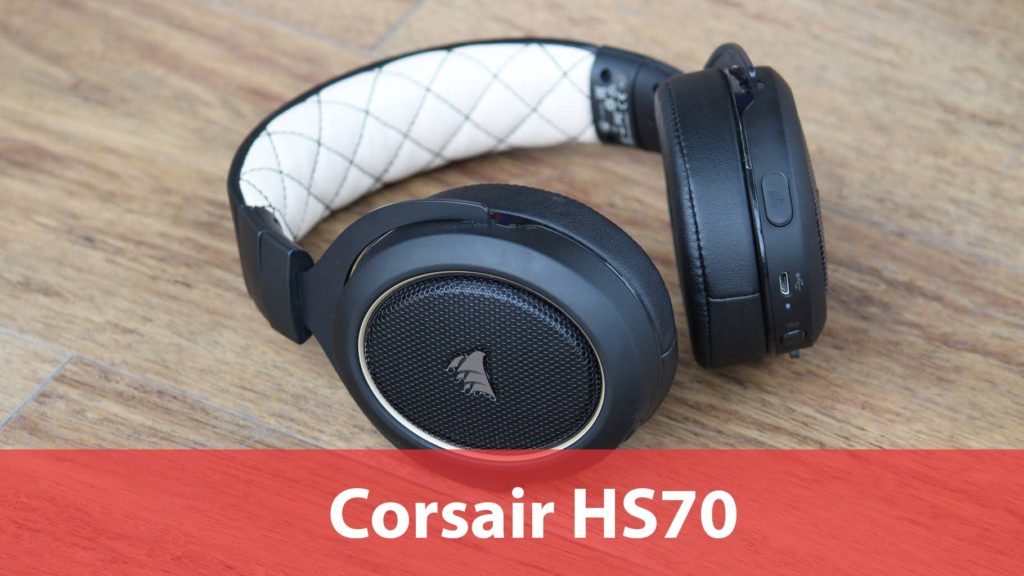
Corsair has done amazing work for its customers they are trying their best to make the higher-end models with high quality and best features at a low price according to other headsets. This is the well-designed and best headset for gaming called Corsair HS70. HS70 available in White and Black colors, It has up to 16 hours of battery life and is much more comfortable to wear during the game.
You can adjust the earcups to wear and feel comfortable confidently, Moreover, you can rotate the earcups with 100% flexibility. The design is so simple and you can control the volume from its earcups. Here, you will find volume buttons, a USB-C port, and a power button on the left side earcups. Moreover, you can customize the settings via its application. Finally, this headset is in demand and till now thousands of users purchase these headphones and they are happy with playing games.
Best Wireless Headphones for Running Or Working Out
Nowadays, gents and ladies are going gym or outside for a workout, So, all of them prefer headphones to listen to music while running or workout at the gym. Listening to the music during the workout have another feeling you just enjoy the time you spend and you will love to have more workouts. But, all these things will be done when you have the best wireless headphones for Running or Working out. So, check the below headphones.
Power Beats pro is an amazing headphone for running or working out without any panic you can use it. It has several features such as this headphone is IPX4 sweat and water-resistant. This is not mean you use it for swimming time, only you can use it while running or working out at the gym. Moreover, you can wear it in rainy weather too. Besides that, it has an H1 chip that you can connect to Apple devices via a strong Bluetooth connection.
With this headphone, you will get 9 hours of battery life with an additional 15 hours of charging case battery life. It has a fast-charging feature if you charge it for 5 minutes then it will give your one and half hour playtime backup. Moreover, you can control the music and music volume from the earbuds. So, this is the best headphone I prefer to purchase.
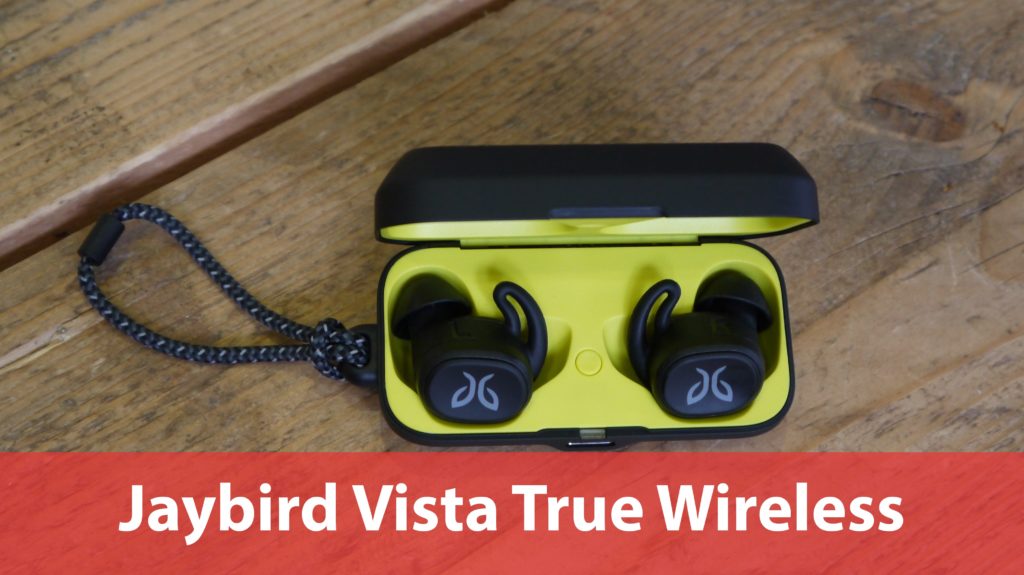
The next well-known earbud is Jaybird Vista which is the best for running and working out. There are multiple features and the new update with its application that I like is custom EQ. So, once you open the app then you will find 6 different tones simply select one of the tones and slide up and down for the volume. What I think, is the best feature and the best thing about its high-quality sounds.
There are many earbuds but Jaybird Vista earbuds have the best sound quality and I think it’s much better than Apple Airpods. So, you can put it in your pocket because its case is too small and it’s very comfortable and portable. Besides that, you can charge it via USB cable. At the bottom, this is amazing and second-to-none.
If you want to listen to your co-worker or you want to listen to music and people’s words of the mouth at the same time. then, AfterShokz Trekz Air is the best earbud for you. While wearing these headphones from the backside of your head and it will be in front of your ear and it will not block your ear or stop you to listen to others. This will be good when you are crossing the road and you can hear the car sounds or surrounding noise.
So, you can charge it with a USB cable and connect it via BlueTooth with your device. This headphone has four different colors and you can go with your favorite one.
Wireless headphones become in demand rather than wire headphones. So, you will find thousands of wireless headphones and wired headphones, But the question is? which one is better to buy. Therefore, I mentioned different types of headphones for all devices that you will need in the future.
I hope you find your favorite headphones and you would purchase it from the link given in this article. Moreover, if you have any questions then feel free to ask me in the comment section.
Facebook is the most popular free social networking platform that allows users to create a personal account, edit profile, add Bio, upload videos and pictures, send messages, and find thousands of friends to be in touch with. However, Facebook is in the 4th position overall and it has 2.50 billion monthly active users. Besides that, you can create your groups for your business or you can create multiple pages for your business, brands, celebrities, and other organizations.
To create your own Facebook page you will need to have a Facebook account, after that, you can create a Facebook page for your brands, business, and other purposes. The one who creates the Facebook page will be the administrator and he/she can upload videos, pictures, status, and add more admin for the page. For the Facebook page you will not add friends or send a request to your friends, only you can gain followers that will like your page and like, comment, and share your Facebook page posts.
Most of the Facebook page admin don’t know that they can add multiple admins with different permission levels for their Facebook page. The pros to add more admins on your Facebook page is to promote your page and upload daily status to keep and entertain your followers. Those pages will gain more followers and like those who upload daily updates and have more than 1 admin to run the page.
Some pages earn money and they monetized their Facebook page and connected with Google Adsense to earn money. Yes, you can monetize your Facebook page, not Facebook group and you can earn a lot of money if you have thousands of followers. So, in this article, I will show you how to add admin on the Facebook page using your mobile or PC.
Why do you need to Add Admin On Facebook Page?
Hands down, a single person can run the whole page and uploads daily updates, then, why we need to add more admins on the Facebook page. However, adding more admins with various permission levels is good for your page. You can say two people are better than one person or three people are better than two people. Because all of the admin will get together and work on the page to promote and gain more followers.
Why do you need to gain more followers and likes for your page? However, the main reason that Facebook page admin tries for the first time once the page is created, to gain likes and followers to see the page posts, like the posts, comment and share the posts with their friends to promote their brands, business, or other things.
The only purpose to create the Facebook page for our brands, business, or other organizations is to promote and popular it. Therefore, follow this article and add more admins for your page to promote them.
Five Different Page Roles on Facebook Page
There are different permission levels for admin and you can give only one role to each admin to perform on the page. So, below are the five different page roles on the Facebook page.
Admin:
The admin has full control on the page, he/she can upload files, send messages, even create an advertisement, control the other admins and seeing which admin is uploading files, add more admins, and many more things.
Editor:
By the name you can understand that an editor can edit the post, create new posts, send messages, see which admin is uploading files, and manage the posts. Even the editor can monetize the page and view insights.
Moderator:
A moderator only response to the comments and delete the comments, send messages, see which admin is creating posts, view insights, and monetize the page.
Advertiser:
The advertiser can’t create a post only he can see which admin is uploading files or commenting to the posts. Moreover, he can create adverts and view insights.
Analyst:
This admin has only the role to see which admin is uploading files and commenting to the posts and he can view the insights.
How to Add Admin On Facebook Page using your Mobile?
You know most of the users run facebook from mobile and some users are running Facebook on PC. However, Mobile is the handiest device that is used from billions of users and you will find thousands of apps that can be run on mobile. Therefore, first of all, I will show you how to add admin on the Facebook page using your mobile.
However, I am using an Android phone for adding a new admin to my Facebook page. But you can use the same method for the iPhone mobiles.
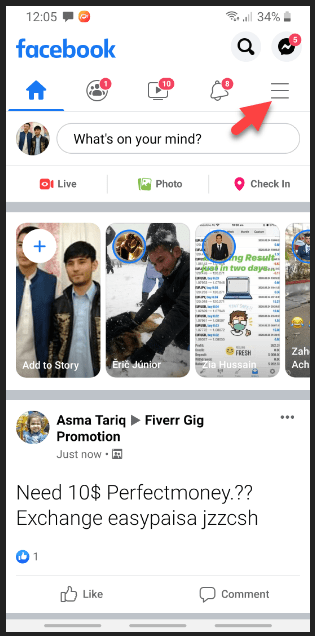
Step 1: Open the Facebook app on your mobile if you don’t have then download the Facebook app from the play store and login to your Facebook account. Once you login then clicks the three-line menu located at the top-right side of the page.
Click the Facebook Menu
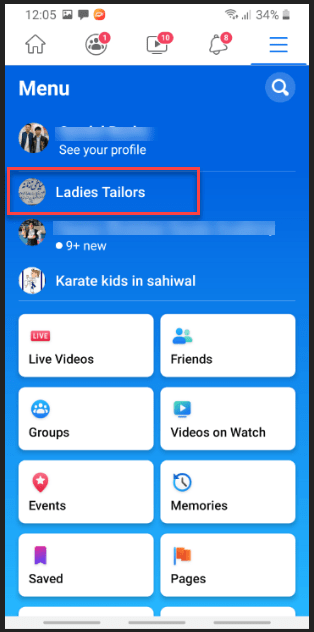
Step 2: Now open the Facebook page that you want to add admin.
Open the Facebook Page
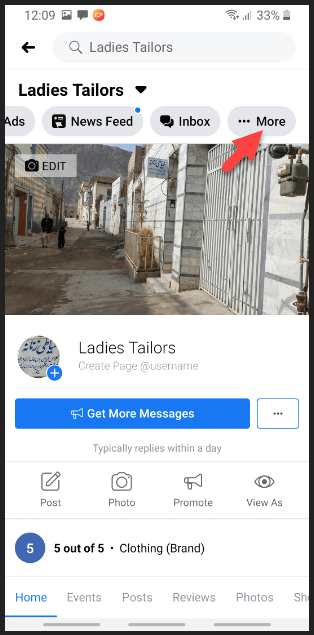
Step 3: Here, you are on your Facebook page. Now, click the More option from the top menu.
Click More Menu
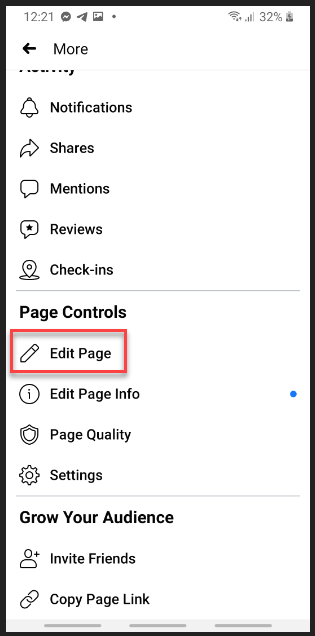
Step 4: On more menu section, scroll down and on the page controls section click the Edit Page option.
Go to Page Controls
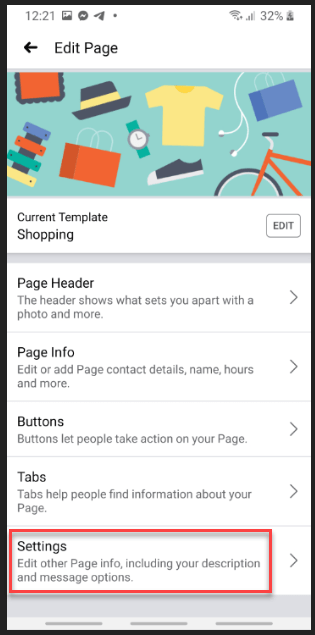
Step 5: After that, you will need to click the Settings option.
Go to Settings
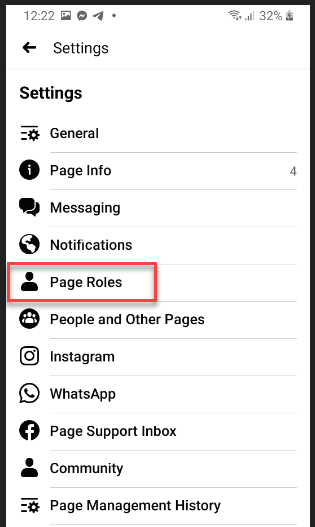
Step 6: On the settings page, you will see the Page Roles option, Therefore, open it.
Click the Page Roles
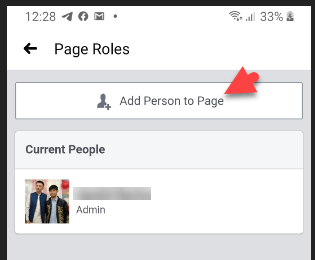
Step 7: On the page roles, click the Add person to page.
Add Person to Page
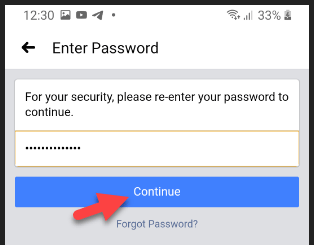
Step 8: Here, you will be asked to re-enter your Facebook account password to continue.
Enter Facebook Account Password
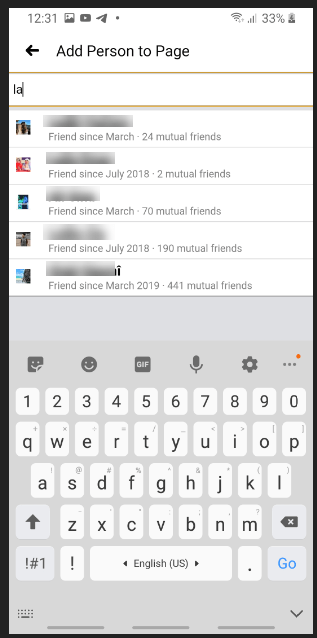
Step 9: After that, type the name of the person you want to add as an admin. Once you typed the name then click on the account person.
Type Person Name
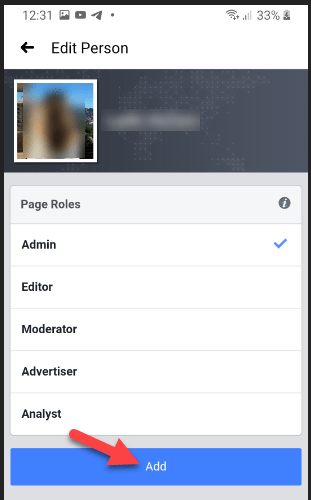
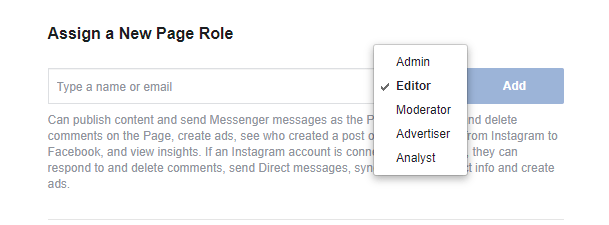
Step 10: Finally, give the person page roles, Here, I will give it the admin page role. you can give any of the permission levels and click the Add button to add the person as an admin.
Give Person Page Roles
At last, you have successfully added the new admin to your Facebook page. However, you can add as many admins as you want, there is no limit for adding admin to your Facebook Page. If you want to add another admin then follow the same method.
Added New Admin
How to Add Admin On Facebook Page using your PC?
You get the method to add admin on your Facebook page using your mobile. Now, let’s see how you can add a new person as an admin for your page.
Step 1: Go to your favorite browser and search for facebook.com. After that, log in to your Facebook account. Here, you have three options to open your Facebook page.
The first option, click the Dropdown menu from the navigation bar and open your Facebook page.
Facebook Main Menu
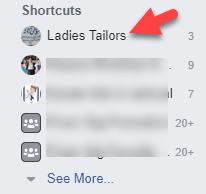
The second option, look at your left side menu and on the Shortcuts section, you can see your Facebook page. From there you can open your Facebook Page.
Open Page from Shortcuts
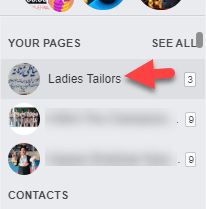
And the third option, you can find your Facebook page on the right side of the page.
Open Your Facebook Page
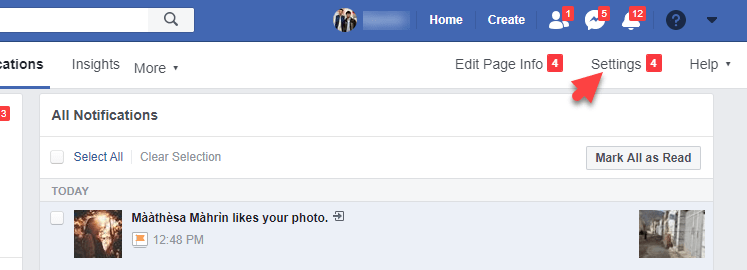
Step 2: Once you open your Facebook page then go to Settings.
Go to Page Settings
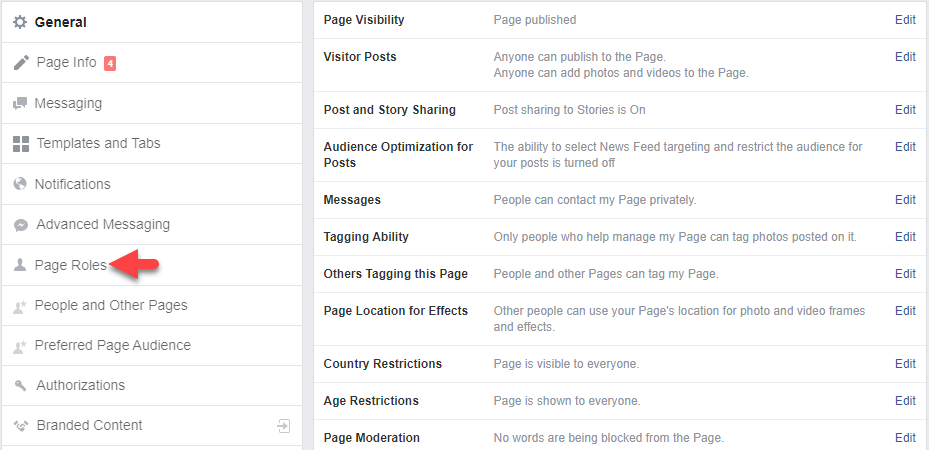
Step 3: On the settings, you will see several options. Therefore, on the left side, on the General section, you will find the Page Roles option. So, open it.
Page Roles
Step 4: Here, you need to type the new person’s name or email. After that, select the admin roles for the person and click the Add button.
Type Person Name or Email
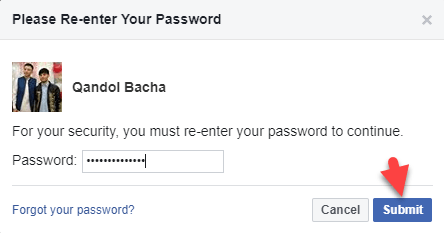
Step 5: To add admin on your page you will need to type your Facebook account password. Afterward, click the submit button.
Type Password
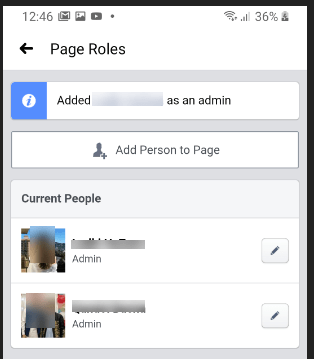
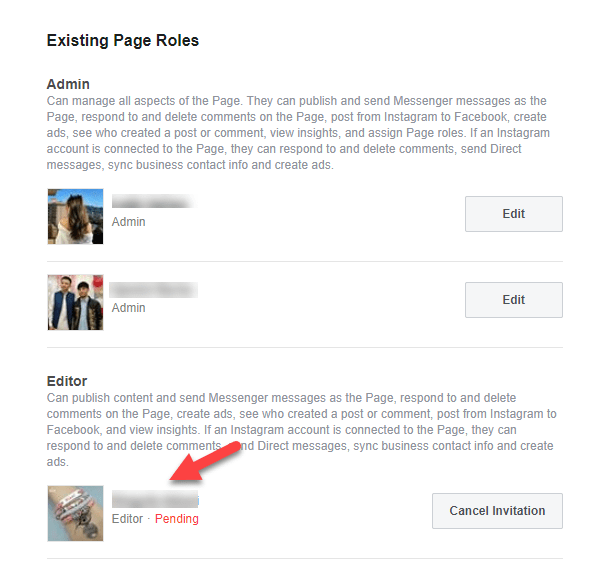
Finally, you have added a new admin for your page and you can see the total admins of your page below on the Existing Page roles. You can see the process is pending because the person needs to accept your admin invitation. Or you can cancel the invitation.
Existing Page Roles
How to Remove or Change Admin Role?
You have added a new admin on your Facebook page but you notice the admin is not working and not active on your page. Therefore, you don’t need anymore and you want to remove it from your page roles. Or you want to change the admin permission levels. For example, if the person is given the admin role and you want to change it to the editor role then you can do it with the below method.
Open your Facebook page.
Go to page settings.
On the left side of the page under the General section, you will find Page Roles. So, open the page roles.
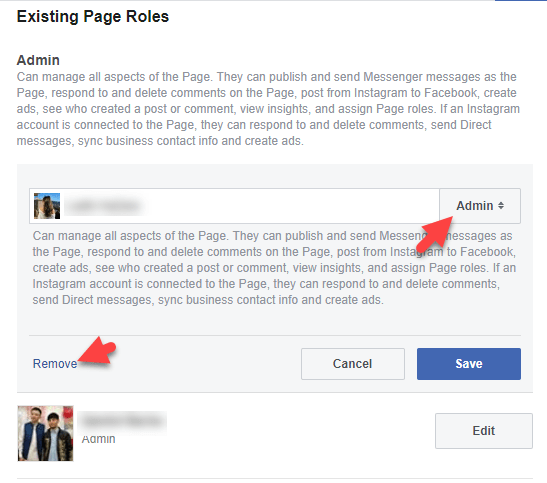
Now, go to the bottom on the Existing Page Roles section. Here, you will see all the admin that you added. So, click on the edit button.
Here, you can change the admin role or you can remove the admin from the page. Once you have done then click the Save button.
Two Admins are better than one admin! So, if you have Facebook Page and you want to promote it and gain thousands of followers then add a new admin to your page and work together for your page performance. There is no limit from the Facebook side for adding admin on your Facebook page. You can add multiple admins for your page.
A question from you all, Tell me in the comment section how many admins you have for your Facebook page? type the amount in the comment section.
A few days ago I get thesoftware update notification on my Samsung Android phone and it was the latest update of the Android 10 operating system. So, I just tab the notification and it asked me to download the Software update. Therefore, I download it and install it on my Android phone. Once, it’s installed and my Android phone gets restart then I checked my phone and I saw there are tons of new features and changes that are awesome and one of the handy features on the latest software update is “Link to Windows”.
This feature is new and it is available for those who updated their Android phone to the latest software update. If you are using the previous software update then you will need to update your software to the latest version that was released on March 2, 2020. In case, the software update is not available for your Android phone then don’t worry, Microsoft Windows has the best feature that was included in the latest Windows 10 update and the feature is “Your Phone”.
However, Microsoft has released the latest Windows 10 Operating system update, therefore, you have to download and install the latest update. for sure, you will get the Windows 10 update notification on your PC. So, go to Setting and search for “Check updates” if the new Windows 10 update is available for you then you will get it and you need to download it.
Though “Your Phone” feature is available on the Windows 10 October 2018 update. In this case, you must have this feature on your Windows 10 PC.
You will get several articles on google that will guide you to connect your Android with Windows 10 PC Via Your Phone feature, But in this article, I will show you How to Link Android phone to Windows 10 PC with “Link to Windows” feature that I have on my Android phone latest update.
Before moving on, I request you all and I need your beautiful support please like the Techbland Facebook page for more product updates.
Why Link Android Phone to Windows 10 PC
Connecting Android phone to Windows 10 is the best way to share all the android files to the Windows PC. there doesn’t seem to be any damage in linking your Android to your PC though there will be many benefits. So, once you connect your phone with Computer then you will receive notifications, you can access your Photos, Messages, web pages, and many more.
There are many applications and software that allow you to connect your Android with Windows 10 PC, but the feature I am going to show you is the best one so far and this feature is new on the Android phone. When you connect your Phone then you will receive SMS on your computer and you can reply to the SMS from the PC. No matter, if you receive Whatsapp messages then you can reply to the message.
Create a Microsoft Account
before moving on, you will need to create a Microsoft account because you will link your Android to Windows Via Microsoft account. Once you open the Link to Windows feature then it will ask you to sign in to your Microsoft Account if you have then you don’t need to create the new one, simply go with your account. if you don’t have then follow the below steps.
Step 1: Click the linkto open the Microsoft create account page.
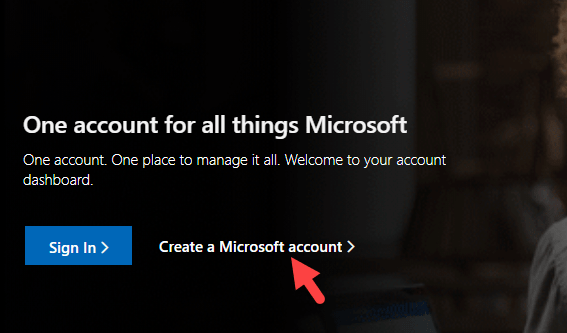
Step 2: Once you click the link then you will see the below screenshot. Here, click the Create a Microsoft Account.
Create a Microsoft Account
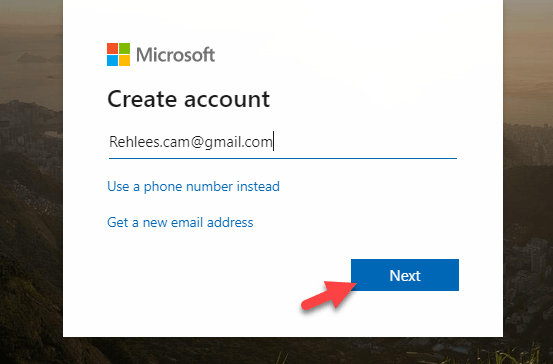
Step 3: After that, it will ask you to type the Email address you want to create an account. then click the Next button.
Type Email ID
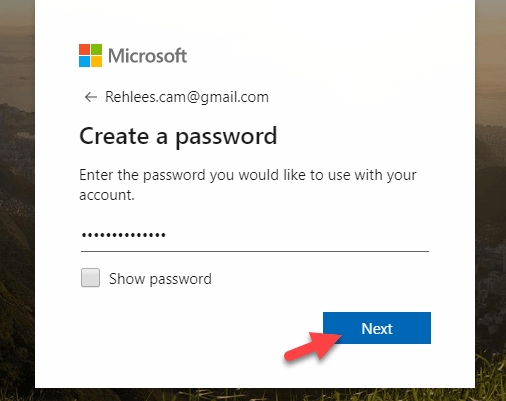
Step 4: Now, create a password, make sure, your password should not include your email address characters.
Type Password
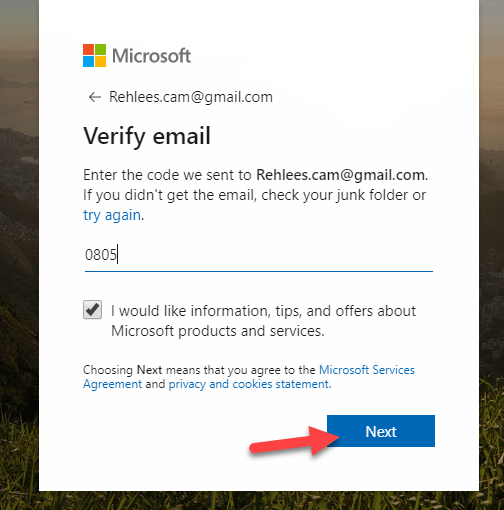
Step 5: Here, Microsoft will send you the verification code to your Email address. Therefore, go to your Gmail account and type the code.
Verify Email
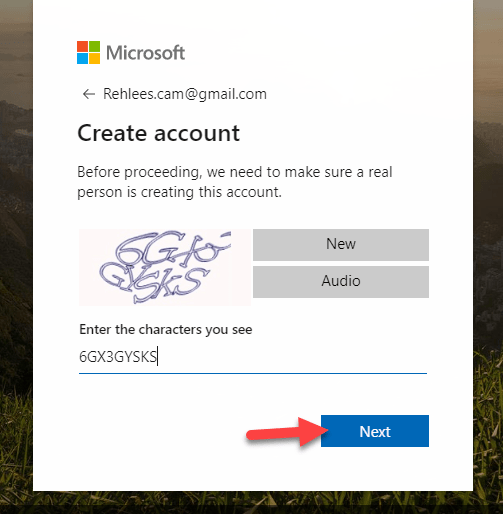
Step 6: Before proceeding, you will need to fill the captcha and click the Next button.
Fill Captcha
Congratulations! you have created a Microsoft Account successfully. now you can link your Android with Windows 10.
How to Link Android Phone to Windows 10 PC?
Take heed, “Link to Windows” feature is only available for those who updated their Android to the latest version that was released on March 2, 2020. Therefore, before going ahead, make sure, you have updated your android software.
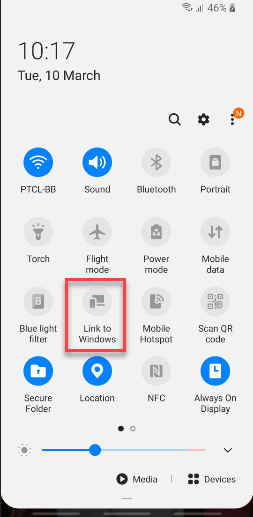
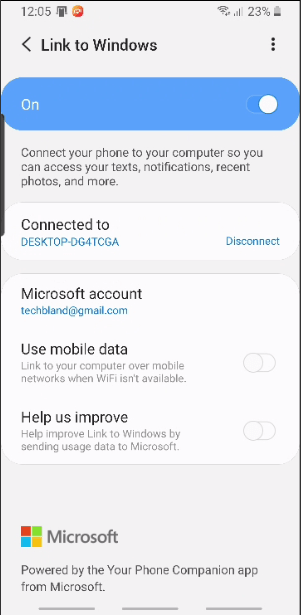
Once you update your software then you will get the “link to windows” feature on the quick setting panel or navigation bar. you can see the screenshot below.
Link to Windows
So, now you have the idea about “Link to Windows” therefore, let’s get started.
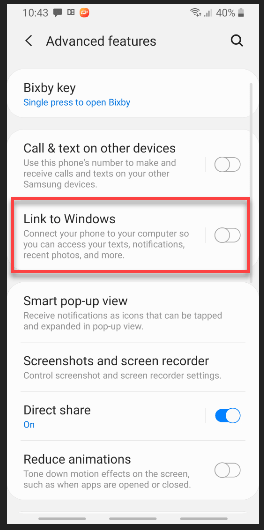
Step 1: you can open “Link to windows” from the navigation bar, but doing it from the setting is much better. Therefore, go to Settings > Advanced Features > Link to Windows. Now, click on the “Link to Windows” option.
Link to Windows
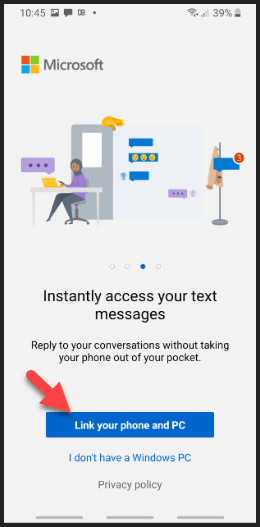
Step 2: Afterward, you will need to tab the Link your phone and PC.
Link your Phone and PC
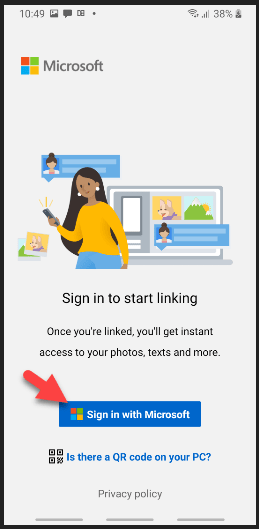
Step 3: Here you need your Microsoft account that I mentioned above to create it. Now, you need to Sign in with Microsoft account.
Sign in With Microsoft Account
Step 4: Here, click Continue and click the Allow option to allow your phone companion to access on your mobile.
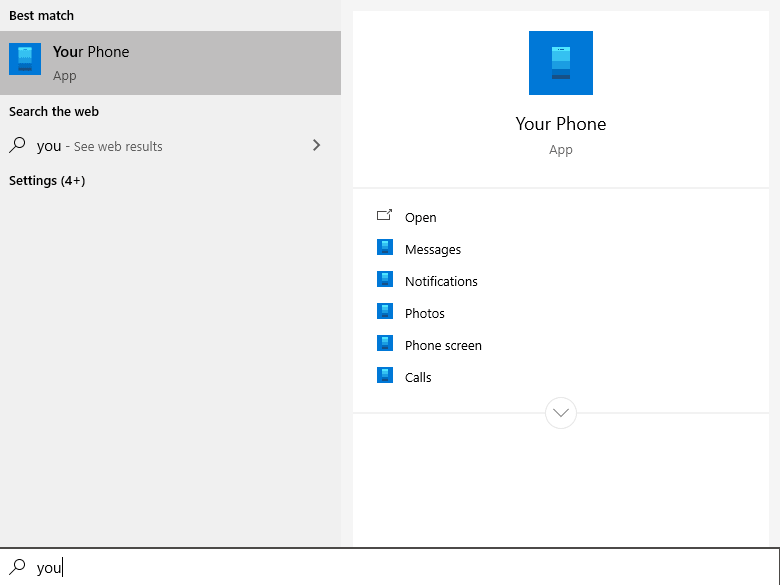
Step 5: As I mentioned, Windows 10 has a handy feature called “your Phone”, therefore, it will ask you to open Your Phone feature from the start menu. So, go to Start Menu and search for Your Phone then open it.
Open Your Phone
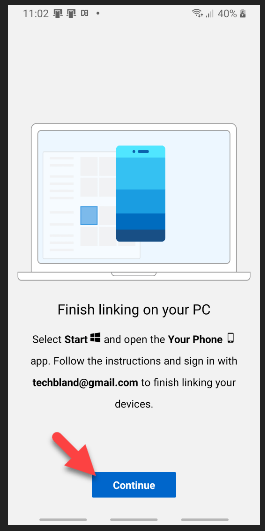
Step 6: Once you open the “Your Phone” app on your PC then click the Continue option on your android.
Linking on your PC
Step 7: After you continue, then it will check your PC. Therefore, wait for a while.
Step 8: Once it finds your PC, then, it will ask for permission to connect your phone with Windows PC. So, you will get three number options on your Windows 10 PC on the “Your Phone” screen. and you will get a number on your phone screen, therefore, select the number on the PC you have on your Android phone and click the Continue button.
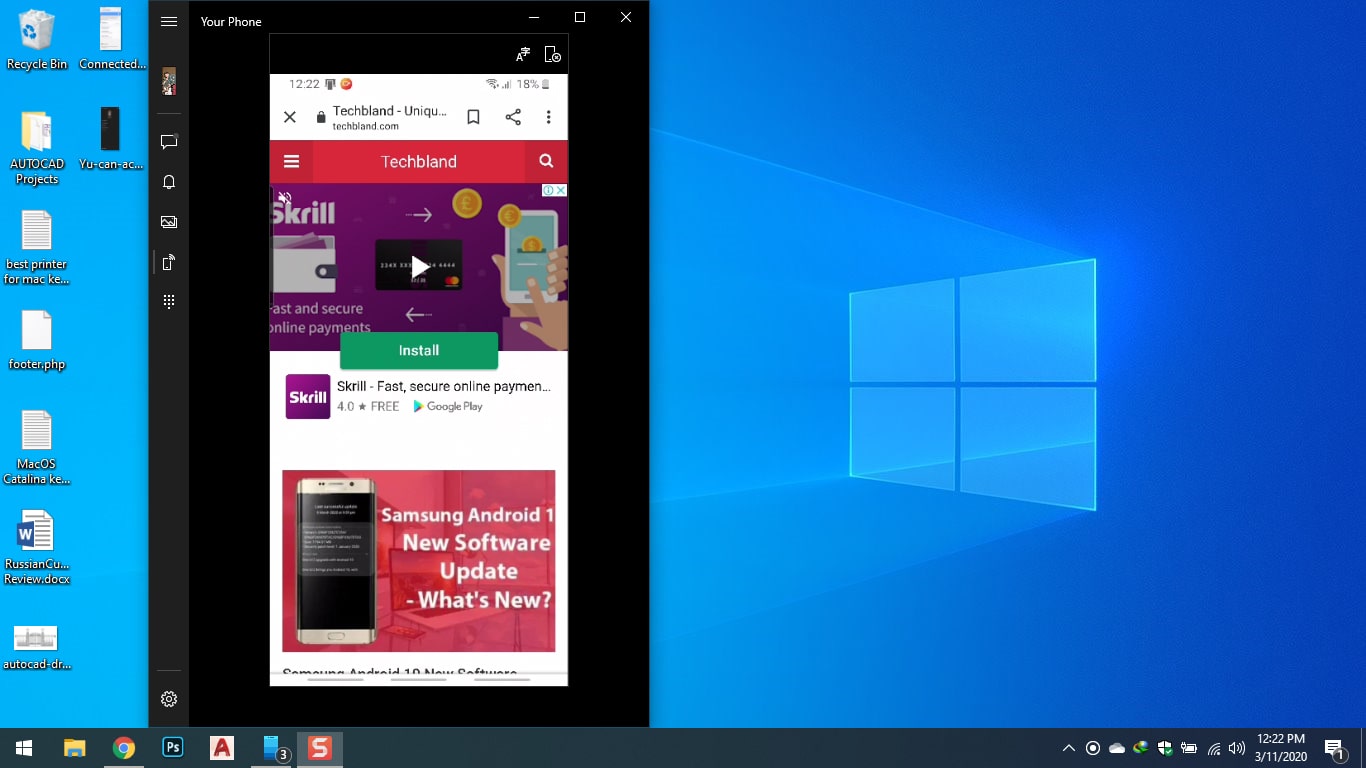
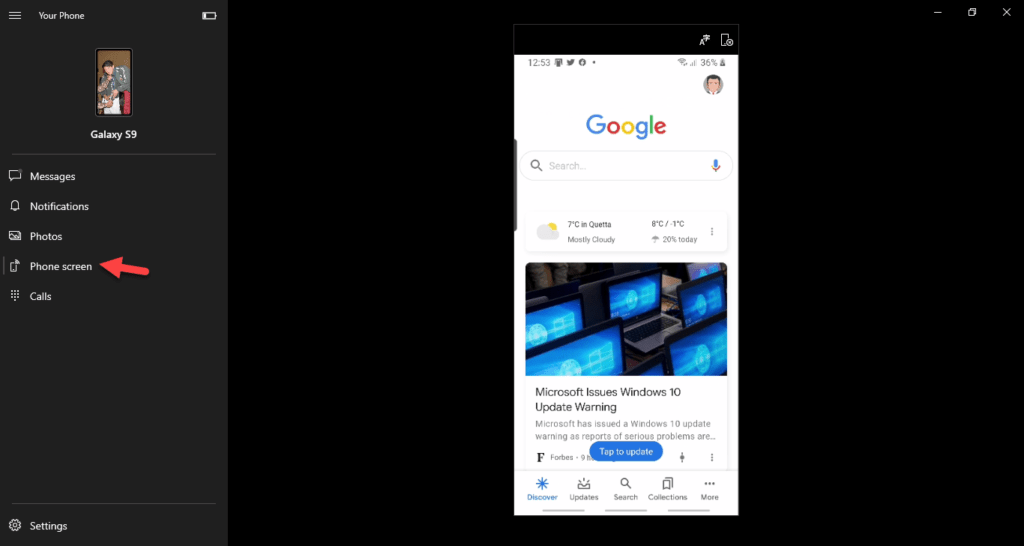
Step 9: Finally, you have connected your Android with Windows 10 PC successfully. Now, you can access to your Messages, Photos, Notifications, and even you can see your phone screen on your Windows.
Your Android Phone Connected with Windows 10
You Can Access to your Phone
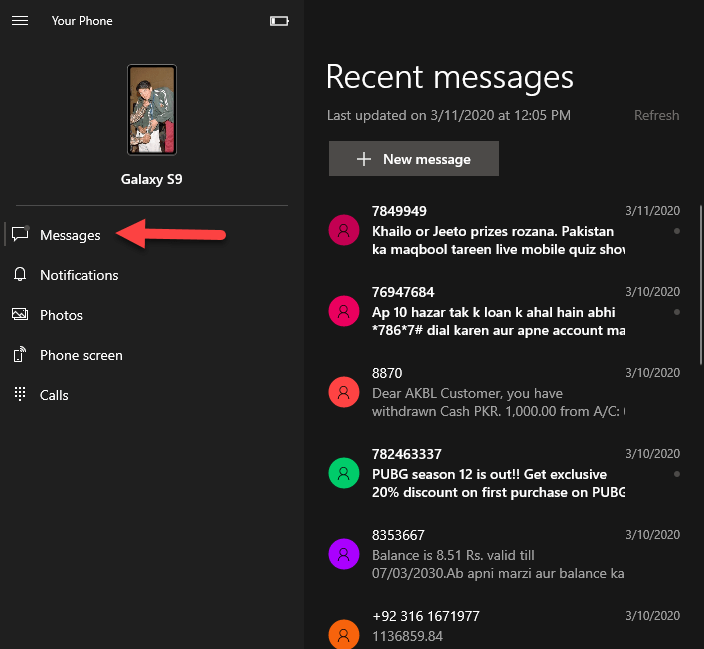
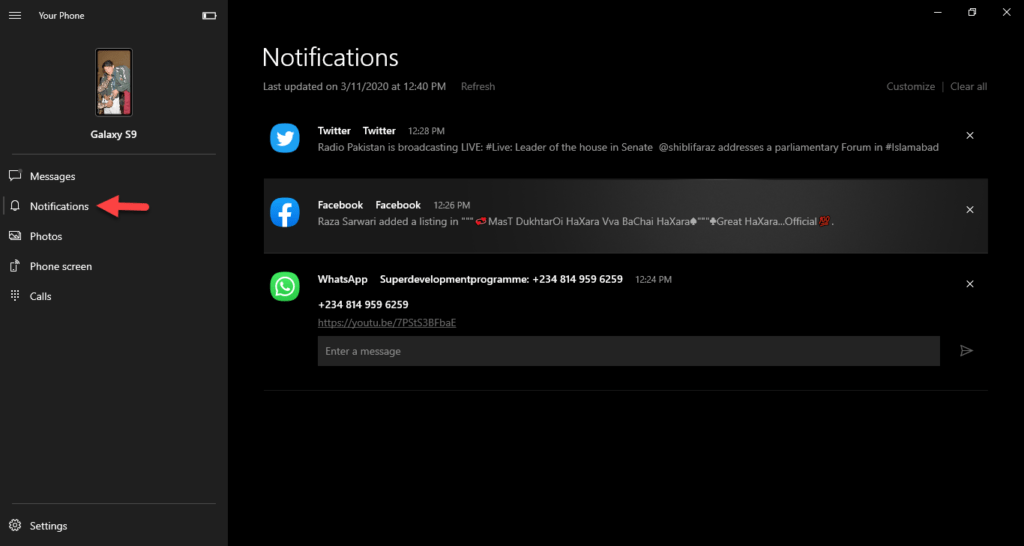
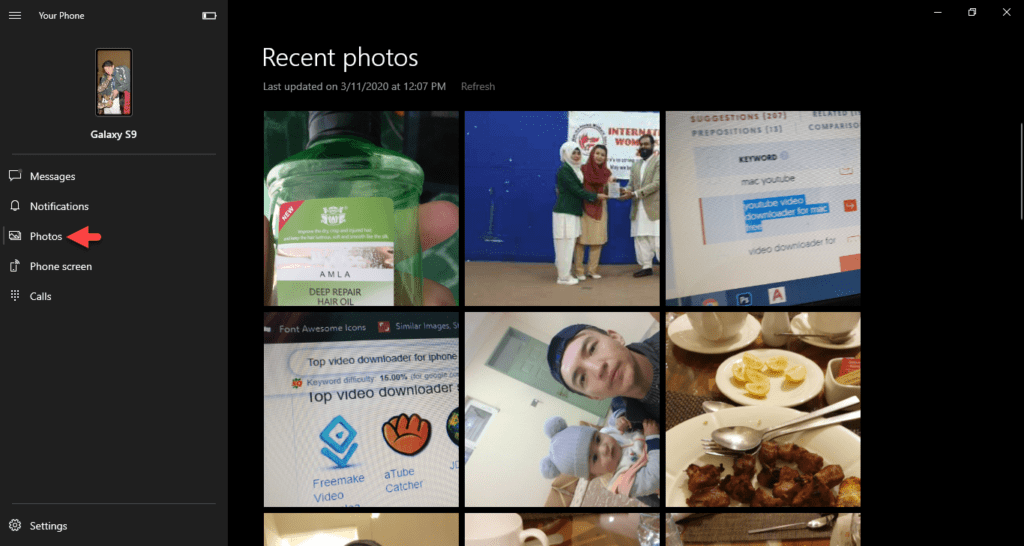
Once you connected your Android Phone to your computer then you can access your Messages, Notifications, Photos, Phone screen, and calls. Here, I will guide you on how you can control your Android from PC.
1: Messages
Control Messages from PC
You can control your messages from your PC once you connect it to your computer. you will receive new SMS on your computer if your android is connected and you can reply to the text from your computer. As you see the screenshot, Here, I have my SMS and I can reply to them from my PC.
2: Notifications
Android Notifications on PC
The second option you can control is Notifications. as you are receiving notifications on your phone the same you will receive it on your PC and you can access the notifications. For those users who linked their phone to the computer, they might not get a notification because they have not allowed it from their phone. Therefore, click the Open your Phone button and allows the Your Phone Companion App. after that, you will get notifications.
3: Photos
Access your Photos on PC
The third option that you can access your photos and you can bring changes to the pictures. Here, you can copy, share, and save the pictures you want. It allows you to control your whole pictures from your PC.
4: Phone Screen
Control Phone Screen
Simply, tab the phone screen and you will see your Android phone screen on your PC. From here, you can control your android like you can open Google, Applications, Camera, you can search for anything, and you can do whatever you want. Even you can send message or call to someone. This is what I like the new Android feature that I have.
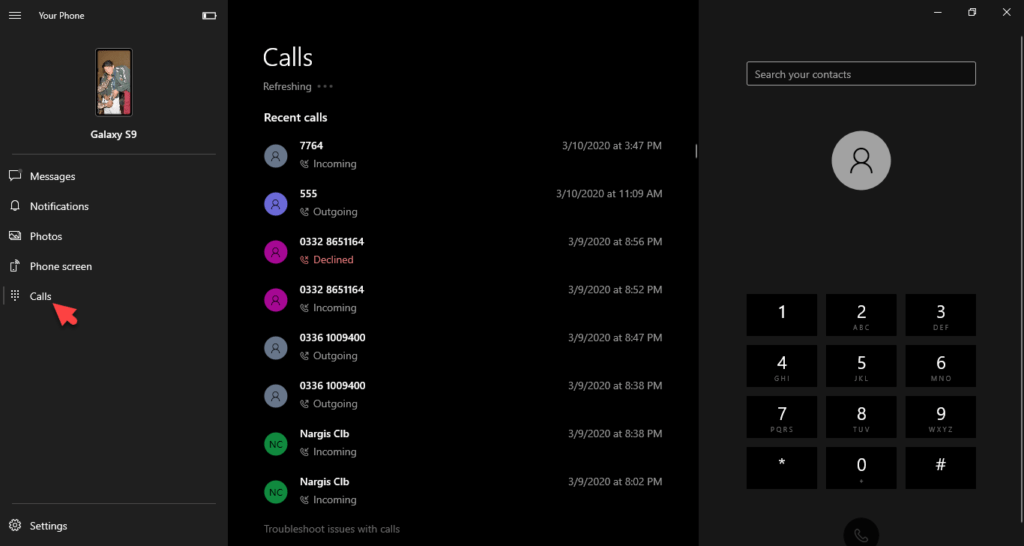
5: Calls
Receive and make Calls on PC
To receive and make calls from PC you will need to connect your android to PC via Bluetooth. After that, allow your PC from your Android to access your calls. Then, you need to send permission from PC to Android in order to get your calls history. Like this, you can make and receive calls on your Windows PC.
Finally, you have linked your Android phone to Windows 10 PC with the new Your Phone Companion application and Your Phone application. In case, you don’t have this app on your phone then go to Play Store and downloadYour Phone Companion. with this application, you can connect your Android with Windows 10 PC.
However, using its application might be difficult for you. Therefore, it is better to update your phone software to the latest version. After that, you don’t need to download any application.
Windows OS and Android OS are the best so far and the latest version of Windows OS is Windows 10 and the latest version of Android is Android 10 ‘Q’ although Google has introduced the next Android operating system called Android 11 ‘R’. You can get the android 11 developer preview mode to give it a try and test its new features and security level. However, the final version of Android 11 will release in May 2020.
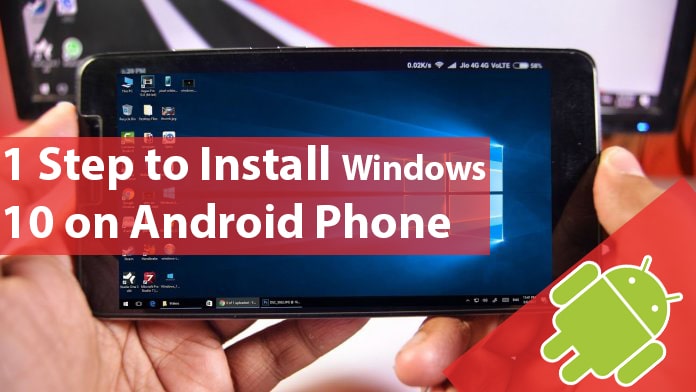
The question is Can I install Windows 10 on Android phones? though you can install an android OS on your Windows 10 PC using Android Studio but the main things you are looking for installing Windows 10 on Android devices. hands down, you can install Windows 10 on your Android phones without rooting your device. as the rooting device is not a good job because the rooted smartphones will lose its warranty.
However, there are Microsoft smartphone devices that are the same as Windows PC, it has a keyboard layout and windows operating system. If you don’t have Microsoft android devices then don’t worry still you can run Windows operating system on your android phone.
Remember, once you installed Windows OS, MacOS, or Linux OS on your android phone then you can use both operating systems at a time switching to Windows from Android and Android to Windows OS.
Can I install Windows 10 on Android Phone?
Do you know about virtual machines like Vmwareand Virtualbox? If yes! then you know how you can install Mac operating systems on your Windows PC though you can not run MacOS on your Windows PC, But virtual machines allow you to run multiple operating systems on a single host PC. In case, you love to test MacOS latest operating system which is MacOS Catalina 10.15 on Windows PC then installing it with virtualization software is the easiest step.
Therefore, you can install a Windows operating system on your smartphones using an android application. the application we are using in this article is the best and easy to use. if you don’t know about that application then keep reading the article and you will get the clue.
is it possible to install windows 10 on Android phones?
Those who are new with Android devices perhaps they don’t know what operating systems they can run on its smartphones though you have Android operating system on your device, besides that, you can run Windows OS, MacOS, or Linux OS on your Android devices. Therefore, you can run multiple operating systems on your Android at a time, as you are running more than one operating system on your single PC.
However, “impossible itself says I am possible” then, nothing is difficult and impossible. simply go to the browser and search for your question then you will get your positive answer with a positive solution. Finally, everything is possible in the internet world and it is possible to install Windows 10 on your smartphones.
How to install Windows 10 on any Android phone?
There will be easy steps to complete the Windows 10 installation on Android phones. remember, if your android phone is the latest model, speed, and supportive. then, you can install windows 10, otherwise, I prefer you to go with Windows XP, Windows 7. because you will face problems during the installation. as your android can not support the latest Windows OS. So, below are the required files to complete this article. check it out.
Required Files
Download and install the Limbo PC Emulator APK file on your Android.
Download and install File Manager from Play Store on your Android.
Finally, Download the Windows operating system ISO file on your Android Phone. if you want to install Windows XP, Windows 7, Windows 8 or Windows 10. then download the ISO file of the operating system. As I am installing Windows 10, So, I will download the Windows 10 img file.
One Step to Install Windows 10 on Android Phone
Once you installed and download the required files then you are ready and your android device is ready to install Windows 10. installing Windows Operating system on android with Limbo PC Emulator is the best and easy way to do that. you will have all the steps and instructions of installing Windows 10 on the Limbo PC Android App. So, let’s start the Windows 10 Installation.
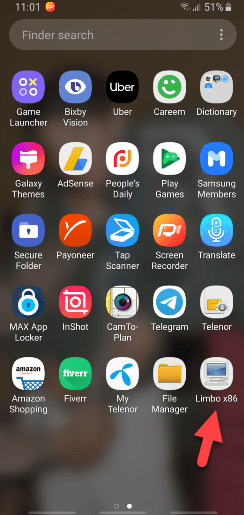
Step1: Unlock your android phone and go to the home page. afterward, open the Limbo PC Emulator.
Open Limbo PC Emulator
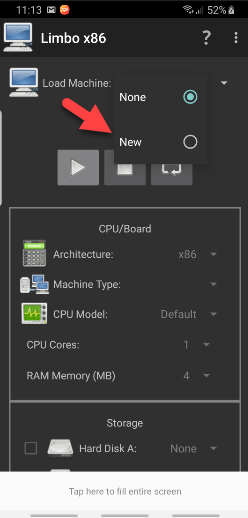
Step2: Now you inside the Limbo PC application, Here, click the Load machine and select the New option.
Click the Load Machine Option
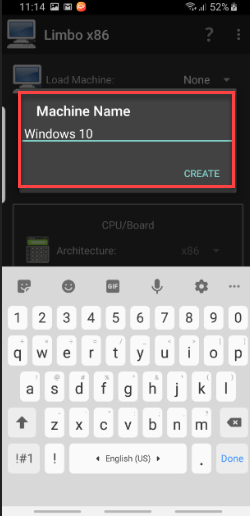
Step3: Once you tab the New option, then, it will ask you to give your Operating system name you are going to install. Therefore, type Windows 10 and click the Create option.
Type Machine Name you are Installing
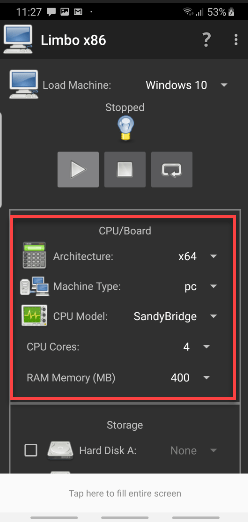
Step4: Once you provide the machine name then scroll down and edit the CPU or Board. So, for Architecture select x64 version, for machine type select PC, for CPU model select your android CPU model, give 4 CPU Cores, and for Ram Memory select RAM size for Windows 10.
Edit CPU
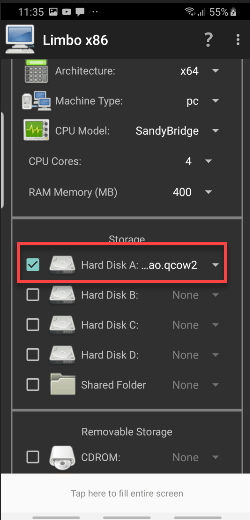
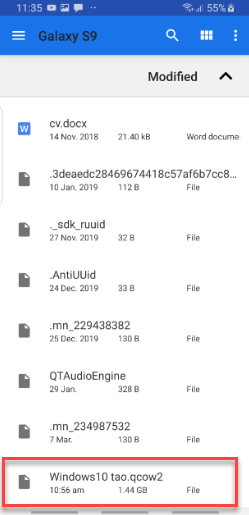
Step5: Now, it is time to insert the Windows 10 img file. So, select Hard Disk 1 and tap on the dropdown menu and tab on the open option. After that, go to your download folder and select Windows 10 img file that you downloaded from the above link.
Select Hard Disk img File
Insert Windows 10 img file
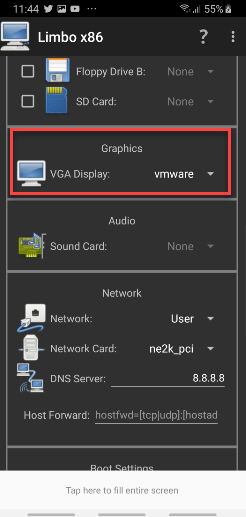
Step6: Scroll down, and select Vmware for VGA Displays.
Select VGA Display
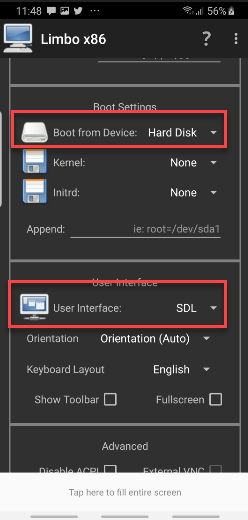
Step7: Move on and tab on the Boot From Device and select Hard Disk option from the dropdown menu. after that, select SDL for User Interface.
Customize Boot Setting and User Interface
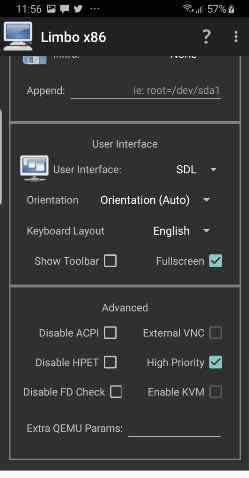
Step8: Now, select Fullscreen and select High Priority. you might get a warning notification once you select a high priority option.
Advanced Settings
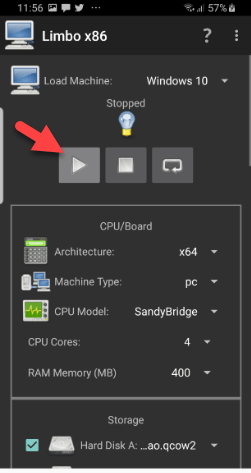
Step9: Finally, scroll up and tab the Play button to start the Windows 10 installation on Android Phone.
Start Windows 10 Installation on Android
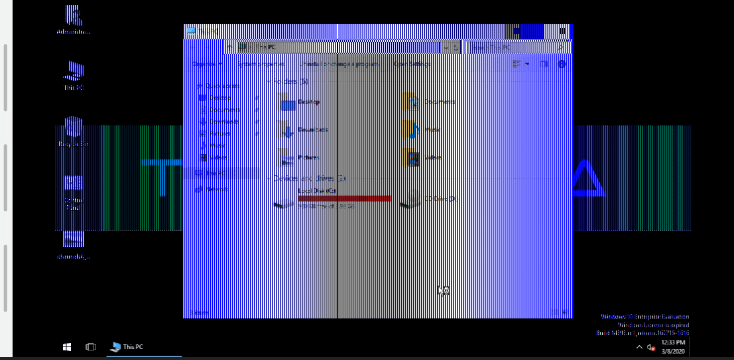
Finally, you have installed Windows 10 on the Android phone successfully. Now you can use Windows 10 features on your android device.
Windows 10 on Android device
How to ShutDown Windows 10 on Android
Now you have Windows 10 and you installed Windows 10 successfully on your android phone. After the installation and having windows 10 on your mobile surface. Then, how to switch from Windows to Android OS? the step is very easy. check the below step.
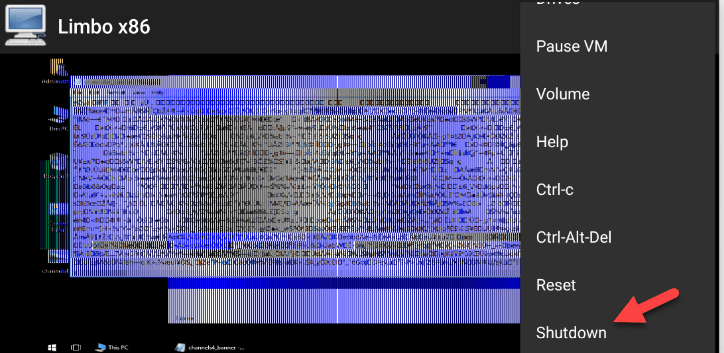
To shutdown Windows OS, you will have the three-dot menu at the right-top side of the Android surface. Tab the menu and you will see several menu options that you can do with Windows 10. Simply, click the ShutDown option. Otherwise, You will not be able to use your Android phone until you shut down the Windows.
Installing windows on Android devices is an easy task and you can do it with the Android Vmware platform and the app is Limbo PC Emulator. So, I hope you have installed Windows 10 on Android Successfully. In case, you have questions and confusion then feel free to ask me in the comment box.
After Android 10 ‘Q’ Google has announced the next powerful Android Operating system earlier this year, Though Android 10 has major new features but Google made the new Android OS much better than the previous version. I know, you can’t wait to test and become proficient in the new version of Google OS. So, in Feb 2020, Google has released the advanced and new version of the Android operating system called Android 11 or you can say Android R. Therefore, the first Android 11 developer preview mode is in stock for users to give it a shot and experiment all the including features.
The official version will launch in May 2020 but before that, you will get developer mode and beta version to experience the android 11 while installing on Pixel smartphones. However, the preview mode has quite errors that you will face during the installation. Google released the preview mode to get a response from Android users what errors they are facing to fix in the official version. As a result, I will recommend you to be patient and wait for the official version then go ahead with the installation on various devices.
Though the developer mode has multiple issues but again I can’t wait to give it a try and enjoy the new features that Google added in the new Android 11 OS. If you want to install Android 11 on the Pixel android device then make sure you have a backup of your data, in case, you might lose your files during the installation because of such an error. So, in this article, I will show you the easy steps to Install Android 11 on Android Studio on Windows 10 PC. Therefore, let’s start.
Android 11 Official Version Release Date
Android users are curious to know the Android 11 release date of the official version though this year 2020 Google announced the new Android 11 ‘R’ earlier than the previous android version. So, the first developer mode was released on Feb 19, 2020, for users to give it a shot and use all the new features. However, after the first preview mode, Google will release the second developer mode in March 2020. Android 11 has three developer preview mode because Google wants to know what errors it has. The users will get the third developer preview mode in April 2020.
After that, android users will receive the first beta version in May 2020. in the beta version, you will have Android 11 in high performance and well security. The beta version will fix several errors and Google will release the second beta version for Android users. I know Google wants to release the official version without having any bug errors, therefore, it is releasing the developer and beta version before the official version.
Finally, after fixing all the errors that were faced by users Google will release the final and official version of Android 11. the official version will perform 100% better and Android 11 will be available for all android users to upgrade and install it on their smartphones.
Android 11 New Features
Let’s have a short glimpse of the Android 11 feature, this version has several new and handy features that users can give it a try once they install android R on Pixel smartphones. So, the below are Android 11 new features lists you have to know.
Chat Bubbles
Conversation in the Notification
Send Images from Notification
Screen Recording
Mute Vibration while using the Camera App
Support for mobile driving licenses
Improvements to scoped storage
New biometric authentication levels
Preparing for 5G
Better compatibility with pinhole/waterfall displays
Android 11 Supported Devices
Pixel 4 Xl
Pixel 4
Pixel 3 XL
Pixel 3
Pixel 3a
Pixel 3a XL
Pixel 2
Pixel 2 XL.
Install Android 11 on Android Studio
On Windows, you can’t install any android OS version without installing Android Studio. Like you are installing Mac operating system on Windows using Virtual machines the same you will use Android studio to install any android version. So, before going ahead let’s know what is Android Studio and SDK tool.
Android Studio Overview
When coming to the installation of MacOS, Linux OS, Windows OS, iOS or Android OS on other operating systems you will need Virtual machines like Virtualbox, Vmware Workstation, Hyper-V, and Android Studio. For example, if you want to install MacOS on Windows then you will need Virtualbox or Vmware workstation virtual machines to test any Mac operating systems. The same case is with Android OS. installing Android version on Windows, Mac, or Linux you need to download and install Android Studio then you can install Android 11. otherwise, you never can install the Android OS version.
Thanks to Google for providing this professional testing tool for Windows, Mac, and Linux platforms to test any Android version. Therefore, you can download the Android Studio from its official site besides that you will find SDK tools also. Before going ahead to Android Studio make sure you have the following hardware system.
SDK Tool Overview
With the help of the SDK tool, you can download all the Android Studio update packages for the Android operating system. the SDK tool is available in the Android SDK tool. However, SDK stands for Software Development Kit in short term DevKit(it means you can develop any kind of android application with the help of SDK tools.)
Operating system to install Android like Windows 8/8.1/10 (32 Bit or 64 Bit)
More than 4GB Ram and 1GB for Android Emulator.
More than 10GB disk space for the installation
Android Studio Installation on Windows
Once you downloaded the Android Studio from its official website, then you need to install it on your Windows PC. However, the installation is quite simple. But again I will show you the picture guide below.
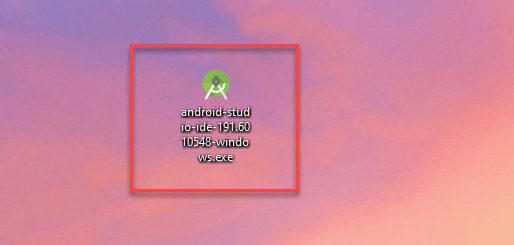
#1: First of all, go to download folder and find the Android Studio setup you downloaded later. Now, double-click on the setup to run the wizard installation.
Android Studio Installation Setup
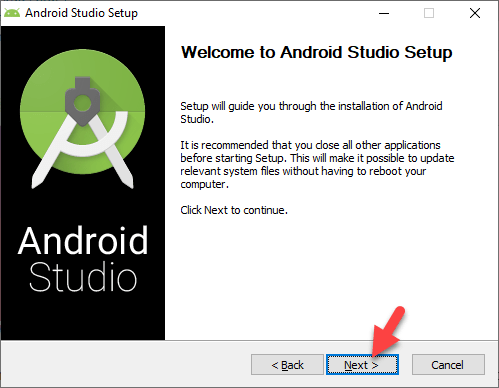
#2: Once you open the installation setup, then it will ask you to allow the installation on your Windows Therefore, click the Yes option. Afterward, you will see the Welcome to Android Studio Setup page. Here, click the Next option to continue.
Android Studio Welcome Page
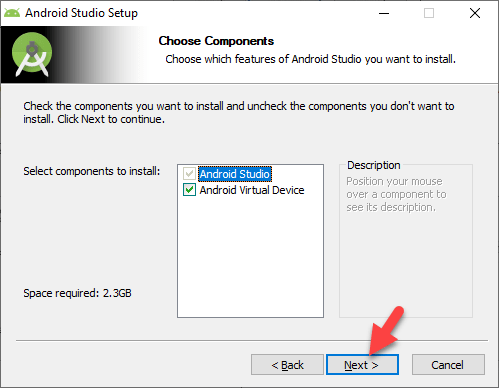
#3: In the third step, you will need to choose the features of Android Studio you want to install, So, you don’t need to bring any changes. Simply, click the Next option.
Choose Android Studio Components
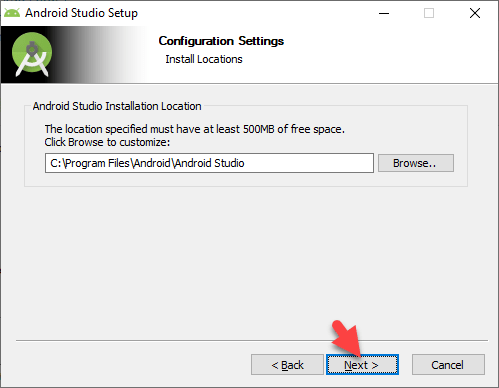
#4: Here, you will be asked to configure the installation locations, leave it as a default and click the Next option.
Configuration Locations Settings
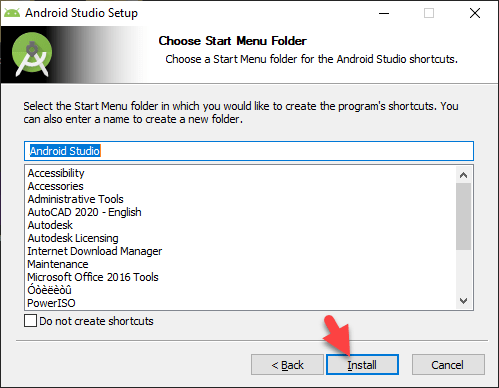
#5: As you are installing Android Studio on Windows, Therefore, choose a start menu folder for Android Studio and click the Next option.
Choose Start Menu Folder
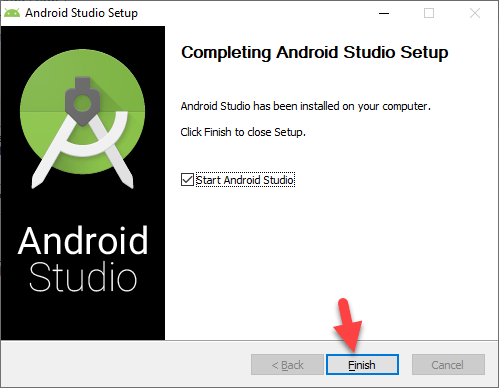
#6: Now, wait for a while to complete the installation. Once the installation is done then click the Next option and finally, click the Finish button.
Android Studio Installed on Windows
Getting Start with Android Studio
#7: Once you finish the installation then you will see the pop-up dialog box. Here, select Do not import settings and click Ok.
Import Android Studio Settings
#8: In the next step, you need to allow Google to collect anonymous usage data for Android Studio and its related tools, therefore, read the descriptions and click the Send usage statistics to Google.
#9: After that, it will start finding the available SDK components. Wait for a while to complete the downloading, it will take a while.
Finding Available SDK Components
#10: Once the downloading is finished, then you will see the welcome Android Studio page. Well, this welcome page wizard will set up your development environment for Android studio. Here, click the Next button.
#11: Choose Standard install type setup for Android Studio and click the Next button.
#12: Now, you have two options theme for Android Studio. Dark Theme or Light Theme, select any of your favorite thee and click the Next option.
Select UI Theme for Android Studio
#13: After selecting Theme UI for Android Studio, Now, on the SDK Components Setup, check these options and click the Next button.
SDK Components
#14: On Verify Settings, click the Finish button.
Verify Settings
#15: Once you click the finished button then Android Studio starts downloading the important files like SDK components. Therefore, wait for a while.
Downloading Components
#16: When the download is done then click the Finish button.
Easy Steps to Install Android 11 on Android Studio on Windows 10
#1: While you are done with the downloading Components and completed the Android Studio installation on Windows. Now, Android Studio will launch and you need to click the Start a new Android Studio Project.
Welcome to Android Studio
#2: In this step, Select Add no Activity and click the Next button.
Choose your Project
#3: Take a look at the below screenshot and configure all the options and click the Finish option.
Configure your project
#4: Here, Click on the Install button to download kotlin plugins. Once you click the install button then wait for a while to complete the downloading.
Install Kali Kotlin Plugins
#5: Once the Kotlin downloading is done then go to the top and click the AVD manager.
Click AVD Manager
#6: In the next step, click the Create Virtual Device option.
Create Virtual Devices
#7: On Select hardware page, you need to select the device you want to install Android 11, Therefore, I have selected Pixel 2 afterward click the Next option.
select Hardware
#8: As you are installing Android 11 on Android Studio on Windows, therefore, click the first Download option.
Click the Download Android 11
#9: Here, you should agree on the license agreement by clicking the Accept option and click the Next button.
Agree on License Agreement
#9: Now wait for a while to download and install the component installer. After that, click the Done button.
#10:Now select the system image for Android 11 and click the Next button.
Android 11 System Image
#11: After that, verify the configuration by giving AVD name, then, choose the startup orientation and click the Finish button.
Android Virtual Device
#12: After all the installation and configuration your Android 11 ‘R’ is ready on the virtual machine Android Studio list. Therefore, to give it a try click the Play button.
Note: If you haven’t installed HAXM then it will ask you to install it first. Therefore, click on the Install button. Once it is installed then click the Finish button.
Invoking Installer
#13: When the components downloaded then you will see the Emulator settings windows will pop-up. Therefore, you have to set the maximum size of RAM that is in stock on the hardware of your PC system. So, the recommended size is 2GB RAM but you can increase it up to 4GB.
Emulator Settings
#14: Now, everything is done and you can run your Android 11 on Android Studio on Windows.
Run Android 11
Finally, the Android 11 has been installed successfully on Android Studio on Windows 10. Now you can test all the new features and enjoy using Android 11 on Windows.
How to Install Android 11 on Android Studio on Windows 10
We have installed the Android 11 preview mode on Android Studio on windows, it means you can install the Android 11 official version using the same method shown in this article. So, I hope you understand each part of the article, in case, you have any questions or problems then let me know in the comment box.
How to Get Windows 10 May 2019 Update – 1903 Version: It’s been six months since the last “major” Windows ten feature update started rolling out, packing ample refinements and notable new options that create exploitation Windows ten a lot of gratifying. This week, another major update of constant caliber is rolling intent on users across the globe, that includes a lot of enhancements and refinements to the user expertise whereas introducing one or two of notable new options on the manner.
Known as the Windows 10 may 2019 Update, this latest unharness from Microsoft is in no manner a large update, rather like the previous ones before it. Upon upgrading, you will probably notice little or no has modified on the surface, and that is on purpose. Microsoft isn’t attempting to force vital changes onto users, instead choosing a lot of refined updates that modification things over time. a number of these changes are smart, some not such a lot. Let’s dive into it all.
how to get windows 10 may 2019 update 1903 version
Therefore, at intervals the reconstitute of Windows ten, Microsoft declared vast changes and provides some rules for updates. If you retain in mind the older version of Microsoft Windows named as “Windows 10 Apr 2019 update”. And currently, Microsoft brought some changes to the name together. that’s formally spoken as “Windows 10 1903 version” and that is known this by its codename 19H1. The 19H1 given to Windows 10 may update because of the Microsoft needed to unhitch this update early. Therefore, the emotional chemical analysis is postponed because of that they have to give 19H1 name as we are going to say 1903 version.
First things that you should know about Windows 10 May 2019 Update release date, as you know after windows 10 there won’t be any new windows like windows 11, So that’s why Microsoft is updating the Windows 10 time by time. However, Windows 10 new update has been released on May 22nd and the problem is here that it is not in stock for all users but people will be getting it in waves.
Well, windows 10 new update is available and installable for all Microsoft users but as I mentioned, the big problem is that every user can’t install it or update it to their PC. Although we have another way to download the 1903 version and upgrade to windows 10. Therefore, I will guide you on how you can.
Actually, if 1903 version is not in stock for everyone then it’s a good idea because might be the new update has problems with their features However it means any issues can be identified and fixed before legions of people install the new update, therefore, be patient.
If you can’t wait for new update and you want to update it then hands down go with it but I prefer you to wait for some days and delay installing the windows 10 may 2019 update for up to 35 days
Windows 10 May 2019 Update name
However, the previous update is known as windows 10 April 2019 update, but Microsoft revised that to May 2019 and this update is officially referred to as Windows 10 version 1903 which codename is windows 19H1. So, the new codename 19H1 gave us the idea of the release date and possibility, However, it suggests the update will be completely released in the first half of 2019.
Well, it seems the new update would choose April 2019 update as the name but actually, Microsoft was apparently running a bit behind schedule, Therefore, the final name has been disclosed to be windows 10 May 2019 Update.
Windows 10 May 2019 Update New Features
A New Light theme: The new update of Windows 10 brought a new and awesome shining light desktop theme. and that one will make your desktop screen light and give more attracted to desktop. However, the new update does not only have a light start menu, but it also gives more light to the icons of the start menu.
A Better Start Menu: We can’t say Microsoft doesn’t do great work, However, they served their best time to bring something good changes and new features into Windows 10 May Update. Therefore, Windows 10 continue and made a great start menu. While you upgrade windows 10 then you will see how much beautiful design the start menu has.
Microsoft Edge Chromium-Based: Microsoft Edge has become a region of Chrome If you would like to launch chrome browser simply. you’ll be able to use in the site of that Microsoft Edge. And net individual your time it’s incompatible to launch some websites. because of that Cr build this compatible to use simply. And having different nice options whereas you update your Windows to the most recent version then you may see the changes.
Cortana is no longer integrated into the search box: When you upgrade windows 10 to new update then in the taskbar you won’t see Cortana because Cortana is no longer integrated into the search box. Moreover, you can use Cortana if you want because they have split and separated from the search bar. So, if you want to search for anything then go ahead and search for it.
Microsoft Windows 10 May Update 2019
Pause Updates: The good news is for all users, the new update of windows allows them to pause and resume the installation or updating windows. However, this is very handy features for users to check the new update in order to not have issues. Although you can check the new update and if you find any kind of problem then pause the windows update and wait to fix it. Needless to say, the new windows update will not have problems because Microsoft has done great work but again it might have some issues.
Reserved space for updates: A very handy features of the new windows 10 this time, while you are updating your PC then it will reserve space and store temporary files. Moreover, the new update 1903 version will reserve 7GB space. So, if you don’t have enough space then free up space and update your Windows.
Windows SandBox: Hands down, if you are running windows 10 professional, then the new windows sandbox tool will be the best features. However, it allows the user to easily run a virtualized version of Windows 10 in a window, although allowing you to run the software and test out settings and code without it affecting your main windows 10 installation.
Get Windows 10 May 2019 update, 1903 version
Here, I will guide you on how to get windows 10 new update, but before going to update your PC into new windows 10 update make sure you have a backup of your all files and data because while updating your PC into a new update you might lose your data that’s why we prefer you to have a backup of your files. However, when I update my PC then I don’t have a backup of my files but again after a new update, I didn’t lose my data.
So here you have two ways to update your PC into new windows update Follow the below steps.
Step 1. Update Windows from Settings
Go to Settings
then go to Update and Security
After that, go to Windows Update
Now select check for updates
Once the windows update appears then select download and Install Now
Note: if you can’t get the new update or the new windows update can’t appear then follow the second steps.
Step 2. Get windows 10 May 2019 Update from Microsoft Website
If the first step won’t work for you then I prefer you to follow this step and hands down it will work because I update my windows through this step.
1. Open your favorite browser and go to the Microsoft Official website.
2. After that, click on Update Now option and download the new windows update.
Download the new Update
3. While the download is done then go to Download folder and find Windows10Upgrade9252, afterward double click on the file.
Double click on File
4. This is time to update your windows into new windows update, therefore, click on Update Now.
Update Now
5. After that, you will see the Congratulations screen and here it will check your CPU, Memory, and Disk Space whether this is compatible for windows 10 new update or no.
this PC is Compatible
6. Your update is ready to go and for that, you should have a strong internet connection in order to update it fast. Moreover, it will take some minutes to install the new windows update. Therefore, don’t turn off your PC and Minimize the window.
getting your update ready
7. Updating to Windows 10, 1903 version will take a while, So be patient and wait for the new windows update to be downloaded. After that, you will have several restarts during an update, Therefore, don’t turn off your PC. Otherwise, you will not be able to have the new update. When the update is completed then restart your PC and enjoy the new windows update with awesome features and themes.
In this article, you learn all about How to get windows 10 May 2019 update, 1903 version. Therefore, whatever you need to know I have mentioned here and I hope you get my article and it was useful for you. Moreover, if you get any kind of problem then feel free to leave a comment and please give your feedback.
How to Customize the Taskbar in Windows 10? every Windows user has this question and they are looking for there answer because of the Windows Taskbar is very handy and useful. it is the best place for storing frequently used apps as well as apps that you are working on. However, you can move the taskbar any side of the windows you like, besides that, you can access to add apps icon or to remove it from the taskbar. Well, the taskbar is the area where you can access to any applications immediately, So, why your taskbar should not look awesome with some customizing tips. Although you have some idea about what is taskbar and how we can use it, future more, in this article, you will learn how to customize the taskbar in Windows 10 with the best tips.
How to Customize the Taskbar in Windows 10
Now I will give you the best tips to customize the taskbar in windows 10, Well, any windows user can go with these all tips because these tips and steps are for all Windows 10 users. However, if you want to go with default taskbar style then hands down you can but the question is here why you should not customize the taskbar and make it beautiful? what I think every user want to use good things and stylish one, that’s why they are searching for this title. Therefore, I am here to make your windows taskbar awesome and great looking. So, let’s have a look at the best tips to customize the taskbar in Windows 10.
Tip 1. Move the Taskbar
As you see the taskbar is at the bottom of the window by default but if you want to move it at the top or side of the screen then needless to say you can do it. However, if you are using Tablet and Netbook with the small screen then at that time you will need to move the taskbar at the left or right of the screen to get more verticle space for the application. So, if you don’t know about it then let’s do it together.
#1. The first step is quite easy and simple and might be preaching to the choir for you but again I will mention those for you. So, to move the taskbar at the left, top, and right of the screen then simply click on the empty area of the taskbar and drag it to the left, top, and right of the screen.
Move the Taskbar to the Left, Top and Right
#2. In the second step, I will show you how you can change the taskbar location on the screen in Taskbar Settings.
Right-click on the taskbar empty area and click Taskbar Setting.
In the taskbar setting scroll down a little bit and you will see Taskbar location on-screen option, So, here select the taskbar location and close the page.
Taskbar Setting and Taskbar Location on Screen Option
Tip 2. Hide the Taskbar
Sometimes it can happen that you don’t want to see the taskbar always and you want to hide it then hands down you can do it. Let’s say that you want the taskbar to remain hidden till the time you move your mouse over the taskbar or its location. So, if you are using Windows PC or you are using any other devices in Desktop mode then right-click on the empty area of the taskbar and click Taskbar setting and Turn On the option that says Automatically hide the taskbar in desktop mode. Well, this option will hide the taskbar unless you move the mouse on its location, While you move the mouse over its location then the taskbar will appear.
If you are using Tablet or any other devices in Tablet mode then Turn On the option that says Automatically hide the taskbar in tablet mode. So, by doing this your taskbar will vanish and only reappear when you move the mouse cursor on its location bar.
Hide the Taskbar in Taskbar Setting
However, if you don’t want this setting then come back to Taskbar setting and turn off both options. after that, you will see your taskbar on the screen full time.
Tip 3. Change the Color of Taskbar
Tip 3 to customize the taskbar in Windows 10 and this one will be interesting. So, here I will show you how you can change the taskbar color with some steps. However, you have the idea that by default the taskbar color is black but if you want to set the color from your wish then certainly you can do it. Now here I will show you the steps.
Change the Taskbar Color
Ok, if you are bored with the default color then here I will change your taskbar color just following with some steps.
Right-click on the taskbar empty area and click the Taskbar Settings.
Select Color option from the left side menu.
Now click on checkbox which is Start, taskbar, and action center. after that select your favorite color from the Windows Color option and close the page.
Set the new color for Taskbar
Note: while you set the new color for taskbar then by default the Start Menu, Taskbar, Window border, and some other area of the operating system will be with the same accent color, So, if you want to set different colors then you can do it.
Tip 4. Pin Apps to the Taskbar
To access any of the applications quickly in the future then you have the best tip which is Pin apps to the taskbar. So, you have two ways to access any application, first one, you can open any app from start menu window and the second way is that you can access from the existing shortcut. Therefore, when the app is running then its icon will appear on the taskbar, Then right-click on the icon and select pin to taskbar from the context menu. After that, the app icon will be in the taskbar always unless you should not Unpin it from the taskbar.
Pin apps to Taskbar
The second way to pin any application does not require the app to be running. Simply, find the app icon on the Start menu and right-click to the icon then move your cursor over the more option and select Pin to taskbar option from there. However, if you don’t want to do that then simply click and drag the app icon to the taskbar then it will pin it to the taskbar.
Pin App Icon from Start Menu
this task will add the app shortcut icon on the taskbar and you will access the application quickly. Moreover, if you want to remove the app icon from the taskbar then simply right click on the app icon and click on Unpin from Taskbar option.
Unpin from taskbar any App Icon
Tip 5. Configure or Remove Cortana and the Search Box
Well, what I think these two features are handy for beginners but those who are advanced in Windows 10 then they don’t need Cortana and Search box because of this two features take lots of space on the taskbar. However, without the Search box, you can do it in the Start Menu window. Simply, click the Windows key and search for any applications or files then you will get your result.
Moreover, if you want to perform a voice search with Cortana then normally click on the Microphone icon in the search box. After that, you can perform a voice search instead of typing.
Configure or Remove Cortana and Search Box
If you want to remove Cortana and Search box then right-click on the taskbar empty area and click on the Cortana option, So, here you have three options whether you want to hide both features or you want to show Cortana Icon and Search box. otherwise, you can remove it by deselecting it or clicking on the Hidden option.
Cortana Options
Tip 6. Add and Remove the Task View Button
How to add and remove the task view button, actually, the ” task view ” button allows you to access your running apps, files, and windows. For example, you have opened several windows and you are working on each of the time by time then Task View Button is the best feature and handy that provides you to access your open files, apps, and windows immediately.
Task View Button
Add Task View Button
By default, the task view button is hidden on the taskbar So if you want to show it on the taskbar then here you have to do one step.
Right-click on the taskbar empty area and click on the Show task view button option.
with this step, the task view button will appear on the left side of the taskbar. after that, you can easily view all your open files, windows and apps. where you can quickly access them.
Show Task View Button
Remove Task View Button
Sometimes it can happen that you don’t want to have the task view button on the taskbar and you prefer to remove or hide it from the taskbar. Because without the task view button you can view your all windows by pressing the window + Tab key. Therefore, we don’t need to show the task view button on the taskbar.
To remove the task view button is not a difficult task simply right click on the taskbar empty area and click on the Show Task View Button option, after that, the task view button will hide from the taskbar and then use Window+Tab key for that.
Tip 7. Change the Size of the Taskbar
Some users pin all their apps on the taskbar and they will face problems with a little space, then at that time, they can resize the taskbar. Resizing the taskbar is handy when you move your taskbar on the left and right side of the screen because of lots of icons. So, right-click on the taskbar empty area and click on the Lock the Taskbar option, By default, this option is unchecked but again before doing this check the option whether it is checked or no. After that, place your mouse on the top edge of the taskbar and drag to resize it, Just like you are doing with windows. However, you can increase the size of the taskbar up to half of the screen.
Resizing the Taskbar
Tip 8. Use Small Icon to Fit More on the Taskbar
If you want to pin more icons and you don’t want to resize the taskbar or increase the size of the taskbar then Windows 10 allows you to use the small icon to keep all the icons. Therefore, right-click on the empty area of the taskbar and go to Taskbar Settings and turn on the Use small taskbar buttons option.
Use Small Icons on the Taskbar
While you turn on the option then you will see the icon become smaller and the taskbar itself shrinks vertically. as a result, you will see everything is fine except the clock option, by doing this the date will be hidden and only the time will be shown but if you move the cursor over the clock then you will see the date or the date will be shown above the clock. Moreover, now you can pin as many icons as you want.
Use Small Taskbar Icon
Tip 9. Show Labels for Taskbar Icons
Well, to customize the taskbar in windows 10 in tip 9 you will learn to show labels for taskbar icons, as you know by default the icon labels are hidden because if you show the icon labels then it will take lots of space in the taskbar. that’s why people hide the icon labels to save more space on the taskbar. However, to show the labels for taskbar icons is well good for newer users to recognize the icons. Moreover, without the computer owner for others, it is difficult to recognize the icons therefore if we show the labels then it makes it easy to understand the icons.
So, to do that, right-click on the empty area of the taskbar and click on the Taskbar Settings. After that, scroll down a little bit and you will find the Combine Taskbar Buttons.
Show Labels for Taskbar Icons
In here, the menu gives you three options and each option means:
Always, Hide Labels. well, this option is the Windows default setting, when this option is set then you won’t see the icon labels.
When Taskbar is Full. if you choose this option then it will be shown the icon labels unless the taskbar becomes full. When it fills up then it reverts to the first option which is Always, Hide labels.
Never. When you select this option then windows are never grouped and labels are always shown you can see this action below in the screenshot.
Labels are shown
Tip 10. Enable or Disable Transparency
Most of the Windows 10 users prefer transparency even they can change the taskbar color and set it by their wish but no they like to set it as transparent. Well, to use transparency effects your taskbar looks great and awesome. So, to do that, right-click on the empty area of the taskbar and go to Taskbar Settings. After that, go to Color option from the left side of the window, then scroll down a little bit and down of the More Option you will see Transparency Effects So turn On this option. After that, your taskbar will be in transparency mode.
Transparency Effects
If you want to disable the Transparency effects then simply turn off the transparency effects and set your favorite color for the taskbar.
In this article, you learn about How to Customize the Taskbar in Windows 10, and the best tips are given in this article that you can simply customize your taskbar. So, we tried to give our best and useful tips to you that you can make your taskbar awesome. Besides that, if you know about more tips then please feel free to let us know.