After Android 10 ‘Q’ Google has announced the next powerful Android Operating system earlier this year, Though Android 10 has major new features but Google made the new Android OS much better than the previous version. I know, you can’t wait to test and become proficient in the new version of Google OS. So, in Feb 2020, Google has released the advanced and new version of the Android operating system called Android 11 or you can say Android R. Therefore, the first Android 11 developer preview mode is in stock for users to give it a shot and experiment all the including features.
The official version will launch in May 2020 but before that, you will get developer mode and beta version to experience the android 11 while installing on Pixel smartphones. However, the preview mode has quite errors that you will face during the installation. Google released the preview mode to get a response from Android users what errors they are facing to fix in the official version. As a result, I will recommend you to be patient and wait for the official version then go ahead with the installation on various devices.
Though the developer mode has multiple issues but again I can’t wait to give it a try and enjoy the new features that Google added in the new Android 11 OS. If you want to install Android 11 on the Pixel android device then make sure you have a backup of your data, in case, you might lose your files during the installation because of such an error. So, in this article, I will show you the easy steps to Install Android 11 on Android Studio on Windows 10 PC. Therefore, let’s start.
Android 11 Official Version Release Date
Android users are curious to know the Android 11 release date of the official version though this year 2020 Google announced the new Android 11 ‘R’ earlier than the previous android version. So, the first developer mode was released on Feb 19, 2020, for users to give it a shot and use all the new features. However, after the first preview mode, Google will release the second developer mode in March 2020. Android 11 has three developer preview mode because Google wants to know what errors it has. The users will get the third developer preview mode in April 2020.
After that, android users will receive the first beta version in May 2020. in the beta version, you will have Android 11 in high performance and well security. The beta version will fix several errors and Google will release the second beta version for Android users. I know Google wants to release the official version without having any bug errors, therefore, it is releasing the developer and beta version before the official version.
Finally, after fixing all the errors that were faced by users Google will release the final and official version of Android 11. the official version will perform 100% better and Android 11 will be available for all android users to upgrade and install it on their smartphones.
Android 11 New Features
Let’s have a short glimpse of the Android 11 feature, this version has several new and handy features that users can give it a try once they install android R on Pixel smartphones. So, the below are Android 11 new features lists you have to know.
- Chat Bubbles
- Conversation in the Notification
- Send Images from Notification
- Screen Recording
- Mute Vibration while using the Camera App
- Support for mobile driving licenses
- Improvements to scoped storage
- New biometric authentication levels
- Preparing for 5G
- Better compatibility with pinhole/waterfall displays
Android 11 Supported Devices
- Pixel 4 Xl
- Pixel 4
- Pixel 3 XL
- Pixel 3
- Pixel 3a
- Pixel 3a XL
- Pixel 2
- Pixel 2 XL.
Install Android 11 on Android Studio
On Windows, you can’t install any android OS version without installing Android Studio. Like you are installing Mac operating system on Windows using Virtual machines the same you will use Android studio to install any android version. So, before going ahead let’s know what is Android Studio and SDK tool.
Android Studio Overview
When coming to the installation of MacOS, Linux OS, Windows OS, iOS or Android OS on other operating systems you will need Virtual machines like Virtualbox, Vmware Workstation, Hyper-V, and Android Studio. For example, if you want to install MacOS on Windows then you will need Virtualbox or Vmware workstation virtual machines to test any Mac operating systems. The same case is with Android OS. installing Android version on Windows, Mac, or Linux you need to download and install Android Studio then you can install Android 11. otherwise, you never can install the Android OS version.
Thanks to Google for providing this professional testing tool for Windows, Mac, and Linux platforms to test any Android version. Therefore, you can download the Android Studio from its official site besides that you will find SDK tools also. Before going ahead to Android Studio make sure you have the following hardware system.
SDK Tool Overview
With the help of the SDK tool, you can download all the Android Studio update packages for the Android operating system. the SDK tool is available in the Android SDK tool. However, SDK stands for Software Development Kit in short term DevKit(it means you can develop any kind of android application with the help of SDK tools.)
Android Studio New Features
- Instant App run
- Visual layout editor
- Fast Emulator
- Intelligence code editor
- Addition of new activity as a code template
- Help to build up App for all devices
- Help to connect with Firebase
- Support KOTLIN
- Colour previews
- Maven Repository
Require Files
- Download Android Studio latest version
- Operating system to install Android like Windows 8/8.1/10 (32 Bit or 64 Bit)
- More than 4GB Ram and 1GB for Android Emulator.
- More than 10GB disk space for the installation
Android Studio Installation on Windows
Once you downloaded the Android Studio from its official website, then you need to install it on your Windows PC. However, the installation is quite simple. But again I will show you the picture guide below.
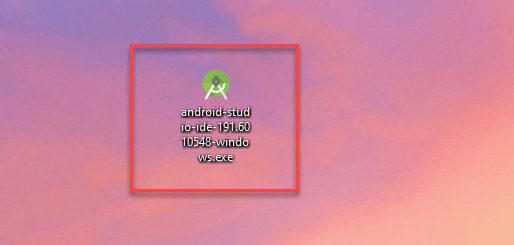
#1: First of all, go to download folder and find the Android Studio setup you downloaded later. Now, double-click on the setup to run the wizard installation.
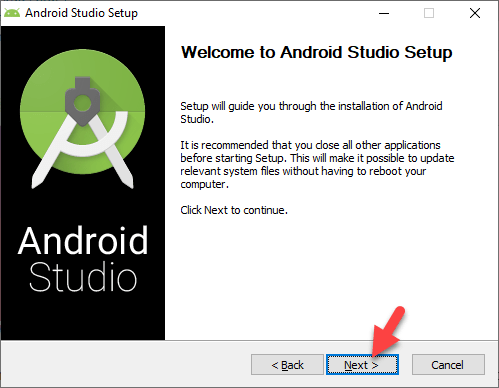
#2: Once you open the installation setup, then it will ask you to allow the installation on your Windows Therefore, click the Yes option. Afterward, you will see the Welcome to Android Studio Setup page. Here, click the Next option to continue.
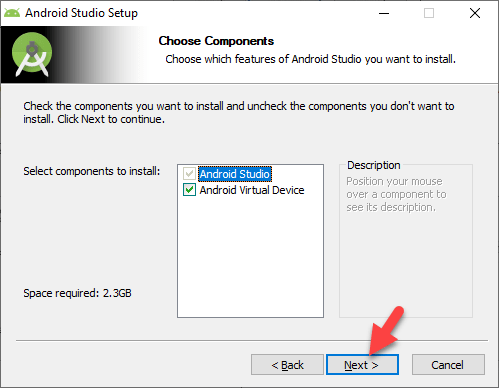
#3: In the third step, you will need to choose the features of Android Studio you want to install, So, you don’t need to bring any changes. Simply, click the Next option.
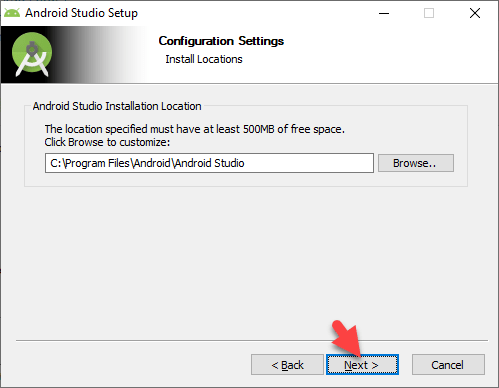
#4: Here, you will be asked to configure the installation locations, leave it as a default and click the Next option.
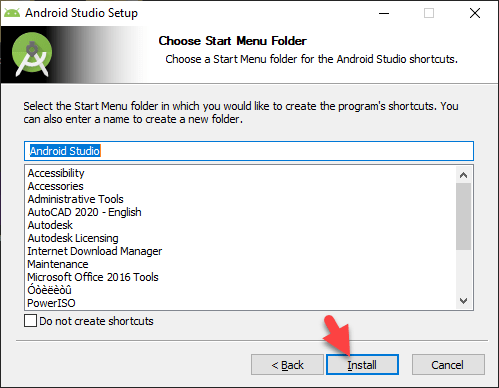
#5: As you are installing Android Studio on Windows, Therefore, choose a start menu folder for Android Studio and click the Next option.
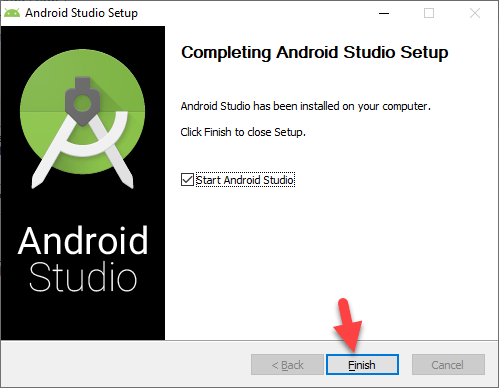
#6: Now, wait for a while to complete the installation. Once the installation is done then click the Next option and finally, click the Finish button.
Getting Start with Android Studio
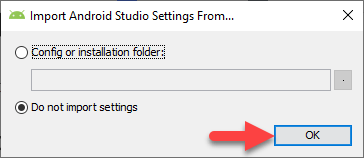
#7: Once you finish the installation then you will see the pop-up dialog box. Here, select Do not import settings and click Ok.
#8: In the next step, you need to allow Google to collect anonymous usage data for Android Studio and its related tools, therefore, read the descriptions and click the Send usage statistics to Google.
#9: After that, it will start finding the available SDK components. Wait for a while to complete the downloading, it will take a while.

#10: Once the downloading is finished, then you will see the welcome Android Studio page. Well, this welcome page wizard will set up your development environment for Android studio. Here, click the Next button.
#11: Choose Standard install type setup for Android Studio and click the Next button.
#12: Now, you have two options theme for Android Studio. Dark Theme or Light Theme, select any of your favorite thee and click the Next option.

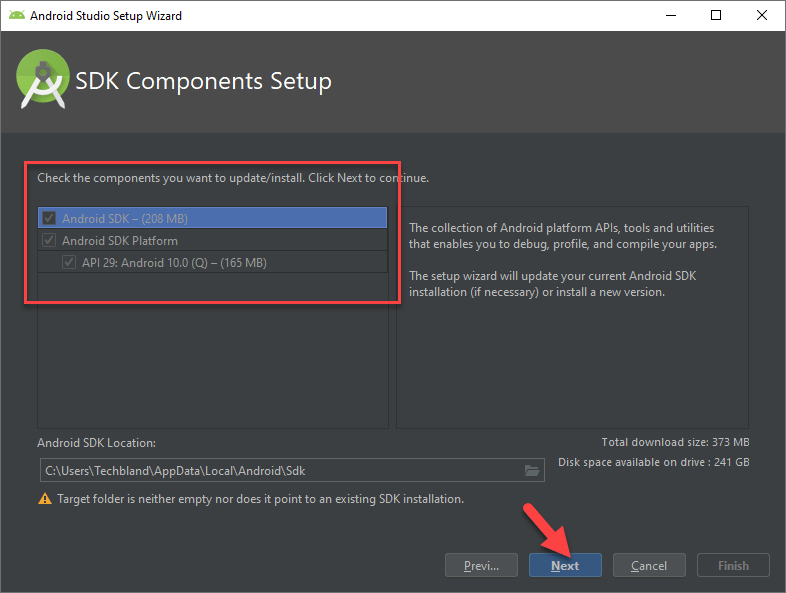
#13: After selecting Theme UI for Android Studio, Now, on the SDK Components Setup, check these options and click the Next button.
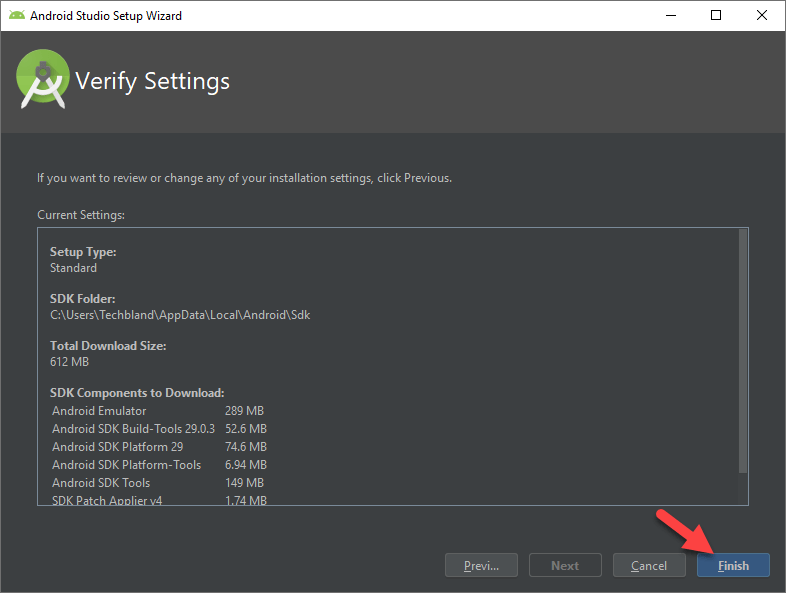
#14: On Verify Settings, click the Finish button.
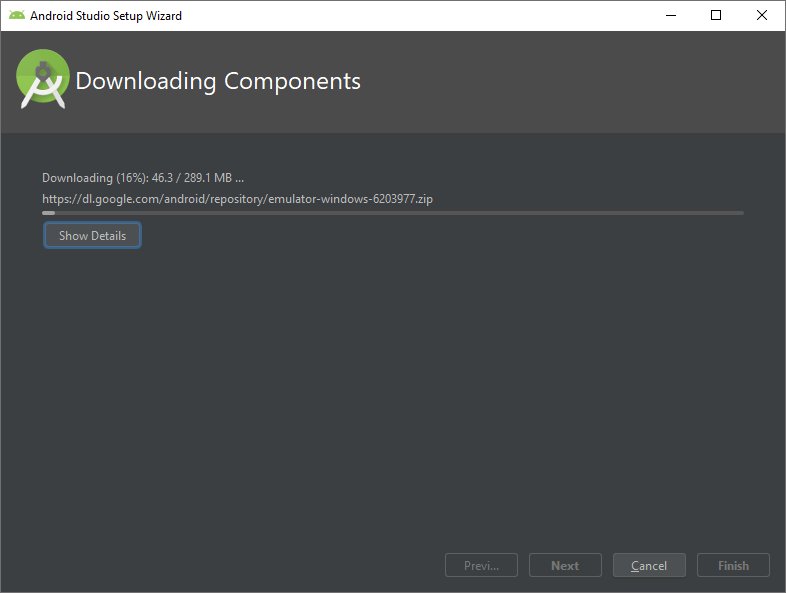
#15: Once you click the finished button then Android Studio starts downloading the important files like SDK components. Therefore, wait for a while.
#16: When the download is done then click the Finish button.
Easy Steps to Install Android 11 on Android Studio on Windows 10
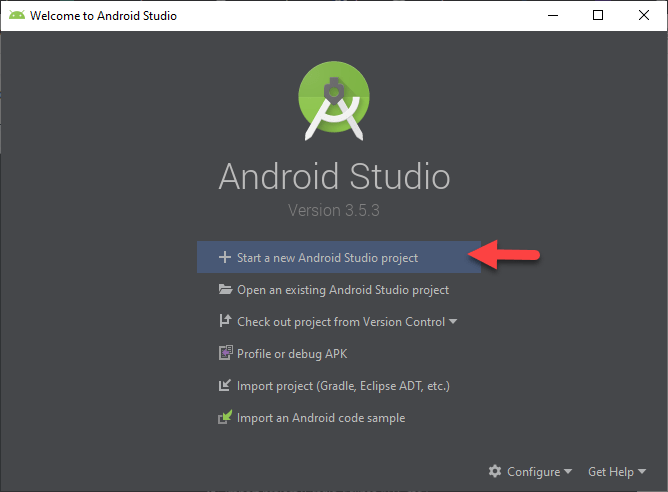
#1: While you are done with the downloading Components and completed the Android Studio installation on Windows. Now, Android Studio will launch and you need to click the Start a new Android Studio Project.
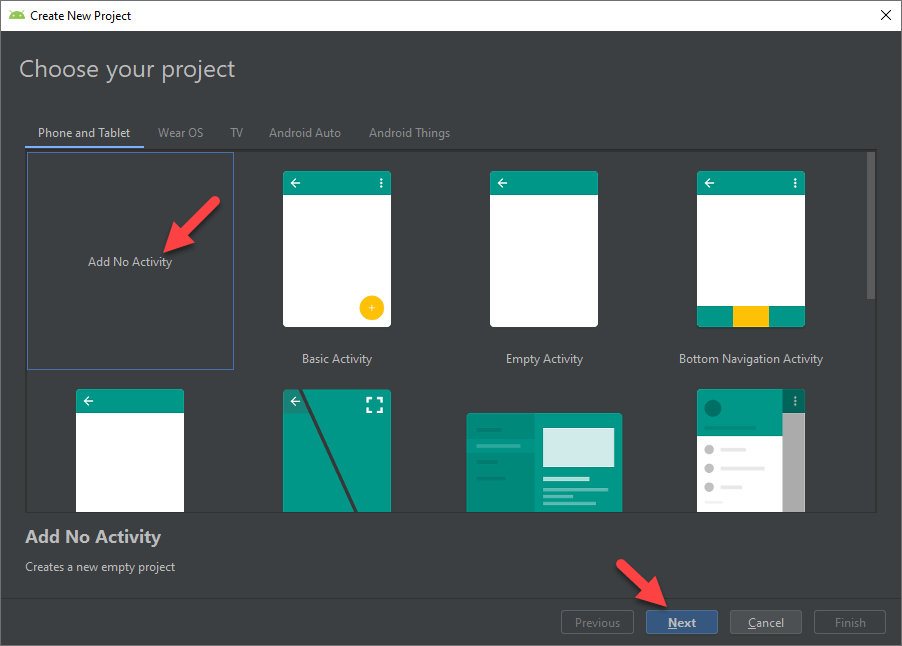
#2: In this step, Select Add no Activity and click the Next button.
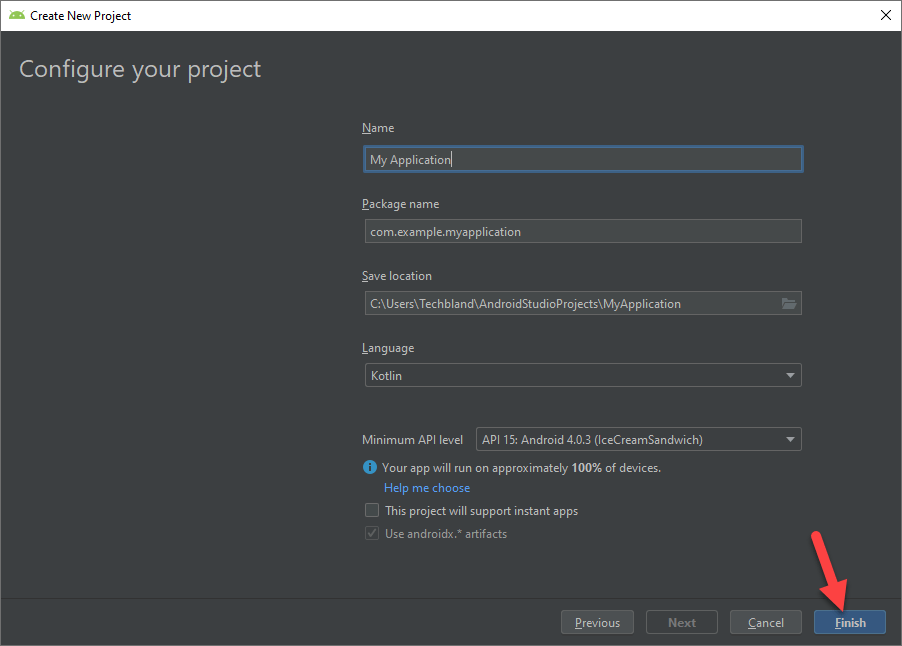
#3: Take a look at the below screenshot and configure all the options and click the Finish option.
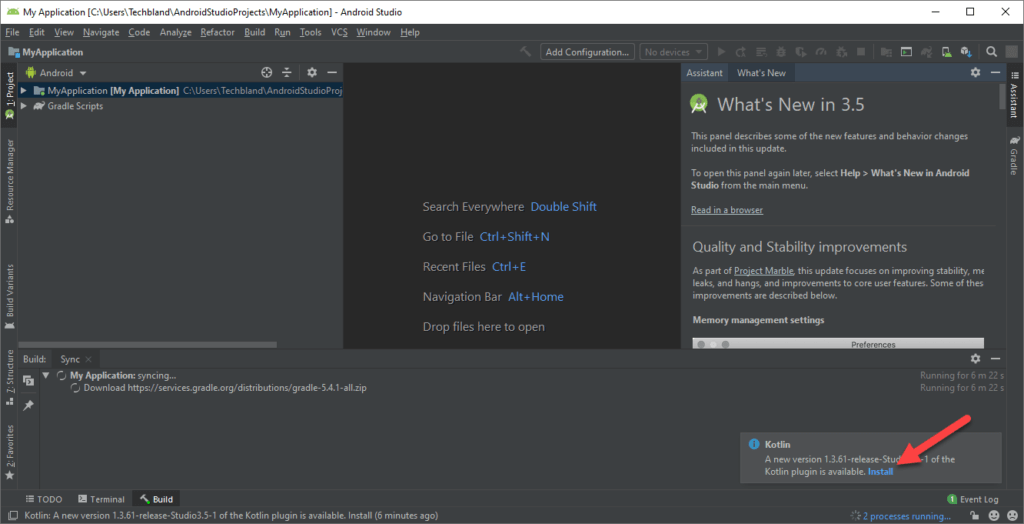
#4: Here, Click on the Install button to download kotlin plugins. Once you click the install button then wait for a while to complete the downloading.
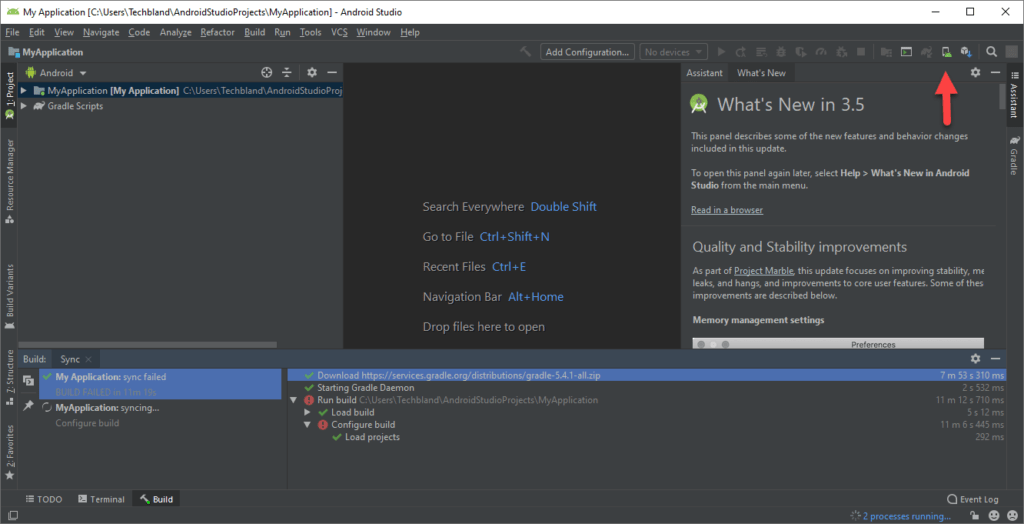
#5: Once the Kotlin downloading is done then go to the top and click the AVD manager.
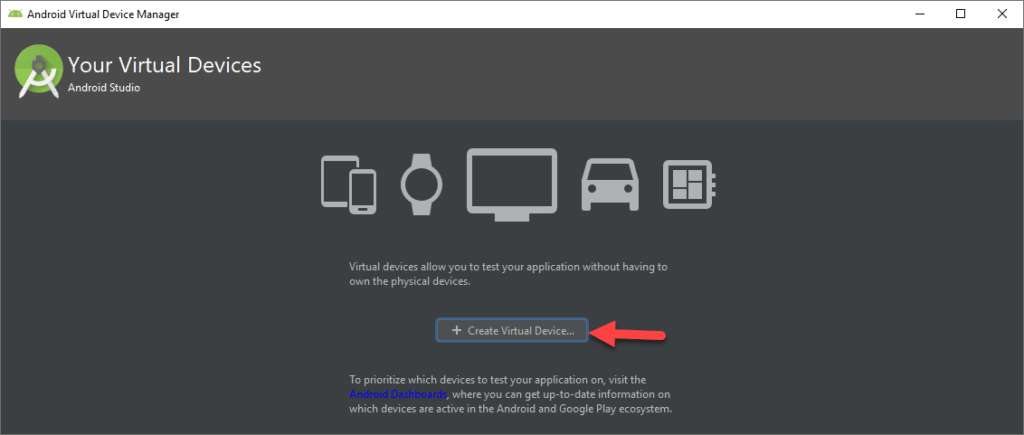
#6: In the next step, click the Create Virtual Device option.
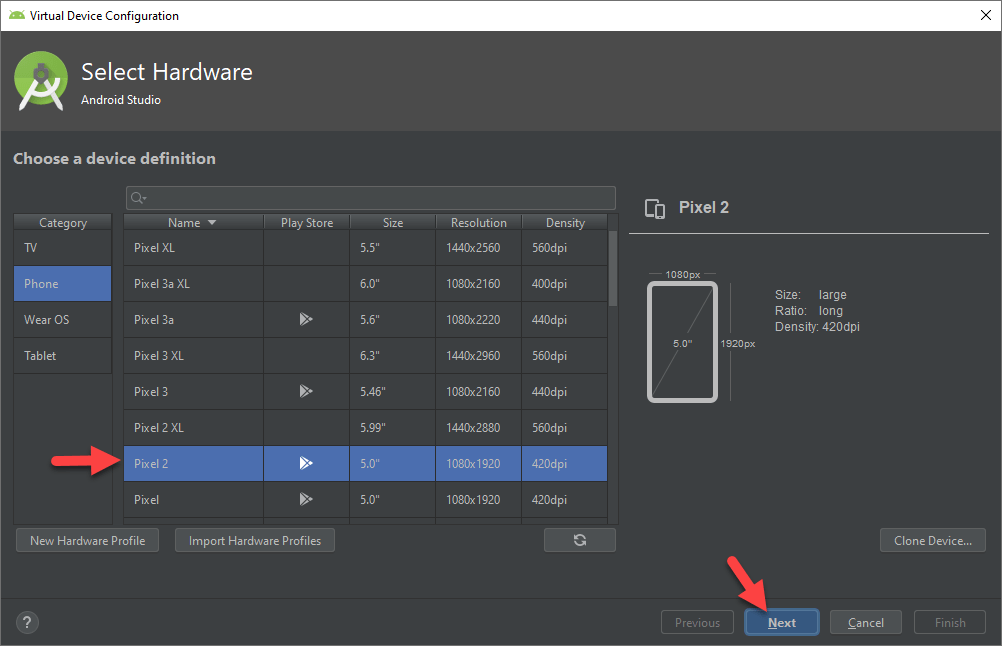
#7: On Select hardware page, you need to select the device you want to install Android 11, Therefore, I have selected Pixel 2 afterward click the Next option.
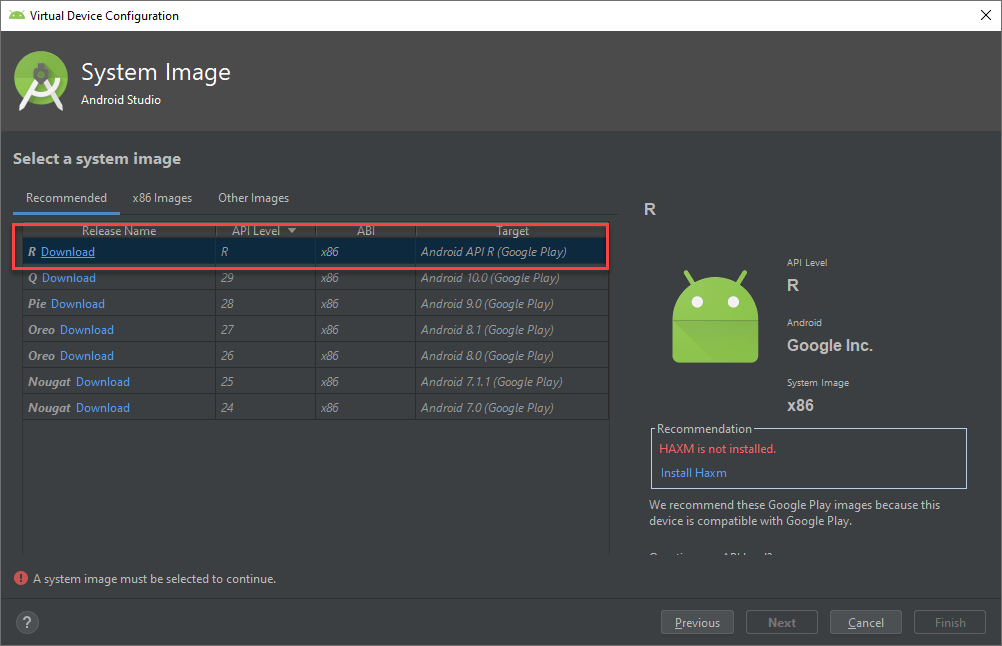
#8: As you are installing Android 11 on Android Studio on Windows, therefore, click the first Download option.
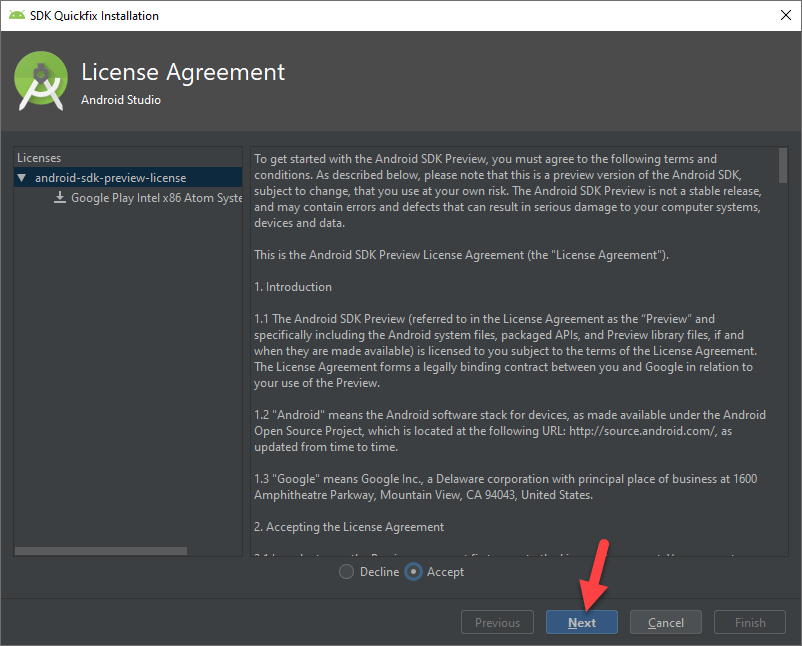
#9: Here, you should agree on the license agreement by clicking the Accept option and click the Next button.
#9: Now wait for a while to download and install the component installer. After that, click the Done button.
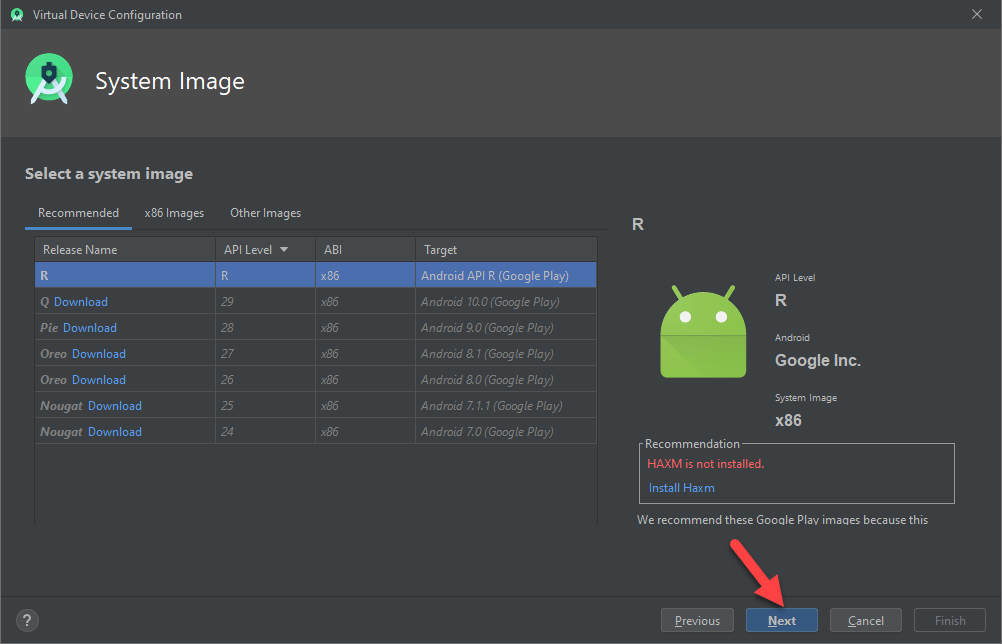
#10: Now select the system image for Android 11 and click the Next button.
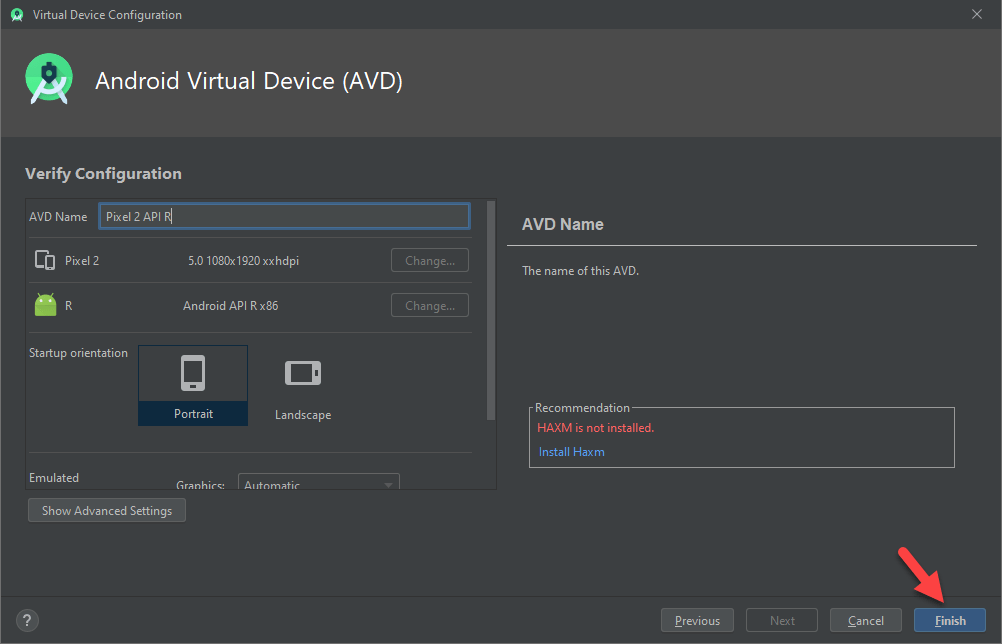
#11: After that, verify the configuration by giving AVD name, then, choose the startup orientation and click the Finish button.
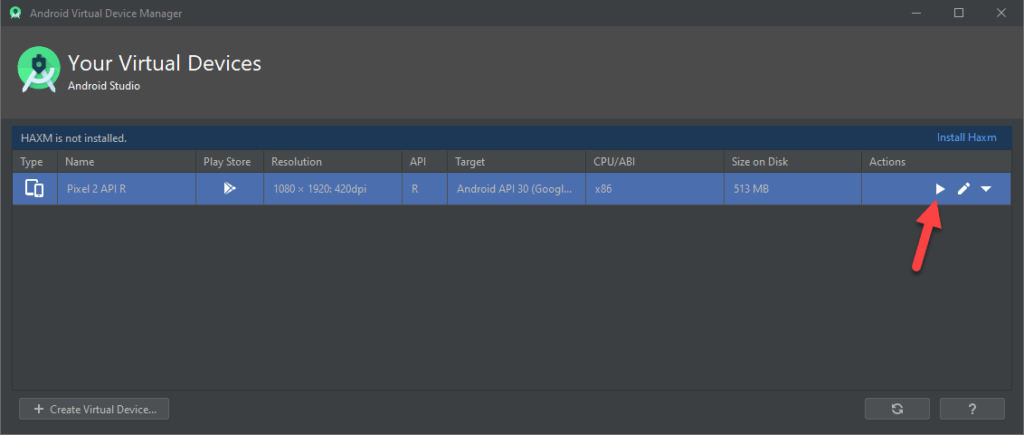
#12: After all the installation and configuration your Android 11 ‘R’ is ready on the virtual machine Android Studio list. Therefore, to give it a try click the Play button.
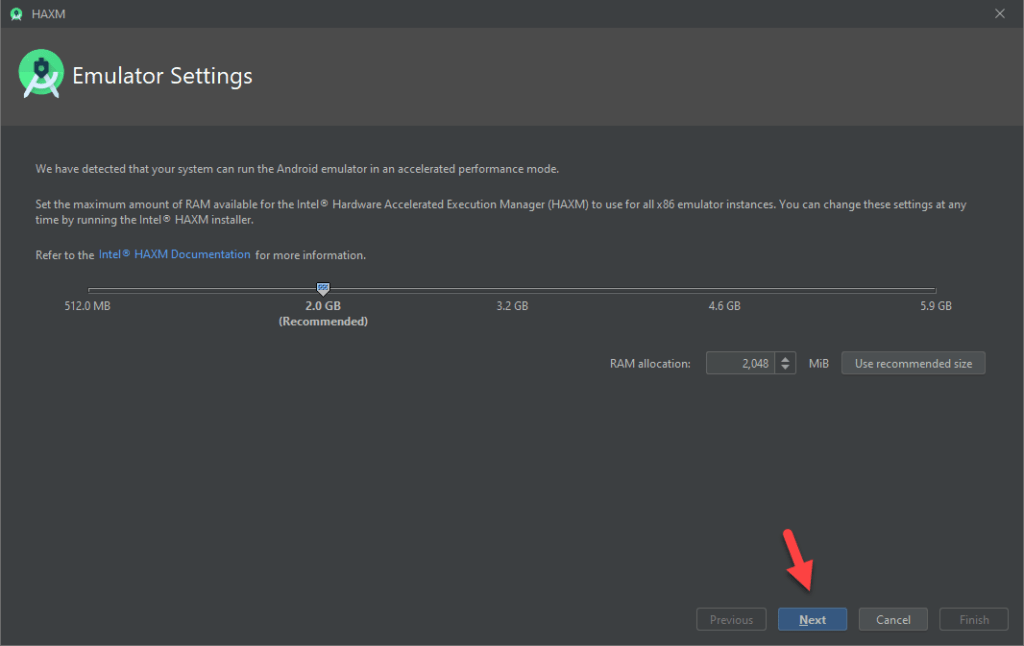
Note: If you haven’t installed HAXM then it will ask you to install it first. Therefore, click on the Install button. Once it is installed then click the Finish button.

#13: When the components downloaded then you will see the Emulator settings windows will pop-up. Therefore, you have to set the maximum size of RAM that is in stock on the hardware of your PC system. So, the recommended size is 2GB RAM but you can increase it up to 4GB.
- Android 10 Best Features Review
- How to Enable Android 10 Dark Mode Theme
- How to Create a Bootable USB from Android Without PC
- Make Website text bigger on Android
- How to Make Android Phone Bootable USB
Conclusion
We have installed the Android 11 preview mode on Android Studio on windows, it means you can install the Android 11 official version using the same method shown in this article. So, I hope you understand each part of the article, in case, you have any questions or problems then let me know in the comment box.