Do you want to have a clue on Apple macOS Big Sur Settings and Features? If yes then move on!
Apple’s macOS Big Sur brings a fresh look, as well as new customizations, and control options to the Mac desktop. Our tip below is a guideline on how to take full advantage of the best out of Apple’s greatest operating system.
Apple’s Big Sur was launched in November 2020 and is now available for download to all 2013 and later Mac desktops. Meanwhile, what does macOS 11.0 has to offer, and how can you fully utilize its features? Fortunately, you don’t have to hunt around on your own to see the pros and cons of Big Sur. Go through our tips to see the few macOS Big Sur Settings and Features that await you in Big Sur, and how you can get the most out of the latest OS.
Meanwhile, if you haven’t updated your Mac to the new OS, click the Apple icon on the top left corner of your screen and select About This Mac. A macOS Window will open, then select Software Update, and click Update Now, then follow the prompts to install the latest Big Sur.
Apple macOS Big Sur: 9 Settings and Features to Tweak
1. Use the New Control Center
Similarly, Big Sur has its own Control Center just like iPad and iPhone which display special icons for frequently used features. You can access the Control Center by clicking on the menu bar which looks like two horizontal line bars. You can now easily and quickly access AirDrop, Bluetooth, Wi-Fi, Do Not Disturb, Display, Keyboard Brightness, Music, Sound, and Screen Mirroring. Also, you can click to expand and use it.
Meanwhile, more options can be added to the Control Center by selecting System Preferences > Dock & Menu Bar. Other Modules are located in the left pane when you scroll down a bit. You can select Battery, Accessibility Shortcuts, or Fast User Switching, and check the box for “Show in Control Center”.
2. Pin Controls to the Menu Bar
Big Sur users can pin controls from the Control Center to the Menu Bar for easier access. However, you can choose to perform this action in either of these ways. You’ll click on System Preferences > Dock & Menu Bar. Alternatively, click the Control Center icon, then drag and drop a specific icon to the Menu Bar just like you can do in iOS and iPad. To access “Show in Menu Bar”, go to the left pane in the Control Center section, select a specific control icon, and then check the box.
We’ve another amazing feature you’ll love to try here. You can choose to hide the Menu Bar so that it’ll show only when you drag the cursor to the top of the screen. This is not a new trick and we’ve seen it on previous versions of the Mac operating system, but things seem to be different here in Big Sur. You can choose to set this feature by going to System Preferences > Dock & Menu Bar and check the box, you’ll see “Automatically hide and show the menu bar.”
3. View Notifications and Widgets
Apple once again equipped another interesting iPad/iOS feature in Big Sur. Currently, notifications and widgets are displayed in the same section just like they’re on iPad and iPhone. Click the Menu Bar > Date and Time in the Menu Bar to view the default widgets such as Date, World Clock, Weather, Screen Time, and see any notifications. You can click a widget to display any corresponding app.
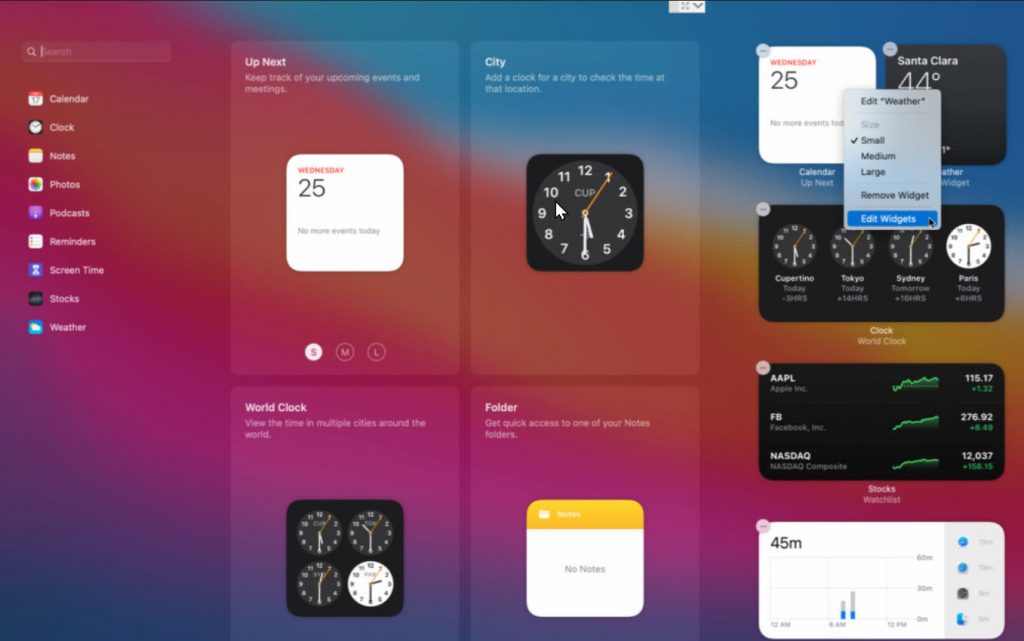
4. Customize Your Widgets
In macOS Big Sur, you can tweak a lot of widgets in a different number of ways. Right-click on any widgets to edit details, change the size, and delete them from the screen. For example, you can edit the weather widget to change the location. Also, you can assign new widgets by dragging and dropping them to different spots.
Fortunately, Big Sur users can add widgets by clicking the Edit Widgets button at the bottom corner, or right-click on any widget and tap Edit Widgets. Also, you can access all the widgets you can add by scrolling down a bit or click on any category in the left pane. Mac users can choose to search for any specific widget by typing the name in the search toolbox. Linger over any widget you want to add and select the green plus icon in the upper left corner of its icon, or you can choose to drag it to the widgets pane.
Big Sur comes with another interesting feature that lets the user download widgets from third parties by typing “Widgets” in the Mac App Store search box. Also, you can choose to use the app as a widget in the Menu bar or the Notification Centre.
5. Turn-off Start-up Sound
The launch of macOS Big Sur saw the chime sound brought back to the Mac desktop. However, many users have found it difficult to adapt to the sound after many years of its absence. Fortunately, Apple allows its users to disable the built-in chime sound that plays after booting the Mac. To turn-off, the start-up sound, go to System Preferences > Sound and uncheck the box for “Play Sound on Start-up. Now, your system will remain quiet when your Mac fires up.
6. Check Your Mac’s Battery
The new Big Sur OS now offers a well detailed and special system preference for your battery. Select the battery icon on the Menu bar to see the remaining percentage of your battery, including the charging status. The Battery Preferences is an option for you to enable Power Nap in battery mode, select when the display shuts off battery power, and optimize video streaming on battery power.
Better still, your battery life can be fully optimized when you take certain precautions to preserve it. You have to ensure the option for “Optimized Battery Charging” is turned on. This battery tweak will make sure your daily charging routine isn’t surpassed. This means your Mac won’t be charged past 80% when the extra boost isn’t needed.
Big Sur allows Mac users to “Manage Battery Longevity” by clicking the battery health option. This feature will reduce the rate at which your battery drains. On the Battery Screen, select “Usage History” to access your Battery level, and last 24 hours or 10 days usage.
7. Hear What You Type
If you’re having an eye-problem, and you’re having trouble seeing clear details on the screen, Big Sur is now offering you the option to hear letters and words as you type them. To set-up this tweak, go to System Preferences > Accessibility. When you see the Spoken Content section, check the box for Speak typing feedback. You can now open any typing app on Mac and start typing to see the letters and words being read aloud to you. After you’ve typed in a certain word, it’ll be read aloud to you. If you enter a space, punctuation marks, new paragraph, or other entries, they’ll be read aloud as well.
8. Try the New Wallpaper
Big Sur offers users a wide range of images that can be used as wallpaper. To access this feature, click on System Preferences > General. Also, previous Mac versions allow you to choose a dynamic wallpaper that changes like day and night progress. Big Sur has greater varieties of amazing pictures including decent fluctuations on the usual scenic themes.
9. Adjust the Colors
macOS Big Sur offers a new cool color tweak known as multicolor which influences the color that shows in menus, buttons, and other elements. Also, app accent color can be changed by multicolor option based on the developer’s preferences. This means each app can have its specific color. To set-up, this tweak, click on System Preferences > General. Meanwhile, select the first icon to access Accent color.
However, the wallpaper tinting default settings is somehow annoying. It changes the shading of apps, windows, and other elements in macOS. To change the natural display of windows to a more neutral color, click on System Preferences > General and tap on the box for “Allow wallpaper tinting in windows.”
Read Next:
- macOS Big Sur Improves Apple Built-in Apps
- How to upgrade your Mac to Latest macOS Big Sur
- Best Video Editing Software for Mac
Conclusion
Apple Big Sur operating system, also known as MacOS 11 is full of newly redesigned tweaks and features that are widely accepted because of its better user experience. Big Sur has a wide range of compatibility, in case you aren’t planning to upgrade to a new Mac. Also, Apple revealed that its upcoming Macs that are powered by Apple Silicon Chips can natively run iPad and iPhone apps.
Finally, Apple’s latest macOS 11 is a must-have for every Mac desktop fan. Our list of 9 macOS Big Sur Settings and Features to tweak on your macOS Big Sur is a detailed explanation of what Apple has to offer.