For installing macOS Monterey on your Macintosh, Macbook, or other Mac device. you will need to create a macOS Monterey Bootable USB drive on Mac using your macOS Mojave, macOS Catalina, or macOS Big Sur. The macOS Monterey is the 18th major release of the Macintosh operating system including several amazing features. By creating a bootable USB drive for macOS Monterey, you can perform a clean installation of macOS Monterey on your Mac computers.
However, macOS Monterey is the 12th version of macOS that was developed and introduced on 7th June 2021 on WWDC. The macOS Monterey has several major updates that are available on the Beta version. So far, macOS Monterey is in the developer beta and later on, you can download the macOS Monterey public beta. The developer beta has various bugs and this version is not recommended for any user to install on its primary system.
If you are curious to install macOS Monterey and check it’s all update. Then, you have the best platform called virtual machines like VirtualBox and Vmware. These virtual machines allow you to run multiple operating systems on a single PC. Therefore, you can install macOS Monterey on Virtualbox on Windows. Even you can use Virtualbox on Mac to install macOS Monterey.
In order to create macOS Monterey bootable USB drive on Mac. You need one USB drive of 32GB because the actual size of macOS Monterey ISO is 16GB. Besides that, you should have the macOS Monterey installer file. However, you can download it from the developer’s website.
How to Download macOS Monterey Installer File from Developer Website
- To download macOS Monterey from the developer website, go to Betaprofiles.
- On the Betaprofiles, scroll down and click the macOS 12 install profile.
- Now the downloading file will be started.
- When the file is downloaded, then open the file and run “InstallAssitantPackage.file“.
- On the first page, click Continue.
- Here, agree to the terms and conditions.
- On the installation page, enter your administrator password and install the software.
- Wait for a while to complete the package downloading.
- Once the software update appeared, click on Upgrade Now.
- While downloading the file you will see a pop-up window installation. So, quit the installation and start creating a bootable USB drive.
How to Create macOS Monterey BootableUSB drive on Mac
Step 1: To start creating a bootable USB drive, attach your USB to your Mac computer and run the Disk Utility. After that, format your USB drive according to the below parameters.
- Click on Erase option from the top menu
- Name: Optional
- Format: APFS
- Scheme: GUID Partition Map
Now, click the erase button to erase the drive. Once the process is done then click the Done button and close the Disk Utility.
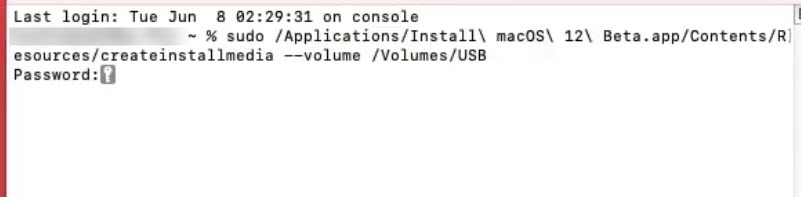
Step 2: It is time to open Terminal from Spotlight and copy the below command code and run on Terminal. After that, type your password and press Enter to run the command code.
Sudo /Applications/Install\ macOS\ 12\ Beta.app/Contents/Resources/createinstallmedia --volume /Volumes/USB
Step 3: Now, the creating macOS Monterey bootable USB drive will be started. This process will take a little time. Once the process is done then Restart your Mac computer.
Step 4: Once your computer is restarted then press the Boot keys to Enter the Boot menu. Afterward, start the macOS Monterey installation using the macOS Monterey Bootable USB drive.
Read Next:
- Download macOS Monterey ISO DMG and VMDK
- How to Download macOS Monterey DMG File
- Download macOS Monterey on Mac
Conclusion
using the above steps, you can create a macOS Monterey USB drive on your Mac computer. The main purpose to create macOS Monterey bootable USB is. To perform a clean installation of macOS Monterey on a Mac device.