macOS Monterey is one of the biggest Macintosh operating systems having several new features and updates. After macOS Big Sur, Apple introduced the next update of the Mac operating system on 7th June 2021 on WWDC. Besides that, Apple released the update of iOS 15, WatchOS 15, iPadOS 15. This update has major new features that are amazing.
But installing macOS Monterey on Windows PC is not an easy task. However, Windows users cannot install macOS Monterey on Windows PC. Therefore, they need to use virtual machines to install macOS. We have the best virtual machines like Virtualbox and Vmware. These two virtualization software are the best that allows you to run multiple operating systems on a single PC. So, in this article, we are going to use Virtualbox to install macOS Monterey on Windows PC.
macOS Monterey has amazing features like Universal Control, Airplay to Mac, Shortcuts, FaceTime and SharePlay, Safari Tab bar, and many more. Besides that, the theme of macOS Monterey is one of the beautiful so far. That’s why everyone wants to check macOS Monterey whether Windows users or Mac.
macOS Monterey is in developer beta mode, which means this update has several bugs. Therefore, do not install macOS Monterey on your Primary Mac. You can use Virtualbox on your Mac computer to install macOS Monterey. However, the public beta is coming soon and at the end of this year, we will see the stable version of macOS Monterey.
To install macOS Monterey on Windows PC. You will need some required files given below. One of the required files is the macOS Monterey Installer file like ISO, VMDK, and DMG. You need to download the macOS Monterey Installer file before going to install macOS Monterey.
Required Files
Step 1: Install Virtualbox on Windows
Before moving on, you should download and install Virtualbox from the link above. Simply go to its official page and click on “Windows Host” to download the Virtualbox to Windows. After that, scroll down and download “Virtualbox Extension Pack”. Once you complete the downloading then follow the below steps to install Virtualbox on Windows PC.
Once the Virtualbox downloading is done. Then, open the Virtualbox Installation Setup.
- On Welcome Setup Wizard, click the Next button
- On Custom Setup, click Next
- Again click Next
- On Warning Network Interface, Click Yes
- The software is ready to install, click on the Install button
- Once the installation is completed, then click on the Finish button
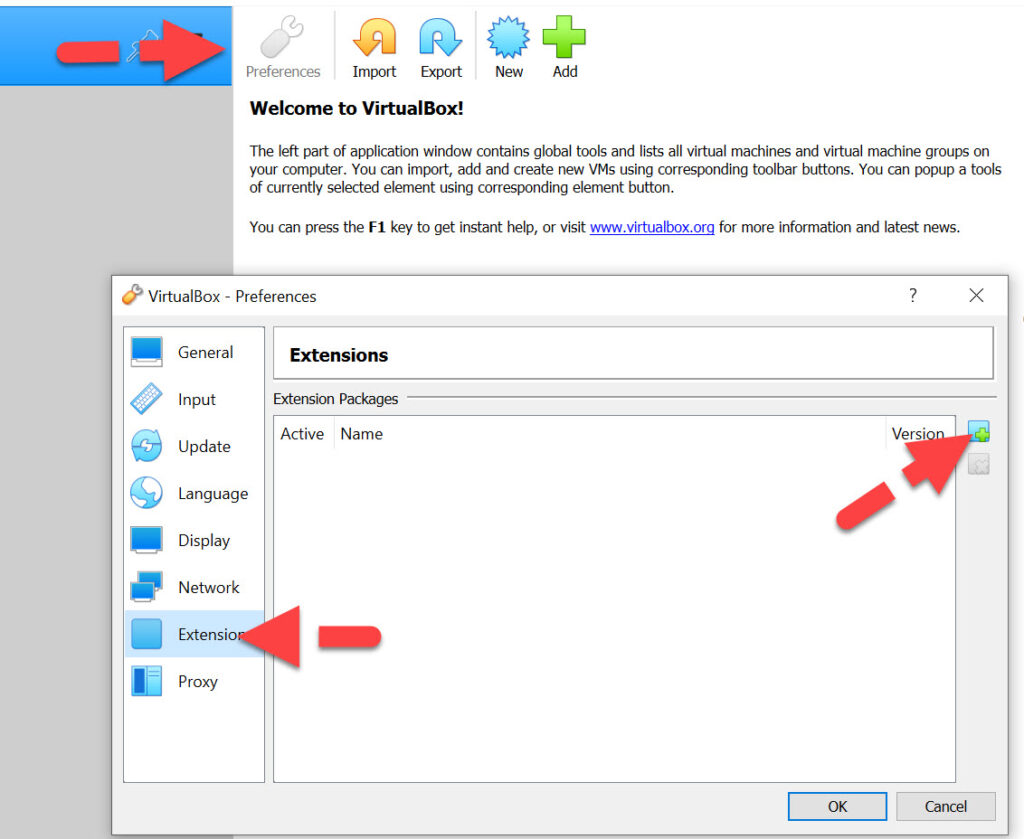
After you installed Virtualbox on your Windows PC. Then, the second step is to install Virtualbox Extension Pack. Make sure, you have downloaded Virtualbox Extension Pack.
Open Virtualbox and go to Preferences – Extensions and click on the +icon to insert the Extension Pack setup.
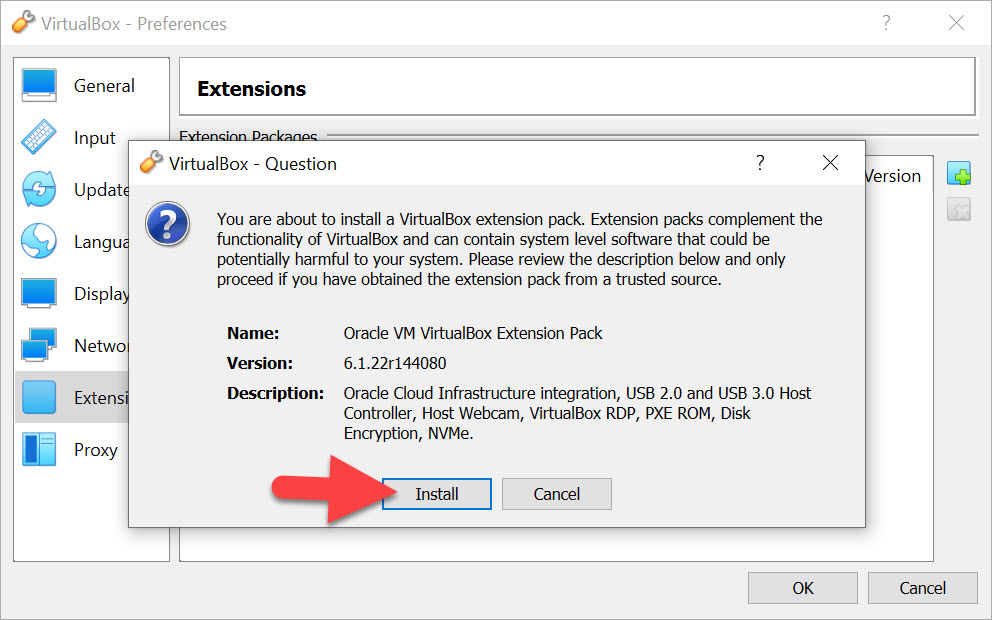
Now, select the Virtualbox Extension Pack and insert it on Virtualbox.
After that, you will be asked to click on the Install button and Agree to the terms and conditions.
Once the installation is done then click the Ok button and click Ok to close the window.
Step 2: Create New macOS Monterey Virtual machine
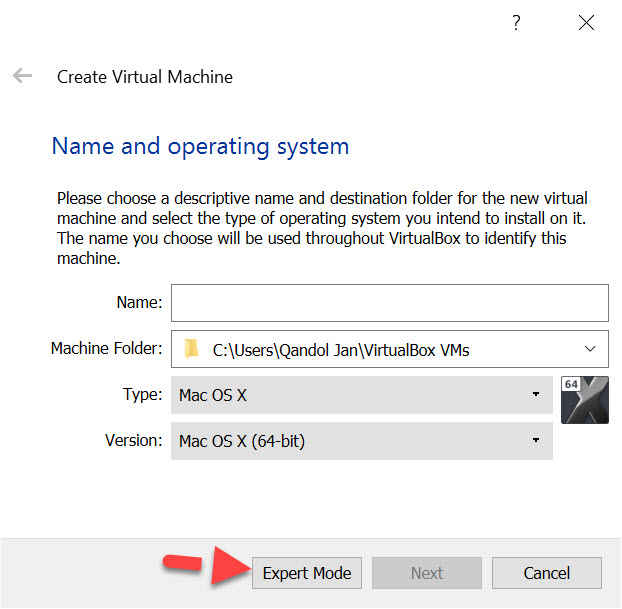
Now Virtualbox is ready to install macOS Monterey. To install macOS Monterey, we need to create a new virtual machine for macOS Monterey. To do that, click on the New option from the top menu.
Here, go to Expert Mode.
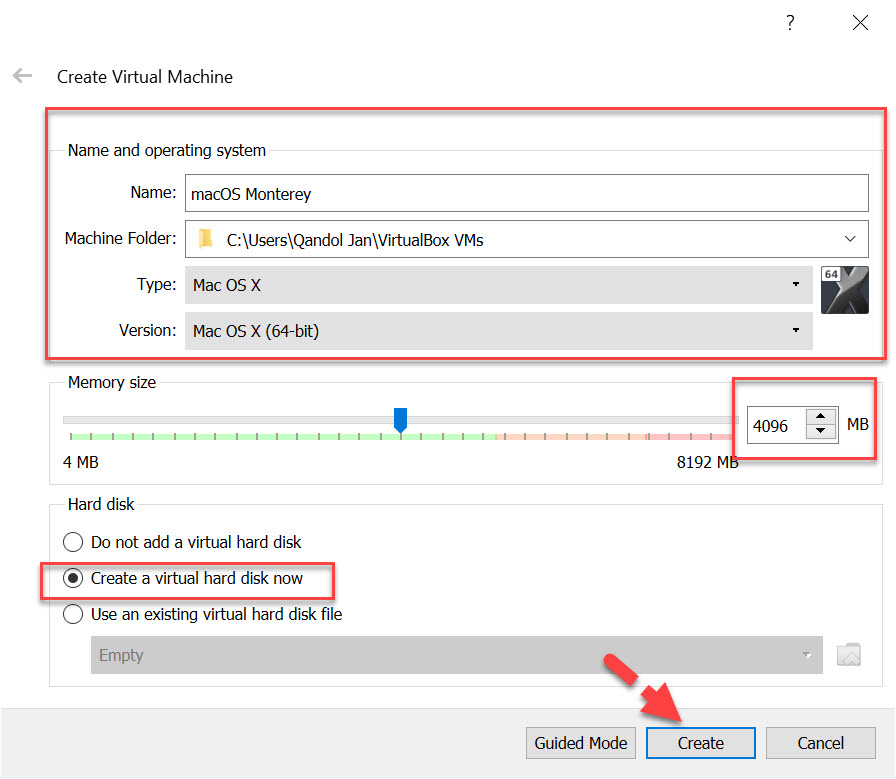
Follow the same steps shown below screenshot. Like
- Name: macOS Monterey
- Type: Mac OS X
- Version: Mac OS X (64-bit)
- Half of your system memory size
- Select Create a virtual hard disk now
Then, click the Create button to move to the next step.
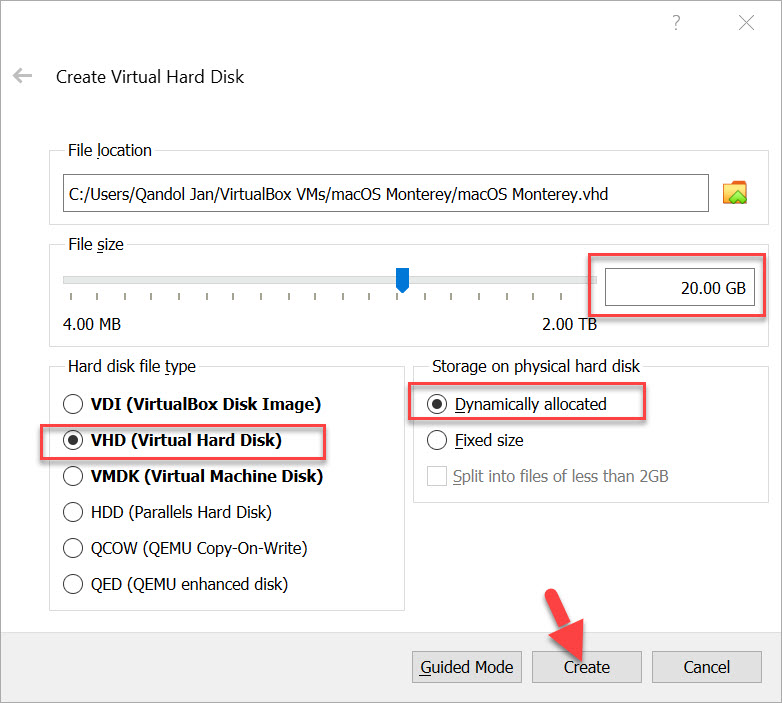
Now, create a virtual hard disk. To do that, follow the below steps.
- Select Half of your computer size or select Min 20GB
- Hard Disk File Type: VHD
- Storage on Physical Hard Disk: Dynamically allocated
Once you are done then click the Create button.
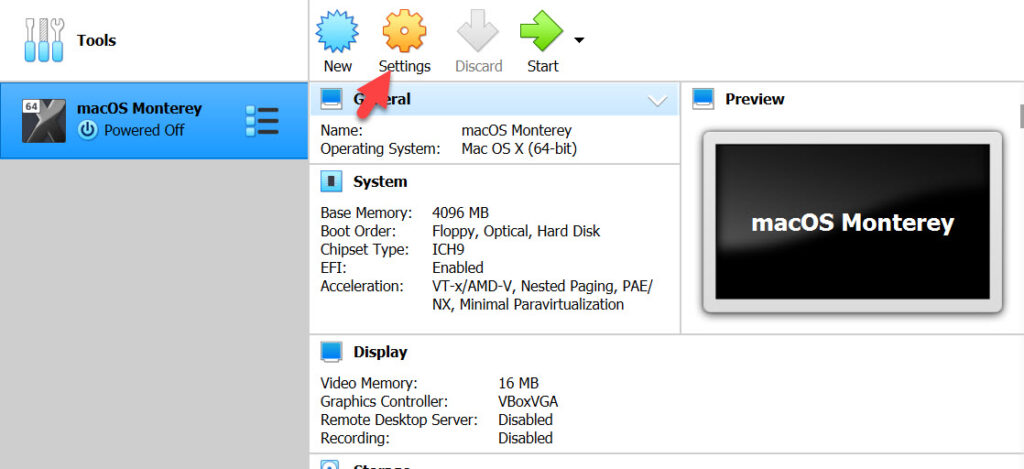
Step 3: Customize Virtual Machine Settings
Finally, we have created a new virtual machine for macOS Monterey. Now, you need to customize the settings for better performance. Therefore, select the macOS Monterey Created Virtual Machine and click on the Settings option from the top menu.
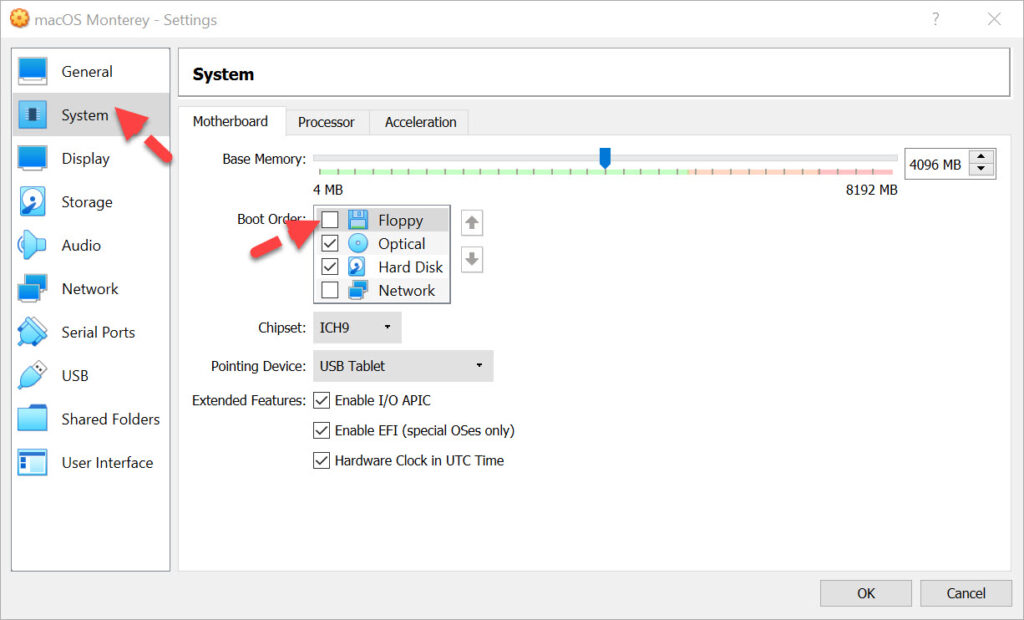
Go to System and DeSelect the Floppy.
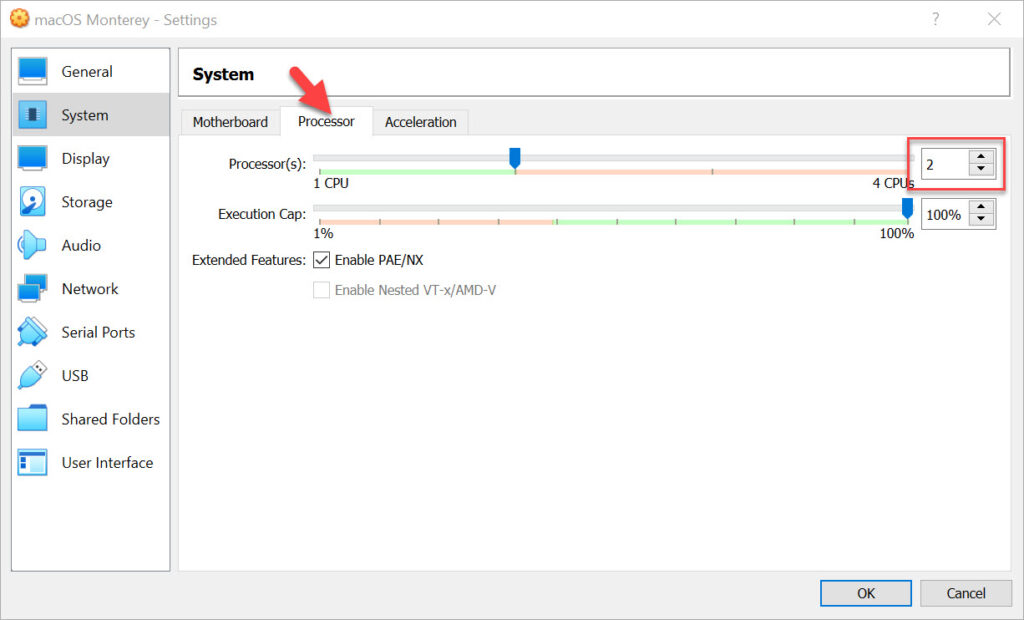
Then, click the Processor and increase the CPU. you can select half of your system CPU.
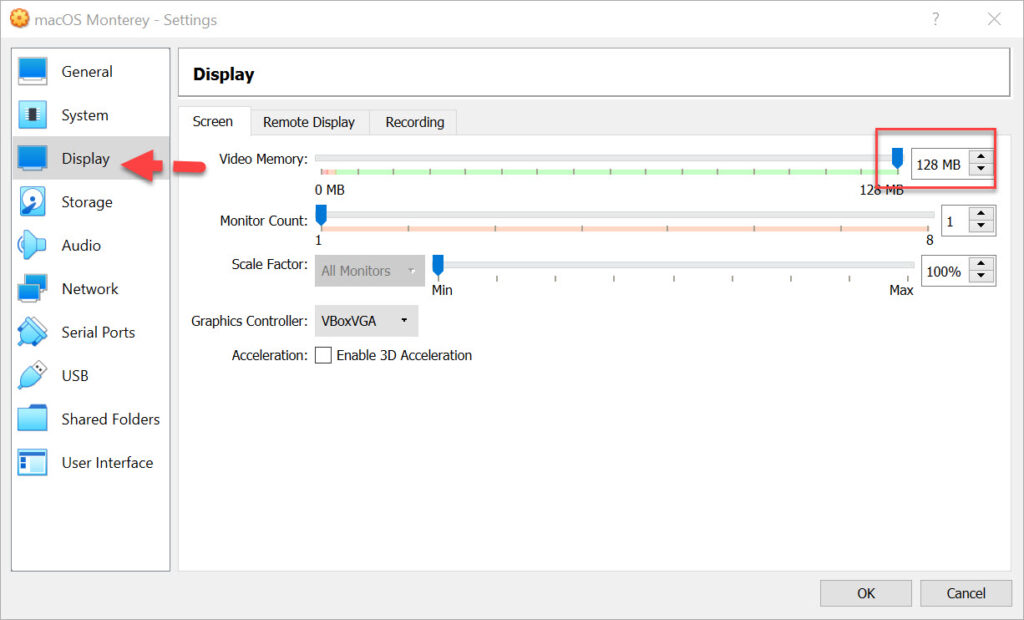
Select Display and increase Video Memory to 128MB.
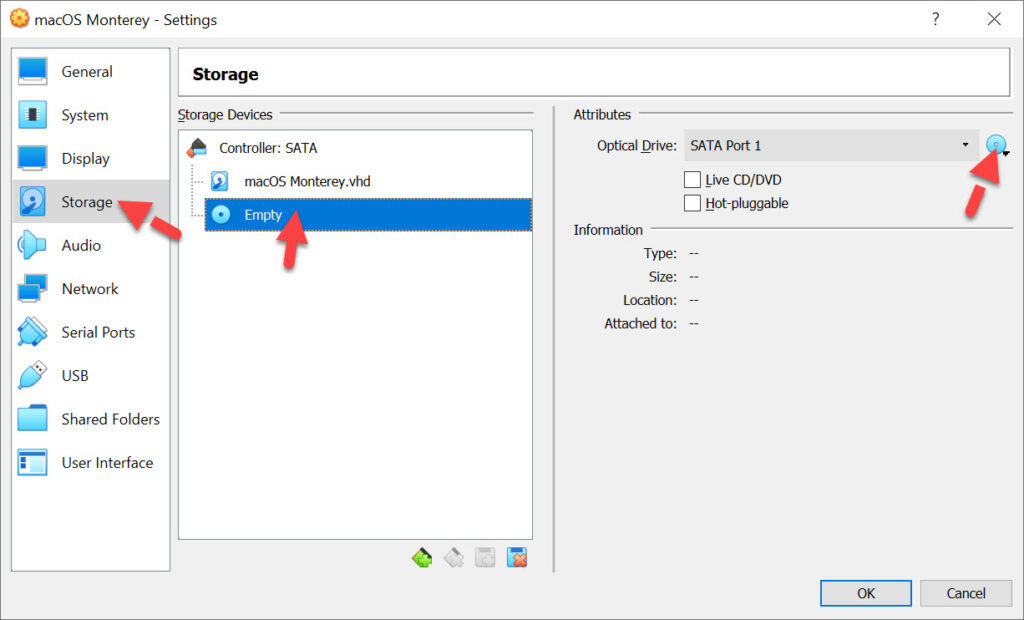
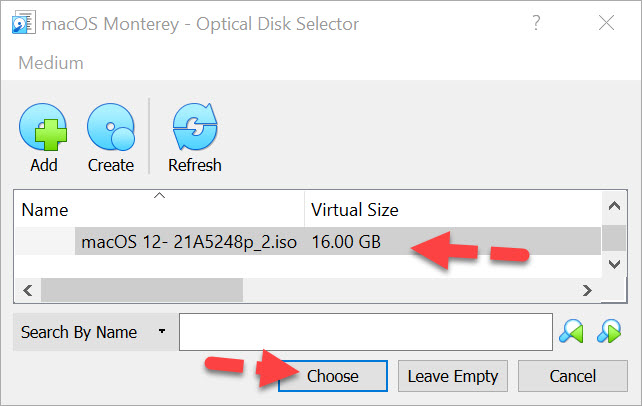
Select Storage and click on Empty, Then, click the small CD icon to insert the installer file. So, click on the Choose/Create a virtual optical disk.
Here, click Add option to insert macOS Monterey Installer File.
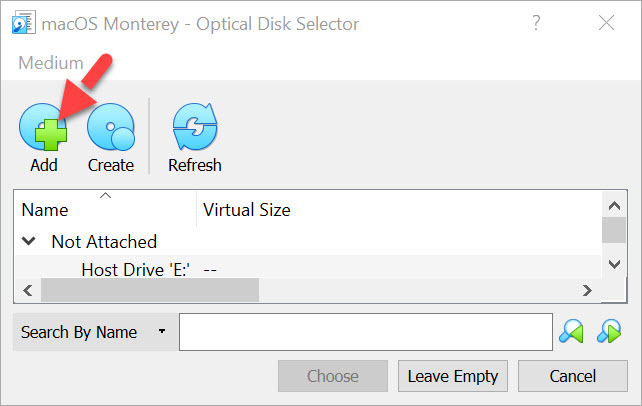
Then, you need to select the macOS Monterey installer file whether ISO or VMDK. After that, click the Choose button.
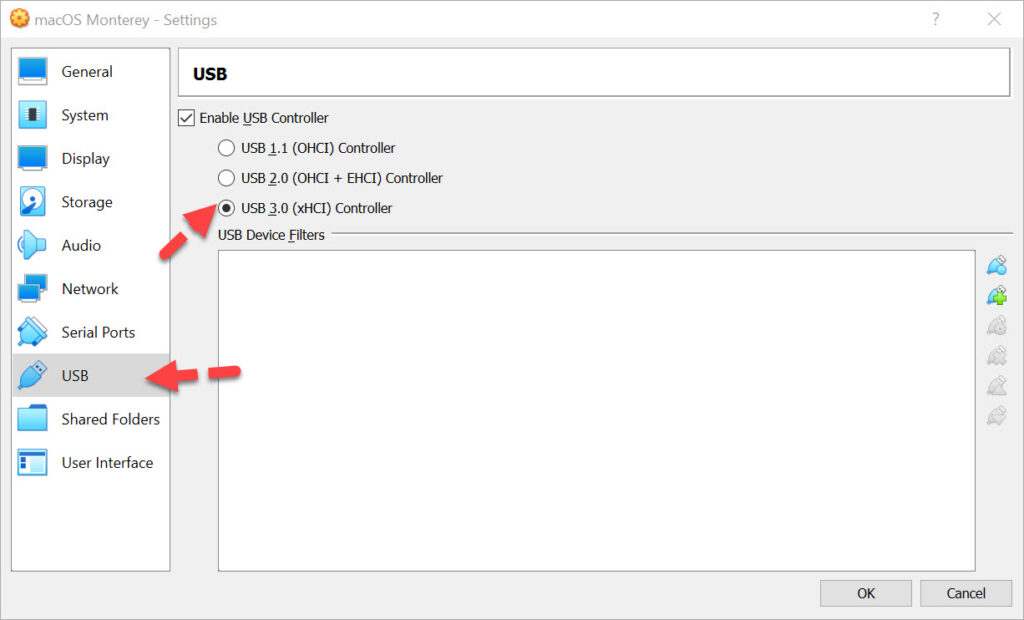
In the end, select the USB and select USB 3.0 then click the Ok button to close the customization page.
Step 4: Add Virtualbox Command Code to CMD
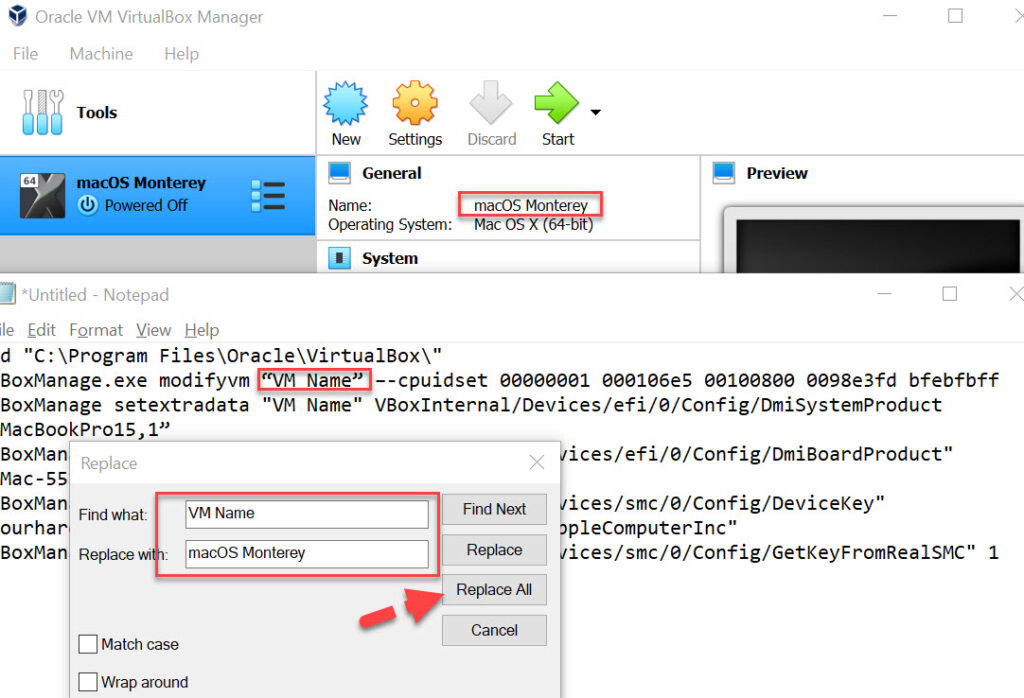
In order to complete the macOS Monterey installation on Virtualbox on Windows PC. You need to apply the below Virtualbox command code to CMD. Otherwise, you are unable to install macOS Monterey on Virtualbox on Windows PC. Therefore, follow the exact code to the CMD.
cd "C:\Program Files\Oracle\VirtualBox\"
VBoxManage.exe modifyvm “VM Name” –-cpuidset 00000001 000106e5 00100800 0098e3fd bfebfbff
VBoxManage setextradata "VM Name" VBoxInternal/Devices/efi/0/Config/DmiSystemProduct “MacBookPro15,1”
VBoxManage setextradata "VM Name" "VBoxInternal/Devices/efi/0/Config/DmiBoardProduct" "Mac-551B86E5744E2388"
VBoxManage setextradata "VM Name" "VBoxInternal/Devices/smc/0/Config/DeviceKey" "ourhardworkbythesewordsguardedpleasedontsteal(c)AppleComputerInc"
VBoxManage setextradata "VM Name" "VBoxInternal/Devices/smc/0/Config/GetKeyFromRealSMC" 1
Now, copy the above codes and paste them to Notepad. Then, go to Edit>Replace and copy the Virtual Machine and replace it with the VM Name. When you are done then click on the Replace all to change the VM Name with your Virtual Machine name.
Now, run CMD as Administrator and copy the code one by one and paste it to command, and press Enter. Make sure to run the code correctly.
Step 5: Perform a Clean Installation of macOS Monterey on Virtualbox on Windows PC
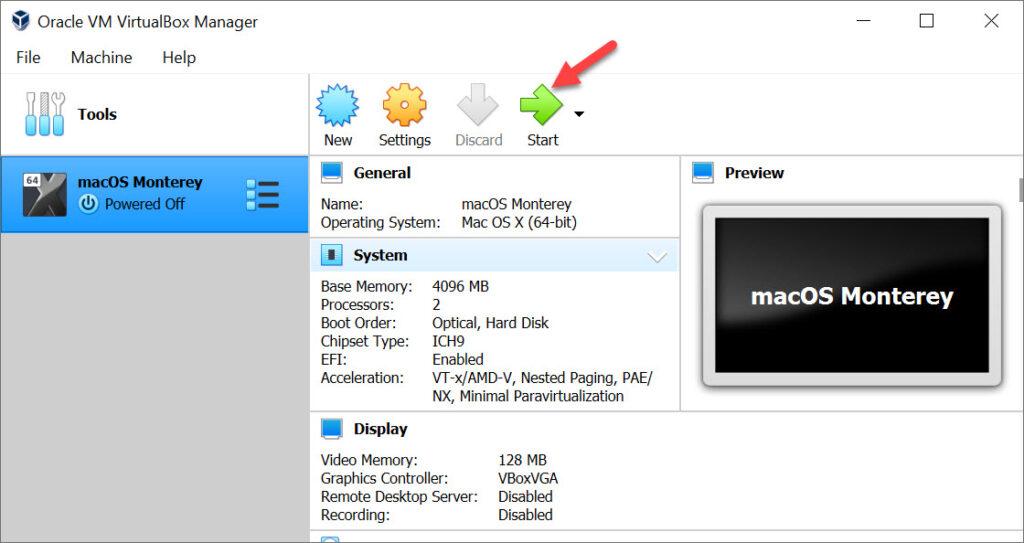
Finally, you are ready to install macOS Monterey on Virtualbox on Windows PC. Make sure, you have created macOS Monterey virtual machine as shown in this article. Now, to move on open Virtualbox and click the Start button to begin the installation.
#1: Once you clicked the start option then you will a bunch of code running on the black screen. So, wait for a while.
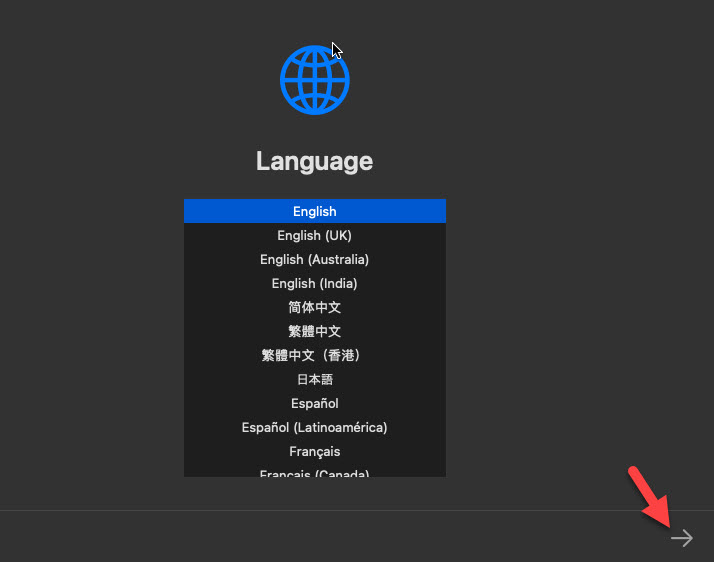
#2: On the first step, you need to select the installation Language. Once you select the language then click the Continue Arrow.
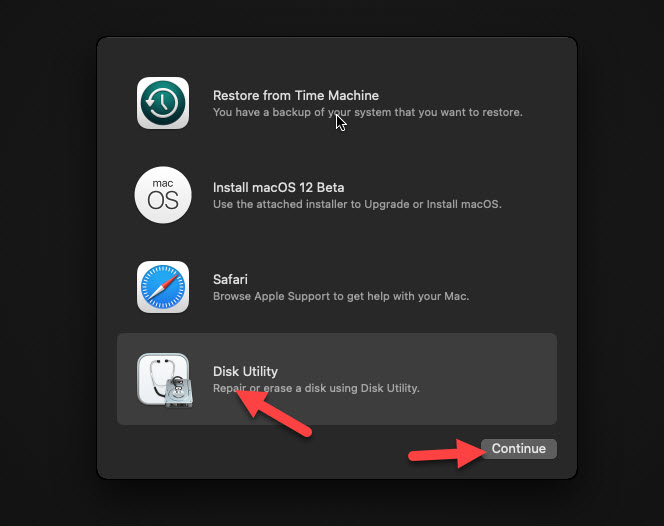
#3: On the recovery page, click the Disk Utility and Continue.
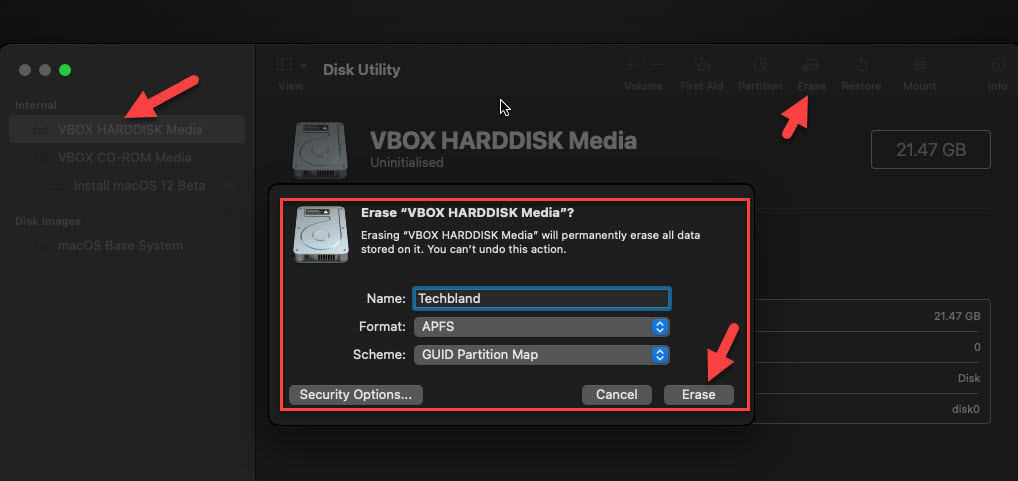
#4: In Disk Utility, select the virtual disk that you created for macOS Monterey from the left-side of the window. Then, click the Erase button from the top menu. After that, follow the below parameters.
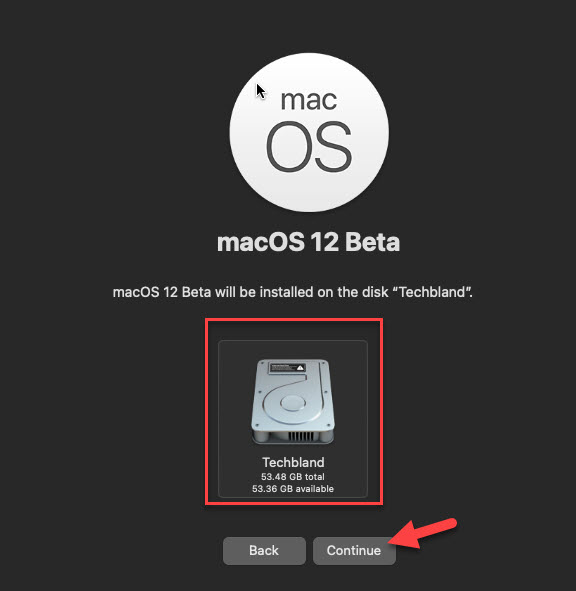
- Name: Techbland
- Format: APFS
- Scheme: GUID Partition Map
Once you have done, then click the erase button to erase the virtual disk. Now, wait for a while to erase the disk. Once the erasing is done then click the Done button and close the Disk Utility.
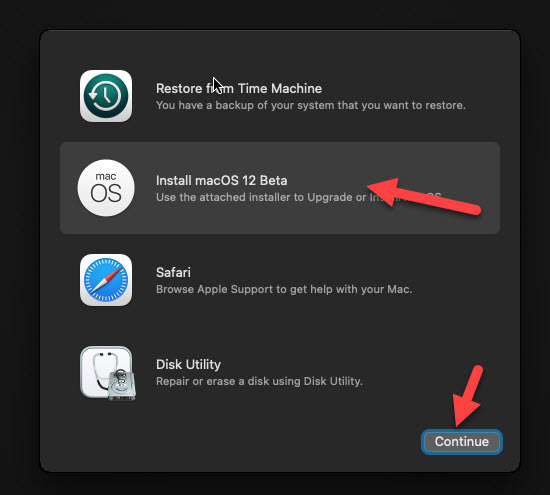
#5: On the recovery page, select Install macOS 12 Beta and click Continue.
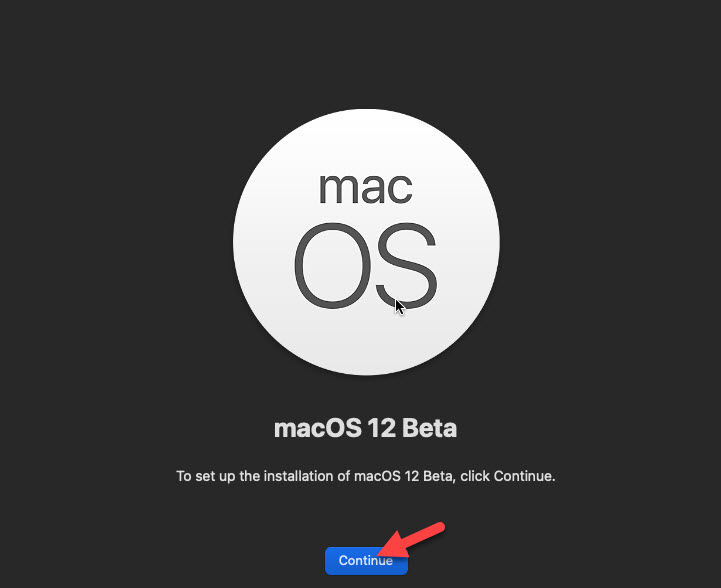
#6: To Set up the installation of macOS 12 Beta click Continue.
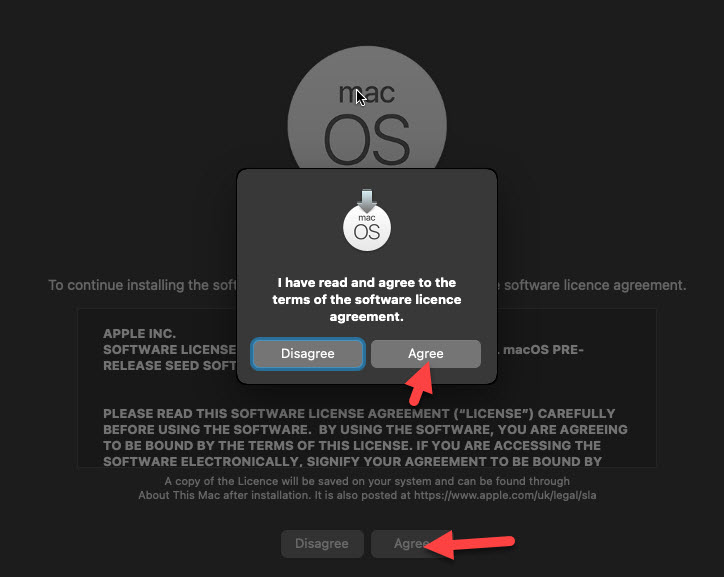
#7: Agree to the terms and conditions by clicking the Agree button.
#8: Select the disk to install the macOS Monterey and click Continue.
The installation will be started and you need to wait for some minutes. During the installation, the Virtualbox machine will restart several times. Don’t do anything just wait. Select the disk to install the macOS Monterey and click Continue.

Step 6: Complete the macOS Monterey Basic Installation
#1: On the first page, you need to choose the Country and click Continue.
#2: Choose your written and spoken language and click Continue.
#3: Click Not Now on the Accessibility Window.
#4: Select my Computer does not connect to the internet and Continue.
#5: Click Continue.
#6: On Data and Privacy, click Continue.
#7: On Migrant Assitant, Click Continue.
#8: Agree to the terms and conditions.
#9: Now, create your computer account and continue.
#10: Click Continue.
#11: Click sign up later on Screen Time.
#12: On Siri, click Continue and enables it.
#13: Choose Language for Siri and continue.
#14: On Improve and Siri Dictation click Not Now and Continue.
#15: Choose your Looks for macOS Monterey and Continue.
#16: Wait for a while for macOS Monterey to be ready for the first time.
#17: Finally, the macOS Monterey is installed on Virtualbox on Windows. Now, you can use it and check its updates on your PC.
Read next:
- How to install macOS Big Sur on Virtualbox on Windows
- How to install macOS Big Sur on Vmware on Windows
- Download macOS Monterey DMG File
- Download macOS Monterey ISO DMG VMDK Installer File
Conclusion
This was the easy method to install macOS Monterey on Virtualbox on Windows PC. I hope you learned all the steps and you have installed macOS Monterey on your PC successfully. If you face any kind of problems. Feel free to ask me in a comment section.