Install MacOS Mojave on VMware on Windows – Best Method
In this article, I will walk you through on how to install MacOS Mojave on VMware on Windows. although, I should let you know that, Apple recently announced its new Operating system at WWDC(2018) which is MacOS Mojave 10.14 and this time this operating system is off the hook and handy. it has awesome features with dark themes, if you give it a try then, needless to say, you will be in heaven. so, at the moment, you can test the new operating system on any virtualization software such as Virtualbox and Vmware.
It is the best way to try MacOS Mojave on Virtualbox or VMware because it is very risky to install it on your physical system. to install it on your personal computer you will need to have a full backup of your data in case something will happen inconveniently. so, to install MacOS Mojave on VMware on windows you have to follow the below methodology and do step by step.
Related Articles:
Download MacOS Mojave VMware & Virtualbox Image How to Downgrade MacOS Mojave to MacOS High Sierra How to Install MacOS Mojave on Virtualbox on Windows
Install MacOS Mojave on VMware on Windows
In order to install MacOS Mojave on VMware, you will need to have MacOS Mojave Vmware Image like download MacOS Mojave 10.14 VMware Image. moreover, download and install VMware Workstation/Player and in last you will need to install 7Zip/ Winrar to extract the Macos Mojave vmdk file. so, I will guide you all the steps one by one in below.
Requirements to Install MacOS Mojave on VMware
- The minimum size of 2GB Memory
- Minimum 2 cores of the processor
- 20GB of Hard disk free space
- At least 256MB graphics memory
- Your system should support Intel/AMD VT (Virtualization Technology)
- Virtualization Technology should be enabled from BIOS setup
File to Download
- Download VMware Workstation Pro
- MacOS Mojave 10.14 Beta (1 Part)
- Download MacOS Mojave 10.14 Beta (9 Part)
- Download Patch Tool
Step 1. Extract MacOS Mojave VMDK File
At the first step, while you have downloaded MacOS Mojave VMDK file, then you will need to extract it via WinRAR or 7Zip. when you extract it then you can use the MacOS Mojave Image file. to extract the file just right click on the file then select Extract Here. it will take around 5 minutes to unzip the file.
Personally, I recommend you to download the 1 Part if your internet is slow but again try to download MacOS Mojave Image 1 part.
Step 2. Download and Install VMware on your PC
As you know to install MacOS Mojave 10.14 on VMware, you will need to download and install it on your system. therefore, download it from the above link and install it on your system. the installation is quite easy but again if you don’t know then follow the below steps. in case if you have installed already then you can skip this step.
- click the Vmware setup file
- then you will see the Welcome page so here click the Next button
- now accept the terms in the license agreement and click the Next button
- Select the installation destination and click the Next button
- In user experience setting leave everything by default and click the Next button
- If you want the shortcuts then select the two options and click the Next button
- Now the installation is ready, therefore, click the Install button
- While the installation is completed then click the Finish button
How to Download & Install VMware Workstation on Windows How to install Oracle Virtualbox on Windows 7/8/10
Step 3. Open unlocker Folder and Install Pitch Tool
Note: before applying this step make sure that you have closed the Vmware Software.
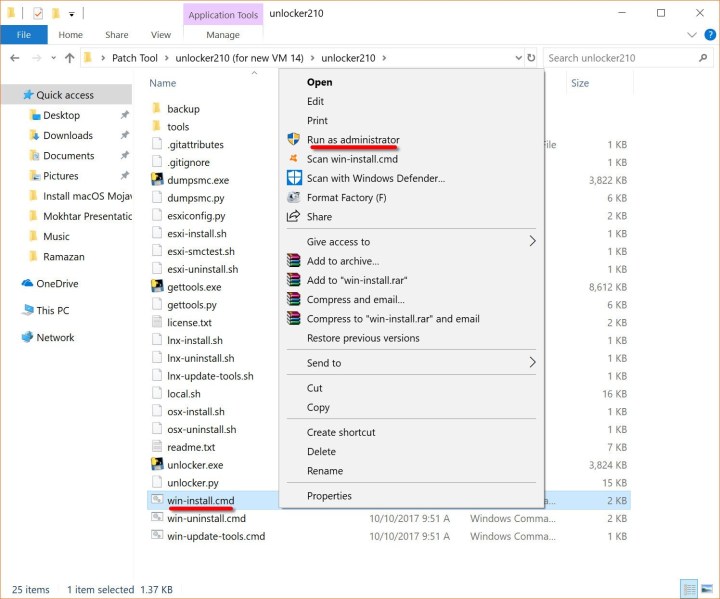
So, now you need to download Pitch Tool from the above link that mentioned in the Download section and unzip it via WinRAR. after that, navigate to unlocker folder and right-click on the win-install.cmd, then click the Run as Administrator. the reason behind doing this step is in order to not see the Mac OS X on the operating system list of VMware unless you install this tool.
How to Install Mac OS X EL Capitan on Virtualbox How to Install MacOS High Sierra on Virtualbox How to Install Manjaro Linux on Virtualbox on Windows
Step 4. Create a New Virtual Machine
So, now create a new virtual machine for MacOS Mojave 10.14. therefore, open VMware and click the Create A New Virtual Machine or simply use the shortcut keys which is Ctrl+N after that, select Typically (Recommended) and click Next button.
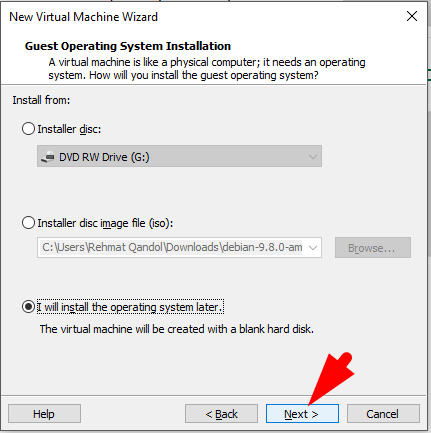
#2. in here, select I will install the operating system later and click the Next button.
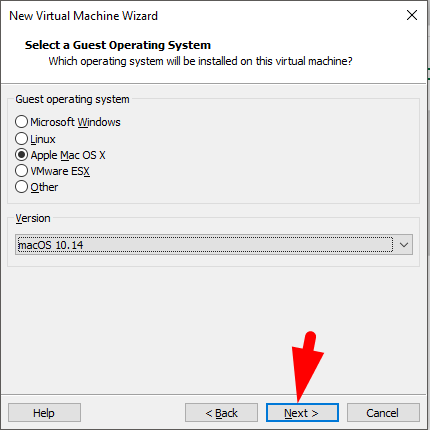
#3. now select a guest operating system, therefore for guest operating system select Apple Mac OS X and for its version select MacOS 10.14 and click the Next button.
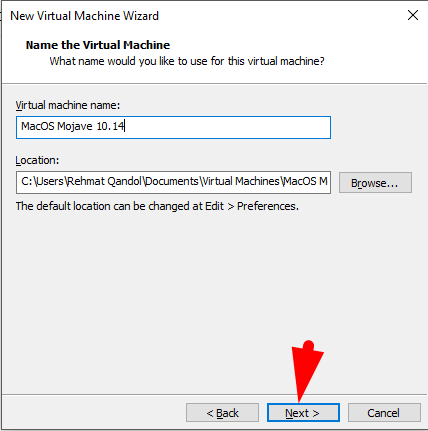
#4. in this page, it will ask you to give a name to the Virtual Machine as you can see my one which is MacOS Mojave 10.14. besides that, if you want to change the location of the operating system then click the Browse button and set the new path then click the Next button.
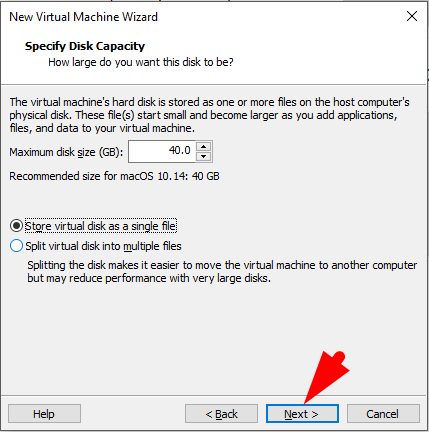
#5. well, in here just leave the disk size by default and select the Store virtual disk as a single file and click the Next button.
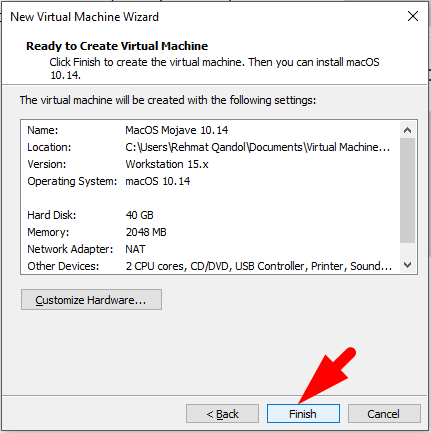
#6. so, the new Virtual Machine is created, therefore, click the Finish button.
Edit the New Virtual Machine
Now you have created a new Virtual machine successfully, after that, there are some more steps to do with a new virtual machine which is shown below.
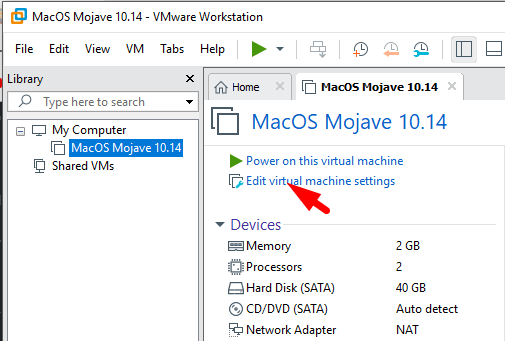
#1. select the created virtual machine and click the Edit virtual machine settings.
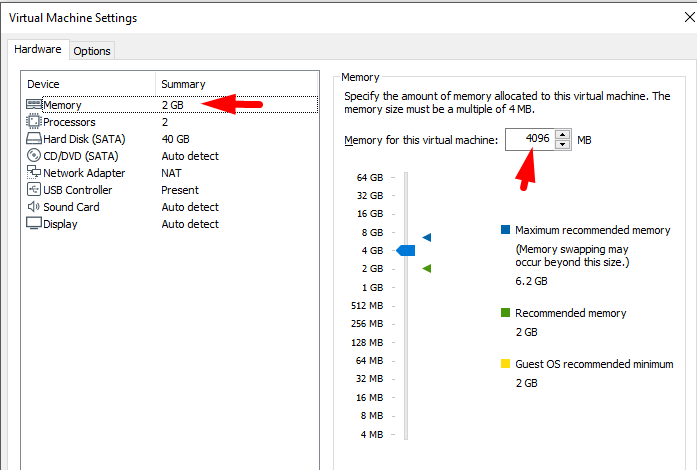
#2. in here, click the memory option and increase it from 2GB to 4GB.
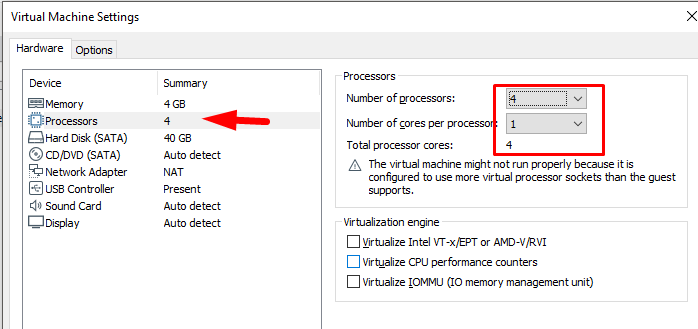
#3. select processors and increase the number of processors up to 4 for better performance.
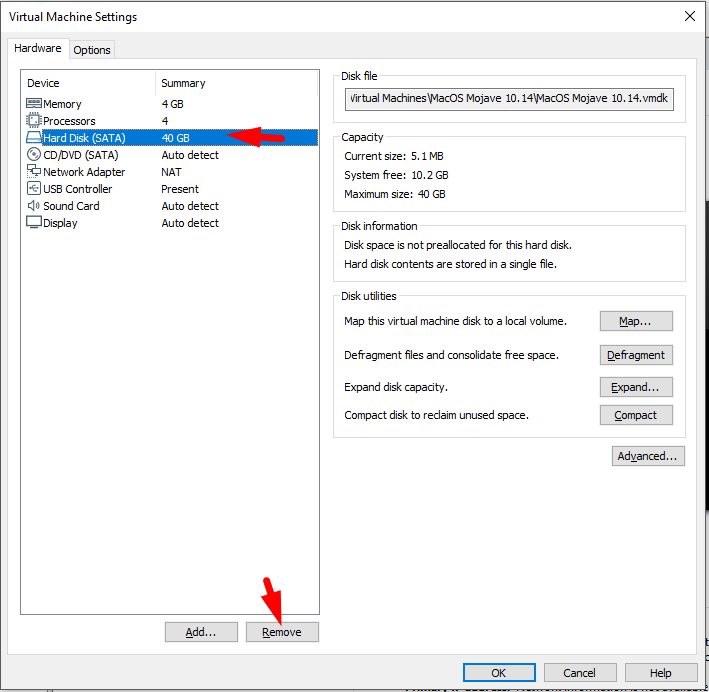
#4. in this step, select Hard Disk (SATA) and click the Remove button. while you removed it then you won’t see the Hard Disk option so don’t worry here.
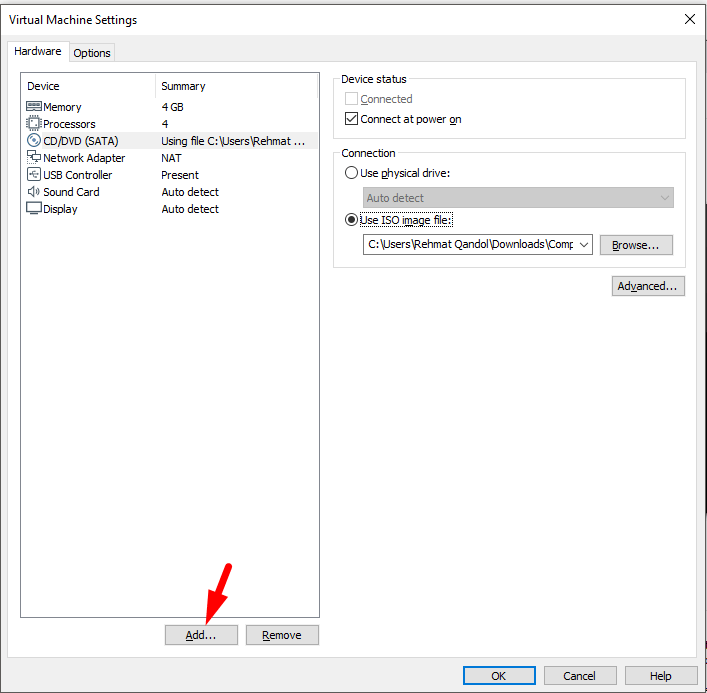
#5. click the add button.
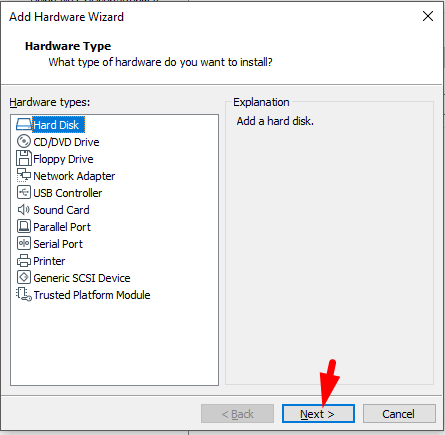
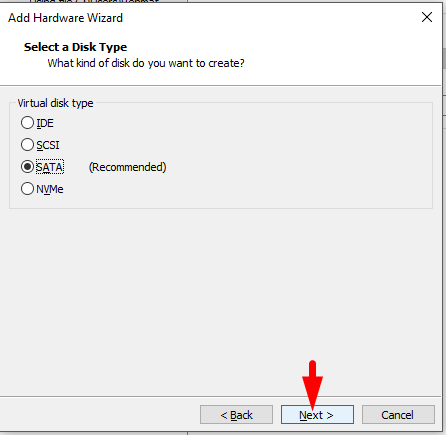
#6. now select Hard Disk from hardware types then click the Next button and after that, select SATA for disk type and click the Next button.
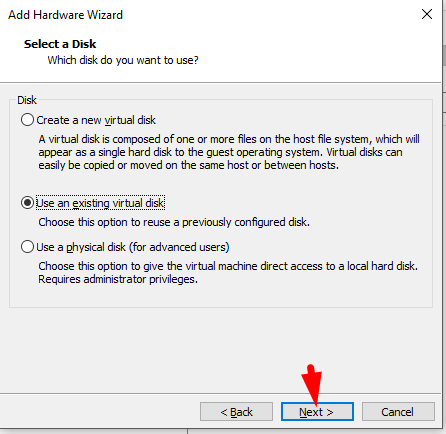
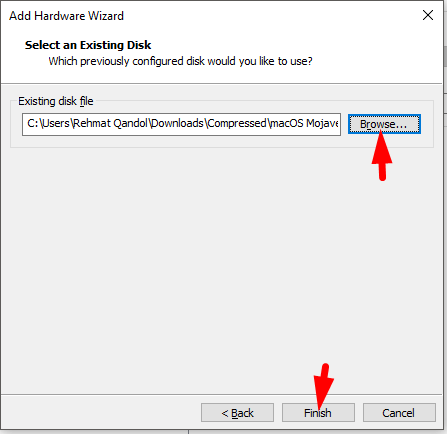
#7. to select a disk in here select the second option which is Use an Existing virtual disk then click the Next button. after that, insert MacOS Mojave VMDK file that you downloaded earlier and finally click the Finish button.
How to Install Debian 9 on VMware Workstation How to Install Debian 9 on Virtualbox How to Check your Debian Linux Version
Step 5. Edit MacOS Mojave VMX File
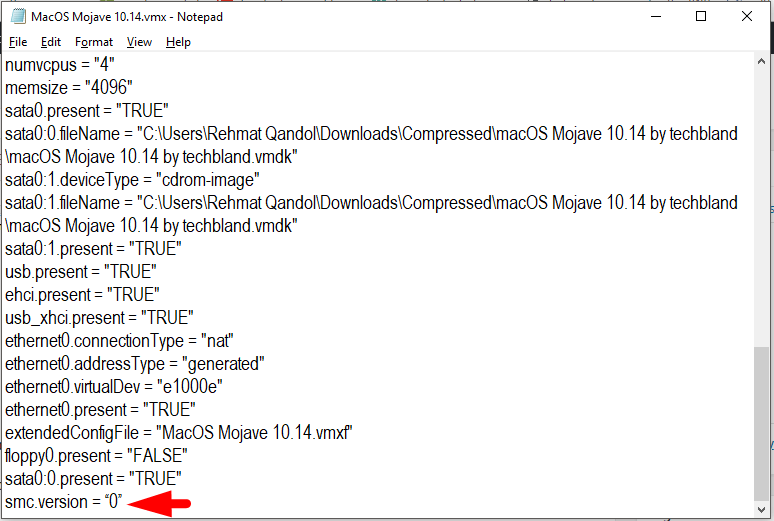
Now you have to edit the MacOS Mojave VMX file and actually, it is the modification of VMware Virtual Machine. therefore, navigate to MacOS Mojave folder that you selected in step 4 of this article. besides that, if you didn’t specify the new location for MacOS Mojave 10.14 then you will get it on Document -> Virtual machines folder.
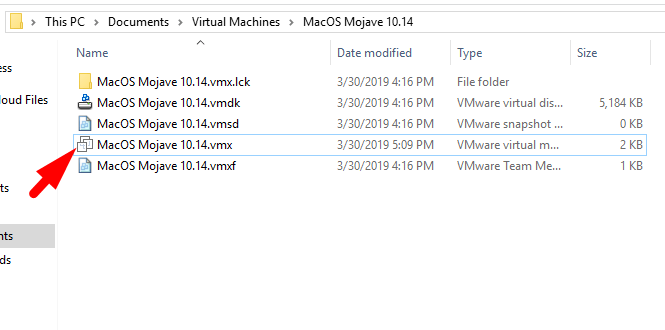
Now right-click on MacOS Mojave by techbland.vmx then open it via notepad or any other text editor.
After that, scroll down to the bottom of the page and add this code smc.version = “0” or smc.version = 0 while you add the code then click the file menu and click the save option (means save the file) and close the text editor.
Step 6. Install MacOS Mojave on VMware
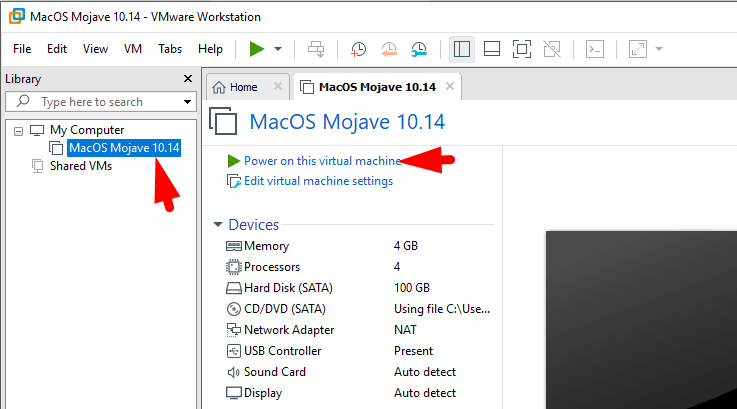
#1. open Vmware and select MacOS Mojave 10.14 from the left side of the window and click on Power on this virtual machine.
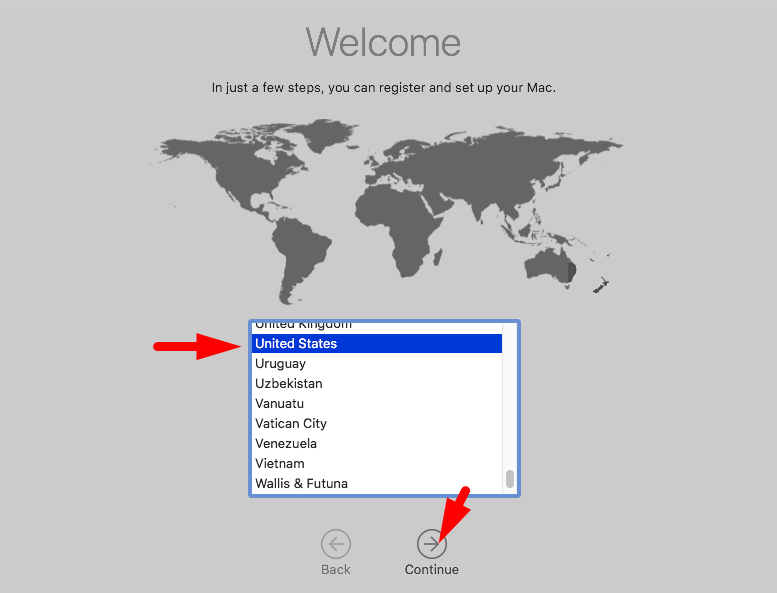
#2. in here, it will ask you to select your country name where you live, therefore select your country and click the Continue button.
#3. in this step, pick a keyboard layout and click on the Continue button.

#4. only click the Continue button.

#5. Ok, now choose your method to Transfer information and click the Continue button. as you see I don’t want to transfer any information.

#6. in this step, it will ask you to sign in with your Apple id if you want to sign in then provide the requirements fields and if you don’t want then click the Set up later and click the Skip button.
How To Create Apple Id on Computer – Best Method

#7. agree to the terms and condition, so click the Agree button.

#8. now create a new user account, to create an account you have to fill full name, account name, password, and password hint. we are making the account in order to login in with our created account.

#9. in here you don’t need to do something just click the Continue button.

#10. here you have two options, as you can see the dark mode has been added in MacOS Mojave 10.14. so, select one of this screen mode and click the Continue button.

#11. wait a while to set up your Mac after that, it will run the MacOS Mojave 10.14.
#12. MacOS Mojave 10.14 has been installed successfully on VMware on windows. so, now enjoy MacOS Mojave on your Vmware.

Conclusion
In this article, you learned about how to install MacOS Mojave on Vmware on windows. as you can see I guide you step by step with easy methods. so, if you have any problems during the installation of MacOS Mojave 10.14 then please let me know and feel free to leave a comment.

