How to Bypass Gmail Account Verification on Android After Reset?
Have you a problem with ‘Verify your Account’ after you reset your android phone? then, in this article, you will get How to Bypass Gmail Account Verification on Android After Reset in 2020.
To log in with Google Account on any android devices is the best way to protect your android phone from hackers and strangers. Android has a powerful feature called Factory Reset Protection (FRP), However, this feature is enabled as a default whenever you start with any new android phone. then FRP will protect your data and your smartphone in the future even you lost your phone. If you remember, when you start with the new android phone then it will ask you to create a Gmail account or login with your Gmail account though without login to google account you never can download any application from App Store. Therefore, you will need to enter your google account.
If you logged in with google account on your android phone then no one can access your phone even after the reset. If you are thinking, after resetting the android phone you can access the phone. No, you are wrong, I mentioned android has FRP feature that will protect your data and your phone in case your Gmail should be logged in on your android phone.
However, if you haven’t logged in to your google account and you lost your android phone then anyone can access your phone even after reset because while starting the phone from the beginning then it won’t ask for Gmail password. Therefore, always log in with the Gmail account and never logout.
In case, your android phone is not working the way you expect or you are looking for then you make your mind to reset your phone and start from the beginning. So, after the reset, you will be asked to enter your Gmail account password but you forget what your Gmail account password is. then in this article, I will show you How to Bypass Gmail Account Verification on Android after the Reset.
How to Bypass Gmail Account Verification on Android After Reset?
There are several ways to bypass Gmail account verification on any android versions. If you are using android KitKat, Android Lollipop, Android Nougat, Android Cupcake, or other Android versions. Then, the method I am going to show you in this article will work for any android phones.
We will try using the best methods to access the android phone without typing the Gmail account password. Take heed, focus on each step and instruction in order to not face problems further. So, I will show you three easy ways to bypass Gmail account verification on the android phone after the reset. Follow any of the methods that will work for you.
Method 1: Bypass Gmail Account Verification Without FRP Tools
In the first method, I will show you how you can bypass “Verify your account” without using any tools or PC. The method will show you the easy way to start your phone from the beginning.
- When you start your phone after a reset, then you will see the Welcome page. Here, select your language and click on the right arrow icon to go ahead.
- Afterward, it will ask you to insert a SIM card although you can insert it later, therefore, click the Skip button.
- In the next step, you will see the Wifi screen page, Remember, you have to connect to your Wifi because we will need the internet connection to bypass the Gmail Verification. In case, you don’t have a google keyboard layout then tap and hold the space button and select the google keyboard layout.
- Now, it will check the connection and software updates, Wait for a while to check the android information.
- Finally, you will see the Gmail account verification page that asks for a password.
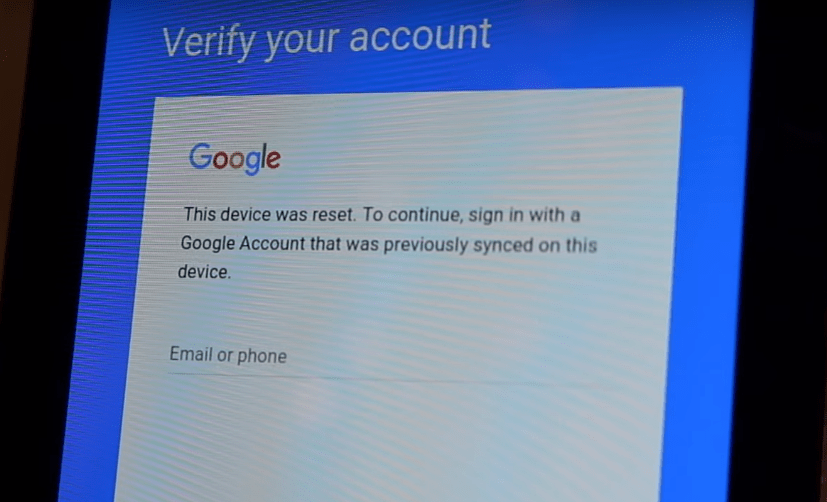
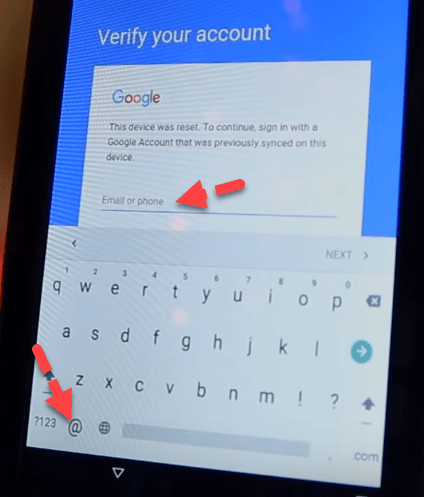
- Now, Tap on the Email or Phone and you will see the keyboard layout. Here, tap on the ‘@’ key and click the setting icon.
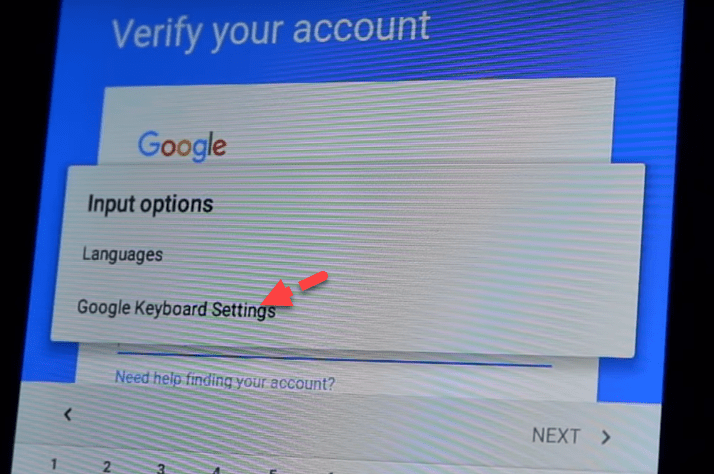
- Now, you will see the Input options and here click the Google keyboard Settings.
- After that, you will be on google keyboard settings, Here, click the three-dot option located at the right top side of your android and tap the Help & Feedback option.
- On the Help & Feedback page, you will see several options. Now, tap on the first option ‘Search google & send results from your keyboard’.
- Then, you will see a bunch of text, Simply select any word and tap the Web Search option from the right-top side, after that, click the Google App to open google chrome browser.
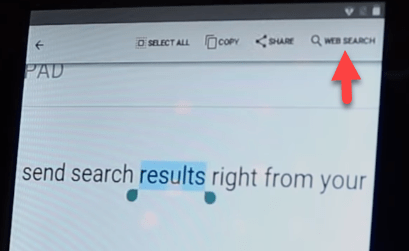
- On google web search, Search for Settings, simply, type S and you will see the setting option. Now, tap on the Setting option.
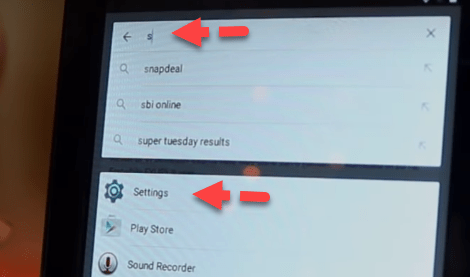
- On the settings page, find the Backup & Reset option and tap on it. Then, tap on the Factory data reset and erase all data.
- Now it will start resetting your android phone, it will take 5 to 10 minutes.
- After resetting, you will see the welcome page again. Here, continue with the steps that you did before. Good news, you won’t be stuck at Gmail account verification and it will not ask for a password. simply skip everything and enjoy using your android from start.
Finally, you have successfully bypassed the Gmail verification on android phones without using any third-party software or FRP tools. I hope this method worked for you.
Method 2: Bypass Gmail Account Verification with FRP tool
In the second method, you will bypass google account with FRP tool, while after a reset and starting your phone from the beginning then on the Gmail account page you will be asked to type the Gmail password. Unfortunately, you don’t know what is the password. Therefore, you will need to download and install the FRP tool and bypass your Gmail account verification without a password.
- When you reset your android phone and while you are starting your phone from the beginning and setting up the settings. Then, go ahead and continue until you will see the Gmail account screen. Remember, connect your android with Wifi connection because you will need it later.
- On the Gmail account screen, In place of a password, type any text then tap and hold the text and you will see the three-dot option. afterward, click on it and tap on the Assist option.
- After that, you will see the google search browser, Here, search for google chrome and open it.
- On the search box, type lavileztechservice and press enter.
- Here, you will see multiple search results. Click the first link that is ‘Download – lavilez.techservice’.
- Then, scroll down and fine number 7 (test DPC 2.0.6). Once you get it then click on it.
- Now, tap on update permission and allow chrome.
- After that, download the app by clicking on the OK button.
- Once the file is downloaded then click on the open option.
- Now, you will need to install the app on your phone, before installing you need to allow unknown source from settings.
- Once again, click on the application and click the install button. after that, click the accept option.
- Now, the app has been installed on your phone. therefore open it and Set Up managed profile by tapping on Set Up option.
- Once you set up the profile then Reboot your android phone, simply press the power button and reboot your phone.
- When your phone restarts again then click the Finish button.
- Congratulation, your phone has been started without asking Gmail and password options.
This is the second method that you will unlock FRP on any android phones. simply, you bypassed Gmail account verification with downloading and installing an application from google chrome.
Method 3: Easy way to Unlock FRP on any Android versions Via USB
If the 2 above methods won’t work for you then follow this method. However, the above methods worked for may users. In case, it won’t work for you then follow the below steps.
To bypass the Gmail password on any android version you will need one USB, OTG, Computer, and android application. if you don’t have USB then you buy it on Amazon and if you don’t have OTG cable then you can but it on amazon.
Now connect your USB to the computer and paste the android application on USB that you downloaded later. after that, follow the below steps.
- Once you reset your phone then start your android phone and setting up all the steps. while you get the Gmail verification page then follow the below steps.
- Connect USB to OTG cable and connect OTG cable to your Android phone.
- After that, you will see the USB folder on your android screen.
- Now, click on the android application that you downloaded from the above link and pasted to USB.
- Here, you will need to allow unknown sources from your Android settings.
- Once you allow the unknown sources then install the application by clicking on the install button.
- When the application has been installed then click on Open option.
- With the help of the android application, you can access your android settings. Now, scroll down and tap the Backup and Reset.
- Now, click the Factory Data Reset and reset your device.
- Wait for a while to restart your android phone.
- Now, set up your android phone from starting and you will not see any Gmail verification option.
Like this, you can unlock the FRP lock on your Android phone. this is the easiest way to bypass Gmail account verification after reset.
Read Next:
- How to Hard Reset iPhone 12, Pro, and Pro Max
- Hard Reset iPhone 11, 11 Pro, and 11 Pro Max
- How to Hard Reset Oppo F11 Pro
- How to Reset Windows Password for Local Account
Conclusion
It is a difficult task to unlock FRP or bypass Gmail account verification during setting up any android phones. Some users are confused about what to do with FRP verification though they are looking to through their android phone because of FRP lock. But, now you have several methods to bypass the Gmail account verification.
I hope, any of the methods work for you, in case, you have any question then feel free to ask me in the comment box. Or if you know any new and easy method then please mention it in the comment box.
