Why you are here? because you are looking for how to format external hard drive on a Mac?. Am I right? Of course you are curious to know how to format external hard drive on a Mac with easy steps. Therefore, in this article, you will find tons of handy steps and information regarding to format external hard drives.
Well, a Mac or Windows user uses an external hard drive when they want to save its personal files out of its PC. However, anyone can access your computer whether they can be your friends, family members, or anyone else. But you can’t hide your personal data or the folder you saved your files. Although you can lock the folder to hide all your personal content, But, there are several ways to unlock the folder. Thus, having an external hard drive will help you to save your files.
For that, you might buy a new external hard drive and you connected with your Mac computer or Windows PC. However, the new external hard drive comes as formatted drive, But, if you think the external drive should be formatted as another format filesystem. Then, you can do it with the below easy step-by-step process.
So, there are several filesystem format as FAT32, exFAT, NTFS, HFS, HFS+, and APFS. But, the question is, which file format is compatible with your Mac computer? or which file format you should choose while formating your external drive?. If you don’t know, then, in this article you will get A to Z details.
Note: If you have important files inside the external hard drive, make sure, copy or transfer the files to another safe era prior to formatting. Because formatting the drive will erase all the data.
Which File Format is Compatible with your Mac?
Before moving on, you should know which file format to use, as there are many file formats to choose from. But, which one is compatible with your Mac, or which one should you use. Here, I will guide you.
APFS (Apple File System)
APFS (Apple File System) is the new file format of Apple that announced and added on the macOS High Sierra operating system. This format is the default if you have macOS High Sierra OS on your computer. However, there several good points such as it is more efficient and more reliable. Although you can use an encrypted version and a case-sensitive version.
As a result, it will not be readable or usable by another Mac that doesn’t have macOS High Sierra. Moreover, a Windows or Linux user can’t use the drive or they can’t read and write either. Well, again I recommend you to use APFS format because that’s no matter which macOS other users have.
macOS Extended (Journaled or HFS+)
Another macOS filesystem format which is macOS Extended (Journaled) also known as HFS+. However, on the latest macOS High Sierra update APFS replaced macOS Extended as the default file format. Therefore, if you have not updated your macOS High Sierra to the latest operating system update then macOS Extended is the default format of your Mac PC.
There are best options to choose if you don’t want others to access your personal files and the option is macOS Extended (Journaled, Encrypted). The other option is to choose macOS Extended (Case-sensitive, Journaled, Encrypted), So, if you want to have capital letters then Windows can read HFS+ drives but can not write to the drive.
MS-DOC FAT or FAT32
The MS-DOC FAT or FAT32 is the oldest file format system that allows anyone to access the file whether to read or to write to them. SO, if you are the one that shares the drive to your friends, colleagues, or other people. Then, this file format is the best option for you. However, this file format has the 4GB or smaller limit space thus you can’t share or save larger files.
ExFAT
ExFAT file format is the same as FAT32 but this file format can store more than 4GB files. Moreover, if your drive is formatted with this file format then both Windows and Mac users can read the drive.
NTFS
The last file format NTFS which is the default Windows file format but macOS user can only read the NTFS and can’t write to them.
What to do before Formatting the External Hard Drive?
This heading is an important part of the article and you should read it carefully if you don’t want to lose your files. So, before going to format your external hard drive, check your drive if there is content. If the drive has content then you need to create a backup of the file because the drive will be erased completely. If you want to back up your files to another external hard drive then you can do it with time machine backup application. But, make sure your drive doesn’t have any files.
How to Format External Hard Drive on a Mac?
Now, I will show you how to format external hard drive on a Mac using the below steps. As we can format the drive from Disk utility, Therefore, we will do it with the disk utility option.
Step 1: Connect the external hard drive to your Mac that you want to format.
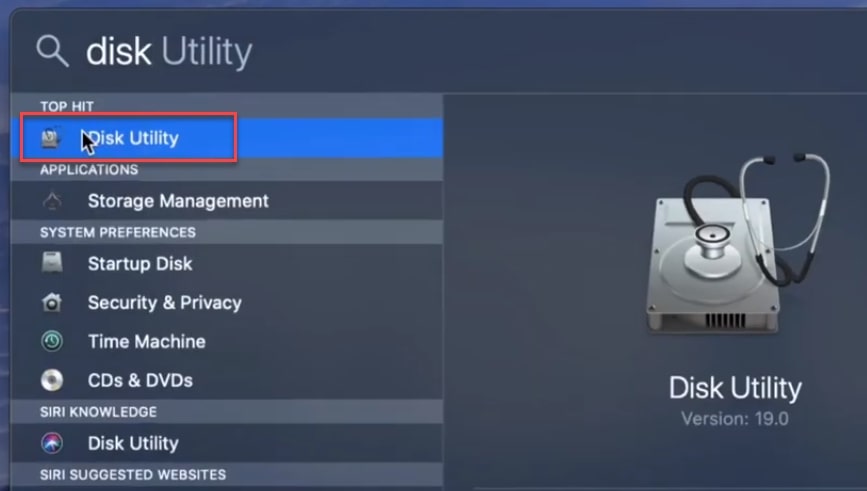
Step 2: Go to Spotlight and search for Disk Utility and open it.
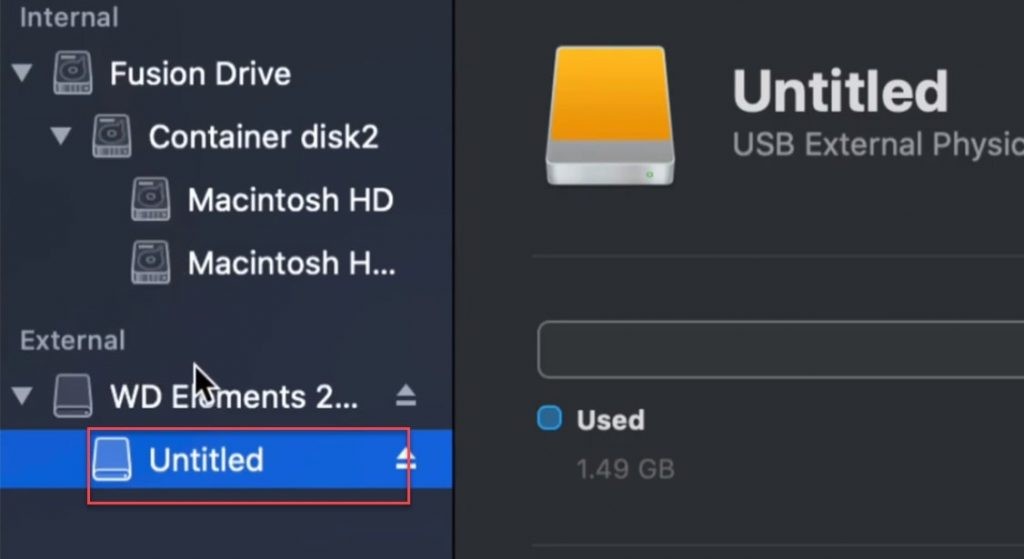
Step 3: Once you access the disk utility, then, on the left side of the window you will see 2 sections Internal and external. Remember, don’t touch the internal hard drive only you need to bring changes with external hard drive. As you are going to format an external hard drive on a Mac. Then, select the external hard drive you connected with your Mac.
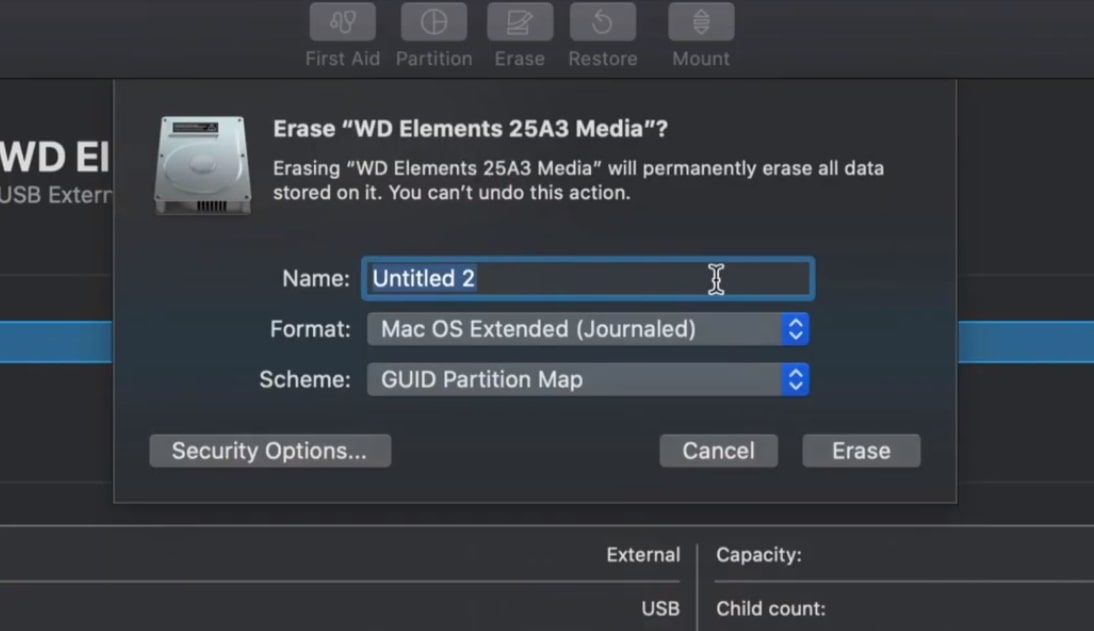
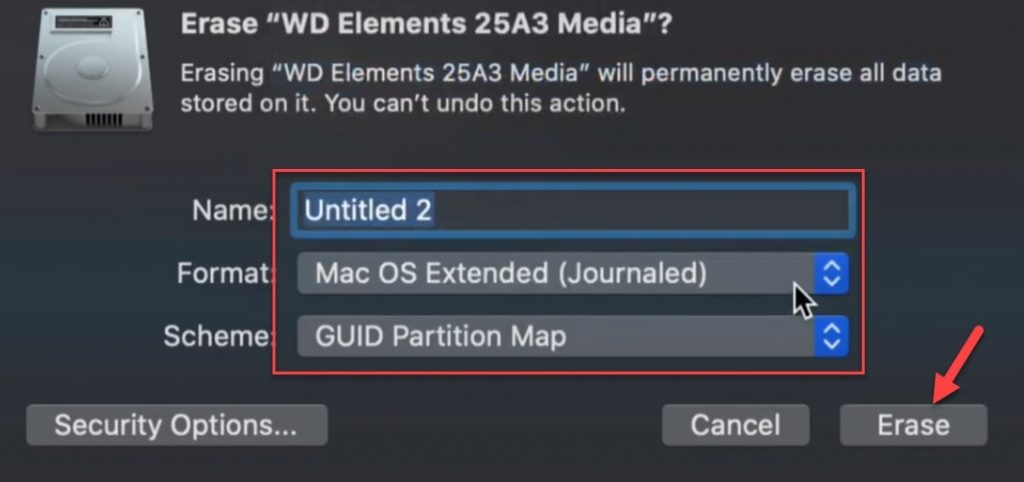
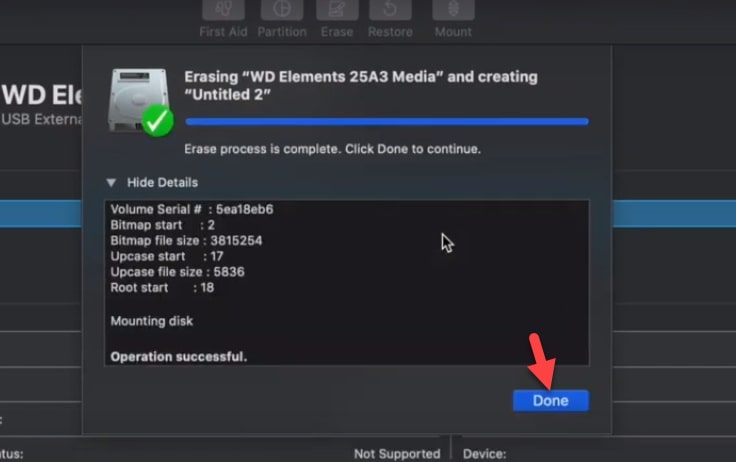
Step 4: Once you select the drive you want to format, Then, click the Erase button from the top menu section. After that, change the Format file system you want, if you want your drive to work on both Windows and Mac then select the ExFAT file format. Or, you want your drive only to work on a Mac then select Mac OS Extended (Journaled). Moreover, select GUID Partition Map for Scheme. If you are formatting your drive for time machine or backup reason then select this scheme. Finally, click the Erase button.
Step 5: Finally, the process is done and your external hard drive formatted successfully. Now, you can use your external hard drive to save your personal data or to transfer any files. So, simply click the Done button.
Prepare your Drive for Time Machine
In case, you want to have a huge backup of your content using time machine application. Then, you will need to create a partition and to do that follow the below steps.
Note: If you don’t want to back up your files or Mac to an external hard drive. Then, I won’t recommend you to go with the below steps.
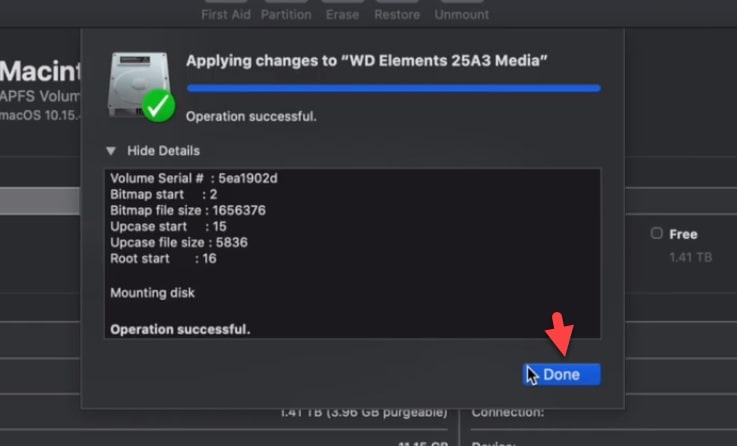
Step 1: To create partition, simple select the external drive that you formatted later and click the Partition from the top menu. After that, create a partition for the selected drive. To do that, click the Plus + icon and add partition. Then, give name to the partition drive and click the Apply button.
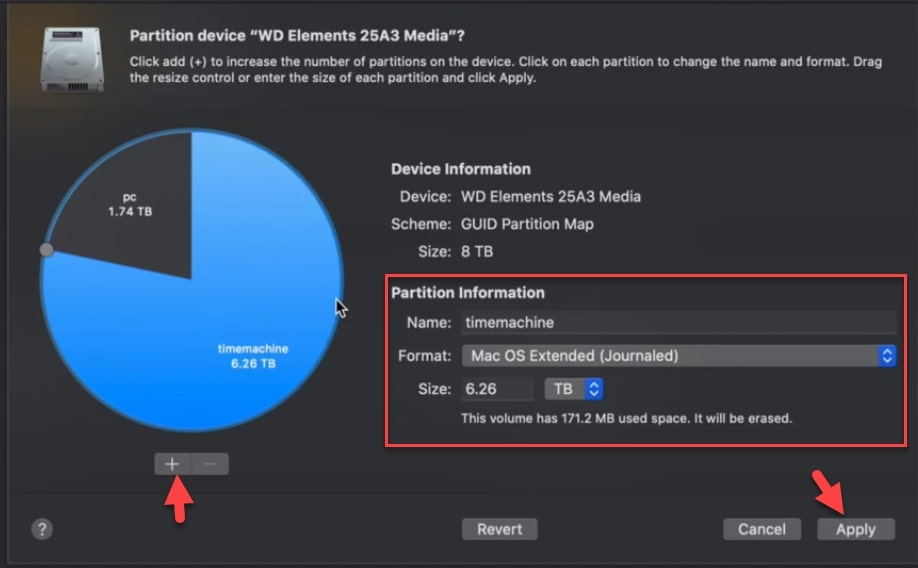
Step 2: Wait for a while to complete the partition process to your external hard drive. After a while, you can see the new partition on the left side of the window under the external hard drive.
How to Backup Mac to External Hard Drive?
You have formatted the external hard drive and then you created partition to the external drive. So, if you want to back up your Mac to the external hard drive then you can do it with time machine. This is the easiest way to back up your files with a time machine. If you want to create a backup of your file then follow the below link.
Read Next:
- Best Printer for Mac Catalina in 2020
- How to Delete a single file from Trash on Mac
- How to Read and Write From NTFS drive on a Mac
Conclusion
This was the best method on how to format external hard drive on a Mac and I hope you understand and get all the points. The format steps were easy and you can do it without facing issues. In case, you have any problem then ask me in the comment section.
We just format WP Element external hard drive. In case, you want to purchase this portable and best hard drive then you can get it at affordable price on Amazon.