
Most of the Macbook users are looking for How to Reset Macbook Air to Factory Settings after several times of the purchase. There are many reasons that you want to bring your Mac to the new state. However, your Macbook is not working the way you want or perhaps your Mac is showing too much little lag. In other words, you want your Mac to perform better or you make your mind to sell your Macbook. SO, there are several reasons why a user wants to reset its MacBook, Mac Mini, iMac, or other Mac computers.
If you are going to sell your Macbook to someone else and you want to clean up your whole personal data for security purposes. Then, to reset your Mac to the factory setting is the best way to protect your files. In this way, you will be relaxed and free of tension after selling your Mac.
However, it is very easy to clean up your all data and content from your Mac with using the below steps. Although, it’s important to do that if you don’t want to leave yourself or your data. Hands down, only resetting your Mac or removing all your content is not enough, after that all, you need to install any MacOS version. This way, the new user of your Mac never can find your personal data if he use recovery software too.
Therefore, in this article, I will guide you from A to Z on how to reset Macbook Air to factory settings. not Macbook, if you have another Mac computer such as Mac Mini, Mac Pro, iMac, or other Mac. Then, you can easily use the below methods to reset your Mac to factory settings.
What to do before Resetting your Macbook Air?
Now that you are here to know how to reset your MacBook Air to factory reset. Then, you need to know what to do before resetting your Mac computer. However, direct resetting your Mac is not the way to solve the issues. Though you don’t want to lose your personal data or handsome pictures. Therefore, you have to back up your files, turn off FileVault, remove authorizations, and other things that show below.
1: Create Backup of your Files
The first step to go before resetting your Mac is to create a backup of your Mac with any applications. However, there are several backup applications but Time Machine is the best choice to go with. Therefore, create a backup of your files with a time machine application.
2: Turn Off FileVault
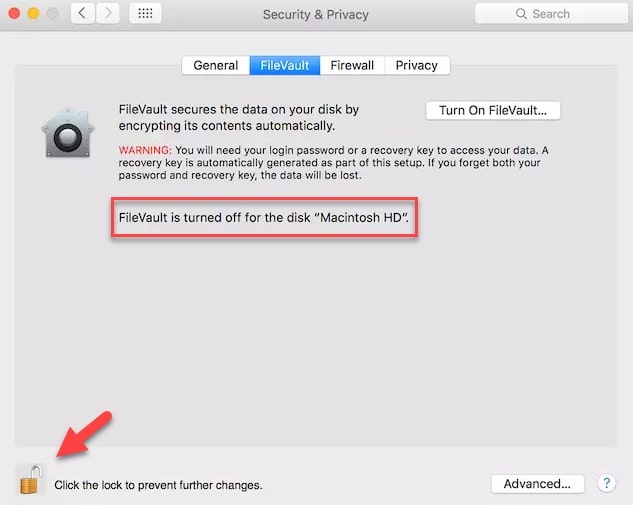
If you are using FileVault then you will need to turn it off before wiping your Macbook Air. However, FileVault uses full-disk encryption to help you prevent unauthorized access to your personal data or disk. Although, most of users don’t know the pros of this feature and they didn’t tune it on. Overall, to turn on FileVault is always good for your Data.
Notice, every time you turn on your Mac and typing the login username and password. Then, it means the FileVault is on. Because, if the FileVault is on then you need always to provide login details. Anyhow, to disable or turn off FileVault follow the below steps.
- First of all, go to System Preferences and open Security & Privacy
- Here, click the FileVault tab from the menu
- Click on the Lock Button
- Now, you will be asked to type admin username and password
- After that, click the Turn Off FileVault
- At last, Restart your Mac
3: Remove authorizations
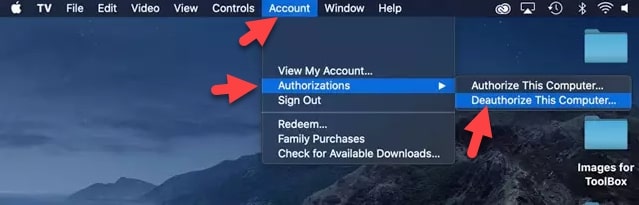
The pros to authorize your Macbook Air is, you will be permitted to access all the apps on your Mac such as AudioBooks, Books, Musics, Movies, and other content and applications. Therefore, removing authorization is the main part to do before the factory reset your Macbook Air. In case, you want to sell your Mac then I recommend you to deauthorize yourself. After that, apple won’t be continuing to count your Mac as one of your authorized computers.
Deauthorize your Mac with latest macOS version
To remove authorization, open your music app, Apple TV app, or Apple books on your Macbook Air. After that, go to Account and go to Authorizations. Then, simply deauthorize your Mac computer.
Deauthorize using iTunes on any macOS or Windows
Now, you will need to deauthorize yourself from the iTunes application. However, it is easy to find in the menu bar on Mac or Windows PC. Though iTunes has its own built-in authorizations tool. Therefore, to deauthorize from iTunes, go to Account and go to Authorizations. Here, simply deauthorize your Macbook Air. If you have an older iTunes version then go to iTunes> Store and Deauthorize your computer.
Deauthorize a Mac or Windows PC
To Deauthorize a Mac or Windows PC go to iTunes and Sign in with your Apple ID if needed. After that, have a look at the top of the screen and choose Account and go to Authorizations. Now, Deauthorize your Macbook Air. To do that, type your Apple ID and Password then press Return and click the Deauthorize.
You don’t need to worry about deauthorizing your computer. However, you don’t lose any of your content or data and nothing will be deleted from your computer. When you deauthorize your computer, only you prevent it from accessing protected content. In case, you want to authorize your mac later then you can do it.
4: Deactivate Programs and Remove Other Authorizations
After all, now you have to deactivate some third-party software including machine authorizations and activations like image, sound, and graphics program. For example, if you have used adobe programs then you know each of the adobe programs required user activation. To activate yourself is the best way to use the full feature of the software. Therefore, try to activate your software before going to use it.
However, deactivation disconnect an application from a valid user license. In case, you deactivated then you can reactivate later. You don’t need to uninstall the software from your computer, only deactivate the license user then no one can use it after all. Therefore, deactivate your all programs that you activated before.
5: Sign out of iCloud
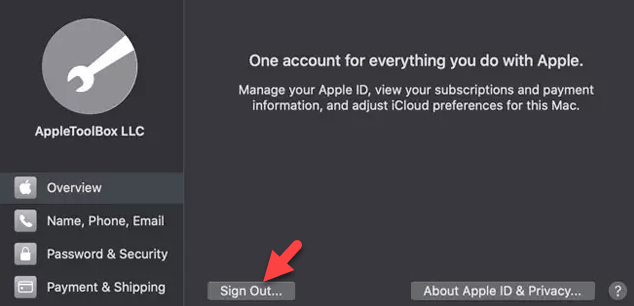
iCloud is the main part of a computer and you never should sell your computer or reset without signing out from iCloud. Therefore, go to the Apple logo at the top of the window and go to System Preferences. After that, select Apple ID then select iCloud and uncheck the box for Find My Mac to turn it off. Now, type your Apple ID and Password to confirm the process.
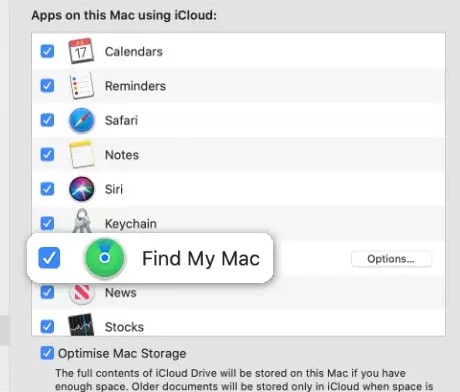
Once, Find My Mac is turned off then tap Overview and click the Sign Out.
In case, you have macOS Mojave, macOS High Sierra or below macOS version then go to the Apple logo and go to System Preferences > iCloud and turn off Find My Mac and click sign out.
Remove iCloud Data from your MacBook:
After you sign out from iCloud then make sure you have removed all of your data by clicking Delete from Mac on every pop-up. In this case, all your iCloud contacts, calendars, and other iCloud data are removed from your Mac.
6: Sign Out of iMessage
The last thing you need to do before the factory reset to sign out from iMessage. Therefore, in your Message app go to Preferences and go to account. After that, select your iMessage account and click sign out.
How to Reset Macbook Air to Factory Settings?
Factory reset your Macbook or other Mac computers is an easy task and you can do it without installing or using any third-party apps. However, macOS recovery is a part of your built-in recovery system on your Mac. It is Utilities that allow you to erase the internal hard disk completely. In case, you want to sell your Mac then reinstall any macOS version after you reset.
If you are selling your Macbook then follow this steps
In case, you don’t want to keep your computer and you make your mind to sell to the next person. As a result, you are looking at how to reset your MacBook Air to factory settings? then check the below steps.
- After doing the above important things then restart your Macbook and hold down the option+Command +R keys.
- When you see the Apple logo then release the keys.
- After you see the Utilities window then the startup is completed.
- Now, select Disk Utility from the recovery menu options.
- Find the device you want to reset from the sidebar. In case, you don’t see sidebar then go to View > Show Sidebar from the menu bar.
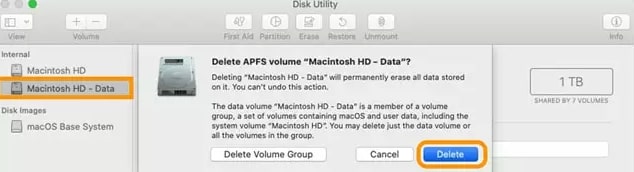
- look for the volume listed with the word Data to the end of the drive name like Macintosh HD – Data. Therefore, select that Data volume and choose Edit > Delete APFS Volume from the menu bar or tap the delete volume button (-) in the Disk Utility toolbar.
- After the confirmation click the Delete button.
![Delete Any Drive Volume]()
Delete the Drive - You can repeat the same steps for any other volume on your startup disk. Hands down, you should not select the Macintosh HD drive.
- Once the delete process is completed then select Macintosh HD in the sidebar.
- Now, click the Erase button from the top menu. Then, type a name and select the format you want for your drive like APFS or macOS Extended Journaled. After that, click the erase to start the process.
- If you will be asked to enter the Apple ID, then, Enter your Apple ID.
- Once the disk is erased then close the Disk Utility.
- On the Recovery Menu, select reinstall macOS and follow the screen steps.
- After you finished the installation, Then your Macbook restarts to the setup assistant and the welcome screen.
- To leave the mac in a factory default state, don’t go with the installation of the system. Simply, press Command-Q then click shut down.
- So, the new owner of the computer will compete with the steps of the installation using their own Apple ID.
If you are keeping your Mac then follow this steps
In case, you don’t want to sell your Macbook Air and you want to keep it yourself and use it further. Then, you might be looking at how to reset your MacBook Air to factory settings. Then, the below step is for you.
- Turn on or restart your Macbook and hold down Command + R keys. After you see Apple Logo then release the key.
- Go to Disk Utility from the recovery menu.
- Find your startup drive from the sidebar. If you don’t see the sidebar then go to View > Show Sidebar from the menu.
- look for the volume listed with the word Data to the end of the drive name like Macintosh HD – Data.
- Click the erase button from the top menu and enter the drive name and select format. However, if you want to encrypt the volume then choose APFS (Encrypted) or APFS (Case-Sensitive, Encrypted). After that, click the Erase and click done.
- Once the erase is completed then close the Disk Utility.
- On the recovery menu, select reinstall macOS and follow the installation steps.
- In case, you face problems with APFS and macOS installs then try internet recovery mode instead. Then, restart and press Option + Command + R.
- Once it is completed, the, you MacBook Air restarts to a setup assistant. So, follow the steps and provide all your information.
Read Next:
- How to install macOS Catalina on Android Phone
- Best Printer for Mac Catalina in 2020
- How to Delete a single file from Trash on Mac
- How to Read and Write From NTFS drive on a Mac
Conclusion
With this handy method on how to reset your MacBook Air to factory settings you can reset all the crushes. However, sometimes the factory reset your computer is good for its performance and will trash or clean up all viruses. In case, your computer is not performing the way to want then reset your computer with the above steps.
The above process is done on Apple 13″ MacBook Air Core i5 CPU, 8GB RAM (2017 Model 128GB) In case, you want to buy a new Macbook Air at an affordable price then you can purchase it from Amazon by clicking the link.