How to Dual Boot macOS Big Sur with Windows 10 on PC-Hackintosh?
At WWDC20, Apple kicked off the latest operating system called macOS 11 Big Sur. Meanwhile, Apple introduced all the new software such as iOS 14, iPadOS 14, tvOS14, and watchOS 7. However, each software has its own new features and improvements that attract users. Mac users are curious to give it a try and check all the amazing features. No doubt, Apple release a successful operating system as a row. And this is one of the successful Macintosh operating system that is in demand and installed by thousands of users.
A few days ago, Apple kicked off the macOS Big Sur Beta 4 including new features and some bug fixes. Though Apple promised to release the macOS Big Sur Public Beta in July. Unfortunately, it doesn’t happen and macOS Big Sur is still in developer beta mode. Moreover, the watchOS 7 Public Beta is not roll out and only Apple released the iOS 14 and tvOS 14 Public Beta to users.
Therefore, in this article, we are going to Dual Boot macOS Big Sur with Windows 10 on PC-Hackintosh. But before moving to that, You should know the macOS Big Sur compatible Mac devices. On WWDC20, Apple dropped the older Mac computers. Those Mac that supports macOS Catalina, some of them cannot support macOS 11. On the other hand, they never get a macOS Big Sur update. But, we have found a solution and discuss how to install macOS Big Sur on Unsupported Mac devices. You may check that and install the latest operating system on your Unsupported Mac.
- MacBook: Early 2015 or newer
- MacBook Air/Pro: Mid 2013 or newer
- Mac Mini: Late 2014 or newer
- iMac: Mid 2014 or newer
- iMac Pro
- Mac Pro: Late 2013 or newer
- Developer Transition Kit (2020)
Anyhow, to dual boot macOS Big Sur with Windows 10 on PC-Hackintosh. You will need several files to download from the below section. The steps might be confusing but you have to pay attention. So, let’s start the article.
Dual Boot macOS 11 Big Sur with Windows 10 on PC-Hackintosh
Before moving on, I want you to know a little about what is Dual Boot Installation?. A Dual Boot system is a computer system where you installed two operating systems on a single hard drive. Which means that allows you either operating system to be loaded and given controls. Whenever, you turn on your computer, a boot manager program pops-up with a menu that allows you to choose the operating system you want to use.
So, the same thing we are going to do in this article. You will install both operating systems (macOS Big Sur and Windows 10). Once both OS installed successfully, then, you can choose the operating system you wish to use either Windows 10 or macOS 11.
What I think, this method is the best option for those users who want to run both “Windows 10 and macOS Big Sur”. Easily, you can switch between two operating systems. Whenever you become sick of the one operating system then switch to another one.
Now, we will go step by step to dual boot macOS Big Sur with Windows 10 on PC-Hackintosh.
Required Files
- Download macOS Big Sur DMG File
- Download Commands
- OpenCore Configurator Download
- Windows 10 ISO file Download
- Download BalenaEtcher
- Download EFI Files
- USB Drive with 16GB
- USB Drive with 8GB
Create macOS Big Sur Bootable USB Drive
Once you download all the required files, then the first step is to create macOS Big Sur bootable USB installer drive. To do that, connect the USB 16GB and follow the below steps.
- First of all, open “Disk Utility” and select the USB drive you connected later.
- Now, click on the “Erase” option from the top menu and follow the below parameters.
- Name: USB
- Format: Mac OS Extended (Case-Sensitive,…)
- Scheme: GUID Partition Map
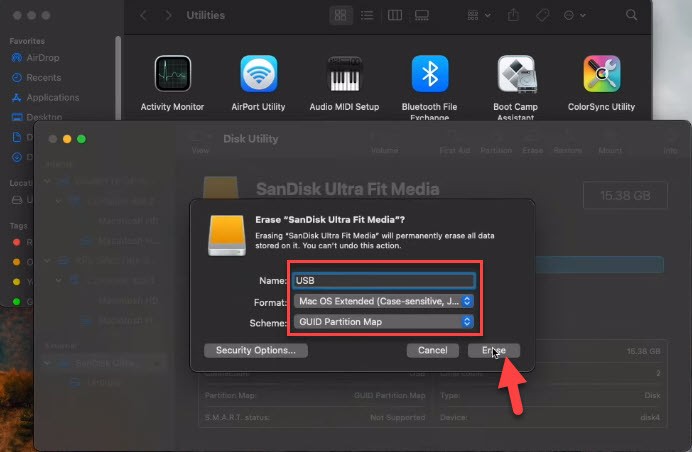
- Click on “Done” and close “Disk Utility”.
- Open “Terminal” and copy the command code that you downloaded from this article and paste it here. Then, press the “Enter” key.
- Afterward, enter your “Password” and press the “Y” key to confirm.
- Wait for a while to complete the macOS Big Sur Bootable USB process.
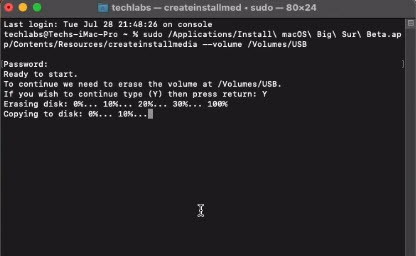
Once the macOS Big Sur bootable USB drive has done successfully. Then, close the Terminal and move to the next step. In case, you need full information regarding macOS Big Sur Bootable USB then check the below article.
Mount EFI Partition
#1: In this step, you need to mount the EFI partition. To do that, open the “OpenCore Configurator” and mount the EFI partition of the USB drive.
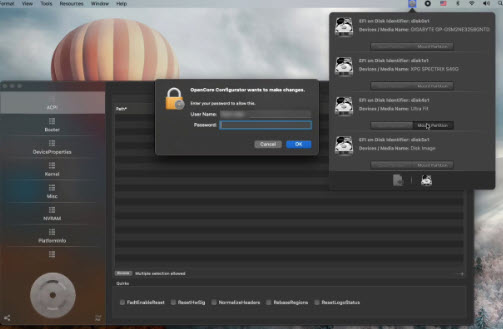
#2: After that, copy the EFI folder that you downloaded and paste to the EFI partition of the USB drive.
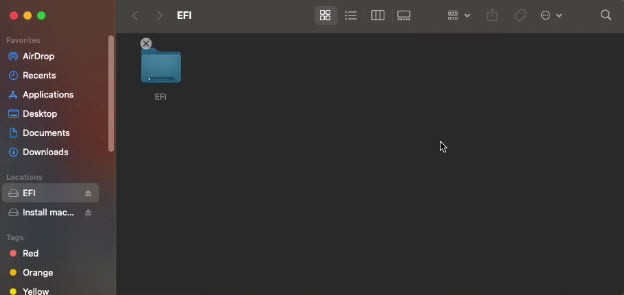
#3: Close the EFI folder and copy the OpenCore Configurator that your downloaded and paste to macOS Big Sur Bootable USB drive.
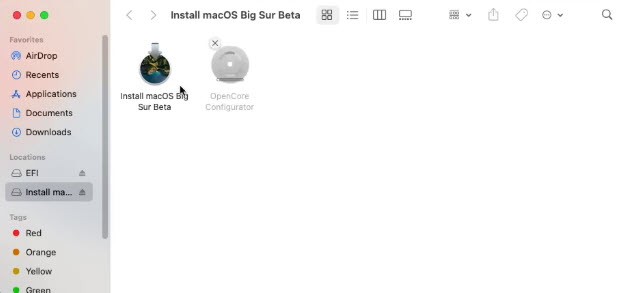
#4: Now, Eject EFI and macOS Big Sur USB drive.
Create Windows 10 USB Drive
Now, you are going to create a Windows 10 USB drive. Therefore, connect the USB drive and go to “Disk utility” and tap on the “Erase” option from the top menu and follow the below parameters.
- Name: USB
- Format: MS-DOS(FAT)
- Scheme: GUID Partition Map
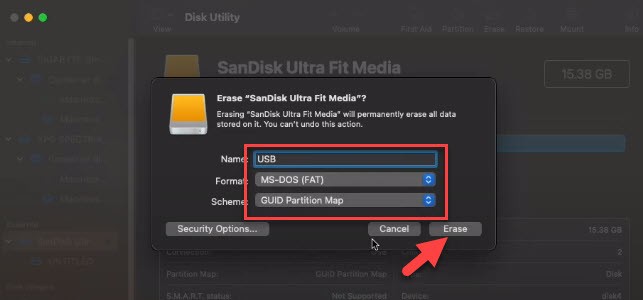
- After it is done then click on “Done” and close “Disk utility”.
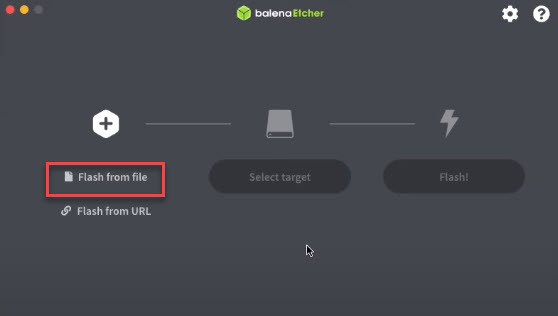
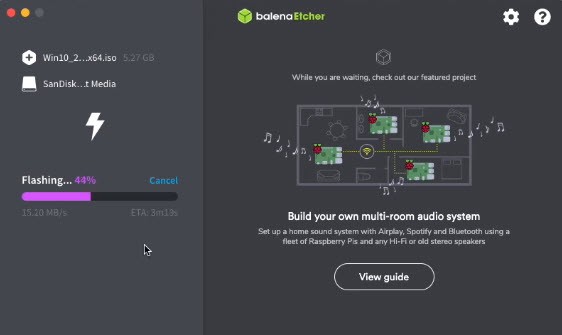
- Afterward, open Launchpad and open the “BalenEtcher” that you downloaded from this article. Then, on the “Welcome Screen” tap on “Flash From File”.
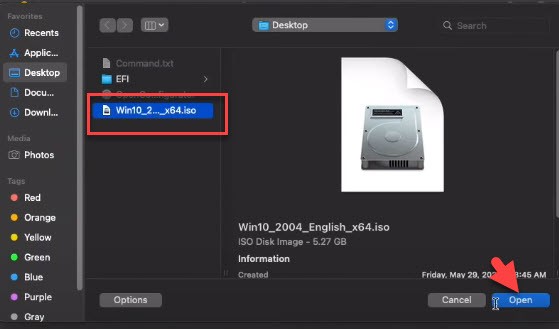
- Choose Windows 10 ISO file and open it.
- On Warning Screen simply go ahead.
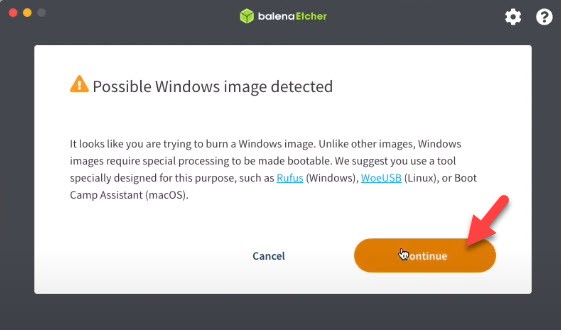
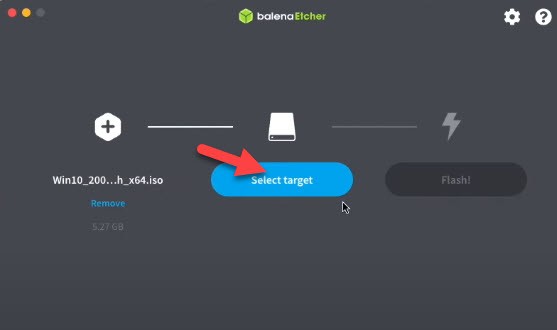
- Click on “Select target” for a destination.
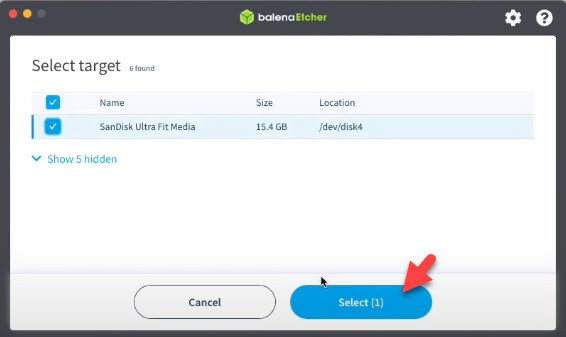
- Now, select the “USB” drive and click on the “Select” option.
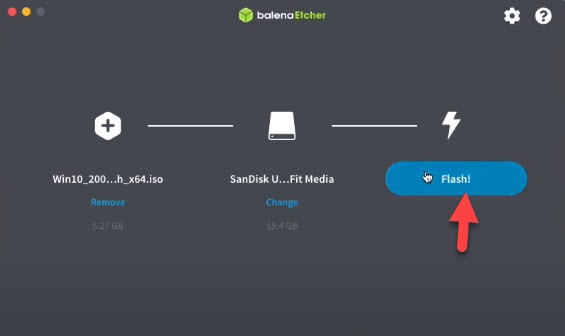
- In the next screen, click on “Flash”.
- It will ask you your password to bring changes.
- Finally, BalenEtcher is copying Windows 10 ISO file to the USB drive. Wait for a while, once the process is done then close the BalenEtcher.
Customize BIOS Settings
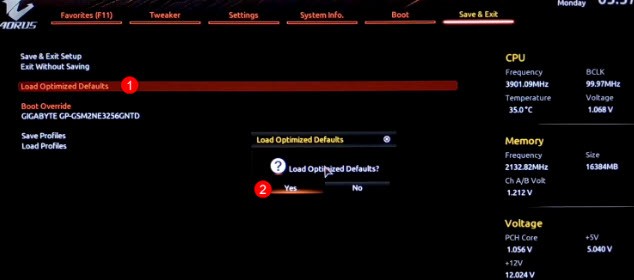
Next step, you have to bring changes to your PC BIOS Settings in order to dual boot macOS Big Sur with Windows 10 on PC-Hackintosh. Therefore, “Restart” your system and press the “Delete” key to bring out BIOS settings. Here, tap on “Save & Exit” > “Load Optimized Defaults” > “Yes”.
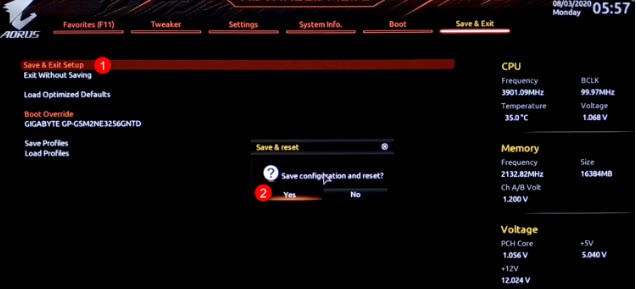
Again, tap on “Save & Exit Setup” and click on “Yes”.
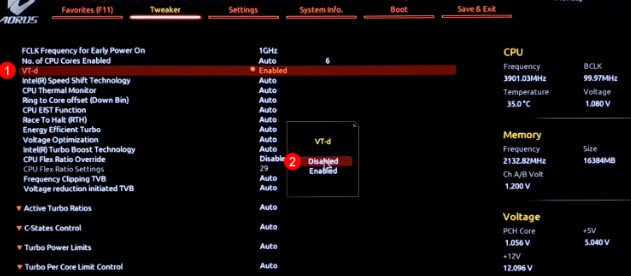
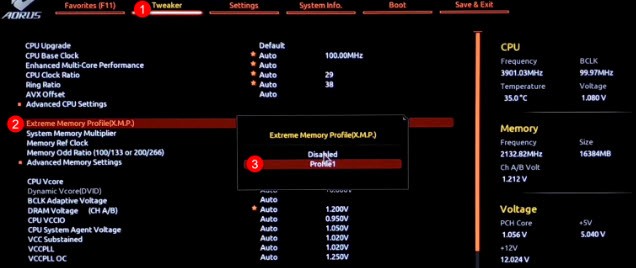
Once your PC restarted and you come back to BIOS Settings. Then, go to “Tweaker” > “VT-d” and click on “Enabled”.
On the same menu option, tap on “Extreme Memory Profile(X.M.P)” and select “Profile1”.
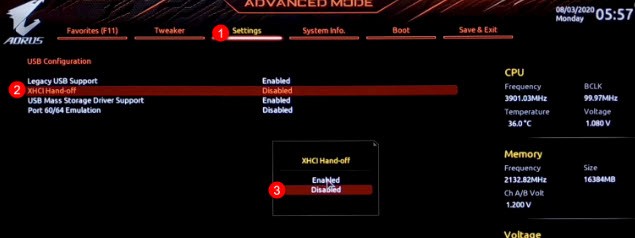
Now, tap on the “Settings” menu and select “XHCI Hand-off” and “Disabled” it.
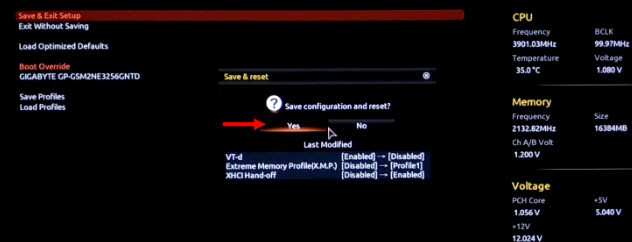
Finally, go to the “Save & Exit” menu and select the “Save & Exit Setup” and select the “Yes” button to save all the changes. Here, your PC will restart.
Install macOS 11 Big Sur on PC-Hackintosh
After completing the BIOS settings, connect the macOS Big Sur bootable USB and start your PC. Here, press the “Boot” menu key and select “Open Core” and press “Enter”.
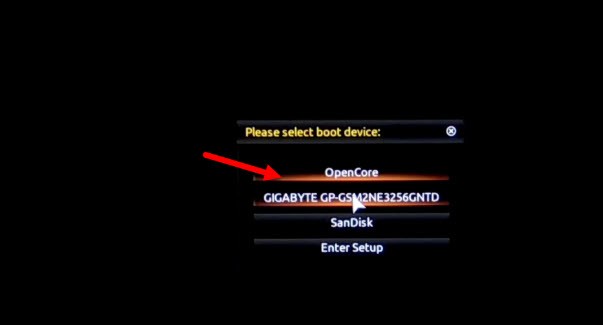
- Now, “select the macOS Big Sur drive” and press Enter.
- Have a patient until the macOS Big Sur enters the Recover Window.
- On the first screen, select your language and country then Continue.
- Go to Disk Utility and continue.
- Select your drive from the sidebar and tap on Erase from the top menu.
- Provide the following parameters (Name: macOS Big Sur, Format: APFS, Scheme: GUID Partition Map).
- Now, press the Erase button and wait a while then click the Done button.
- Finally, close the disk utility.
- Here, click on Install macOS and continue.
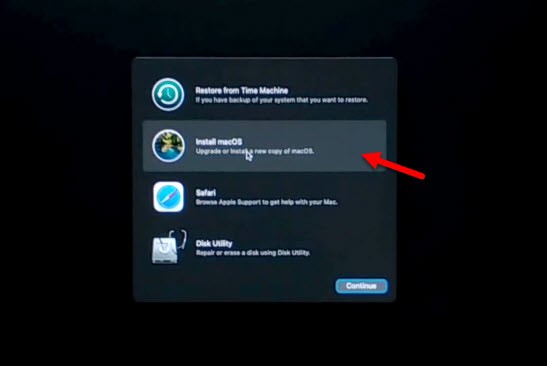
- To Set Up macOS Big Sur click continue.
- Agree to the software terms and software.
- Now, select the drive that you formatted and click Install.
- The macOS Big Sur is installing on the drive, once the installation is done then your PC will restart automatically.
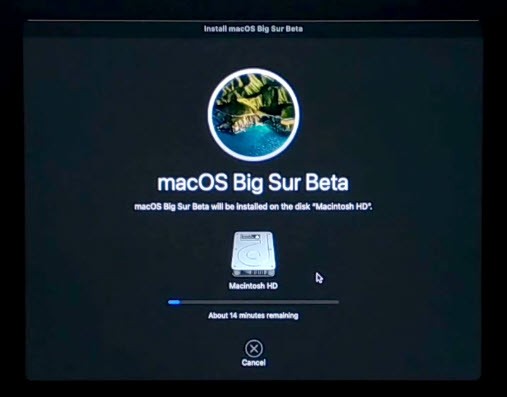
- After the macOS Big Sur installation is done, then, complete the basic settings of macOS Big Sur installation on your PC.
- After that, connect the USB drive and copy the OpenCore Configurator to your desktop.
- Then, open the OpenCore Configurator & mount the EFI partition of USB & system drive.
- Here, copy the EFI folder from the EFI partition of USB and paste it to the EFI partition of the system drive.
- Now, eject EFI partition of USB and system drive.
- Restart your PC.
- After that, check all the basic settings of macOS Big Sur like Sound, brightness, Volume, Wi-Fi, etc.
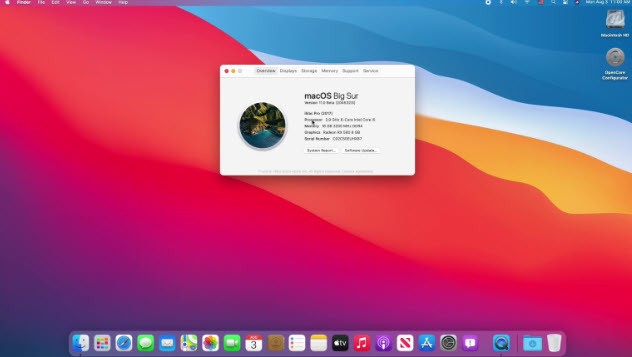
Create Partition for Windows 10 Installation on PC-Hackintosh
To dual boot macOS Big Sur with Windows 10, you will need to create a separate partition for each operating system. Though you have installed macOS Big Sur successfully and now you need to create a new partition for Windows installation. However, you cannot install macOS Big Sur and Windows 10 on the same hard drive. It is how something impossible, Therefor, go to “Utilities” > “Disk Utility”.
- If you can’t see your drive then click on the “View” option and click on “Show All Devices”. After that, select the drive where you want to create a partition for Windows 10.
- Now, click on “Erase” from the top menu and click on the “partition” option.
- Click on Plus sign to add another partition.
- To create a new partition for Windows 10, you need to follow the below parameters.
- Name: Windows 10
- Format: Mac OS X Extended (Journaled)
- Size: Minimum 60GB
- Once you are done then click on Apply.
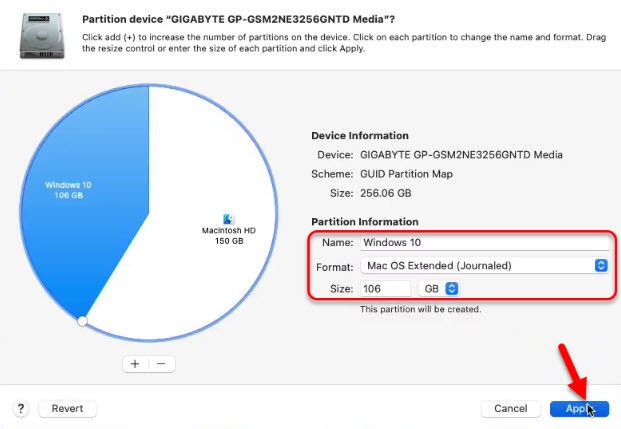
- Now, tap on the Partition option.
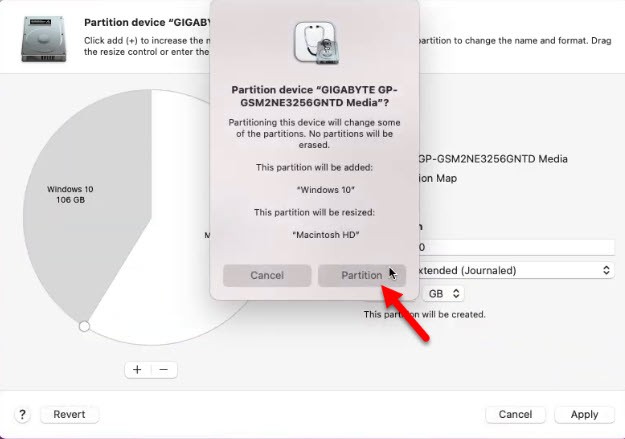
- On the warning pop-up menu, click Continue.
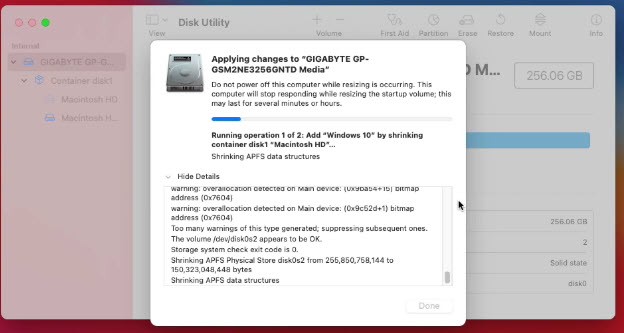
- Finally, you need to wait to complete the creating partition for Windows 10. It might take time but during the process don’t do anything.
Install Windows 10 on PC-Hackintosh
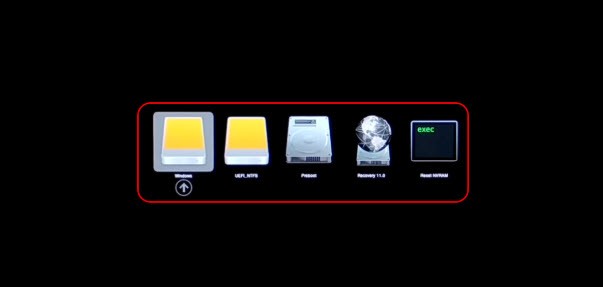
When the Windows 10 partition is done then connect the Windows 10 USB Drive and restart your PC. After that, go to the Boot Menu and select Windows 10 drive and press Enter.
- On the Windows 10 first screen, select your Language, Time, and currency method and click next.
- If you don’t have Windows 10 License Key then click on “I don’t have a product key”.
- Here, you will see various Windows 10 installation version. Therefore, select the Windows 10 version and go ahead.
- Accept the license terms and go ahead.
- For installation type, select “Custom: Install Windows only (advanced)”.
- Take heed, don’t delete EFI partition and macOS Partition. Only delete the Windows 10 partition that you created later. Without deleting the Windows 10 partition you won’t be able to install Windows 10.
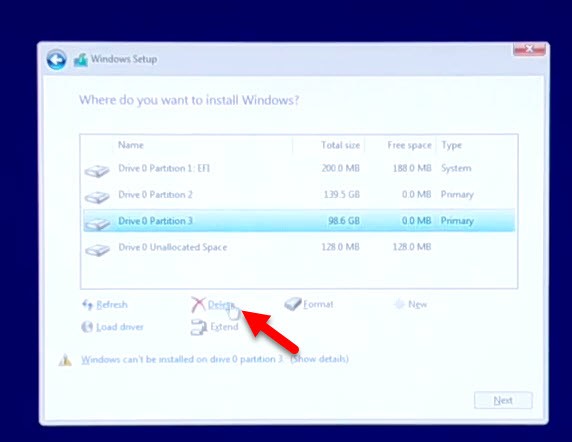
- Once you are done with deleting the partition, then select the empty drive and click on next.
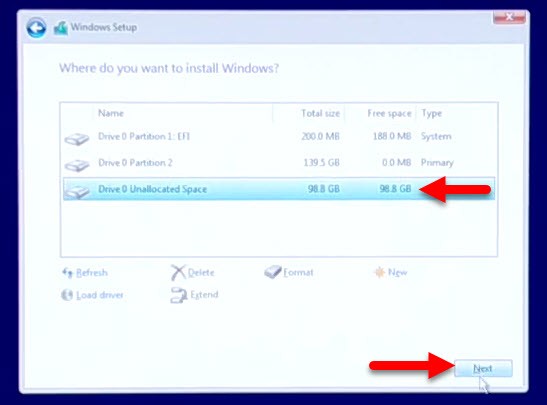
- Now, it will take time to complete the Windows 10 installation on your PC. Have a patient, once the Windows 10 installed successfully then your PC will restart automatically.
- Once the installation is done then complete the basic settings and finally you have the Windows 10 on your PC.
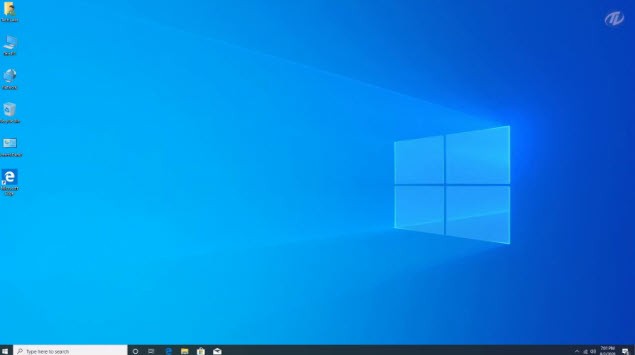
Once the Windows 10 installation is done successfully. Then, go to “Settings” > “Security” and “Update”. Now, update the Windows 10 completely to fix the drivers like sound, graphic display, Wi-Fi, etc.
Read Next:
- How to Install macOS Big Sur and Dual Boot with Catalina
- How to Install macOS Big Sur on PC-Hackintosh
Conclusion
You have dual boot macOS Big Sur with Windows 10 on PC-Hackintosh successfully. Now, you can switch between both operating systems whenever you want. So, restart your PC and check the startup window. Here, you will see both operating systems macOS Big Sur and Windows 10. So, click on any operating system that you want to use.
