At the Worldwide Developer Conference, Apple revealed the new operating system with a new user interface and redesigning icons, menu bars, and other features. This operating system is better than macOS 10.15 Catalina and it has tons of new features and powerful improvements. However, Apple released the macOS 11 Big Sur on June 22, 2020. Along with macOS 11, Apple introduced iOS 14, iPadOS 14, watchOS 7, and tvOS 14.
Thanks to Apple for such an amazing software with its handy features. All the software has new features and the macOS Big Sur biggest update comes with the Safari web browser. Although Apple said, Safari is 50% faster than Chrome while you visit the website. However, the macOS Big Sur is inspired by iOS 14, though you will find the control center in macOS Big Sur to change the settings. Besides that, you will see the Widgets on the home page of your macOS 11.
The macOS 11 Big Sur is an advanced Macintosh operating system and Apple dropped some Macs version. Those Macs can’t receive macOS 11 Big Sur update and they can not install the new operating system. You don’t need to worry, in this article, I will guide you on how to install macOS 11 Big Sur on Unsupported Mac with easy steps.
However, the macOS 11 Big Sur developer beta is available and you can download and install the macOS 11 Big Sur on your Mac. Before going to install the macOS 11 Big Sur, have a look at macOS 11 Big Sur compatible Macs list. If you Mac can support macOS 11 Big Sur, then, this article is not for you. In case, your Mac is dropped from the list then you are in a good place.
Point to be noted, the macOS Big Sur developer beta has tons of bugs where your Mac can be crash and you might lose your data. I know, the current operating system is amazing and it has beautiful wallpapers for desktop, iPhone, and iPad. Therefore, you can’t wait for the public beta and you are going to download the macOS Big Sur installer file to install it on your system.
So, let’s start the article and check all the features, changes, and improvements on macOS Big Sur applications.
macOS Big Sur can be Installed on
Before going to install the macOS 11 Big Sur on your Mac, Let’s see which Macs can support macOS 11 Big Sur. The below Mac computers you see, they will get all the macOS Big Sur update without any errors. In case, your Mac is among the below list then you don’t need to follow this article. Because your Mac can support macOS Big Sur.
- MacBook 2015 and later
- MacBook Air and Pro Late 2013 and later
- Mac mini 2014 and later
- iMac 2014 and later
- iMac Pro 2017 and later (all models)
- Mac Pro 2013 and later
The Macs that dropped this time are listed below and with the help of this article, you can install macOS Big Sur. The below methods have been tested on Macbook Air 2012 and iMac 2013. The installation was done successfully.
- MacBook Air 2012
- MacBook Pro 2012, Early 2013 MacBook Pro
- 2012 Mac mini 2012
- iMac 2012, 2013 iMac
Make Backups of your Mac
The developer beta will have errors and you will face problems during the installation or upgrading to macOS Big Sur. Therefore, before you install the new operating system, make backups of your Mac to an external hard drive using time machine. You have several backups software like Disk Drill, iCloud, Dropbox, and many more.
Once you make backups of your Mac and data, then, you can install the macOS Big Sur. No matter, if you lose your data because you have the backups of your files.
How to Install macOS Big Sur on Unsupported Mac?
The method I am going to guide you will work for Macbook Pro 2012 and iMac 2013 that we have tested. You can test this method on your Mac and check whether this method is working for you or no. Please, tell us in the comment section and let us know our method worked for you or no.
As we have tested the developer beta 1 on the Mid 2012 Macbook Pro and all the functions and features are working except Wifi. In other machines, Wifi might work or not because some users have no issue with Wifi. So, you perform this procedure at your own risk. As we confirm it works well on Macbook 2010, Macbook 2012, iMac Late 2013, and iMac Late 2011.
Remember, focus on each code and steps in order to not face problems during the installation.
Required Files:
You will need to download the two required files from the below links to complete the macOS 11 Big Sur installation on unsupported Mac.
- Download InstallAssistant.pkg
- Download https://forums.macrumors.com/attachments/really-simple-installer-hack-zip.926156/
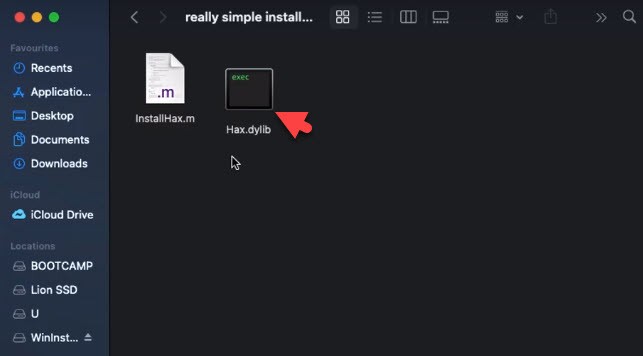
Step 1: Once you download the two required files, then, copy the hax.dylib file and paste it to the home folder.
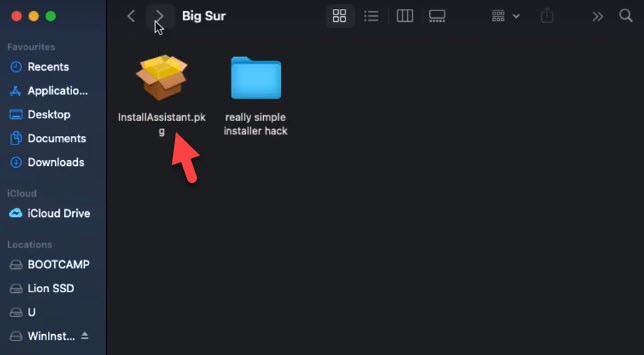
Step 2: When you paste the code to the home folder, Then, Double-Click InstallAssistant.pkg to install its content.
Step 3: Now you are on the Install Assistant installer Introduction page. You need to follow the five steps to complete the installer process. So, click the Continue.

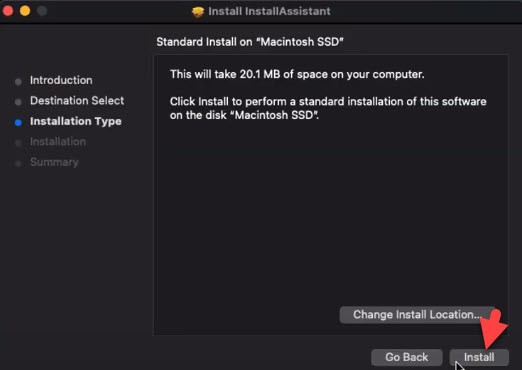
Step 4: The file will take 20.1 MB size on your computer. Now, click the Install button to perform a standard installation of this software on the disk “Macintosh SSD”. Once you click the install button then it will ask you to enter your password and click the Install Software.
Step 5: Now, boot into recovery mode by holding Cmd-R immediately on startup until recovery starts booting. If you have no recovery partition, you can hold down Cmd-Option-R. If your machine supports Internet recovery. So, when the installation and recovery mode is finished then Go to Utilities -> Terminal and type csrutil disable and press enter.
Once you press the enter key, then, you have to restart your Mac in order to apply the changes.

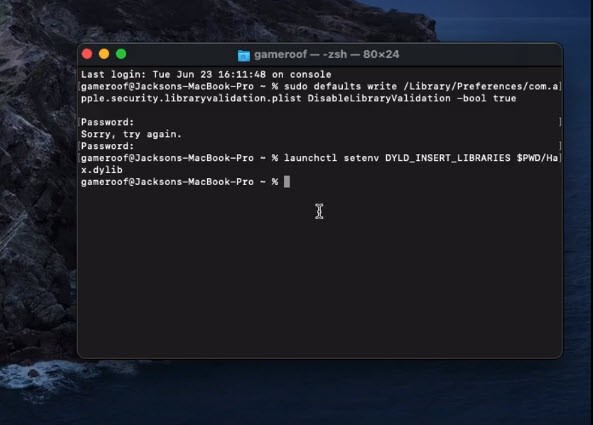
Step 6: After you restart your Mac, Then, open Terminal and type the below two commands line in the terminal carefully. Once you apply the first commands then you need to type your password and apply the second command.
Terminal command 1: sudo defaults write /Library/Preferences/com.apple.security.libraryvalidation.plist DisableLibraryValidation -bool true
Terminal command 2: launchctl setenv DYLD_INSERT_LIBRARIES $PWD/Hax.dylib
Step 7: Once you apply the two commands line, then, run the macOS 11 Big Sur installer that you installed from InstallAssistant.pkg earlier. After that, click on Continue and follow the other instructions to complete the installation.
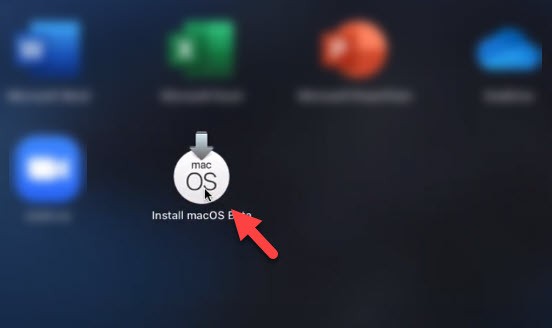
Step 8: Just wait for 30 minutes to complete the installation. Once the installation is done then you will see the macOS 11 Big Sur wallpaper on your Mac screen. Finally, you have installed macOS Big Sur on your unsupported Mac successfully.
So, this was the method to install macOS 11 Big Sur on unsupported Mac devices. The method is quite easy, only you have to focus on the commands line and other installation procedure.
Read Next:
- How to Install macOS Big Sur on Virtualbox on Windows
- Download macOS Big Sur dmg File
- How to Install macOS Big Sur on Vmware on Windows
- Delete/Uninstall Application in macOS Big Sur
Conclusion
Nothing is impossible, you can do with your Mac everything you want, only you have to find the solution and the method to do that. With this step, you don’t need to worry because you can run macOS 11 Big Sur on your unsupported Mac.
Kindly, leave a comment below if you have successfully installed macOS Big Sur on your Mac device. In case, the method doesn’t work for you, So, please let us know in the comment section.