The main reason to create macOS 11 Big Sur Bootable USB on Windows is to have a clean installation of macOS Big Sur on virtual machines. With bootable USB you can install macOS Big Sur on VirtualBox and Vmware. Even, you will have a full installation on Mac compatible computers. However, if the virtual machines or Macbook and Mac has crushed and don’t reboot normally as it should.
The reason to not reboot macOS Big Sur can be from file corruption, buggy update, hardware failure, or malware. Then, with a macOS 11 Big Sur bootable installer you can easily install the latest operating system.
On Mac computers, you can easily create a USB installer for macOS Big Sur using Terminal and some commands line. But, doing it on Windows is somehow difficult and you have to create it using third-party software. Therefore, we will create a macOS 11 Big Sur USB installer using UUByte DMG Editor and TransMac software.
- How to Install macOS Big Sur on Virtualbox on Windows
- How to Install macOS Big Sur on Vmware on Windows
However, the macOS 11 Big Sur developer beta version is available and the public beta will be released in July. Remember, with this method, you can create any version of the macOS Big Sur installer. Whether, it is developer beta, Public beta, or final release version.
MacOS 11 Big Sur Compatible devices
Before moving on the macOS 11 Big Sur compatible Macs list. Let’s have a short glimpse of macOS 11 Big Sur introduction. However, Apple Inc. announced and released macOS 11 Big Sur the latest Macintosh operating system. Meanwhile, Apple released the first developer beta for developer users to check the new operating system bugs, features, and improvements.
The macOS 11 Big Sur has major new features with new user interface design and iOS14 and iPadOS 14 supports. The refreshed design to macOS Big Sur, Control center for Wifi and Bluetooth connectivity, Notification center, support for Apple-designed ARM processor, Support for iOS and iPadOS apps, Signed system volume, Software updates, Spotlight, Improvements to Safari, Messages, App Store, Notes, Photos, Maps, and New apps introduced in Mac Catalyst.
When Apple introduced the next Mac operating system and tweeted ‘the older Mac computer 2012 and 2013 will not get macOS Big Sur updates’. So, the older Mac has dropped from the compatible list and it can’t support macOS Big Sur. However, you can install macOS Big Sur on Unsupported Mac devices. and you can download and install macOS Big Sur on your Mac.
So, the below lists can support macOS 11 Big Sur and they will get the new updates and can install macOS 11. Therefore, if you have the below Mac computer then you can get macOS 11 experience by creating macOS 11 Big Sur bootable USB.
- MacBook 2015 and later
- MacBook Air and Pro Late 2013 and later
- Mac mini 2014 and later
- iMac 2014 and later
- iMac Pro 2017 and later (all models)
- Mac Pro 2013 and later
The older Mac computers like Macbook 2012, Mac Mini 2012, iMac 2012, and 2013 can not support macOS Big Sur. But, you can follow the article above.
How to Create macOS Big Sur Bootable USB on Windows
To create a macOS 11 Big Sur USB Installer, you need a few required files to complete the process. So, the below files are important and you have to prepare them. However, the macOS Big Sur developer beta is available and without developers, no one can download it. But, you can download macOS 11 Big Sur from the below link.
Require Files
- macOS Big Sur installer file
- At least 16GB USB Drive
- Download TransMac Or Download UUByte DMG Editor
Create macOS 11 Big Sur Bootable USB Installer Using UUByte DMG Editor
The best method to create a macOS Big Sur USB installer is using UUByte DMG Editor. It is super easy to use and has a modern user interface. After downloading the macOS Big Sur DMG file, then it is only four clicks away to make a bootable macOS Big Sur USB within a few minutes.
- Download and install UUByte DMG Editor on your Windows PC.
- Insert a USB drive or DVD disc into the PC.
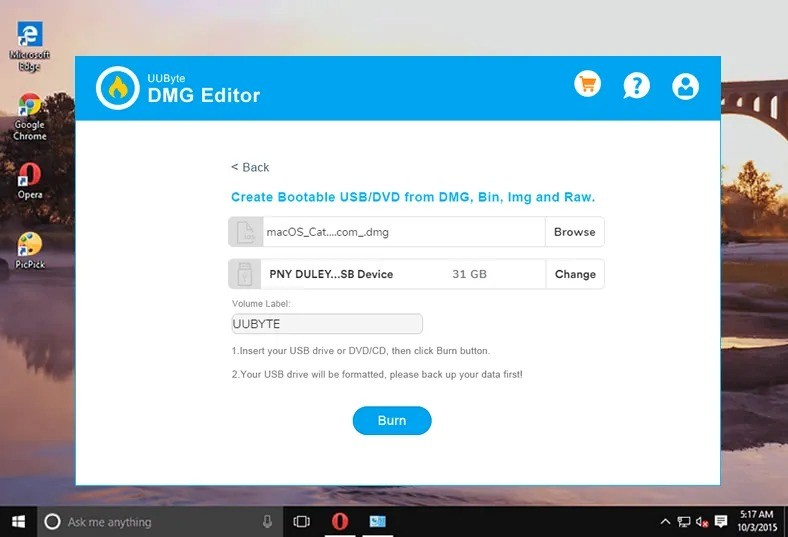
- Launch the app from the desktop shortcut and click the ‘Burn’ tab at the welcome window.
- Now, import the macOS Big Sur DMG file into the software by clicking the ‘Browse’ button.
- Select the USB or DVD drive name and click the ‘Burn’ button to start burning the dmg file to the target device.
- Wait about 10 minutes and a bootable macOS Big Sur installer USB is ready!
The above process is much easier than any other method. In addition, you can also make bootable USB from other types of image files, such as .iso, .img, .bin, .zip, etc.. So, it is a powerful image file burning utility.
Create macOS 11 Big Sur Bootable USB Installer Using TransMac
TransMac is another premium software that can help you create a bootable macOS USB installer on Windows. Though it is not free, But, you will have a 15-days trial. Between 15-days, you can easily create multiple time macOS bootable USB on Windows. However, TransMac is an application for Windows users for file management to read, write, and format Mac disks in your PC. This application allows you to open Mac-formatted devices and drives on your Windows.
Most of Windows users are using TransMac for creating a macOS bootable USB installer. Creating a bootable USB using TransMac is the easy way on Windows. Therefore, download the TransMac on your Windows and follow the installation steps.
Install TransMac on Windows
- Go to the Download folder and find the TransMac installer file that you downloaded earlier.
- Double-Click the TransMac installer file.
- Now, you will see the TransMac welcome page. Here, click the Next
- Kindly read the following important information before moving on. After that, check the ‘I accept the agreement’ and click the Next
- Where you are going to install TransMac, So, select the destination folder and click the Next
- On select start menu folder, click Next
- Click
- Finally, click the Install button to install the TransMac on your Windows.
- Once the installation is completed then click the Finish
Open TransMac as Administrator
Once you installed TransMac on your Windows then connect the USB drive you are going to use it for macOS 11 Bootable USB. After that, launch TransMac as an administrator and follow the below steps.
- Now, right-click the USB drive from the left side of the page. After that, tap on ‘Restore with disk image‘.
- You will get a warning pop-up menu, click Ok.
- After that, browse the macOS 11 Big Sur dmg file using the three-dot option. Make sure you have selected the macOS Big Sur dmg file. Then, click the Ok button.
- You will see another warning pop-up menu that said ‘This is a compressed dmg, it will be decompressed on the fly’. Simply, click Yes.
- Now the TransMac will start making a bootable USB for macOS Big Sur. The process will take time and don’t do anything simply to be patient.
Read Next:
- How to create a bootable USB for macOS Catalina on Windows
- Create macOS High Sierra Bootable USB on Windows
- How to Create a bootable USB from Android
- Create macOS Mojave bootable USB Installer on Windows
Conclusion
As you created macOS Big Sur bootable USB on your Windows. Therefore, you can install macOS Big Sur on Mac and virtual machines using the macOS 11 USB Installer. It will help you to have a clean macOS Big Sur installation.
The method that shown in this article will work with all types of macOS Big Sur version. Till now, the macOS Big Sur developer beta is available. But, once the public beta or final version will release then using this method you can create macOS Big Sur bootable USB on your Windows.