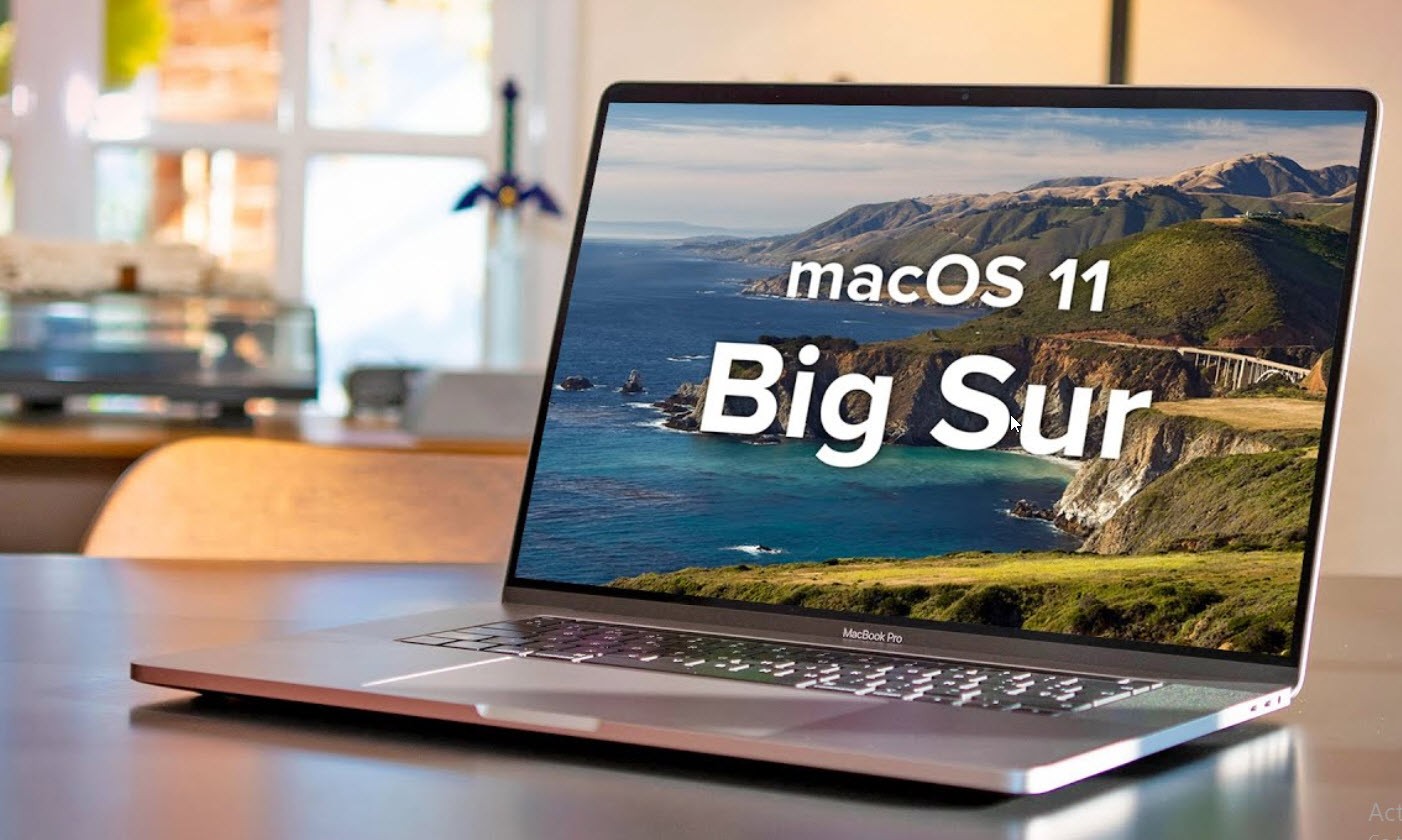
Thanks to Apple for launching the latest and biggest operating system called macOS Big Sur. The macOS Big Sur is one of the advanced OS that released in July 2020 at WWDC “World Wide Developer Conference”. Meanwhile, Apple announced the first developer beta for Mac developers to check it out and give its feedback on macOS Big Sur. But the main problem is, Apple dropped the older Mac devices like the Mac model 2012 and some of the 2013 models. You know these Mac computers supported by macOS Catalina but not by macOS Big Sur.
However, macOS Big Sur has various new features like new updates on the Safari web browser (on macOS Big Sur Safari is 50% faster than Chrome). Along with, Apple included iOS 14 and iPadOS 14 features on macOS Big Sur like Notification Center and Control Center. Moreover, you will see a new update on Messages, Maps, and much more.
Looking to macOS Big Sur features and improvement, every user wants to try macOS Big Sur whether to its primary Mac device or virtual machines. Although Apple released the final version of macOS Big Sur in November and it is available to download. Therefore, download and install macOS Big Sur on your primary Mac device.
Unfortunately, those who have older Mac devices cannot install macOS Big Sur. Don’t worry we have discussed how to install macOS Big Sur on an Unsupported Mac. But, in this article, I am going to guide you to the new method to install macOS Big Sur on an unsupported Mac device. Follow each step properly and tell me in the comment section if this method works for you or no.
Is your Mac Supported by macOS Big Sur?
macOS Big Sur is the advanced and biggest change of Apple operating system. This OS has multiple new features and improvements that are attractive and handy. But, sorry to those users who have Mac computers below 2012 models. You can check the below Mac computers and see if your Mac is dropped or no.
- MacBook: Early 2015 or newer
- MacBook Air: Mid 2013 or newer
- 2013 MacBook Pro: Late 2013 or newer
- Mac Mini: Late 2014 or newer
- iMac: Mid 2014 or newer
- iMac Pro
- Mac Pro: Late 2013 or newer
- Developer Transition Kit (2020)
Also, below is the list of MacBooks that are not supported by macOS Big Sur.
- MacBook Pro Air 2012
- MacBook Pro 2012 and early 2013 MacBook Pro
- Apple 2012 Mac Mini
- iMac 2012 and 2013
In case your Mac is not supported then don’t worry I am here to explore the new method to install macOS Big Sur on an Unsupported Mac device. The process might be difficult but not impossible.
Backup your Mac
Before performing any installations or upgrading to another operating system you have to back up your Mac computer to an external hard drive using Time Machine. There are several Backup third-parties that allow you to backup your data. But, using Time Machine is the easiest way to do that.
Install macOS Big Sur on Unsupported Mac Device
On your Mac desktop, you might have macOS Mojave or macOS Catalina. So, installing macOS Big Sur might be a new step for you, and using this guide you will the learn procedure.
Before moving to the steps, make sure you have a full backup of your Mac computer. No one knows during the process you face problems.
Required Files
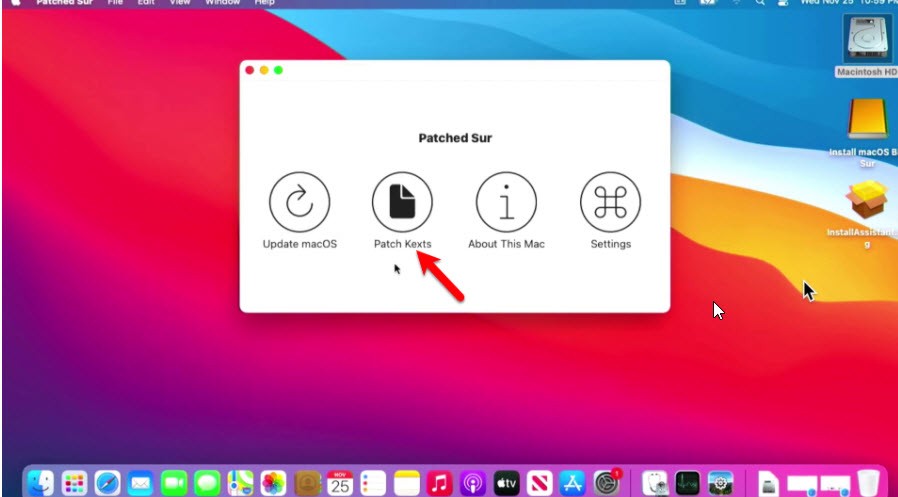
Step 1: Get Started with Patched Sur
First of you need to download the above required files. After that, the first step is to install the Patched Sur which is the UI patched for macOS Big Sur. The patched Sur designed to make it easy to run/install macOS Big Sur on unsupported Macs. Although this patched Sur allows you to easily run macOS Big Sur.
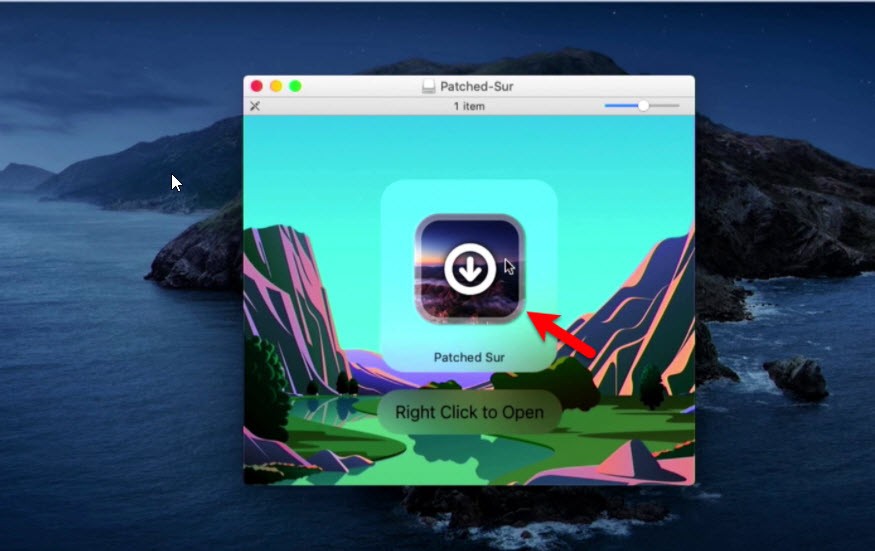
#1: Once you downloaded the Patched Sur file, then go to the download destination and double-click the Patched Sur to launch the installation window. On the first window double-click the icon or click to Right-Click to Open option.
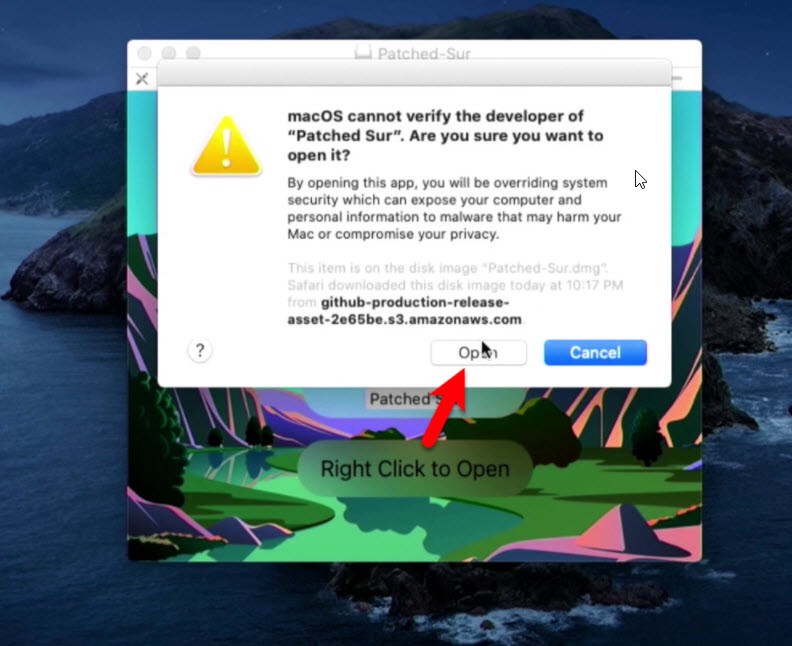
#2: Here you will a notification “macOS Cannot verify the developer of Patched Sur…….”. Simply click the Open button.
#3: Now on the welcome page you will one paragraph (read it carefully) and click the Start button.

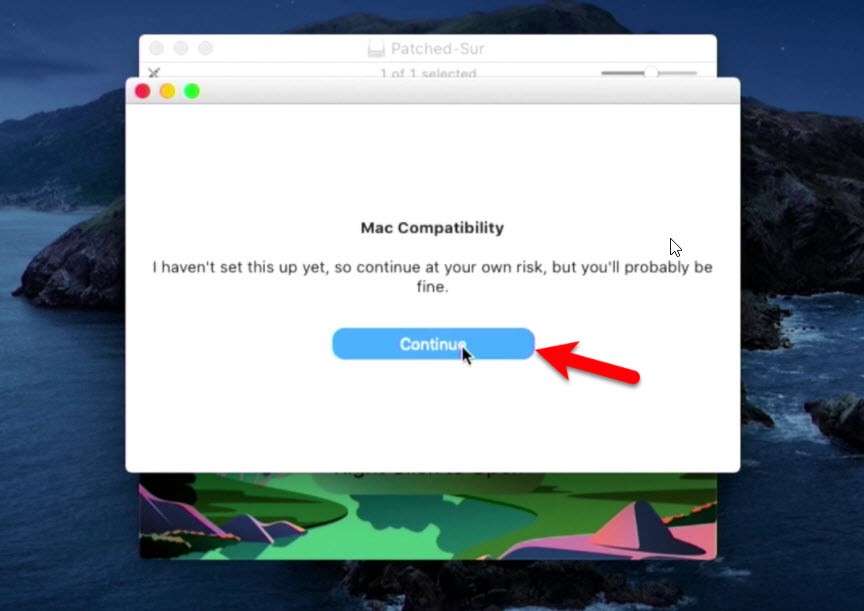
#4: On Mac Compatibility click on Continue to go ahead.
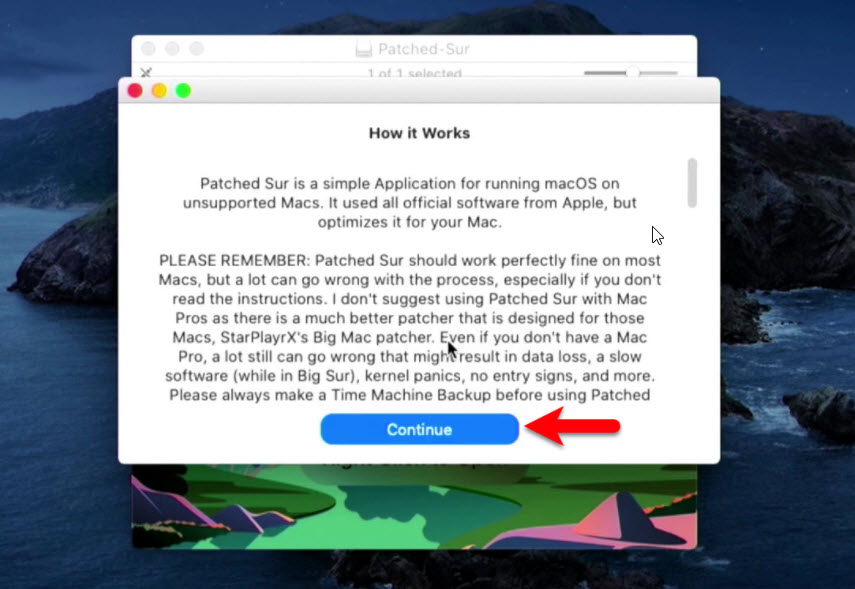
#5: You should have a knowledge of what Patched Sur does on an unsupported Mac. Therefore, read how Patched Sur works and click Continue.
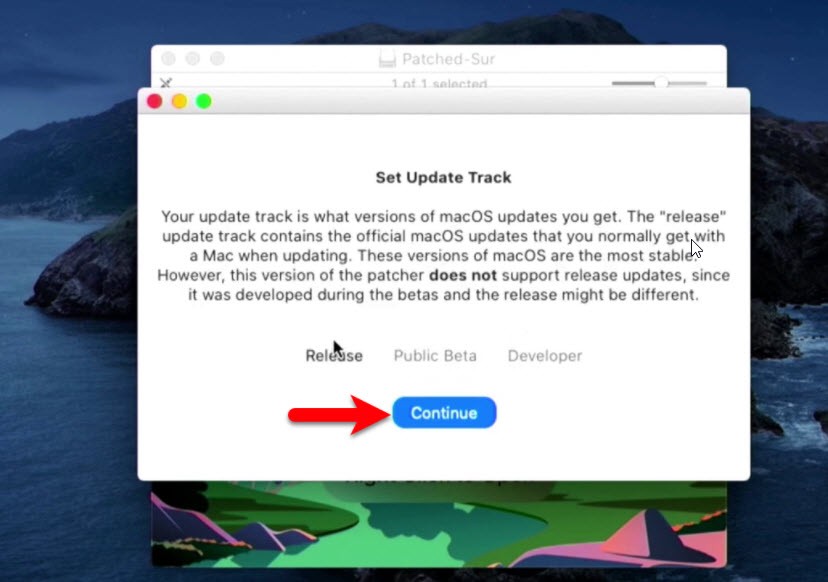
#6: Here you need to set the updated track as you can see in the paragraph “Your update track is what versions of macOS updates you get. the “release” update track contains the official macOS updates that you normally get with a Mac when updating and read more. So, select Release and click Continue.
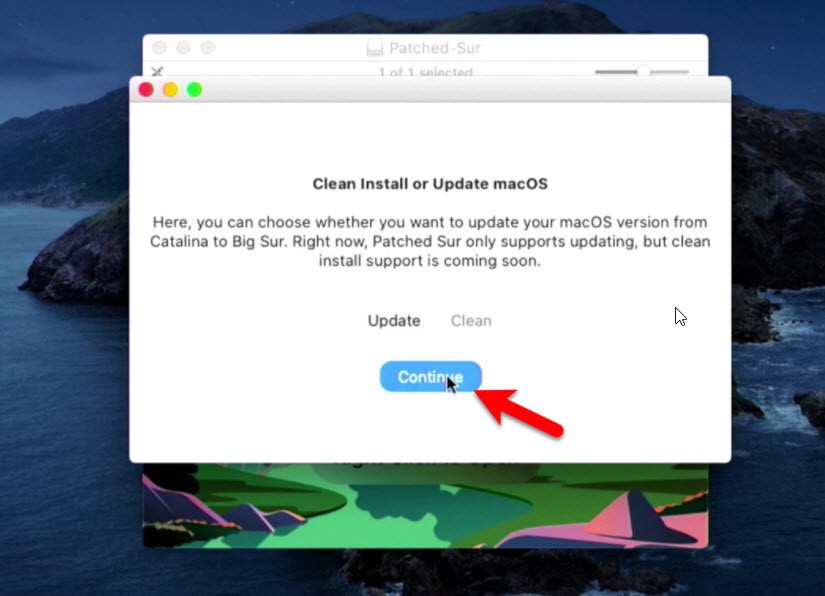
#7: On this page, you will have to clean install, or update the macOS Big Sur option is yours. Whether you want to update from macOS Catalina/Mojave to macOS Big Sur or clean installation of macOS Big Sur. However, Patched Sur only supports the update option for now. So, select Update and click continue.
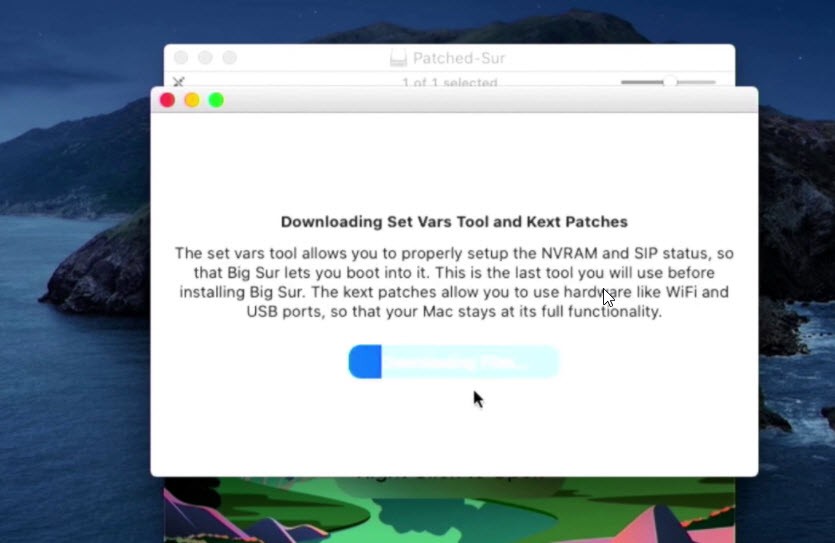
#8: Now Patched Sur will start downloading Set Vars Tool and Kext patches. However, the set vars tool allows you to properly set up the NVRAM and SIP status. So, that macOS Big Sur lets you boot into it. This is the last tool you will use before installing Big Sur. the Kext patches allow you to use hardware like Wi-Fi and USB ports. So, that your Mac stays at its full functionality.
#9: Afterward, you have to download the Package installer or Assistant package. Here, click on “View other options”.
#10: On the other Window click on Find an Installer to insert the Package Installer file as you downloaded from the required file.
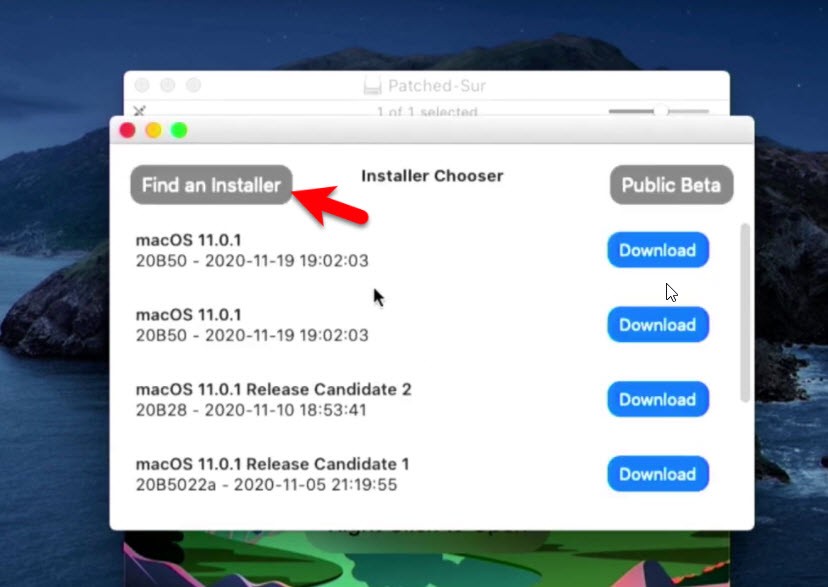
#11: Find the Package Installer file that you downloaded and open it.
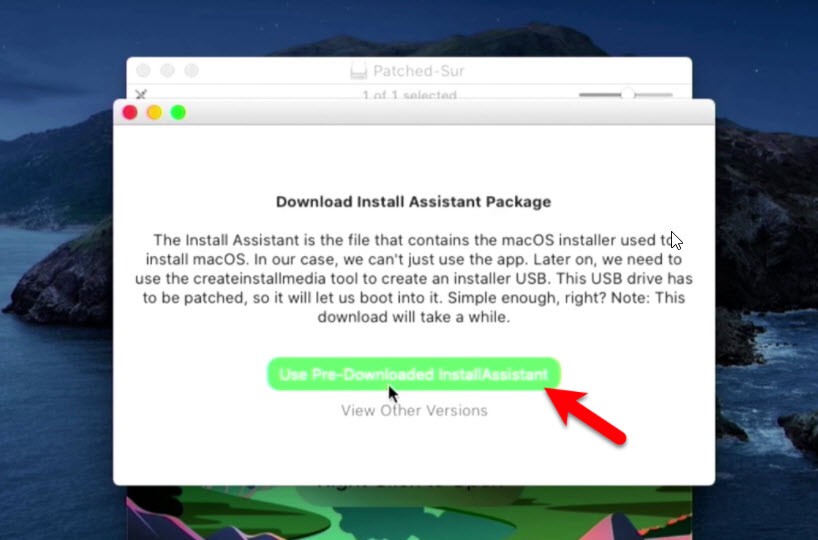
#12: Here, you need to download the install assistant package. As the install assistant is the file that contains the macOS installer sued to install macOS. In our case, we cannot just use the app. later on, we need to use the createinstallmedia tool to create an installer USB. this USB drive has to be patched. So, it will let us boot into it. Therefore, click the Use pre-downloaded InstallAssistant option and it will take time.
#13: To complete the download enter your administrator password and continue.
#14: Now it will install the package so have a patient.
#15: At this point, you need to connect the 16GB USB drive in order to create a USB installer. Once you plugged in then refresh the page to see the USB drive and continue.
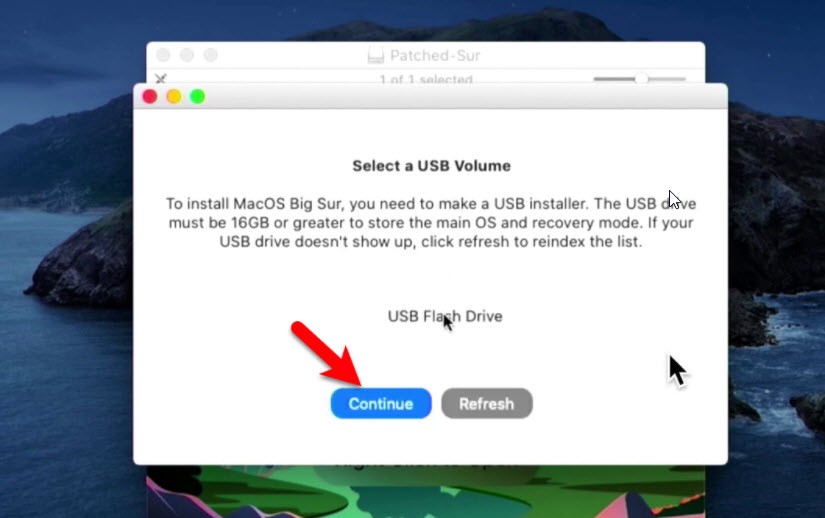
#16: To create a USB installer your pen drive will be erased and all the files and folder will be removed. If you agree with this point then click on Continue.
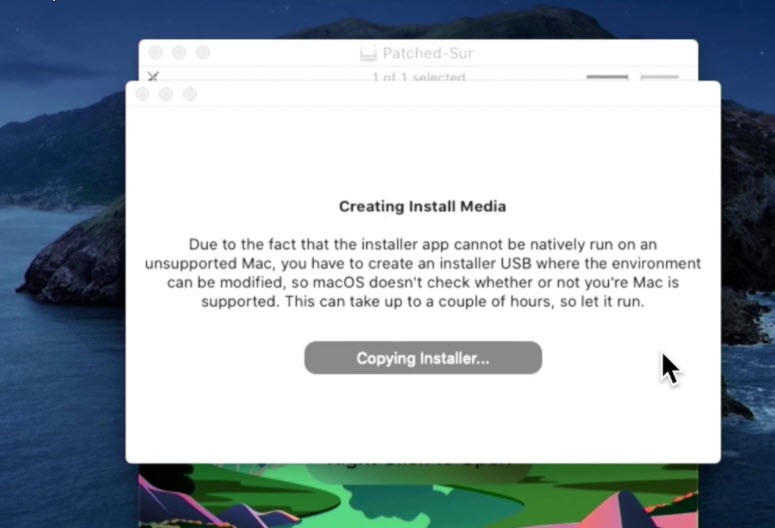
#17: Due to the fact that the installer app cannot be natively run on an unsupported Mac, you to create an installer USB where the environment can be modified. So macOS doesn’t check whether or not you’re Mac is supported. This can take up to a couple of hours, so let it run. So, wait until it should erase the USB drive.
#18: Once the USB drive erased successfully then it will start automatically copying the macOS Big Sur installer file to the USB drive.
Step 2: Restart and Install macOS Big Sur
The last step is to install macOS Big Sur on your unsupported Mac device. To do that, connect the USB drive and restart your Mac. To restart, go to the Apple logo located in the top-left corner of the screen and restart your Mac.
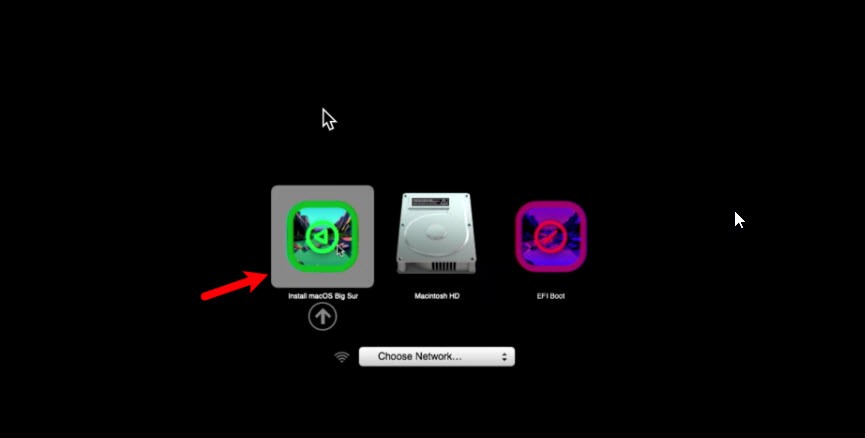
When your Mac computer restarted then press and hold the boot menu key. Here, select the Install macOS Big Sur and click the arrow option.
- Wait for the Apple logo to appear
- Once you reached the recovery window then you don’t need to touch the drive or create any partition. Simply you will install or upgrade the existing OS to macOS Big Sur. So, for that click on the “Install macOS Big Sur” option.
- To set up the installation click continue.
- Now, agree to the terms and conditions of macOS Big Sur.
- Here select the disk and continue.
- Now your Mac is upgrading to the macOS Big Sur operating system.
When the macOS Big Sur is successfully installed then go ahead and install some Patched Sur required files.
Note: Patching the Kexts get you Wi-Fi, USB, and much other functionality that work on your macOS Big Sur installation. Without these Kexts, your Mac would not be at its full potential on Big Sur and several things would not work. Did you get it?
Once the Patch Kexts done successfully then restart your Mac and check all the settings that should work properly.
Read Next:
- How to prepare your Mac to upgrade to macOS Big Sur
- How to install macOS Big Sur on Separate APFS Volume
- Perform a clean installation of macOS Big Sur on Mac
Conclusion
Installing macOS Big Sur on an Unsupported Mac is difficult but not impossible. You will see many articles and Youtube videos that guide you on how to install macOS Big Sur on an Unsupported Mac device. But, few of them work, and can install macOS 11.0 on your Mac. Therefore, this article will work and help you to install macOS Big Sur on an Unsupported Mac device.