
macOS 11 Big Sur is one of the powerful Macintosh operating systems that rolled out on June 22, 2020. At WWDC20, Apple introduced all its new software with its new features. The current macOS Big Sur has amazing features and improvements that attract the users. However, Apple kicked off the macOS Big Sur Beta 3 a few days ago. If you have macOS Big Sur on your Mac laptop. Then, you can update your macOS Big Sur to the latest version.
In case, you have not installed or test the latest Apple operating system on your laptop. Here, we will guide you on how to install macOS 11 Big Sur on a Mac laptop using the easy method. What we recommend for you, the macOS 11 Big Sur is in its Beta modes and the Beta mode has multiple bugs that can crash your primary system. Though the stable version will be released in September or October. This macOS Big Sur installer has no bugs and more included features.
If you don’t want to miss the advanced operating system which is added in the 11 series of Apple operating systems. Then, there are several ways to give it a try and protect your main computer from errors. The best way to check it out, you have the handy virtualization software like Virtualbox, Vmware Workstation, Vmware Fusion, and many more. This virtual machine allows you to test out and run multiple guests operating systems on a single host. The virtual machine is a different part of your system and it never destroys your primary system.
It means you need to install any virtual machine software on your Mac laptop. Afterward, you can easily install macOS Big Sur on a virtual machine on your Mac laptop. If you don’t have a clue how to do that, then, check the below 2 articles that we have discussed before.
- How to Install macOS Big Sur on Virtualbox on Windows
- How to Install macOS Big Sur on Vmware on Windows
In case, you want to check macOS 11 Big Sur on your primary system. Then, Apple has dropped some older Mac computers. that means the older Mac desktop cannot support macOS 11 Big Sur and they never get macOS 11 Big Sur update. However, we have provided a solution on how to install macOS 11 Big Sur on Unsupported Mac device. You can check this article, though this method worked for some users. Here, you can check the macOS 11 Big Sur compatible Mac devices. And check whether your Mac laptop can support macOS Big Sur Or No.
- MacBook (2015 or later)
- MacBook Air/Pro (2013 or later)
- Mac mini (2014 or later)
- iMac (2014 or later)
- iMac Pro (2017 or later)
- Mac Pro (2013 or later)
Steps to Install macOS 11 Big Sur on Mac Laptop
To install macOS 11 Big Sur on a Mac laptop. There are a few steps that need your attention and some download files to be downloaded. So, pay attention and install macOS Big Sur on your laptop.
Step 1: Download Required Files
- Download macOS Big Sur dmg (Installer file)
- Download OpenCore Configurator
- And Download EFI files
- 16GB Gigabytes USB Drive
Step 2: Create macOS Big Sur Bootable USB Drive
To install macOS 11 Big Sur on your Mac. You will need to create a macOS Big Sur Bootable USB Drive. There is two best way to create a bootable USB drive for macOS Big Sur. The easy way is to use UUBute DMG Editor software on your Windows. This method is the easiest way to create macOS Big Sur bootable USB Drive. And the next method is to use TransMac software on your Windows. Don’t worry the below article will help you to create a bootable USB Drive for macOS Big Sur.
Step 3: Change Your Mac Laptop BIOS Settings for Installation
- Restart your Mac laptop
- Now, press the BIOS menu key
- Tap on the Save & Exit menu
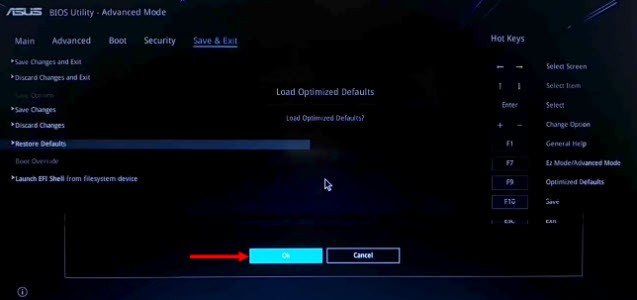
- Select Restore Default option and press enter
- Then, click on the Ok button.
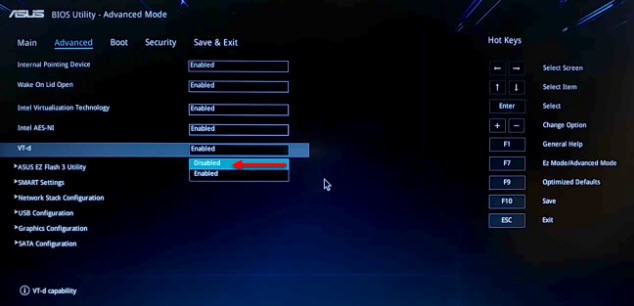
- Now, go to the Advanced menu and select VT-d and press Enter. Afterward, select the Disabled option.
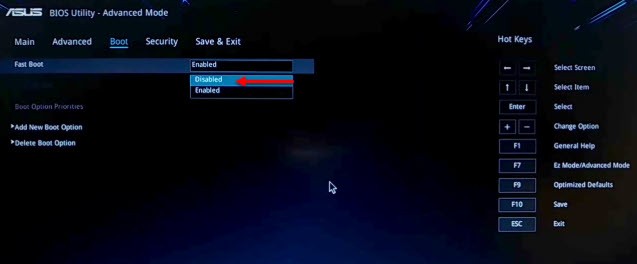
- After that, go to the Boot Menu and select the Fast Boot option then press Enter and click on Disabled.
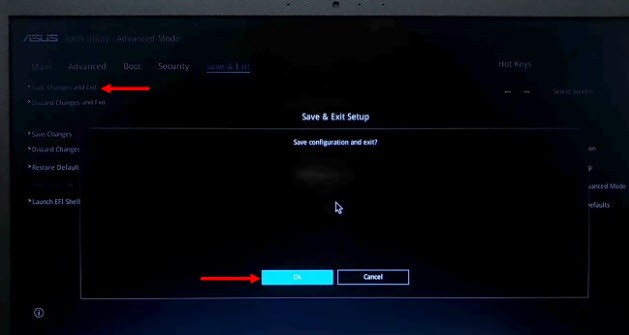
- You are done with BIOS Settings, Therefore, tap on Save & Exit and click Save Changes and Exit and click Ok.
Step 4: Install macOS 11 Big Sur on Mac Laptop
You are done with your Mac BIOS settings and now you are ready to install macOS Big Sur on your Mac Laptop. To do that, connect the bootable USB Drive and Restart your Mac. After that, press the Boot menu key and select the USB Drive and press Enter key to boot into macOS Big Sur.
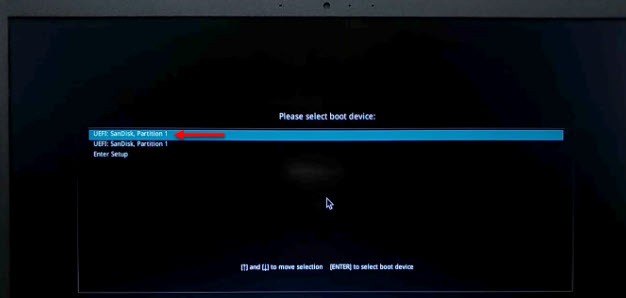
- Select Install macOS Big Sur and press Enter.
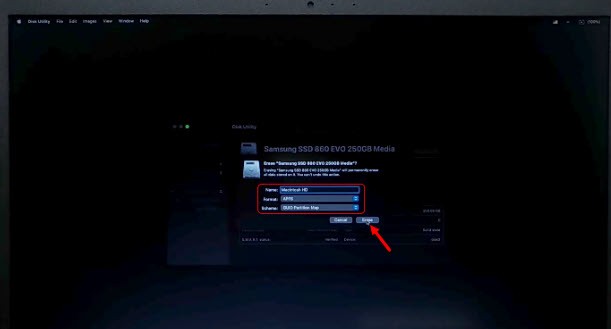
- Here, select Disk Utility and press the Continue option.
- Now, select the drive you want to install macOS Big Sur from the sidebar. After that, click on the Erase option from the top menu and follow the below settings.
- Name: Macintosh HD
- Format: APFS
- Scheme: GUID Partition Map
- Click on the Erase button and wait to complete the format process. After that, click on the Done button and exit the Disk Utility.
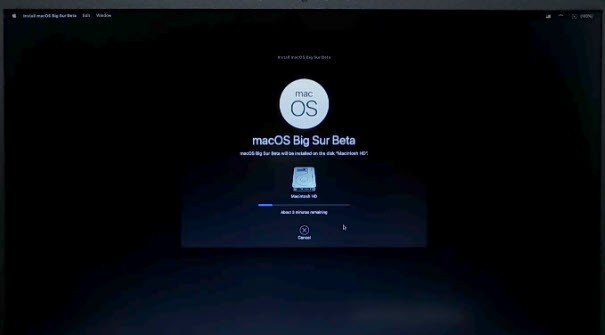
- Now, click on Install macOS and Continue.
- To set up the macOS Big Sur installation, you need to click on Continue.
- Agree to the software terms and conditions.
- Here, you will see two drive, But, you should select the drive where you want to install macOS Big Sur and click on Install.
- Wait for a few minutes to complete the installation process. Once the installation process is done then your Mac will restart.
Step 5: Complete macOS Big Sur Installation
Once the macOS Big Sur is completed, then, you need to complete the basic macOS Big Sur installation. The first screen you will see to select your Country and click Continue.
- On the next screen, you will see the Written and Spoken language. Here, click on Continue.
- On Set Up the Accessibility, click the Not Now option to skip this option for now. However, you can set it later once the macOS Big Sur installed on your Mac.
- On Data and Privacy click Continue.
- For now, skip the Migration Assistant option because you can access this option later. So, click on Not Now.
- Sign in to your Apple ID later once the installation is done. So, click on Set Up Later and Click on Skip.
- Agree to the Software terms and conditions.
- Create a computer account for the first time, to do that, follow the below settings.
- Full Name
- Account Name
- Password
- Password Hint and click Continue
- Click Continue on Express Set Up screen.
- Click Continue on Analytics screen.
- On Screen Time, click on Set Up Later.
- On Siri, click Continue.
- To Improve Siri and Dictation, click the Not Now and click on Continue.
- Here, you need to select your macOS Big Sur theme appearance.
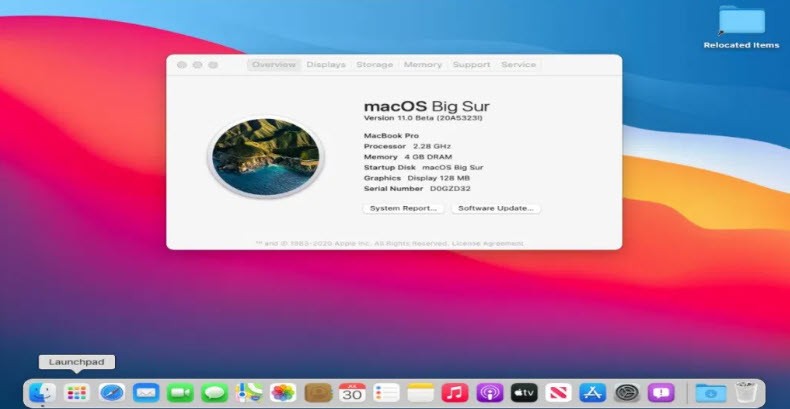
Finally, you are done with a macOS Big Sur installation on your Mac laptop. You have installed macOS Big Sur on your Mac laptop successfully.
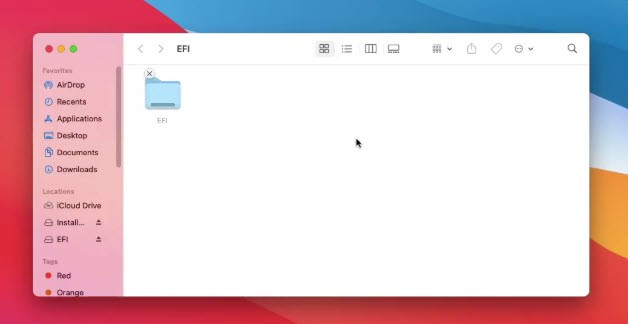
Step 6: Mount the Partition
Once you are done with macOS Big Sur installation. Then, you need to mount the EFI partition of the system drive and USB drive via OpenCore Configurator. Therefore, connect the USB Drive and copy the OpenCore Configurator to the desktop. Now, double-click and mount the EFI partition of USB drive and the system drive.
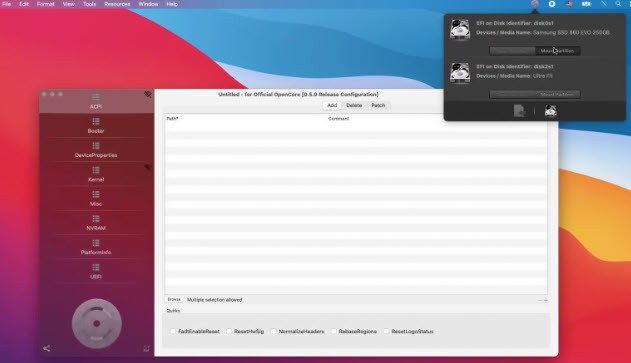
When the partition is done then copy the EFI file from a USB drive and paste it to the system drive. After that, restart your Mac computer.
Once your Mac restarted then check the below settings whether it is working fine or no.
- Audio ✔
- Graphics ✔
- HDMI ✔
- Sleep/wake Function ✔
- Power Management ✔
- App Store ✔
- iMessage ✔
- iCloud ✔
- FaceTime ✔
- USB with 2.0, 3.0, 3.1 and USB Type-C Ports ✔
- Bootloader ✔
- HDMI Audio ✔
- Volume Hotkeys ✔
- AirDrop ✔
- AirPlay ✔
- HandOff ✔
- Side Car ✔
Download macOS Big Sur HD Wallpapers
Now, that you have installed macOS Big Sur on your Mac laptop. Then, you might be looking for the macOS Big Sur wallpapers. However, having the same wallpaper for a long time will be a boring and you don’t want it exactly. Therefore, we have uploaded the best and HD wallpapers of macOS Big Sur for Desktop, iPhone, and iPad. Although, macOS Big Sur has different wallpaper with a various time-zone. You will get more than 10 wallpapers that looks beautiful.
Related Article:
Conclusion
Finally, you have installed macOS Big Sur on your Mac laptop. However, the macOS Big Sur Beta 3 version is available and you will get the upcoming update on “System Preference > Software Update”. Once you have the macOS Big Sur on your Mac, then, you can update to any upcoming macOS Big Sur updates. So, I hope you understand all the steps and installation process. In case, you have questions then feel free to ask me in the comment section.