How to Install MacOS Mojave 10.14.1 on VMware on Windows
How to Install MacOS Mojave 10.14.1 on VMware on Windows, MacOS Mojave 10.14.1 is the latest version of MacOS and this version is an impressive Operating System, However, you have the knowledge that MacOS deliver best intuitive user experience on your Mac. Actually, the MacOS user has the idea that MacOS was developed or launched in 2001 and so far it is in stock with different versions and features. most of the users are running Mac on there PC and However, this Operating system has released their latest version which is MacOS Mojave 10.14.1 and I should let you know that this version has amazing features which you will learn later.
This Operating System has various features that help you to manage your activity very efficiency. Although with MacOS application you can organize your contact and calendars, Moreover, in here you will get such features that you can send/receive email and even you can perform mathematical operator and you can check anything on browser online.
Therefore, if you are looking for the installation of this Operating system then in this article, I will walk you through the installation of MacOS Mojave 10.14.1 on VMware on windows. Besides that, you get all the things that you need during the installation. So, read and focus on each step and follow my methodology in order to not face difficulties.
How to Downgrade MacOS Mojave to MacOS High Sierra Install MacOS Mojave on VMware on Windows How to Install MacOS Mojave on Virtualbox on Windows Install VMware Tools on MacOS Mojave using VMware Download MacOS Mojave dmg File and Install on VMware & Virtualbox
MacOS Mojave 10.14.1 New Features
In this heading, you will get noticeable features that you should know before downloading and installing MacOS Mojave 10.14.1 on VMware on Windows.
- An impressive OS that you will get the best intuitive user experience using Mac.
- If you are Apple user then hands down you will get it on your Mac or iOS devices which are connected with the same workflow.
- MacOS Mojave features allow you to manage your daily activity very efficiency.
- However, you can manage your contact and calendars easily, where you can go with these two options.
- Needless to say, you can write text, send or receive emails, even you can use a mathematical operator and search online on the browser.
- In this version, you have the Mac App Store application where you can get the collection of iOS applications and use it on your MacOS Mojave.
- You have Compressed memory feature that will automatically shrink the data into memory due to make the Mac as quick and responsive as possible.
- You can secure your data or various sensitive information like Password, banking and credit card information with the help of Icloud Keychain features.
Related: The best new features of MacOS Mojave 10.14
MacOS Mojave 10.14.1 Setup details
Software full name: MacOS Mojave 10.14.1 VMware Image
Setup full name: MacOS_Mojave.zip
Full Size: 12GB
Setup type: Offline installer / Full standalone Setup
Compatibility Architecture: 32 Bit (x86) / 64 Bit (x64)
Latest Version Release Added On: 30th Mar 2019
MacOS Mojave System Requirments
For installing MacOS Mojave 10.14.1 on your PC, you need the system requirements. make sure, your system has this requirement.
- Operating System: Windows 10/8/7
- Memory (RAM): 2 GB of RAM required.
- Hard Disk Space: 13 GB of free space required.
- Processor: Intel Dual Core processor or later.
How to Install Mac OS X EL Capitan on Virtualbox on Windows How to Install MacOS High Sierra on VirtualboxDownload MacOS Mojave VMware & Virtualbox Image 10 Reasons Why Linux is Better Than Windows
Download required files to install macOS on VMware on Windows
- WinRAR or 7Zip
- VMware Workstation Player
- macOS Mojave 10.14.1 (One Part, March 30, 2019)
Install MacOS Mojave 10.14.1 on Vmware on Windows
Now it is time to install MacOS Mojave latest version on Vmware using windows. However, below you will get all the steps that you will need during the installation of MacOS Mojave 10.14.1.
Step 1. Extract the downloaded macOS Mojave 10.14.1 image file
The downloaded file of MacOS Mojave 10.14.1 is compressed and you need to extract it with WinRAR or 7zip. if you don’t have one of this application then hands down, download it from the given above link and extract the downloaded file.
Therefore, to extract the file simply right-click on the compressed file and select the Extract Here option.

Step 2. Install VMware Workstation Pro
In order to install MacOS Mojave 10.14.1 on VMware, you need to download VMware from the above link and install it on your system. However, the installation is quite simple and easy. as you know VMware Workstation is free and you can download it free from its official website, on other hands, you can say it is free virtualization software. Therefore, if you don’t know how to install VMware Workstation on windows then here I have uploaded article so you can check it.
Related: How to Download and Install VMware Workstation on Windows
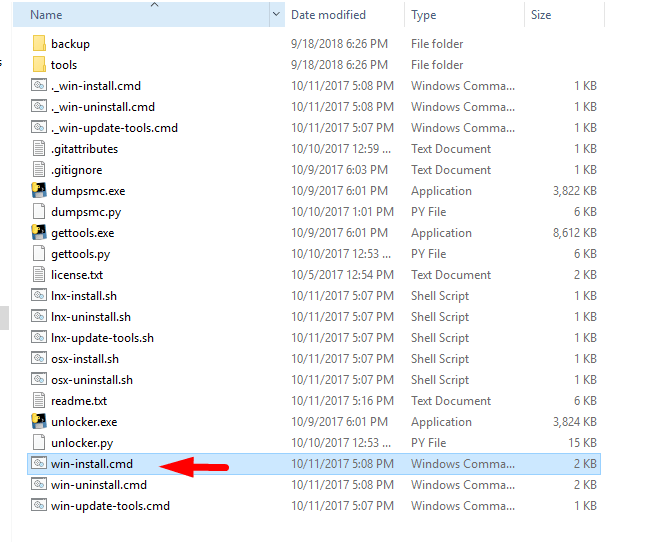
To enable Apple Services on VMware Workstation, Therefore, you have to download and install the Unblocker tools or Unblocker Master. So, for that, if you don’t know then here I will let you know how you can install Unblocker on VMware. First of all, download unlocker and extract the compressed file, after that, find win.install.cmd while you get it then right click on the file and select Run as Administrator.
Download Debian 9 Images for Virtualbox and VMware How to Install Debian 9 on Virtualbox on windows How to Install Debian 9 on VMware Workstation on Windows
Step 3. Create A New Virtual Machine for MacOS Mojave 10.14.1
In every Guest Machine, you need to create a new Virtual Machine for the Operating System. Therefore, to install Mac OS Mojave 10.14.1 on Vmware you have to create a new Virtual Machine. So, if you have the idea then skip this step if you don’t know then follow the below instructions.
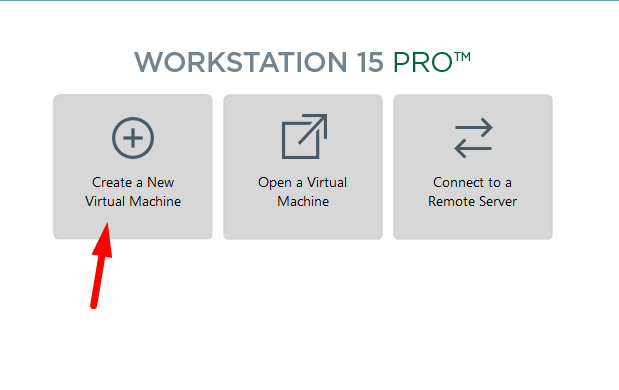
#1. Open the Vmware Workstation Pro and click on the Create a New Virtual Machine.
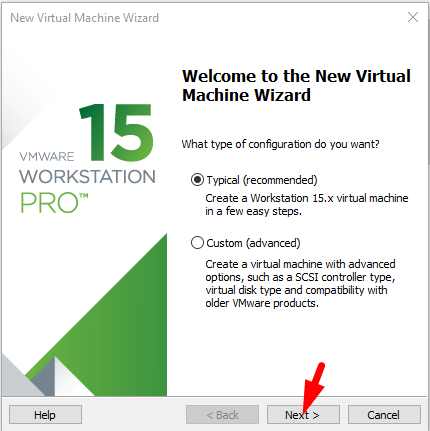
#2. after that, you will see the welcome page then in here you have two options, you can go with any of this options but I recommend you to go with Typical option and click the Next button.
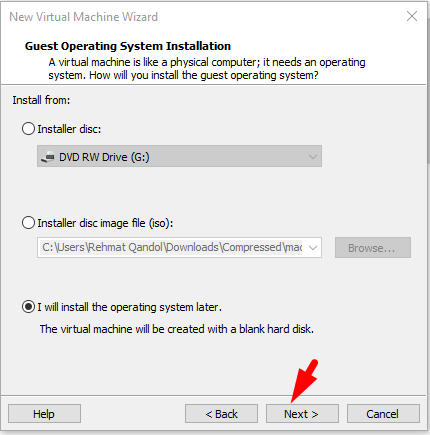
#3. in the Guest Operating System you have three options and you have to with the late option which is I will Install The Operating System Later and click the Next button.
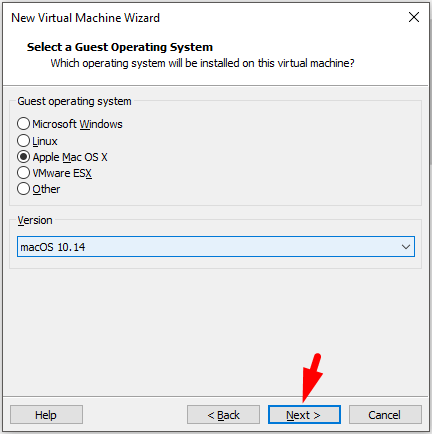
#4. in this step, you have to Select Guest Operating System so for Guest OS select Apple Mac OS X and for its versions select MacOS 10.14 and click the Next button.
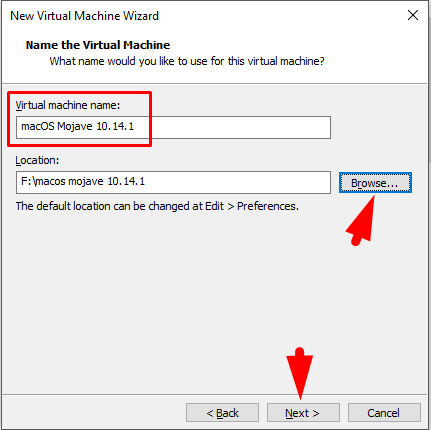
#5. Here, give a proper name to the new Virtual Machine and besides that, if you want to change the VM location then simply click the Browse button and set the new path. then click the Next button.
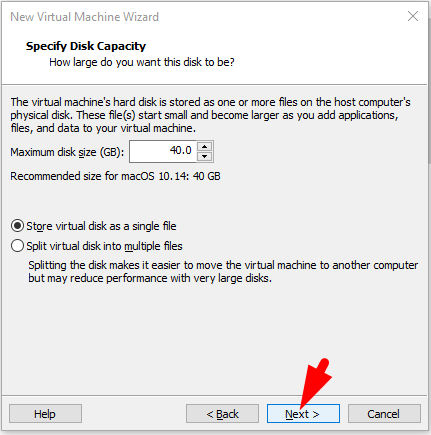
#6. In this Step, give 40GB for Disk Capacity and select Store Virtual Disk As A Single File then click the Next. after that, click the Finish button.
Step 4. Customize the Virtual Machine
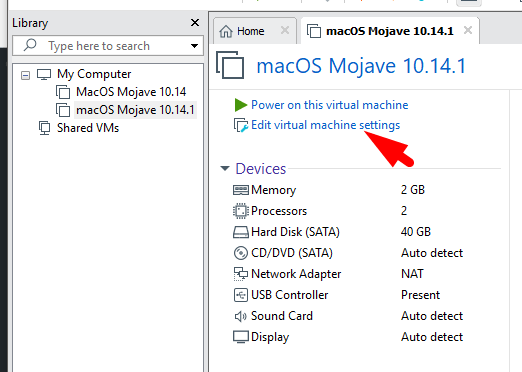
#1. After creating a new Virtual Machine then you need to customize it. So, for that click the Edit Virtual machine Settings.
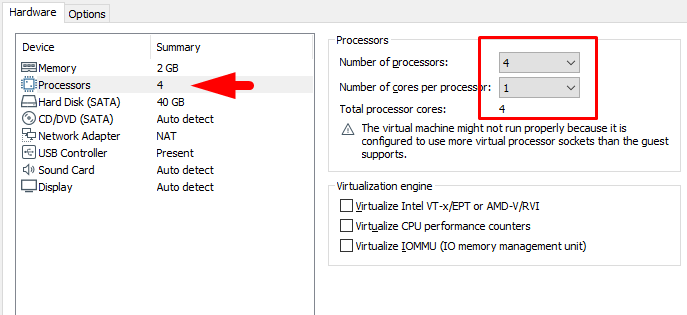
#2. In here, select Processor and increase the number of Processor up to 4.
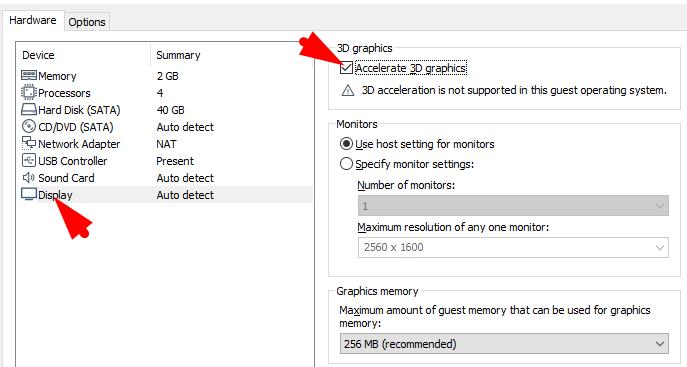
#3. After that, go to Display setting and select 3D Graphics.
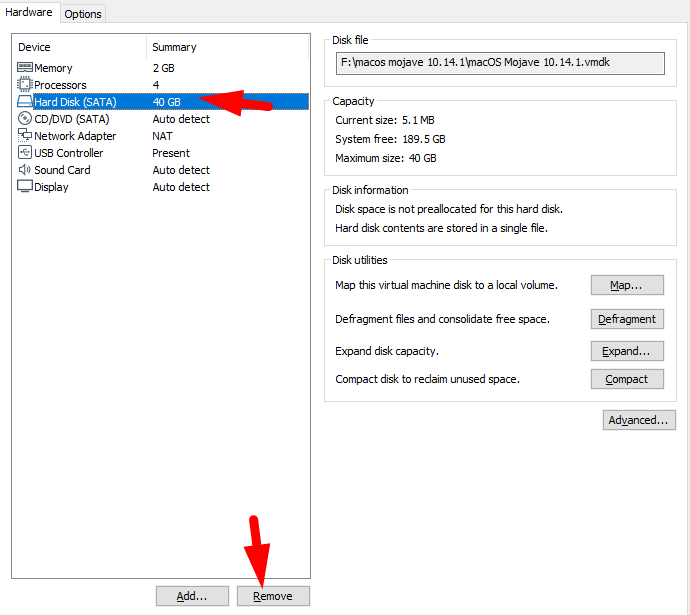
#4. Now select the Hard Disk Option and remove it now. it will remove the hard disk that you created when creating Virtual Machine, after that, click the Add button.
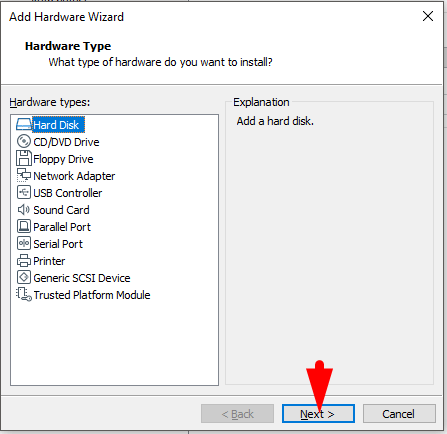
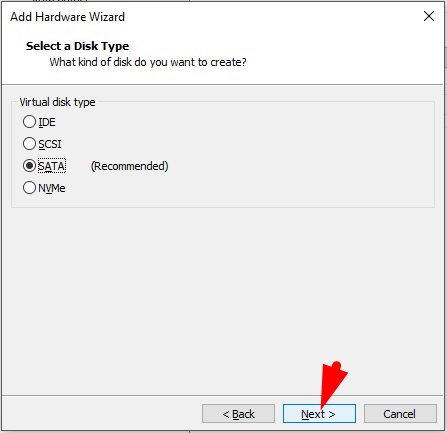
#5. So here you need to Add a new Hard Disk / MacOS Mojave VMDK File. therefore, choose Hard Disk then click the Next button. after that, select SATA for Hard Disk and click the Next button.
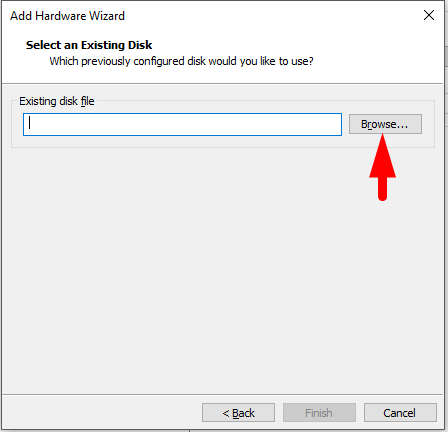
#6. In this Step, it will ask you to Select A Disk, So, here you will see three options and you have to select the second option which is Use an Existing Virtual Disk then click the Next button,
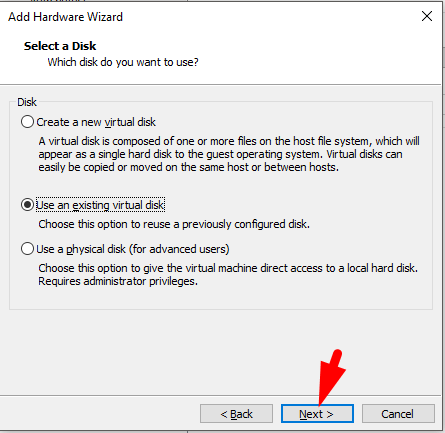
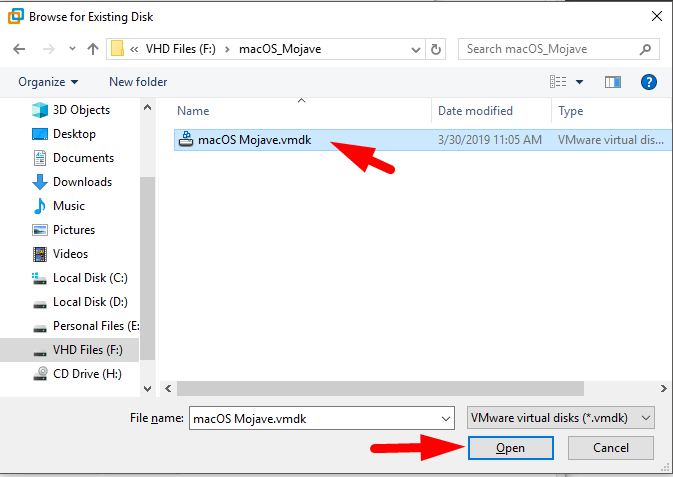
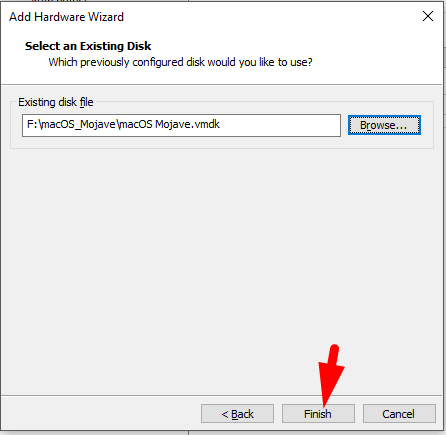
#7. In the last step, Verify the MacOS Mojave 10.14.1 VMDK file. Therefore, to add MacOS Mojave 10.14.1 click the Browse button and find the VMDK file that you extracted before. then while you find it then Open it and click the Finish and Click the Ok button.
How to Install Lubuntu on Virtualbox on Windows How to Install Manjaro Linux on Virtualbox on Windows How to Install Zorin OS on Virtualbox on Windows How to Install Ubuntu 18.10 on Virtualbox on Windows
Step 5. Edit VMX File
The VMX file is the configuration of the VMware Virtual Machine and it needs to be edited in order to make it compatible with windows. to edit it follow the below instructions.
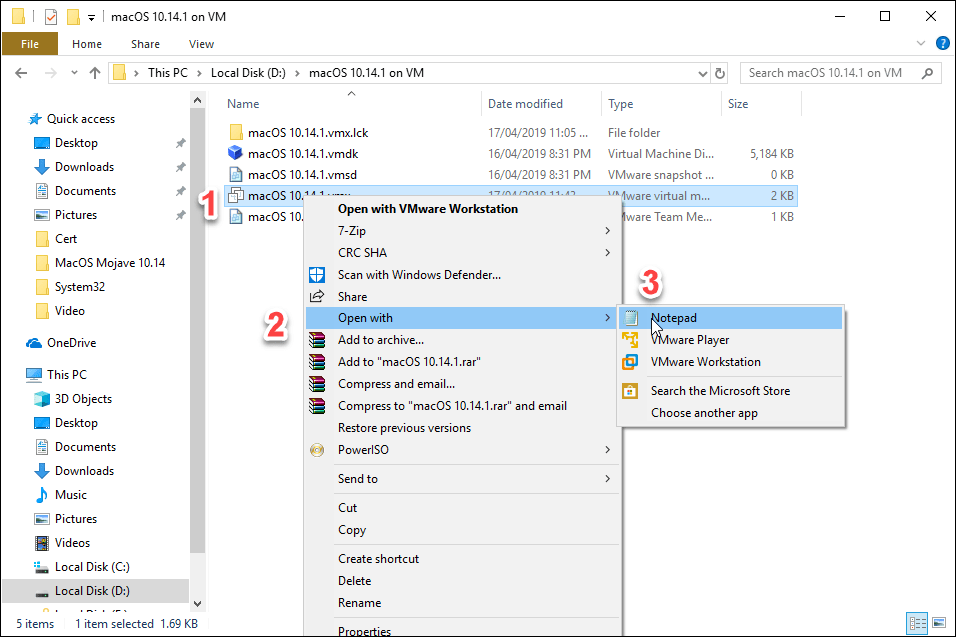
#1. Go to the Virtual Machine directory where you saved the image of the created Virtual Machine. then, right click on the VMX file and open it with any third party application.
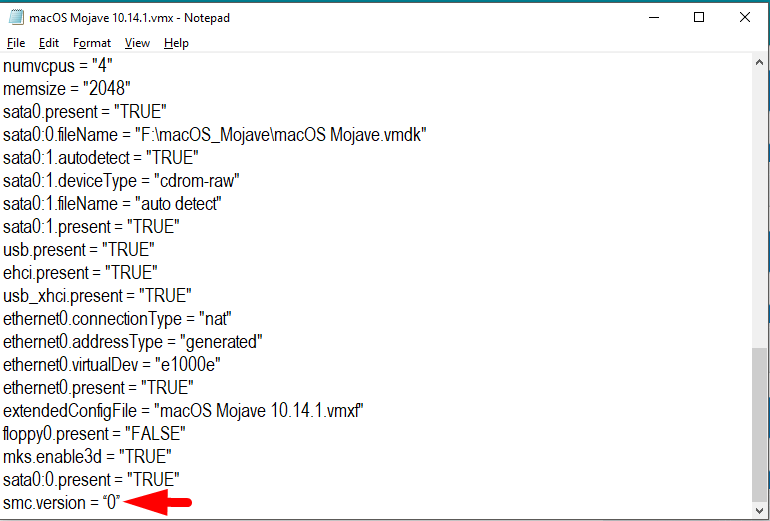
#2. Scroll down and add this code smc.version = “0” on the last line then save the changes with Ctrl+S.
Step 6. Install MacOS Mojave 10.14.1 on VMware
Now you can install MacOS Mojave 10.14.1 on Vmware because every step we did and it is ready to go. so simply Power On the Created Virtual Machine.
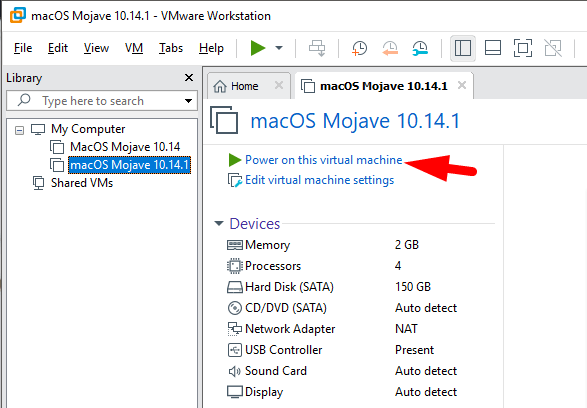
Now, wait for a while till the time MacOS Mojave 10.14.1 will be installed.
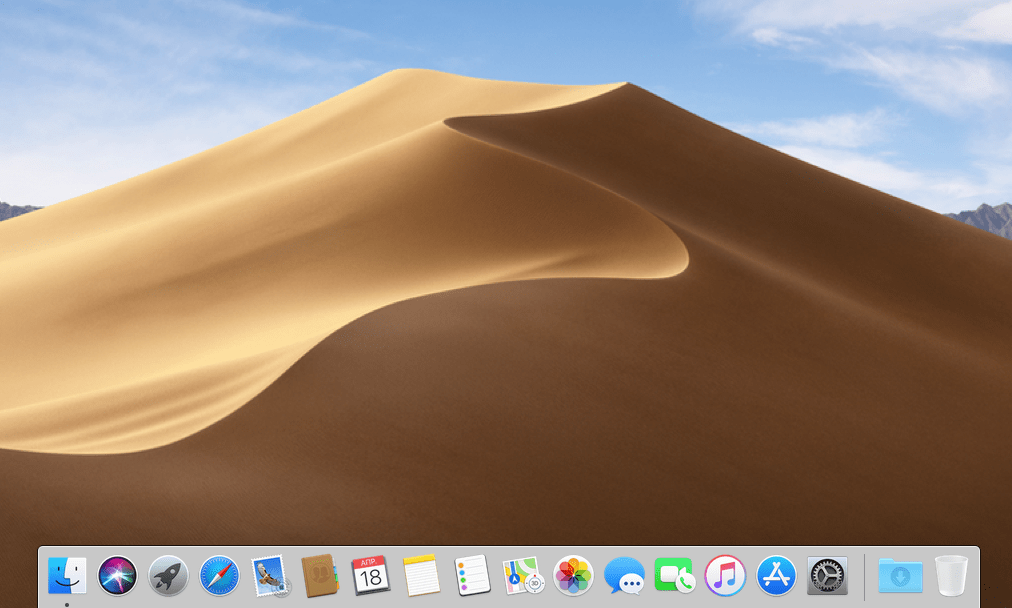
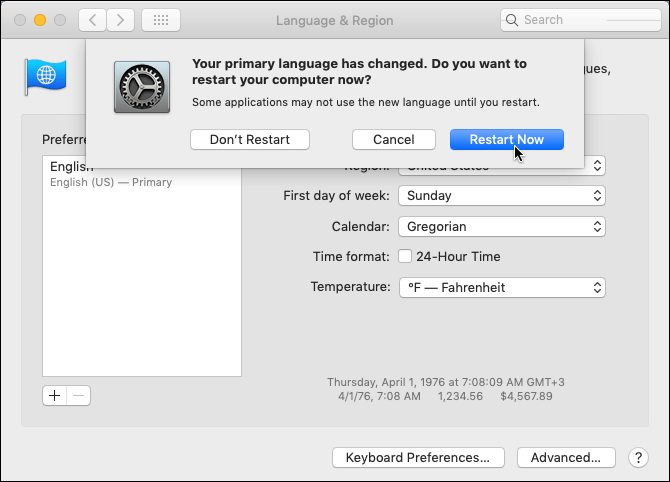
Step 7. Change the System Language
When the MacOS Mojave 10.14.1 installed on Vmware, So if you have another Language rather than English then you can change it with some steps. Therefore, change the region and Language with the following steps.
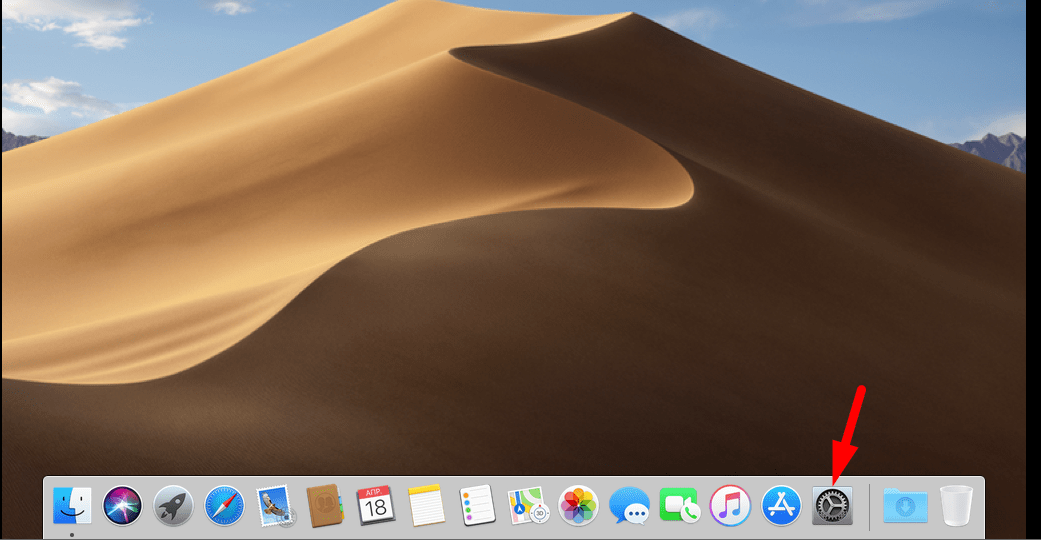
#1. Go to System Preference.
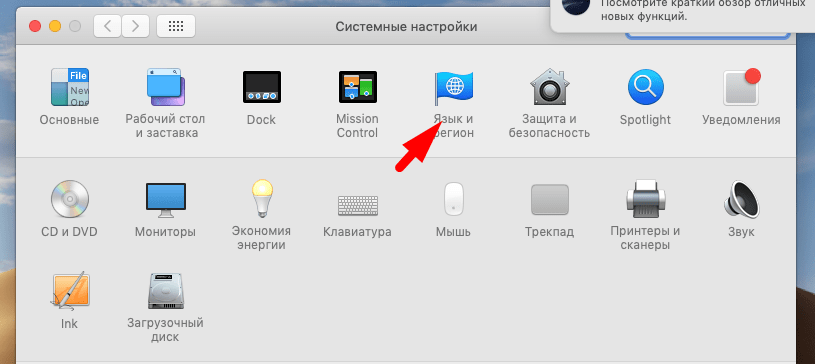
#2. after that, click on the Language and region icon in order to change the Langauge.
#3. In here, simply click the + and select your preferred Language and Region.
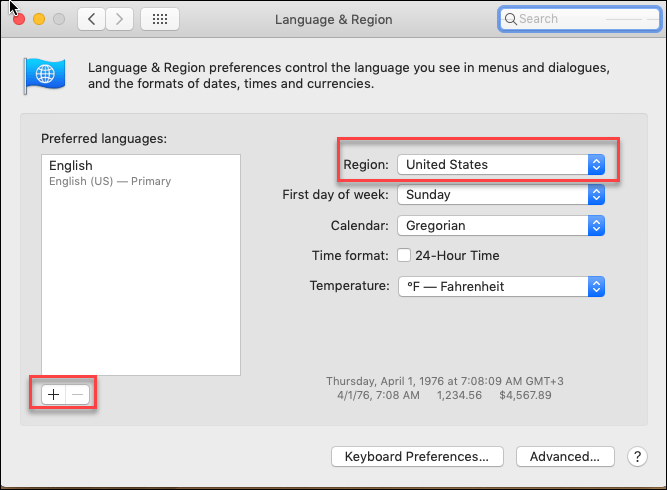
#4. after that, it will ask you to restart the system in order to save everything.
Video Guide:
Conclusion
This is all about the installation of MacOS Mojave, as I told you about How to Install MacOS Mojave 10.14.1 on VMware on Windows. However, all the steps are simple and easy but again if you get any question then feel free to ask me.

