No doubt macOS Big Sur is the latest and powerful Apple operating system having +85 features that are handy for Mac users. Though the previous Macintosh operating systems like macOS Mojave and macOS Catalina has been in high demand and installed by thousands of Mac and Windows users. Take heed, whenever Apple releases any new operating system, Then, you have several options to check it out and get the Apple OS experience. On other hand, you have tested and installed macOS Catalina on several systems. Therefore, you can do the same procedure with macOS Big Sur. Thus we are going to install macOS Big Sur on Acer Laptop.
Apple introduced macOS Big Sur on 22nd June 2020 at WWDC (World Wide Developer Conference). The current macOS Big Sur has incredible features like better experience, Control Center, Notification Center, Safari update, Updates in Messages and Maps, and many more. There are tons of features that make your work easy and can be useful for you.
After releasing macOS Big Sur, Apple kicked off the macOS Big Sur installer file to install the macOS Big Sur on certain platforms. So far, macOS Big Sur is in Public Beta mode and we hope the stable and final version will be released in September or October of this year. For now, you will see several bugs while installing or using macOS Big Sur. Don’t worry, Apple is working to fix the issues and in each update of macOS Big Sur, Apple fixes the bugs and improves the macOS Big Sur.
Until this moment, you have installed macOS Big Sur on several platforms like installing on PC-Hackintosh, Mac Laptop, AMD Ryzen PC, and installing on virtual machines such as Virtualbox, VMware Workstation, and Vmware Fusion. You can install macOS Big Sur on certain systems that you installed macOS Catalina. Till now, you get the experience on how to install macOS Big Sur on Mac or on Virtual Machines. Therefore, in this article, we are going to install macOS Big Sur on Acer Laptop.
Here are my Acer Laptop system Specifications
- LAPTOP: Acer Aspire ES572-38KV
- CPU: Intel Core i3 6006U (2.0GHz) LGA 1356
- RAM: 4 GB DDR4 2400MHz
- GRAPHICS: Intel HD Graphics 520
- WiFi and BT: Intel Dual Band 9750
- AUDIO: Realtek ALC235
- SSD: GIGABYTE 240GB 6GB/s
- macOS VERSION: 11.0
- SMBIOS: 13,1
- SYSTEM DEFINITION: MacBook Pro (13-inch, 2016, Two Thunderbolt 3 ports)
Required Files to Install macOS Big Sur
- macOS Big Sur Installer (Download macOS Big Sur Via Developer Account or direct link)
- Download Command Line
- Download OpenCore Configurator
- 16GB USB
- Download EFI Partition
Step 1: Create macOS Big Sur Installer USB
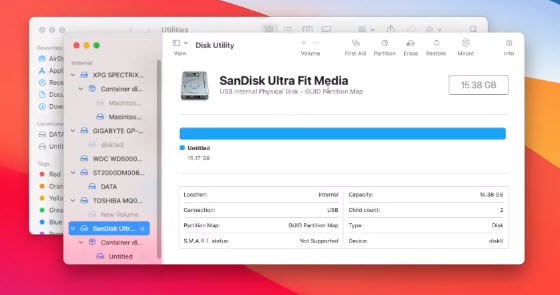
The first step is to create a bootable USB for macOS Big Sur in order to install on Acer laptop. Therefore, plug the USB and open Disk Utility to erase the USB.
On Disk Utility, Select your USB from the sidebar and tap on the Erase option from the top menu bar to completely erase the USB flash drive.
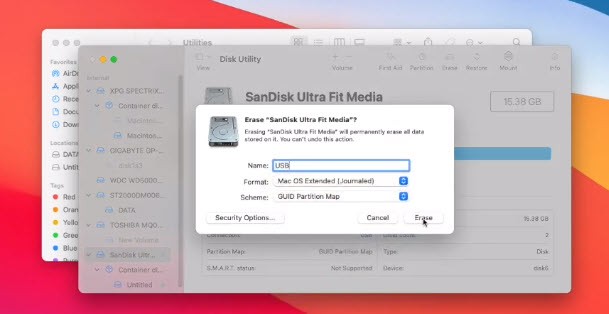
Remember, erasing the USB flash drive will delete all data stored on it. Make sure you have a backup of your flash drive. Now, follow the below parameters.
- Name: USB
- Format: Mac OS Extended (Journaled)
- Scheme: GUID Partition Map
After that, click on the Erase button and wait for a while to erase the flash drive. Later on, tap on the Done button and close the Disk Utility and utilities window.
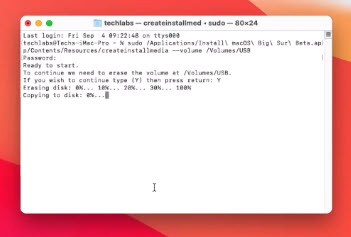
Now, go to Spotlight and search for Terminal and open it. Then, copy the below command line or copy the command from the downloaded file and paste it on Terminal and press the Enter key. Afterward, type your password and press the Y key to confirm. Now, wait for some minutes to create the bootable USB drive for macOS Big Sur.
sudo /Applications/Install\ macOS\ Beta.app/Contents/Resources/createinstallmedia --volume /Volumes/macOSInstaller --nointeraction
- Related Article: How to Create macOS Big Sur Bootable USB
Step 2: Mount EFI Partition
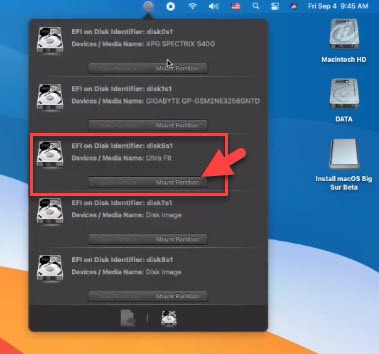
Here you have created a bootable USB flash drive for macOS Big Sur successfully. Now, you need to mount EFI partition, though you should download the OpenCore Configurator and EFI partition from the required file section. So to mount EFI partition follow the below steps.
Open the Core Configurator that you downloaded from this article and mount EFI partition of your USB. Then, close the OpenCore Configurator.
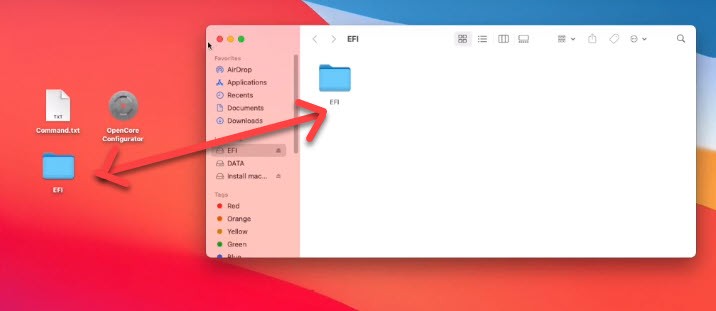
Afterward, copy the EFI folder that you downloaded from this article and paste it to USB EFI Partition. Then, close the USB EFI Partition Window.
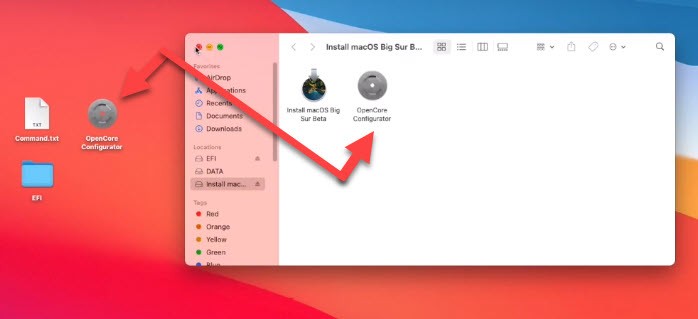
At last, copy OpenCore Configurator and paste it to macOS Big Sur bootable USB flash drive.
Now, Eject EFI partition and USB flash drive.
Step 3: Customize BIOS Settings
Now, we are ready to install macOS Big Sur on Acer Laptop. Therefore, restart your Acer laptop and press f2 to enter the BIOS settings.
Before customizing the BIOS settings, you have to restore the default settings of your BIOS. Therefore, tap on the Exit menu and click on Load Setup Defaults > Yes. Then, go to Exit Saving Changes and click on the yes option. Now the changes will be saved and your laptop will restart again. So, again press the f2 key to enter the BIOS Settings.
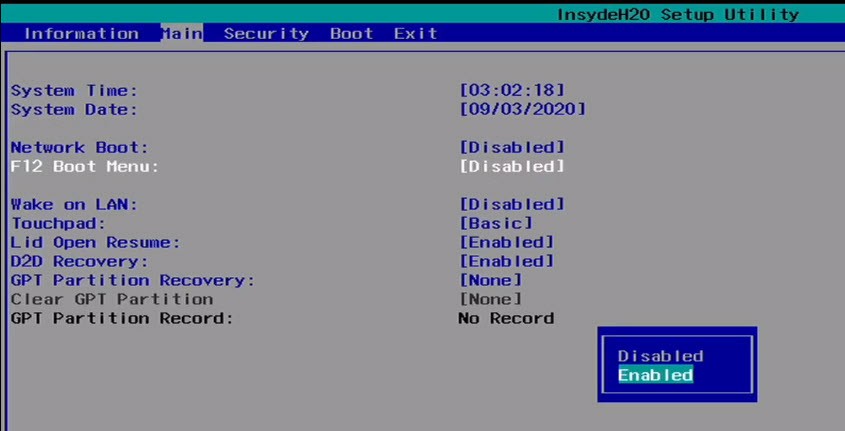
Once you come back to BIOS settings then tap on the Main menu and click on F12 Boot menu and Enabled it.
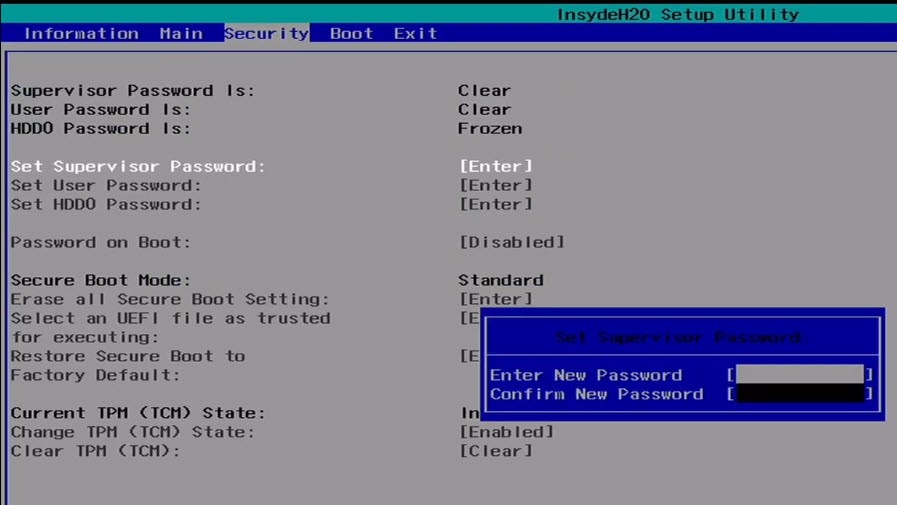
Then, go to the Security option and tap on Set Supervisor Password and enter a new password and Continue.
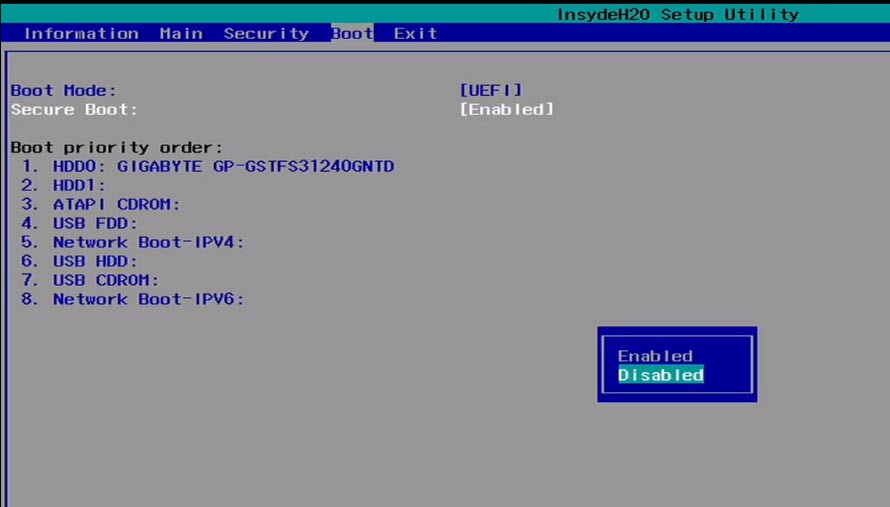
Go to the Boot option and tap on Secure Boot and Disable it.
Finally, go to Exit tap and exit the BIOS changes to save all the changes you made.
Step 4: Install macOS Big Sur on Acer laptop
Here, you are ready to continue the macOS Big Sur installation on the Acer laptop. though you have customized the BIOS settings for macOS Big Sur. Therefore, restart your Laptop and plug the bootable USB of macOS Big Sur and go to the Boot menu. Now, select the macOS Big Sur bootable USB and press enter.
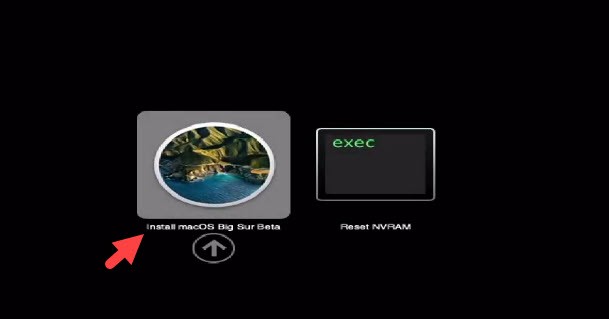
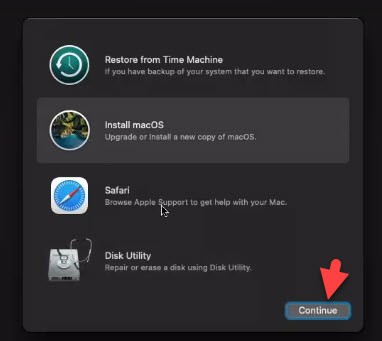
Here, you will see the Install macOS Big Sur Beta option. So, click on the Install macOS Big Sur Beta.
Wait for a while to boot macOS Big Sur as you see the Apple logo is on the process. After that, select your Language and continue.

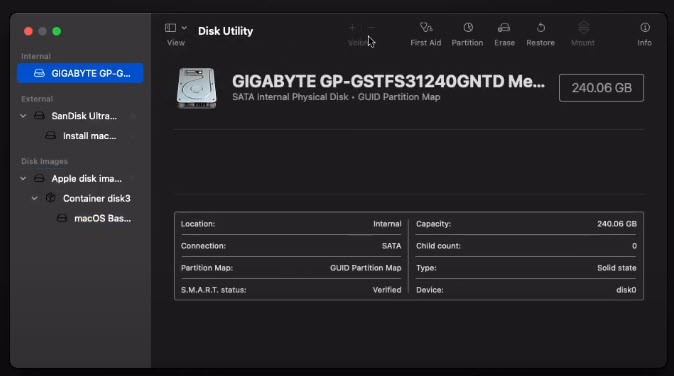
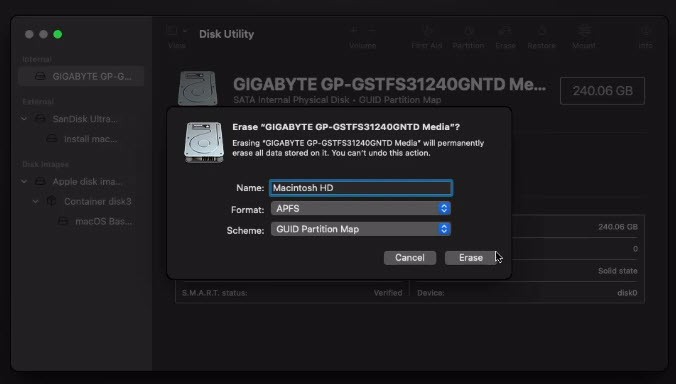
After that, select Disk Utility and select the USB Drive from the left side of the window. Then, click on the Erase option from the top menu.
Now follow the below parameters
- Name: Macintosh HD
- Format: APFS
- Scheme: GUID Partition Map
Then, click the Erase button and wait for a while to completely erase the USB drive. Afterward, click on the Done and close Disk Utility.
Now, click on Install macOS and Continue
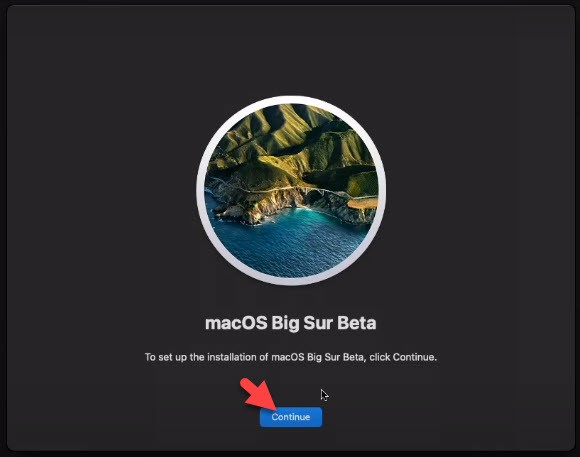
Click to continue to set up the macOS Big Sur installation.
Then, Agree to the software license agreement.
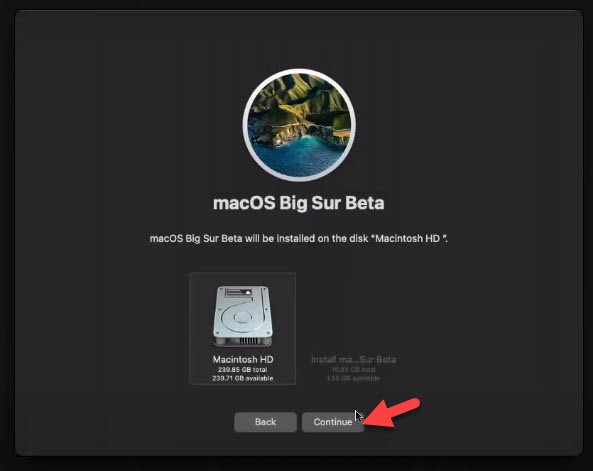
Now, select the Disk to install the macOS Big Sur and continue.
Wait for a while to complete the installation, remember, your laptop will restart several times during the installation. So, don’t worry about that and have a patient.
Step 5: Complete the installation
While we booted to macOS Big Sur then complete the installation instructions using the below steps.
- Select your Country and Continue.
- On Written and Spoken languages click continue.
- On Accessibility click Not Now.
- Select the last option “My Computer does not connect to the Internet” and continue.
- On Data and privacy click continue.
- On Migration Assistant click Not Now.
- Agree to the terms and conditions.
- Now create a new account for macOS Big Sur with the following parameters
Type Full Name
Account Name
Password and verify password
Type Password Hint
once you are done then continue. - On Express Set Up click Continue.
- Continue on Analytics.
- Click continue on Screen time.
- On Siri click continue.
- Select your language for Siri and continue.
- Select Not Now for Improve Siri & Dictation and continue.
- Here, select a theme for your macOS Big Sur as you have a Light theme, Dark theme, and Auto theme.
Finally, you have installed macOS Big Sur on Acer Laptop using the above steps successfully. Now, you check all the features and improvements of macOS Big Sur.
Step 6: Copy OpenCore Configurator and EFI
- Open the bootable USB and copy the OpenCore Configurator and paste it to your Desktop. Then, close the folder.
- Now, open Core Configurator and mount the EFI Partition of both USB and System Drive. Then, close the folder.
- After that, open the EFI partition of USB and copy the EFI folder and paste it to the EFI system drive. By doing this step you will easily able to boot directly without USB.
- Then, eject both EFI partitions and USB flash drive.
Now restart your macOS Big Sur and check all the hardware whether it is working or no.
Read Next:
- How to Install macOS Big Sur on Mac Laptop
- 3 Ways to install macOS Big Sur on Windows 10 PC
- Best Printers for macOS Big Sur
- How to Install macOS Big Sur on PC-Hackintosh
- How to Install macOS Big Sur on Unsupported Mac
Conclusion
The above method is quite easy to install macOS Big Sur on Acer Laptop. We have explained each and everything to help you with the installation of macOS Big Sur. In case, you have any type of questions or suggestions then feel free to ask me in the comment section.