About this review: You don’t have to wait for your files to get lost from your iOS device. Check out how to solve the problem immediately with this FoneDog iOS Data Recovery review.
It can be very stressful knowing that your iOS device is inches away from suffering from data loss. This is especially true for those that’s been using the same iOS device for quite a long time. While there’s nothing you can do about completely preventing data loss, you can at least prepare for the worst. That is where a data recovery software comes in.
This FoneDog iOS Data Recovery review will show you a complete guide to FoneDog iOS Data Recovery, and hopefully, it will convince you to get the software as part of your contingency plan for data loss. Let’s begin by taking a look at an overview of the software.
FoneDog iOS Data Recovery Review: Overview
FoneDog iOS Data Recovery is a software designed by the FoneDog group as part of the FoneDog iOS Toolkit Suite. It was made to be a quick and simple way to recover files from iOS devices. While it may seem like your typical iOS data recovery software, it is a bit better since it supports the recovery of files from third-party apps like Viber, Line, Kik, and such.
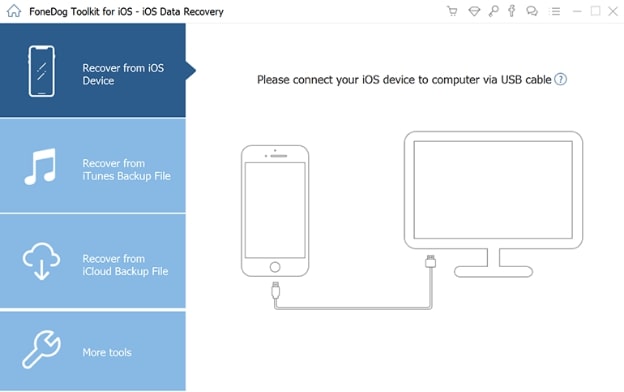
Recover From iOS
FoneDog iOS Data Recovery: Functions
The first thing that one has to look for when checking out FoneDog iOS Data Recovery reviews is if it is any different from run-in-the-mill tools. Fortunately for you, when it comes to functionality, FoneDog iOS Data Recovery is the best there is.
To begin with, there are three functions of FoneDog iOS Data Recovery, all of which involve three different recovery methods.
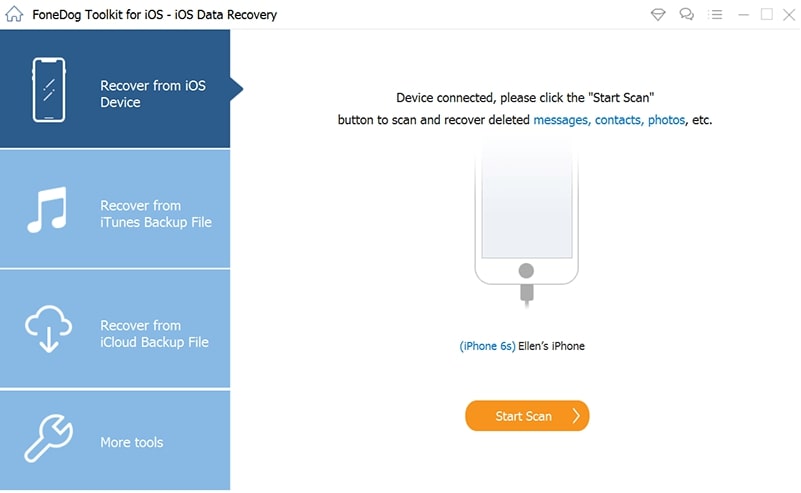
The first one and perhaps the most straightforward method is when you Recover from iDevice Directly. This involves connecting the device directly to the PC and recovering through it.
Start Scan Now
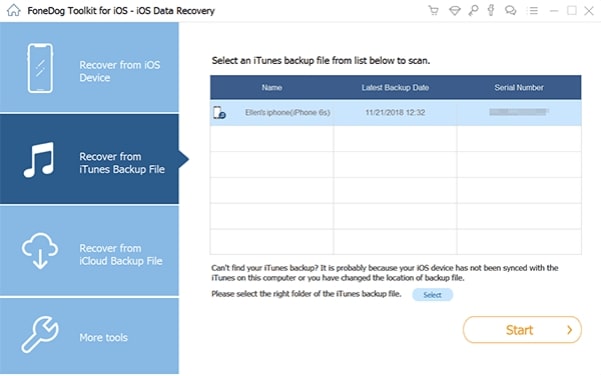
The second one is to Recover from iTunes Backup. As the name suggests, you will make use of iTunes backups that were prepared beforehand to recover files.
Select iTunes Backup
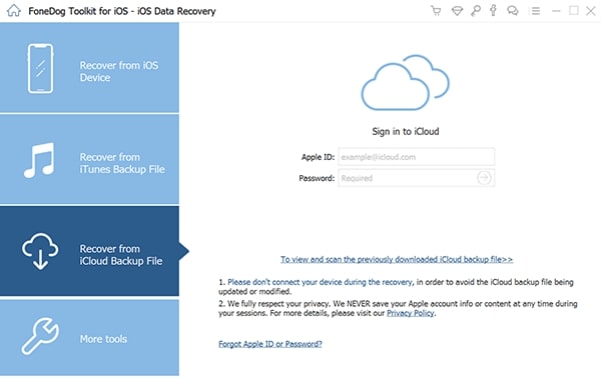
The third one, Recover from iCloud Backup, is very similar to the second one in the way that you’ll have to access backups created from iCloud to recover files. The only difference is you have to have an iCloud account.
Recover Data from iCloud
Simply put, with these three available methods, it would be more difficult to fail in recovery than to succeed. Hence, you will find that most FoneDog iOS Data Recovery reviews refer to the software as a very versatile tool.
FoneDog iOS Data Recovery: File Types
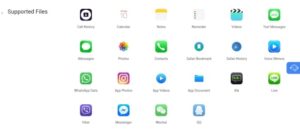
The next thing you should know about FoneDog iOS Data Recovery is whether it is capable of recovering the filesthat you want to recover. Fortunately, the tool supports most file types available out there.
FoneDog Recover Different Files
As you can see, FoneDog iOS Data Recovery is a tool that focuses on recovering files from third-party apps such as Messenger, Wechat, QQ, Viber, and many more.
While some very specific file types are not included in the list, we suggest that you try it out for yourself. This is mainly because we found that some rather unknown file types were still recovered by the tool regardless of whether it was indicated in the list of Supported Files.
FoneDog iOS Data Recovery: Performance
As we tried out FoneDog iOS Data Recovery, we’ve noticed that it’s not lacking in performance either. After all, it’s not very demanding on your system requirements in the first place. With that being said, it’s only natural to run smoothly regardless of your device. Nevertheless, here’s a look at the minimum requirements of running the software:
Windows XP or later versions
MacOS 10.7 or later versions
512 MB of RAM or higher
1 GB of disk space or higher
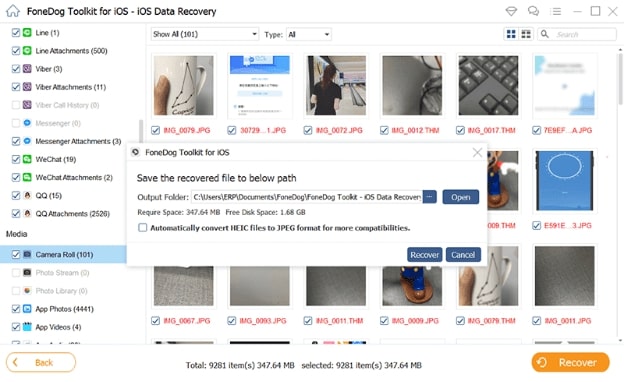
With these requirements satisfied, FoneDog iOS Data Recovery was able to run without any problems. As for the particulars, it was able to recover 1GB worth of files within 30 minutes. It may not be as fast as others, but since it doesn’t consume too much of your computer’s resources, it’s very understandable.
FoneDog Recovery Performance
FoneDog iOS Data Recovery: Support
If you are not very sure how to use FoneDog iOS Data Recovery, or what it is for that matter, you can always rely on customer support. That’s the first solution you should come up with when trying out a new software.
However, it doesn’t always go as planned. After all, some companies doesn’t have a solid customer support quality. With that said, most of the FoneDog iOS Data Recovery reviews out there can be the testimony to FoneDog’s customer support.
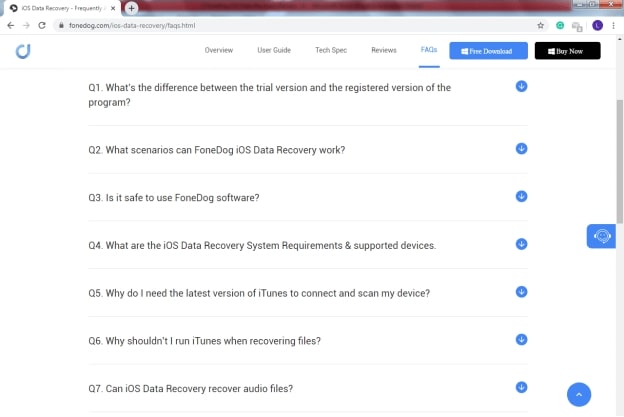
FoneDog Data Recovery Support
In terms of documentation, there is an FAQ page dedicated to FoneDog iOS Data Recovery. On top of this, you may also contact their support staff in case you don’t find the answers to your questions on the said page.
FoneDog iOS Data Recovery: Pricing
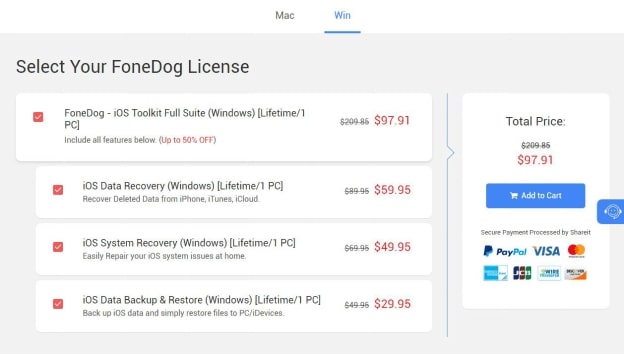
FoneDog iOS Data Recovery offers two paid plans. The cheaper one, which costs $59.95, requires you to buy the whole iOS Toolkit Full Suite for $97.91 which consists of iOS System Recovery, iOS Data Backup and Restore, and iOS Data Recovery. Technically, it is cheaper in this package.
On the other hand, if you don’t plan on buying additional tools, you can opt for a separate package with a price of $89.95.
Select FoneDog License
To summarize, FoneDog iOS Data Recovery is a bit expensive compared to other data recovery tools. However, if you choose the right plan, you will be able to maximize the value that you get with your money.
FoneDog iOS Data Recovery: Final Verdict
When it comes to iOS data recovery, FoneDog iOS Data Recovery is full of features. The interface design is neat and the process is easy enough to be understood by beginners. It can perform smoothly regardless of your device. Most importantly, you can recover files on most occasions, since it supports most file types.
Basically, there’s nothing to complain about, except maybe the price that can be a bit excessive for some users. However, it still depends on whether you can take advantage of the plans that are readily available to you.
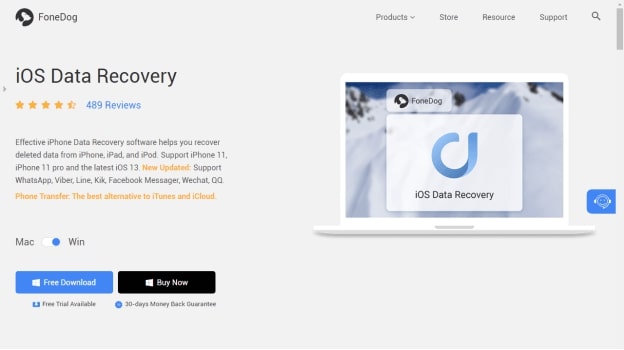
FoneDog iOS Data Recovery Webpage
Overall, the tool was made for those that are really dedicated to recovering data. Otherwise, you might think that it is too excessive for the value that it provides. So if you don’t want to end up like those that write negative FoneDog iOS Data Recovery reviews, we suggest finding out if it’s really for you in the first place.
It’s not every day that you get the chance to encounter data loss. But that doesn’t mean you won’t be facing such an issue in the near future. Although we don’t have a way to guarantee the complete removal of that possibility, you can at least prepare for it. That’s why we recommend using a third-party data recovery software.
This FoneDog iOS Data Recovery review should give you the particulars as to what advantages you will get when you use such software. Better yet, it may even help you understand how data management works.
Still using USB charging cable for your phone? have you heard about the wireless chargers that charge your phone faster than USB cable? Even you will be free of wire around your phone and plugging the cable to charge the mobile. However, there are multiple best fast wireless charger for any iPhone versions. But, you don’t need to worry about which wireless charger is the top in the market for iPhone mobiles. Although we have research and find out the top and standard wireless charger for your iPhone.
Before moving on, you have to know, is your iPhone supports wireless charger or is your iPhone has that feature. The oldest iPhone version doesn’t have wireless charging features, As Apple added a wireless charging feature since 2017 on every iPhone version. It means, the wireless charger begins with the iPhone 8, iPhone X, iPhone XS, iPhone XR, iPhone 11, and even iPhone 11 pro. The mentioned iPhones are the latest Apple device and if you have one of this iPhone then you can choose one of your favorite wireless chargers and purchase right now.
However, finding the best wireless charger is not as easy as drinking water. Though many smartphones support the Qi wireless charging standard and wireless charger has become in demand and more capable and affordable. You might think, why we should purchase a wireless charger and put USB cable to the side. There are several pros to use wireless charger rather than a USB cable, you simply place your iPhone on a wireless charging mat or stand and your phone starts receiving power.
In 2020, the phones that support wireless charger becomes more affordable such as iPhone SE the new iPhone device comes with wireless charging feature. Moreover, some Android phones support wireless charger like Samsung Galaxy S10 series, Samsung Galaxy Note 9, Samsung Galaxy S9 series, LG G8 ThinQ, Nokia 9, and many other Android phones. So, let’s check the best wireless charging for iPhones.
What are the Best Fast Wireless Charger for iPhone?
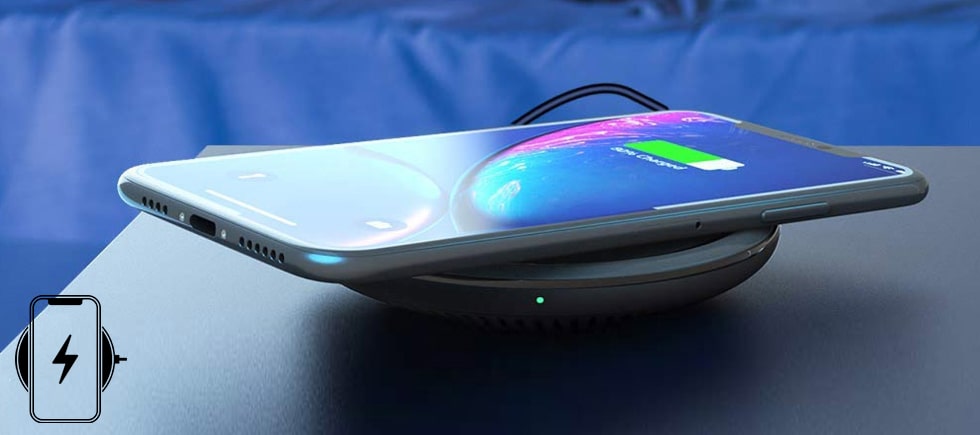
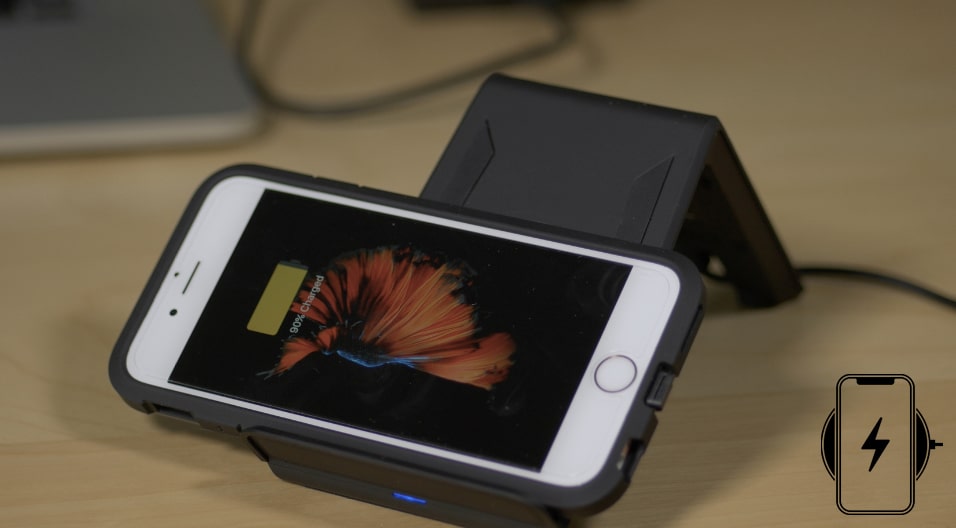
There are three varieties of wireless chargers called stands, pads, and multi-device chargers. Well, the pads wireless charger is good to keep near to your bed table. However, stands make more sense when your iPhone has Face ID then at that time, stands is more comfortable than pads. You can easily unlock your iPhone while on the stands wireless charger.
Most of the people prefer stands wireless charger because you can read and use your iPhone while it charges. But, sometimes you want your phone to lie flat, then, you can’t do it wit stands wireless charger. For that option, pads wireless charger is handy than stands. However, pads are low-priced than stands wireless charger.
So, there are many stands, pads, and multi-device wireless charger. But, we have picked up the best and worthy wireless charger for your iPhones.
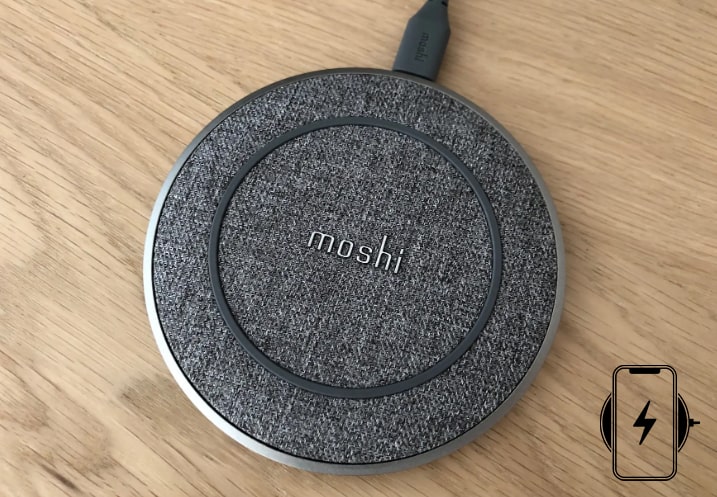
Here is the first wireless charger for your iPhone called Moshi Otto Q. However, you can see the picture and it looks like furniture. Although Moshi said, it’s inspired by Danish furniture. Well, the design and silver colors look awesome, and putting near to your bed or on the table just looks good.
Mostly the Moshi charger uses a USB-C cable for connection and Moshi Otto Q provides a USB-A to USB-C cable. You will get Moshi wireless charger around $40 which is affordable, but there won’t be a power adapter. What I think, you need to purchase its power adapter or use one of the USB-A power cable.
If you use the right power adapter with 9V output like most quick charger cable. Then, the pad wireless charger will support fast charging of 7.5W for your iPhone and 10W for your Android phones. The report says, Moshi Otto Q is one of the fastest wireless charger. So, this is the best option for you to purchase from the link above and charge your iPhone quickly.
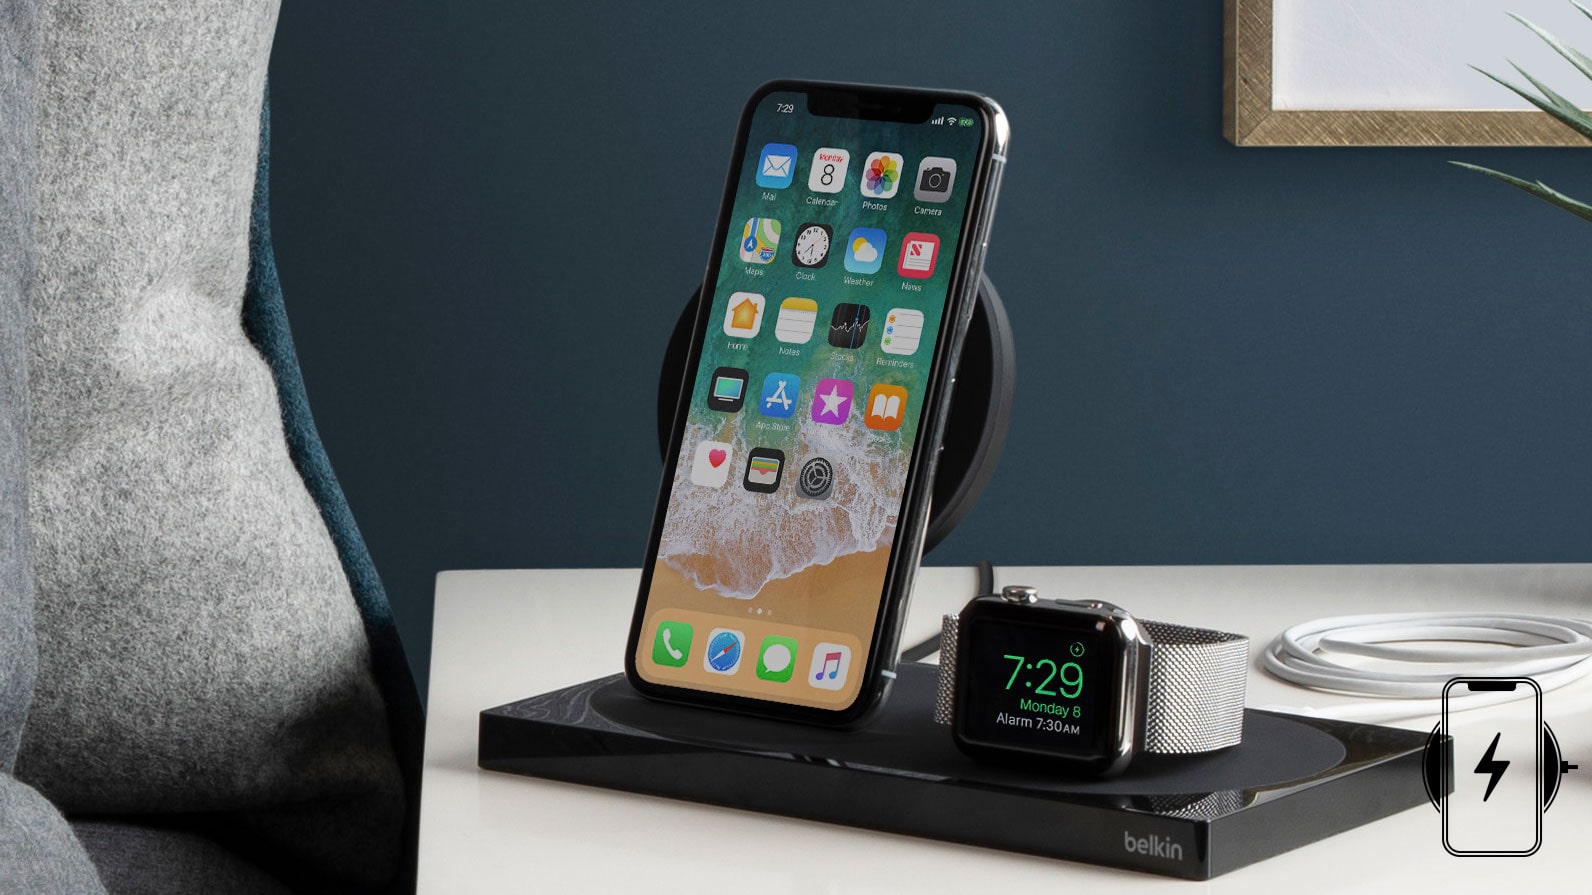
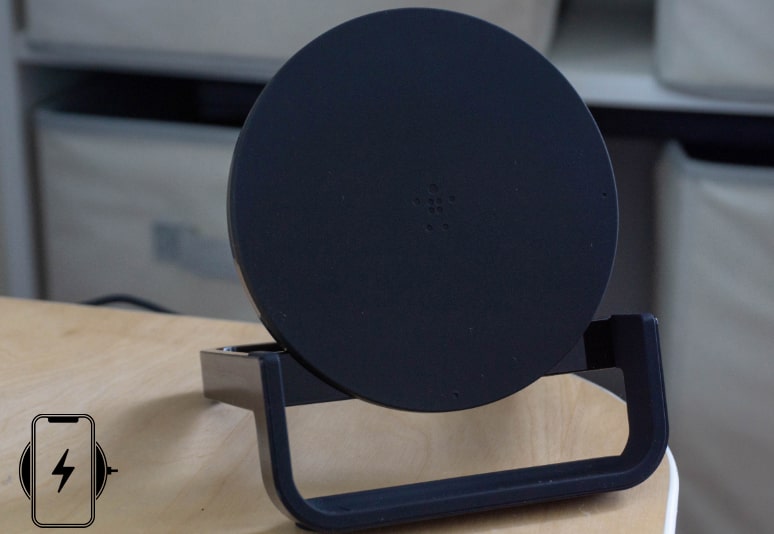
Belkin is in stock for both iPhone and Samsung devices, That’s no matter which device you have. But you can use it for charging your iPhone. However, Belkin boost up is wireless stands charger which is another positive point. It has 10W of power with 3.88 pounds weight and 4.3 x 3.9 x 3.9 inches dimension. Belkin will charge your iPhone up to 7.5W and will charge your Samsung up to 9W.
The best thing, Belkin can charge your phone including case up to 3mm thick. It means, you don’t need to worry about your phone case.
The design allows you to charge your phone in portrait or landscape mode. This is the best feature that you can use your phone while charging. What I like about Belkin wireless charger is, it has LED indicator light for letting you know the device is in charge or Belkin is charging. Besides that, A foreign-object-detection features will know if the phone is in charge or no.
You will get Belkin in two colors black and white. So, choose your favorite color and purchase right now.
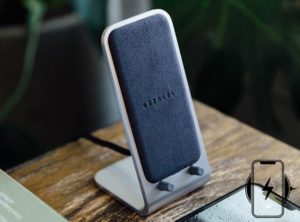
This awesome looks stand wireless charger is suitable for your iPhone or Samsung. However, you can use it if you have the latest Samsung android phones. The device has 10W power output with 221g weight and 6.12 x 3.25 x 2.75 dimension. Its made of aluminum with a soft suede panel to protect your iPhone. Besides that, the bottom is made of rubber that helps Bezalel Altair to not move around. This wireless charger will charge your iPhone quickly. You can place your phone portrait or landscape which is the extra positive point to use your phone while charging.
Bezalel Altair has an LED feature that will know when the phone is placed or the phone is in charge or no. When you place your phone then you will see a flashlight for a second. The flashlight will help you when you place your phone at night. Moreover, Altair can charge the phone that has cases up to 5mm thick. that no matter, if you have cases for protection, But you can charge your phone easily.
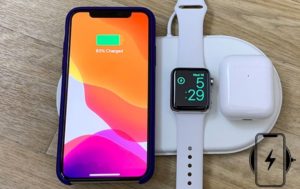
You might look for the charging pad that can charge your iPhone, Apple Watch, and Airpods at the same time at affordable prices. Yeah, Well it is better to have a multi-charging pad that provides wireless charging to our iPhone, watch, and Airpods. The above best fast wireless charger for the iPhone can only charge your mobile not AirPods or watch. Although some of them might work for watch and AirPods. Therefore, Mophie wireless charger allows you to charge you three devices at a time.
Mophie is so smart to manage the power delivered to each device with iOS notifications. So, mophie has this ability of 3-in-1 charger that other charger doesn’t have. The phone will be place on one side and the Airpods and Apple watch will place on the other side near to each other. The device have 7.5W charger power to charge your three device.
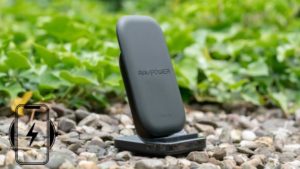
The recent RAVPower model is much batter than the previous wireless charger. You will see many new changes and improvements over the latest version. However, this version gots a sleek, unassuming design with a big rubberized pad to place your phone whether in portrait or landscape mode. This quality is great, you can use your phone while on charging. However, the angle is precipitous which makes us panic about Face ID lock screen. Whether it will work or no, for that, you can check it out.
The new charger can be used for Android and iPhone devices, each device has different voltage power. The charger supports 5W and 10W on android devices and 7.5W for iPhone devices. RAVPower’s latest version improved the cooling to keep the phone out of warm, this feature can slow down charging performance.
The problem you will face with a USB cable, as it is about 4 feet long which is difficult to reach the socket. it can reach if you put it on the desk. However, never think to use your phone while charging. Overall this charger is the best among all other chargers.
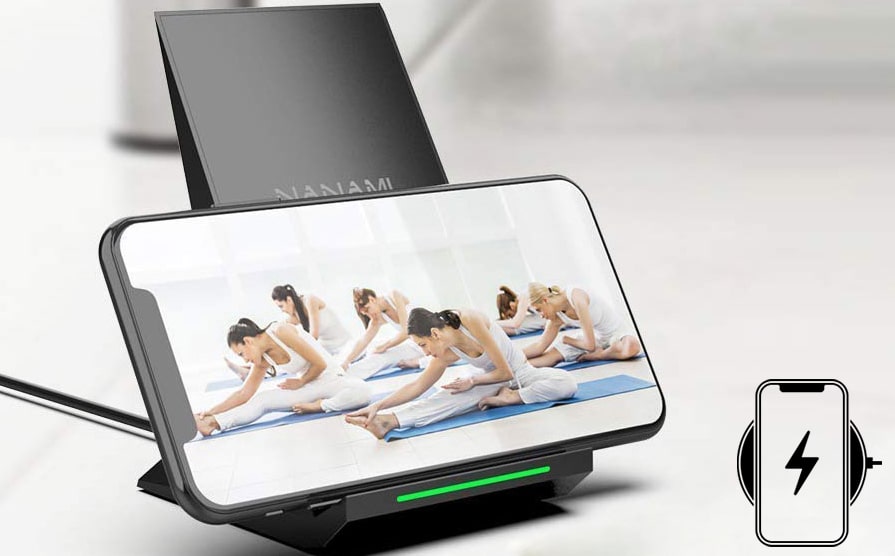
More wireless chargers are used for both devices iPhone and Android, If you have any of the wireless charger brand then you can charge your both devices. So, the same Nanami is the best fast wireless charger for any iPhone versions or Android. Nanami is one of the cheapest and quick power delivers that you are looking for and Nanami gives you cheap price and fast charging.
The Nanami supports 10W for Android and 7.5W for iPhone devices with 7.4 ounces and 5.3×3.9×2.8 inches dimension. However, Nanami is a stand wireless charger, therefore, you can charge your phone in landscape mode or portrait mode. Moreover, you can use your phone or streaming movies during charges.
Although Nanami can give a more quick charge of 2.0 if you purchase extra charges or above adapter to have fast charging. This charger has a safety assurance feature that doesn’t allow your phone to overcharge or overheat. This is sleep-friendly because of an LED indicator that will shut off automatically after 10 seconds. Finally, you will get Nanami quick charger under $15 of this date which is affordable for you.
Another best wireless pad charger for iPhone under $30 which is affordable and worth the money you paid. However, Anker wireless charger supports 7.5W for iPhone and 10W for Android phones. You have checked, several chargers support both devices which are extra benefits.
Well, using your iPhone during charges might be difficult because it is pad wireless charger, and the most easy you will feel yourself while charging your phone on wireless stand charger. But, pad charger has many positive points and Anker is one of your favorite chargers in 2020.
The Anker charging-indicator light will help you while you place your phone on the charger. But, the light is not too bright and it will be covered though it will be ok according to the price.
After you purchase the Spigen wireless charger then you yourself check the quality of the charger. Because this charger looks great and it has a beautiful design and you can easily place your phone. The Spigen stand wireless charger helps you to place your phone in landscape mode or portrait mode. Besides that, you can use your phone and you can unlock face ID easily.
The charger is made of aluminum and also chamfered, Then, you can see a protected non-slip rubberized grip on the top. Moreover, you will get a charging indicator with the charger and it has the best operates quietly. So, I think, Spigen is the best option for you to purchase it right now from the above link.
You might like this charger that has the best quality and design, Though it’s wireless stand charger that you will place your phone in portrait mode. Even you can use your phone, send messages, stream movies, and unlock face ID while charging.
Moreover, the charger comes with a 3feet USB cable and LED light that gives you the idea of your phone battery charges. However, the light is not too bright but you can see your phone battery status. Well, the USB cable is somehow short to reach the socket and you need to put the charger on the desk.
So, this is the best charger and suitable for those who want to use the phone during charges too. The price is affordable and the quality worth the money you paid.
The Fuse Chicken best quality charger and fast power deliver to the phone. However, it is made of aluminum with lightweight. So, you will see 4 rubber feet on the bottom to prevent the charger from slipping or sliding on the desk. Moreover, it has a blue LED light on the bottom to alert when the phone is on the charge. The Fuse Chicken charger supports 10W for every phone which is enough to charge the phone quickly.
The charger looks like an iPhone device though it is pad wireless charger and the iPhone 11 series can easily placed on the pad. However, if your phone has a case then again it’s ok the charger can charge with case. Although your phone should have a case otherwise this charger is not suitable for you. But you can purchase an extra $5 for the leather version of the charger.
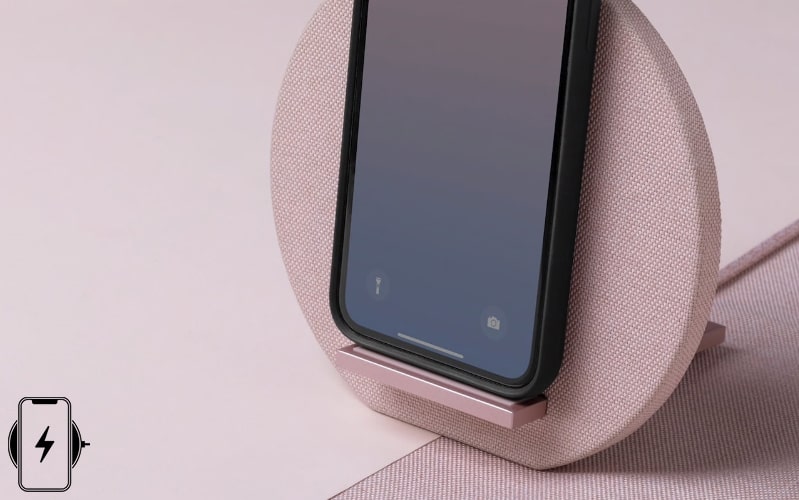
Our research finds out the native Union wireless charger best among all in 2020 with having unique style and design. The charger is a stand wireless charger with 6 different colors that look awesome. Such as Maruetry Rose, Rose, Marquetry Slate, Slate, Terrazzo Rose, and Terrazzo Slate.
The charger has a little plinth to raise your phone so you can easily use your phone, send messages, watch videos, and unlock face ID. This wireless charger supports 10W and you can place your phone in landscape mode or portrait mode. Native Union doesn’t have a wall adapter but you will get 6.5feet USB cable.
If your phone has cases then you don’t need to worry because the Native charger can charge phone cases up to 3mm thick. Moreover, the design provides a protection sensor to prevent overheating.
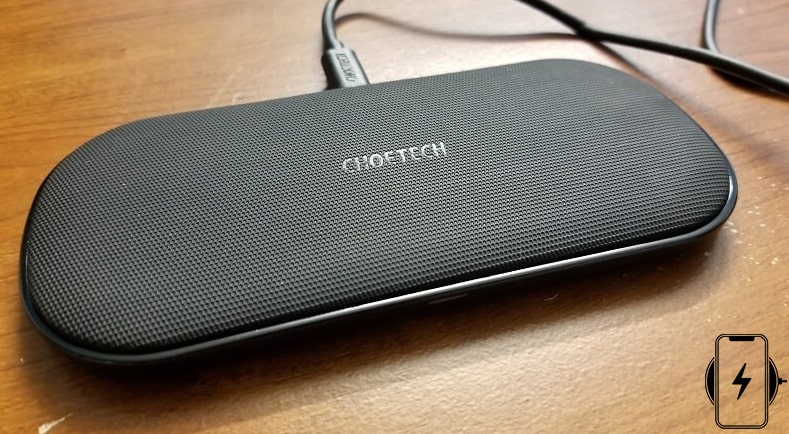
If you are curious to find a dual wireless charger that charges two phones simultaneously then Choetech Dual wireless charger is for you. Even you can charge your Airpods case too at the same time. The charger comes under $35 which is affordable and the best choice to pick up rather than other chargers. The low-cost will gives you a multi-device charger with 10W power, 6.6 ounces weight, and 4.8×3.9×3.6 inches dimension.
However, the charger supports 10W power output, But when you charge 2 devices then it comes with 18W QC 3.0 adapter. Moreover, the company give this product with 18 months warranty. So, why you are waiting, purchase this charger as it has several benefits.
Well, the Choetech charger is a bit larger than other chargers which not looks portable charger. The charger has leather on the top surface to prevent slipping or sliding the phone on the desk.
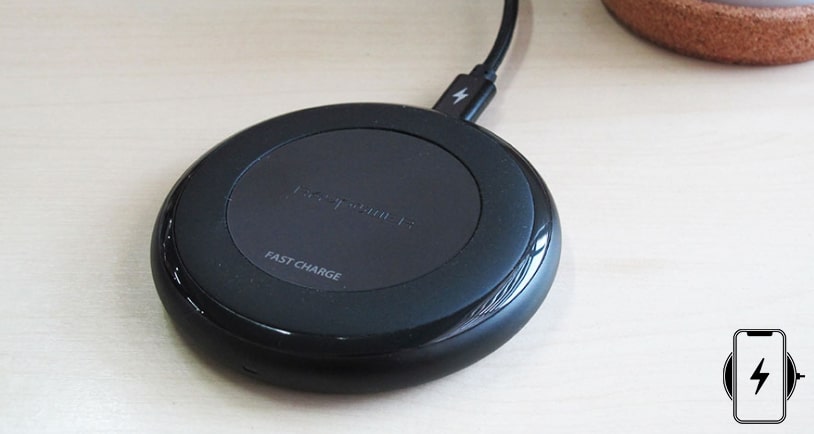
The RAVPower wireless chargers are in demand as it will charge your phone quickly. SO, if you love to purchase a wireless pad charger to place your phone and to lie flat while charging then RAVPower (RP-PC058) is the option for you. It supports 10W for Android phones and 7.5W for iPhone devices. Sounds good, the charge supports both android and iPhone devices.
This charger comes with the same cable and AC adapter, However, the Pad charger is less expensive than stand charger. But, during charges you can’t use your phone, you can but not like stand charger. The negative point, the charge includes 4foot USB cable which is trouble to reach the socket.
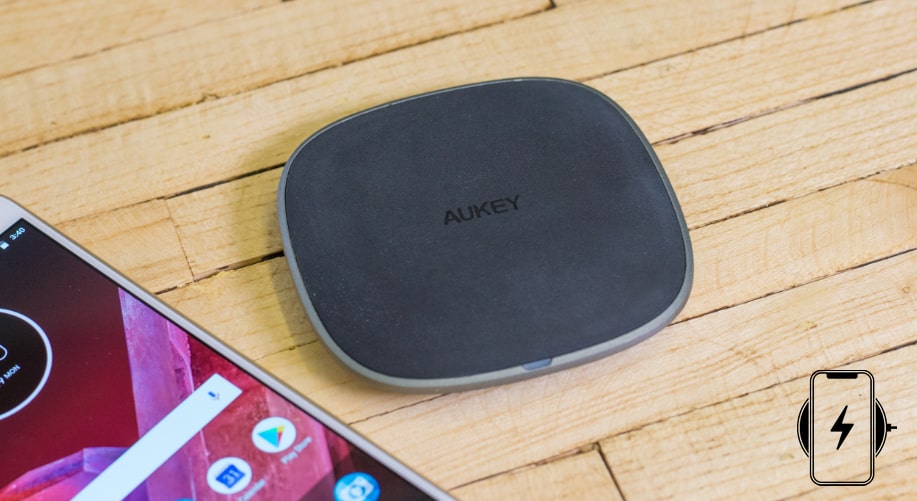
The Aukey Graphite is the best solution for those who are looking for portability and power wireless charger pad. The charger supports 10W fast charging and it is one of the portable pads in 2020 with 3.4×3.4×0.5 inches dimension. You can easily fit the Aukey charger in your pocket. Moreover, this is the best charging pads for both Androids and iPhones devices.
Inside the box you will get Aukey wireless charger with Micro USB cable along with user manual and warranty card. It means the charging pad has a warranty. However, every charger has LED light on the surface to let you know if your mobile is on charge. Besides that, the Aukey charger has a rubberized coating to prevent slips and the other part is made of aluminum.
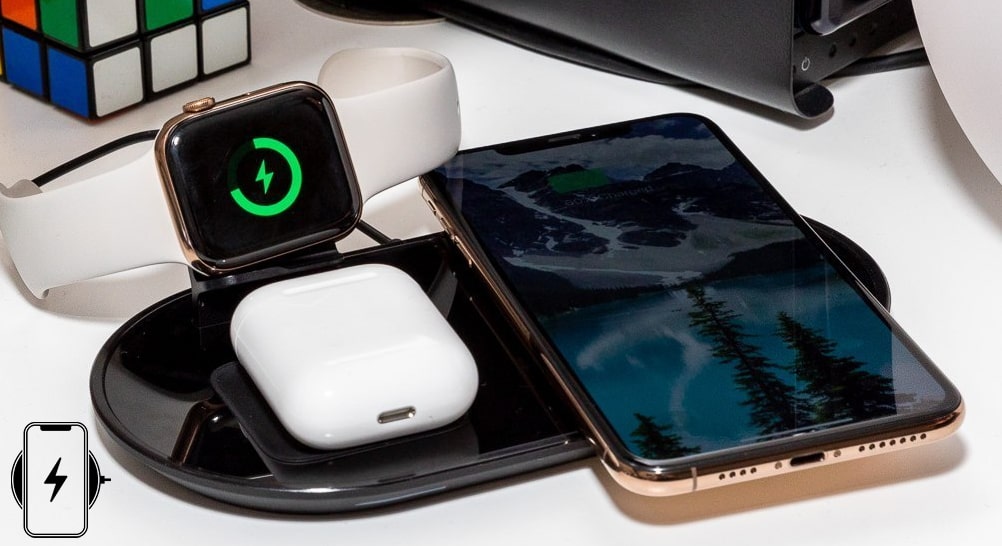
The last and the best multi-device wireless charger Airunleashed pads allows you to charge your iPhone, Airpods, and Apple Watch simultaneously with 18W at affordable prices. The design looks great and you can place your phone easily on the pad wireless charger. if you are among those people who love pad charger then this is your option.
However, you can charge any iPhone version but before that check the phone if it supports Qi charger. Although the latest iPhone version can be charged wirelessly. The charger corner is made of rubber to prevent slipping on the desk. So, for iPhone users this wireless charger is the best to charge their phone, Airpods, and watch at the same time.
Before purchasing any of the wireless chargers make sure to check the charger if it is compatible with your phone or no. However, firstly check the wireless charger is Qi certified and it can support your mobiles. As we have different phone brands like Samsung, iPhone, and other Android phones. Well, some of the chargers can support all the devices, and some chargers only support one mobile brand. But, the Samsung android phone has a 10W charger and iPhone has a 7.5W charger.
Besides that, while purchasing pay attention to the box if it has a charger and charging cable. Hands down, no wireless charger is without charging cable. But, check the cable if it supports Qualcomm’s Quick charge 2.0 or 3.0 technology. Remember, the best wireless chargers are those who can place your phone in landscape mode and portrait mode. Along with mobile cases up to 3mm thick. But, more thicker cases may not be supported.
If you want to have a multi-device wireless charger then you have many that are listed in this article. There are some 3-in-1 chargers in stock that allow you to charge your iPhone, Airpods, and Apple Watch at the same time.
Why to Choose Wireless Charger?
Well, wireless chargers are in demand more than wire chargers. As we have more latest smartphones are can support wireless charger and it has Qi charging feature. Then, the company started to make wireless charger in the market. Thus, people love to have wireless chargers as they are portable and you don’t need light on the trip.
The main reason to purchase a wireless charger is, you will need on the trip and long drive tour. At that time you can charge your mobile with a wireless charger.
Finally, you have found out the best fast wireless charger for any iPhone version. The top 15 wireless chargers are in demand and they are at the top in the market of 2020. So, each of the chargers is the best and affordable, Thus you can purchase any of the chargers that are compatible with your iPhone.
Facebook is the most popular free social networking platform that allows users to create a personal account, edit profile, add Bio, upload videos and pictures, send messages, and find thousands of friends to be in touch with. However, Facebook is in the 4th position overall and it has 2.50 billion monthly active users. Besides that, you can create your groups for your business or you can create multiple pages for your business, brands, celebrities, and other organizations.
To create your own Facebook page you will need to have a Facebook account, after that, you can create a Facebook page for your brands, business, and other purposes. The one who creates the Facebook page will be the administrator and he/she can upload videos, pictures, status, and add more admin for the page. For the Facebook page you will not add friends or send a request to your friends, only you can gain followers that will like your page and like, comment, and share your Facebook page posts.
Most of the Facebook page admin don’t know that they can add multiple admins with different permission levels for their Facebook page. The pros to add more admins on your Facebook page is to promote your page and upload daily status to keep and entertain your followers. Those pages will gain more followers and like those who upload daily updates and have more than 1 admin to run the page.
Some pages earn money and they monetized their Facebook page and connected with Google Adsense to earn money. Yes, you can monetize your Facebook page, not Facebook group and you can earn a lot of money if you have thousands of followers. So, in this article, I will show you how to add admin on the Facebook page using your mobile or PC.
Why do you need to Add Admin On Facebook Page?
Hands down, a single person can run the whole page and uploads daily updates, then, why we need to add more admins on the Facebook page. However, adding more admins with various permission levels is good for your page. You can say two people are better than one person or three people are better than two people. Because all of the admin will get together and work on the page to promote and gain more followers.
Why do you need to gain more followers and likes for your page? However, the main reason that Facebook page admin tries for the first time once the page is created, to gain likes and followers to see the page posts, like the posts, comment and share the posts with their friends to promote their brands, business, or other things.
The only purpose to create the Facebook page for our brands, business, or other organizations is to promote and popular it. Therefore, follow this article and add more admins for your page to promote them.
Five Different Page Roles on Facebook Page
There are different permission levels for admin and you can give only one role to each admin to perform on the page. So, below are the five different page roles on the Facebook page.
Admin:
The admin has full control on the page, he/she can upload files, send messages, even create an advertisement, control the other admins and seeing which admin is uploading files, add more admins, and many more things.
Editor:
By the name you can understand that an editor can edit the post, create new posts, send messages, see which admin is uploading files, and manage the posts. Even the editor can monetize the page and view insights.
Moderator:
A moderator only response to the comments and delete the comments, send messages, see which admin is creating posts, view insights, and monetize the page.
Advertiser:
The advertiser can’t create a post only he can see which admin is uploading files or commenting to the posts. Moreover, he can create adverts and view insights.
Analyst:
This admin has only the role to see which admin is uploading files and commenting to the posts and he can view the insights.
How to Add Admin On Facebook Page using your Mobile?
You know most of the users run facebook from mobile and some users are running Facebook on PC. However, Mobile is the handiest device that is used from billions of users and you will find thousands of apps that can be run on mobile. Therefore, first of all, I will show you how to add admin on the Facebook page using your mobile.
However, I am using an Android phone for adding a new admin to my Facebook page. But you can use the same method for the iPhone mobiles.
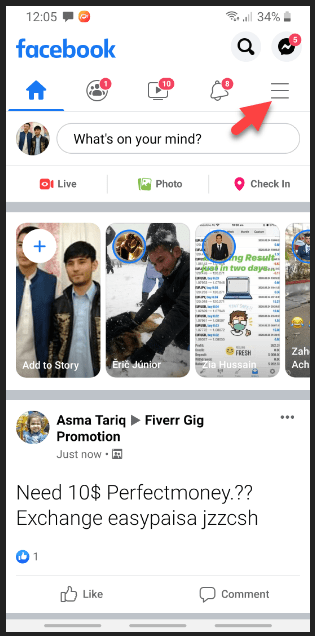
Step 1: Open the Facebook app on your mobile if you don’t have then download the Facebook app from the play store and login to your Facebook account. Once you login then clicks the three-line menu located at the top-right side of the page.
Click the Facebook Menu
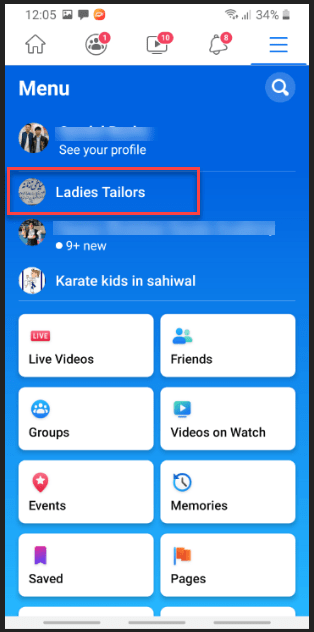
Step 2: Now open the Facebook page that you want to add admin.
Open the Facebook Page
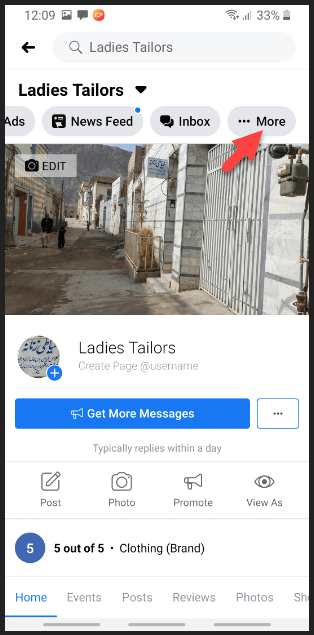
Step 3: Here, you are on your Facebook page. Now, click the More option from the top menu.
Click More Menu
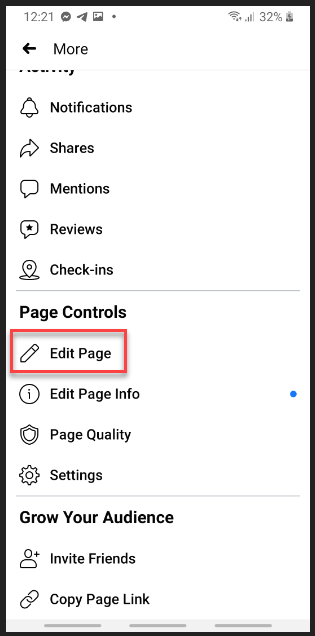
Step 4: On more menu section, scroll down and on the page controls section click the Edit Page option.
Go to Page Controls
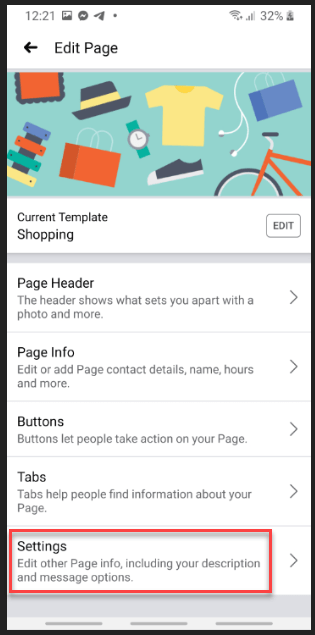
Step 5: After that, you will need to click the Settings option.
Go to Settings
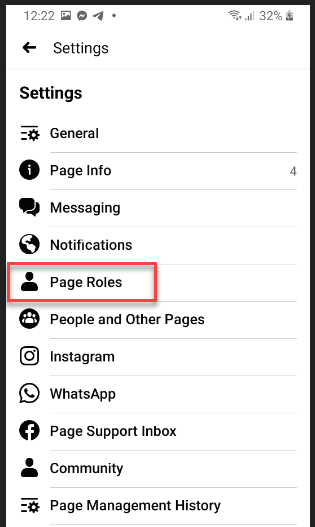
Step 6: On the settings page, you will see the Page Roles option, Therefore, open it.
Click the Page Roles
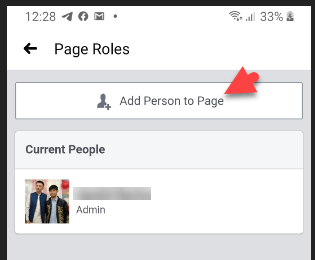
Step 7: On the page roles, click the Add person to page.
Add Person to Page
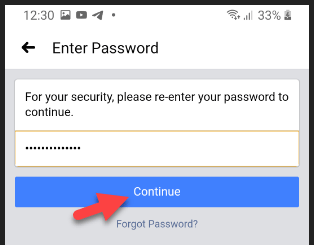
Step 8: Here, you will be asked to re-enter your Facebook account password to continue.
Enter Facebook Account Password
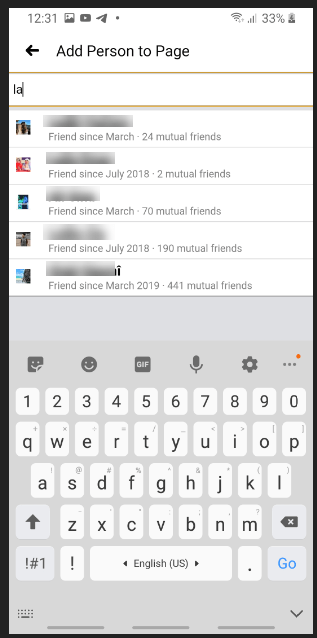
Step 9: After that, type the name of the person you want to add as an admin. Once you typed the name then click on the account person.
Type Person Name
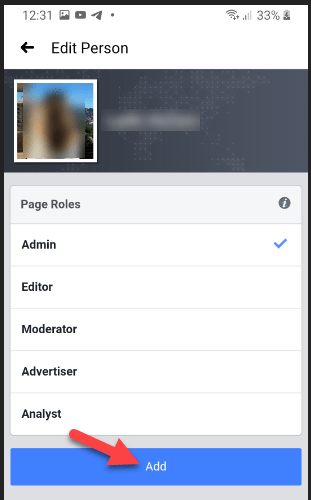
Step 10: Finally, give the person page roles, Here, I will give it the admin page role. you can give any of the permission levels and click the Add button to add the person as an admin.
Give Person Page Roles
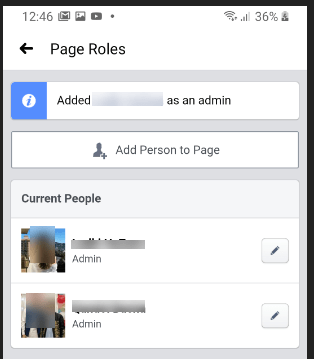
At last, you have successfully added the new admin to your Facebook page. However, you can add as many admins as you want, there is no limit for adding admin to your Facebook Page. If you want to add another admin then follow the same method.
Added New Admin
How to Add Admin On Facebook Page using your PC?
You get the method to add admin on your Facebook page using your mobile. Now, let’s see how you can add a new person as an admin for your page.
Step 1: Go to your favorite browser and search for facebook.com. After that, log in to your Facebook account. Here, you have three options to open your Facebook page.
The first option, click the Dropdown menu from the navigation bar and open your Facebook page.
Facebook Main Menu
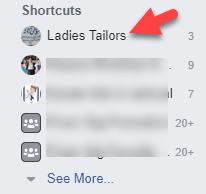
The second option, look at your left side menu and on the Shortcuts section, you can see your Facebook page. From there you can open your Facebook Page.
Open Page from Shortcuts
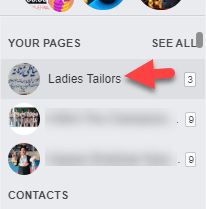
And the third option, you can find your Facebook page on the right side of the page.
Open Your Facebook Page
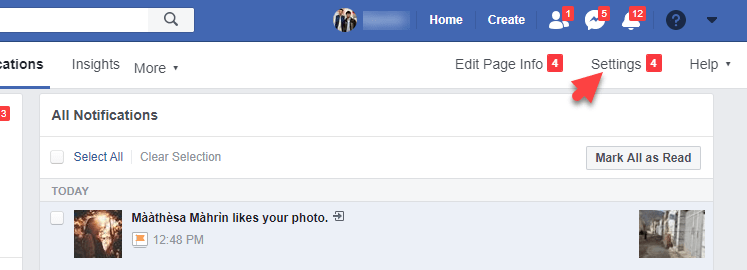
Step 2: Once you open your Facebook page then go to Settings.
Go to Page Settings
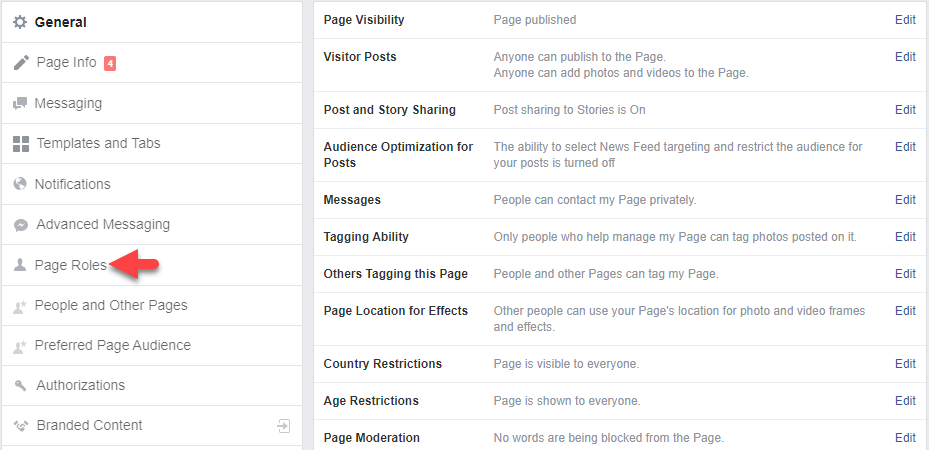
Step 3: On the settings, you will see several options. Therefore, on the left side, on the General section, you will find the Page Roles option. So, open it.
Page Roles
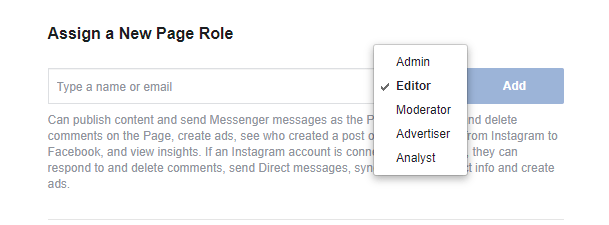
Step 4: Here, you need to type the new person’s name or email. After that, select the admin roles for the person and click the Add button.
Type Person Name or Email
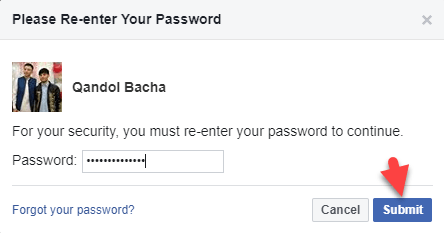
Step 5: To add admin on your page you will need to type your Facebook account password. Afterward, click the submit button.
Type Password
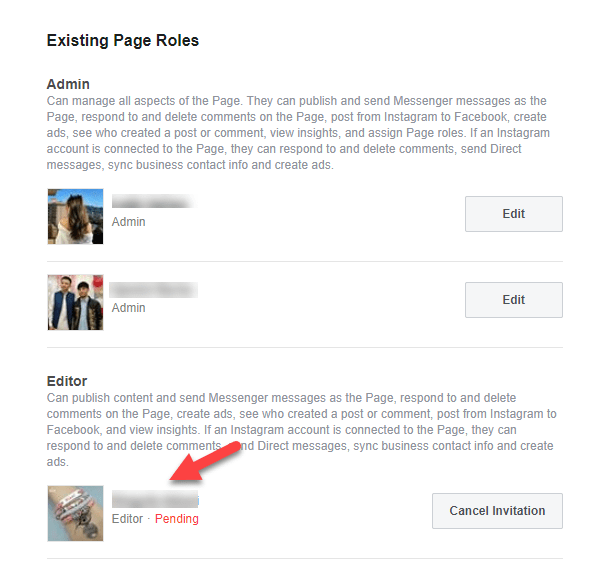
Finally, you have added a new admin for your page and you can see the total admins of your page below on the Existing Page roles. You can see the process is pending because the person needs to accept your admin invitation. Or you can cancel the invitation.
Existing Page Roles
How to Remove or Change Admin Role?
You have added a new admin on your Facebook page but you notice the admin is not working and not active on your page. Therefore, you don’t need anymore and you want to remove it from your page roles. Or you want to change the admin permission levels. For example, if the person is given the admin role and you want to change it to the editor role then you can do it with the below method.
Open your Facebook page.
Go to page settings.
On the left side of the page under the General section, you will find Page Roles. So, open the page roles.
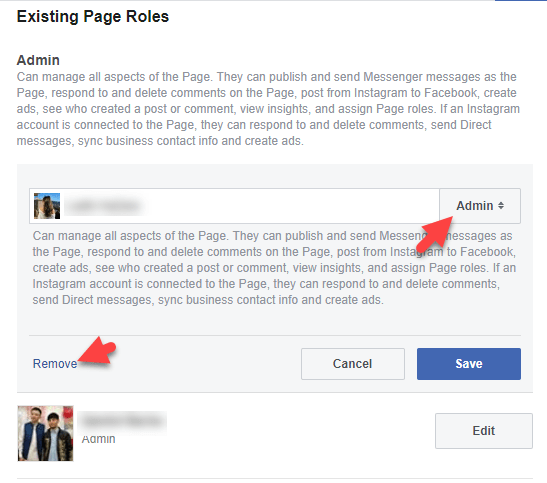
Now, go to the bottom on the Existing Page Roles section. Here, you will see all the admin that you added. So, click on the edit button.
Here, you can change the admin role or you can remove the admin from the page. Once you have done then click the Save button.
Two Admins are better than one admin! So, if you have Facebook Page and you want to promote it and gain thousands of followers then add a new admin to your page and work together for your page performance. There is no limit from the Facebook side for adding admin on your Facebook page. You can add multiple admins for your page.
A question from you all, Tell me in the comment section how many admins you have for your Facebook page? type the amount in the comment section.
People love to upload their videos to youtube for several purposes, However, some of the people are making videos and upload them to youtube to earn a penny or might be they are uploading their videos to become a well-known person. So, sharing videos on youtube is not a difficult task but again if you don’t know How to Upload Videos to Youtube from iPhone in 2020 then don’t worry here I will guide you the easiest way to help you for uploading videos to youtube. However, you might have some idea about youtube and you might know why people are focusing a lot on youtube.
Youtube is a platform where millions of people are watching and searching for videos and titles. Although millions of people are earning a good bit of money from youtube by uploading a unique video. You can find billions of videos on youtube and millions of users are uploading videos daily. As you know youtube is in 2 positions overall in the world because of their users and searches.
We should thank social media such as Facebook, Instagram, Twitter, and youtube to let us share our thought and ideas about the unique title and for sharing our videos to have millions of views.
Before uploading videos to youtube you have to know which video format youtube supports and what kind of videos we have to share. So, normally youtube can supports video formats such as MOV, MPEG4, MP4, AVI, WMV, MPEG, FLV, 3GP, WebM. Therefore, be careful why you are making a video then be aware that you selected one of this format otherwise you can’t upload videos to youtube.
How to upload videos to youtube from iPhone?
So, now I will walk you through each step and guide you on how you can upload videos to youtube. well, most of the people have the idea to share videos to youtube but some users and people don’t know how to share videos to youtube. So, if you don’t know, then this article is for you, therefore, read the article till the end to not face difficulties in the future.
What you need before uploading a video to Youtube?
To share videos to youtube, you need to create a Gmail account, if you have then it is fine if you don’t have then you have to create a new account for your youtube channel. Although no one can upload a video without sign in to youtube because youtube will not allow those users who didn’t sign in with their Gmail account.
While you create a new Gmail account then you have the idea how to sign in to youtube with your Gmail account if you don’t then follow this.
Go to App Store and search for Youtube
Install Youtube App in your Phone
Open the App
Now click the Sign-in button from the right side of the window
Here, give your Gmail account with the password and sign in
Finally, you sign in to youtube with your Gmail Account
Create a Youtube Channel to upload videos to youtube
That’s not completed yet, you might think that now you sign in to youtube with your Gmail account and you can upload a video but no you are wrong. You have to create a youtube channel to share a video to youtube. Millions of video that you are watching in youtube all are uploaded by individual user and each user has a youtube channel that’s why youtube allow them to upload a video. So, if you know how to create a youtube channel then sounds good but if you don’t know then click the link below and create a youtube channel.
or if you want a video guide on how to create a youtube channel then watch this video.
Get know Youtube Privacy Settings
Well, it is important to know youtube video privacy settings to not share your video with billions of users. here is some important privacy settings list that you have to know before uploading your video to youtube.
Keep your video public
You can upload your video with millions of user or even you can make it private to not share your video with billions of users. So, you can share those videos with the public like, educate, information, entertainment, funny, motivate or create awareness about a product or services and make sure that you are the owner of the video otherwise youtube make it copyright.
Keep your video Private
When you set the setting to private then it means that you can only see the video not others. Private videos will not appear on your youtube channel and will not discover by others. However, you can share your videos with selected people.
Set your video to Unlisted
If you set your video to unlisted then anyone can watch your video even those who have not youtube account and they watch your video by the web browser or address. Otherwise, no one can access your video because the unlisted video will not appear on your youtube channel.
Scheduled
Well, you will use this setting when you want to set a date or time for uploading your video and mostly this setting is designed for uploading a video campaign. However, this setting allows you to share videos and prevent them from being viewed by the public.
So now that you understand the youtube privacy setting then let us get started with the steps to upload videos to youtube from iPhone.
Upload Videos to Youtube from iPhone
For a beginner, this might seem geeky because they have never done such things and they don’t know how to upload videos. However, uploading a video to youtube is so simple and the way you upload videos from your iPhone.
So, here I will guide you two ways to upload a video to youtube, the first way we will use camera roll to share video and the second way we will use youtube app to do that.
Upload Videos to YouTube Using YouTube App
However, uploading a video to youtube using the youtube app is quite easy and it will give you more options. So, let’s get started without wasting time.
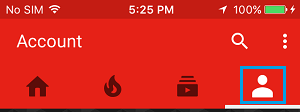
Step 2. After that, tap on youtube my account icon.
Youtube My Account Icon
Step 3. here, it will ask you to sign in with your Gmail account, in case if you are not already signed in.
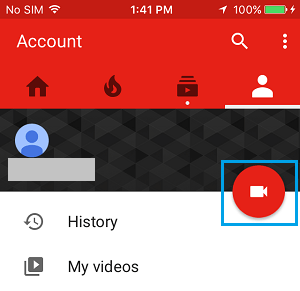
Step 4. While you signed in then tap on Video Icon.
tap on Video Icon
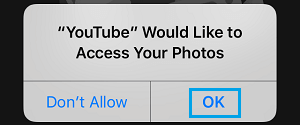
Step 5. if you are uploading a video to youtube from your iPhone first time then it will ask you to access your photos on iPhone, so here click on the OK button.
Provide youtube access to your photos
Step 6. While you click on OK button then you will be in the video folder, So, here select the video that you want to upload on youtube.
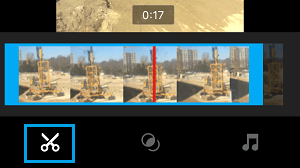
Step 7. After that, you will see the next screen and here tap on the Scissor icon from the bottom left corner of the screen. So, this option allows you to trim the video length by moving the slider to left and right with your finger to the desired point on the video.
Trim a video
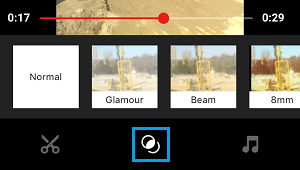
Step 8. in here, if you want to apply filters to your video then simply tap on the filtericon and select any filter and apply to your video.
Add filters to your Video
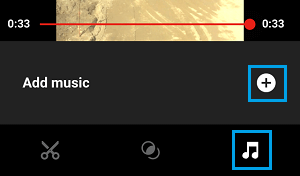
Step 9. If you want to apply music to your video then tap on the musicicon and click on the ‘+’ icon to add music to your video.
Add Music to your Video
Step 10. now that your video is fully ready for uploading and everything is fine, So, tap on the Next button.
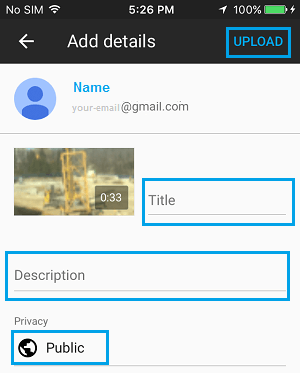
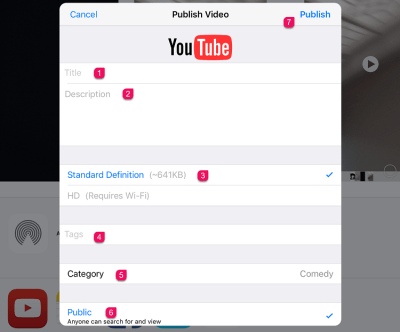
Step 11. After that, you have to provide all the video details like, provide a proper title for your video with a good description and choose a privacy setting. While you have done with these all options then at last tap on the upload button from the right corner of the screen to upload the video to youtube.
Upload a video to Youtube from iPhone
Upload Video to youtube using Camera Roll
Here, I will show you how you can upload a video to youtube using camera roll you can share any kind of video from the camera roll. So, have a look at how we can do it.
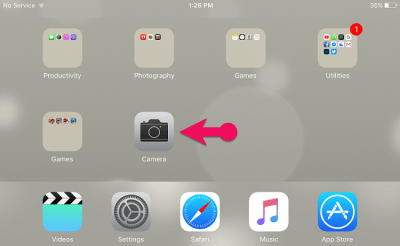
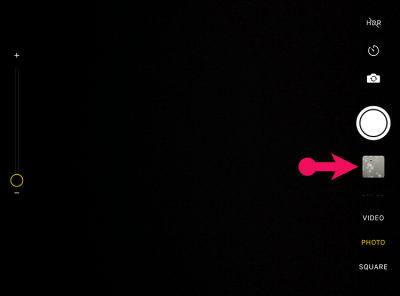
Step 1. Open Camera roll from the home page and click on the all photos option. However, if you don’t know what camera roll is then actually it is a camera that you are taking a picture and making a video from your iPhone.
Open Camera roll
Go to all Photos in Camera roll
Step 2. Now select the video that you want to upload to youtube but remember you can’t upload more than one video at a time.
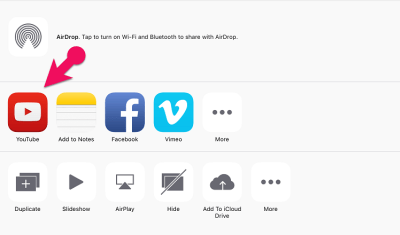
Step 3. After that, tap on the save and share icon and scroll a little bit down until you didn’t see the youtube-icon. While you get there then click on the youtube-icon.
Tap on the youtube-icon
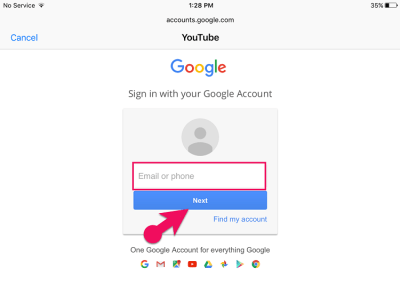
Step 4. While you tap on the youtube-icon then it will ask you to sign in with your Gmail account, if you have already signed in then it will not ask you.
Sign in with Your Gmail Account
Step 5. This is your last step, here provide the video title, description, tag, and select a thumbnail. When you have done completely then click on the publish option.
Give video Title, Description, Tag.
Step 6. After clicking on the publish option then wait for a while until the video has been uploaded. Then, the video will publish on your youtube channel and you can find it from your channel.
Upload Videos to Youtube using the Photos App
The last method to share videos to youtube is using photos app. Actually, it is the easiest way to upload a video to youtube from iPhone by using a share option that is available in the Photos app.
Step 1. open photos app from the home page.
Step 2. After that, go to the folder where your video is located and you want to upload it to youtube.
Step 3. Now select the video that you want to share. Afterward, click on the up-arrow shaped share icon from the bottom left corner of the screen.
Step 4. While you tap on the icon then you will see the share menu with multiple options. So, here find the Youtube app icon and click on it,
Step 5. In this step, it will ask you to sign in with your Gmail account. If you have signed in already then it will not ask you.
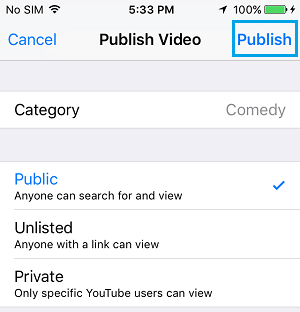
Step 6. On the next screen, it will ask you to provide the video details. So, here provide a proper title for the video and give a description related to your video. After that, select category for your video like How-to, Style, etc. Then chooses a privacy setting for your video whether you want to make the video public, private or unlisted.
Step 7. Once you have done with all steps then tap on the publish from the right corner of the screen.
In this article, you learn three methods to upload videos to youtube from iPhone in 2020. And all the steps are explained very well and perfectly. So, these methods will work for any iPhone and iPad versions. Any Apple user can use this method to upload a video to youtube. However, if you get or if you have any new method then please let us know in the comment. And we are waiting for your feedback, thanks.
In this article, I will tell you about the Best Facebook Video Downloader for Android, IOS, and PC. many articles and websites are telling you about Facebook video downloaders although they are somehow working there methods. but today the method I am going to write about is the best method ever, you can easily get what I am letting you know about. and the things you are looking for is entirely this article. it will help you to download videos from Facebook.
Everyone wants to use Facebook and watch the video on Facebook. and the time when they want to download it for themselves but they can’t do it because Facebook doesn’t have those features. like if you used youtube so on youtube it’s so simple to download video because it gives the download option. but Facebook is not like youtube so don’t worry this article will help you and show you how you can easily download video from Facebook either in Android, IOS, and PC.
Facebook Video Downloader Apps for Android
Nowadays people are using Facebook in android often than PC. because in Android once you log in your account in FB apps then there is no need to login for a second time. and people are getting into FB android apps. as you know in 21st-century android users are quite a few than PC users that’s why FB is in high demand in android.
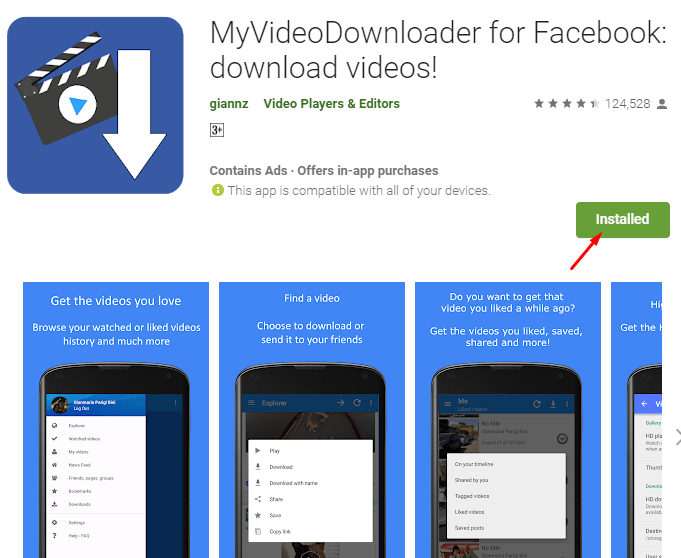
The best method and Facebook video downloader are called MyVideoDownloader for Facebook. this app is so handy and in high demand. you can easily download Facebook video with this app. here you will get how to install this app from play store and how to download video with this app.
How to Install MyVideoDownloader For Facebook in Android?
It is so simple to install this app from the play store. in the first step go to your Android and open Play Store then search MyVideoDownloader For Facebook after you find out then click on it and click on the install button.
MyVideoDownloader For Facebook
Learn About MyVideoDownloader For Facebook Apps
Download Facebook videos and GIF – Save and share videos from Facebook with the most advanced video downloader, fast and easy to use!
– The only app for Android that can download HD videos!
– Send a video or GIF to your friends on WhatsApp or Telegram directly!
– Get your watched, liked, saved videos, and much more!
– Find you liked, saved GIF, and much more!
– Find and download any video by browsing directly the Facebook website
– Download shared videos of your friends
– Download videos from your news feed, groups or pages
This is the former MyVideoDownloader app
Would you like to help to translate the app into your language? Join us at https://giannz.oneskyapp.com
Download not working?
Be sure to have granted write permissions: system Settings -> Applications -> VideoDownloader -> Permissions
This app doesn’t collect nor transmit any of your data.
This app is not endorsed, supported or certified by Facebook and it is provided by a third party that does not relate to Facebook.
How to Download Video from MyVideoDownloader for Facebook Apps?
In this paragraph, you will learn how to download videos from MyVideoDownloader for Facebook apps. it is so simple and easy, you don’t need to search for it on google and youtube because here you will get the method of how to do.
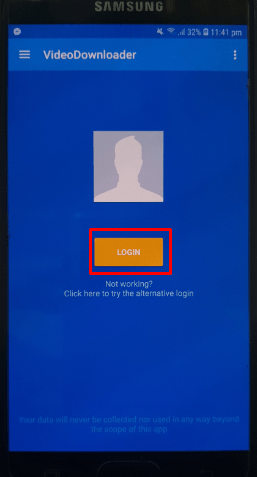
Step 1. open apps from your Android and log in with your Facebook account. don’t worry your Facebook Account will be secure.
MyVideoDownloader Apps log in Page
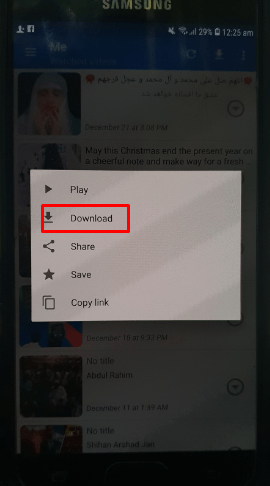
Step 2. find any kind of video from your timeline or from your friend timeline. then play the video and after some minute stop the video, after that tab on the video then you will see a popup menu that there is written Download. so click on the download button and it will download the video in HD. besides that you can set your downloading quality in HD from the setting, it will download a video in HD even the video is not in HD but again it downloads it in high quality.
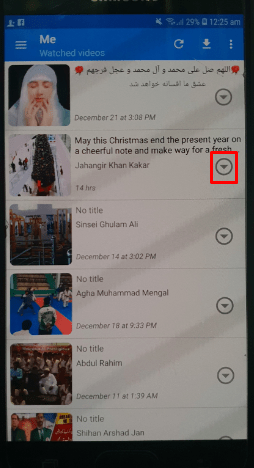
the next method is going to your watched video, likes video or saved video from menu bars and click on the download icon to download that video.
Click on Download Button
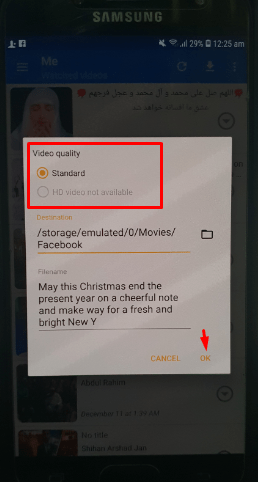
Select Video Quality
Download Video
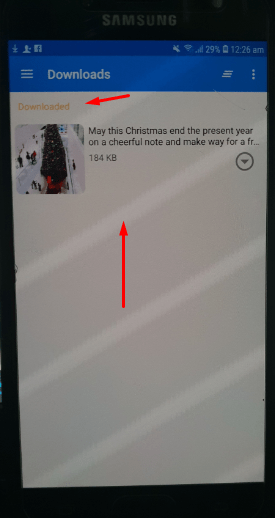
Step 3. if you are determined that your video is downloading or no then go to the Download menu and you will see your download file.
Downloaded Video
this was all about an Android phone. and I hope you loved this method because these Apps are the most powerful and handy. once you give a shot these Apps then you become into it.
Facebook Video Downloader Apps for IOS
You learned about Facebook video downloader Apps for Android. so now you will get about Facebook video downloader for IOS if you have iPhone Mobile and you have no idea how to download video from Facebook in iPhone then don’t switch to others website because this article is for you and the method I am going to write is so simple and interesting. that method is called Friendly for Facebook Apps.
How to Install Friendly For Facebook Apps in IOS?
Here you will know about how to install Friendly for Facebook Apps from App Store. you only need to follow in my footsteps.
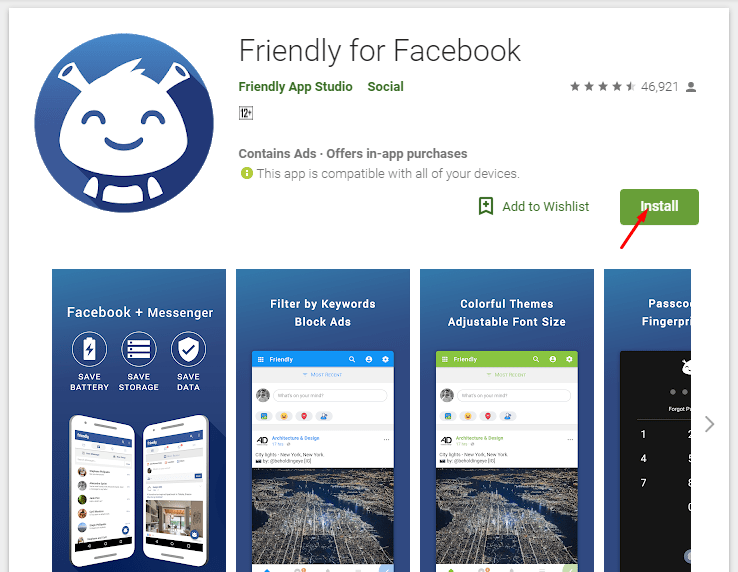
Go to App Store and search for Friendly for FaceBook. after that open it and click on the install button.
Friendly for Facebook Apps
Learn About Friendly For Facebook Apps
Friendly is the most complete alternative to your favorite social network
Over 17 million mobile downloads!
Built as an extension of the light mobile website, it preserves your battery, storage, and data, while giving you back control over your news feed.
All in one app
No need to download another app. You can chat and message your friends right within Friendly.
Video Download
Easily save your videos to share or watch them later.
Customize your News Feed
The brand spanking new Keyword Filtering feature for Android devices works in two ways: If you’re tired of seeing political posts, simply set your Keyword Filter to hide posts and articles containing the keywords “election,” “Republican,” or “Democrat”… and voilà: Any posts containing those words will not appear in your news feed.
Conversely, if you want to see more posts featuring cats (or posts from a close friend), you can set a Keyword Filter to highlight topics and users. Why settle for Facebook’s less-than-ideal algorithm when you can take full news feed control with Friendly?
Why You’ll Love Friendly?
Download your videos
Take control of your news feed with Keyword Filters.
Sort your news feed by most recent posts.
Block Ads
No need for another messenger app to message your friends
Secure your account with Fingerprint & Passcode Lock
Quickly switch between multiple social media accounts
Beautiful material themes
How to Download Video from Friendly for Facebook Apps?
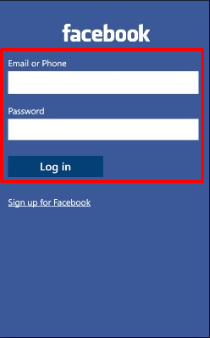
Step 1. Open Apps and login to your Facebook account. remember don’t be Pinick your account is secure in Friendly for Facebook Apps.
Login to your Account
Step 2. Go to your timeline and find out any video. play the video and click on the Download icon for downloading the video.
Click On Download Icon
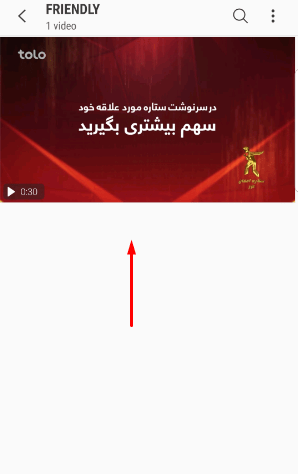
Step 3. Go to your File or Gallery and find Friendly folder, inside this folder you will see your downloaded video.
Downloaded video
Finally, you learned how to download videos from Facebook in IOS completely. now let know about How to download video from Facebook in PC.
Facebook Video Downloader for PC (Windows & Mac)
It is so easy to download videos from Facebook on PC. even you don’t need to download and install any kind of software although you can do it without software. the things you only need are to have IDM (Internet Download Manager) on your PC. as you know IDM is off the hook software for downloading video, like if you take an example of youtube. you are downloading video from youtube through IDM so Facebook is in the same line with youtube. you can download videos from Facebook through IDM.
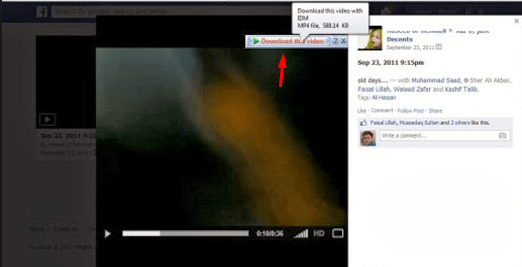
Open your Facebook Account on the browser then after that find a video on your timeline. while you found video play it and you will see Download the Video option on the top right of the video. Click on the option, select the video quality and download your video.
In this article, you learned about how to download videos from Facebook with the best method and easy. if you are searching for this title then this article is for you. and if you have any kind of question then feel free to leave a comment.